


Front air dam

Thread Starter
Advanced

Joined: Jun 2010
Posts: 84
Likes: 1
From: Pacifica CA
A post I made a few days ago I related how my front air dam ripped off the first time I drove out my driveway after having front end body work done.
I am going to try and re-install this myself. The shop service manual has a very vague diagram that doesn't show all parts including springs and front clips.
I did find one photo on Vette but I was hoping to find something more detailed.
Doesn't anyone know of a internet location of better diagrams and or photos?
Todd
Race Director


Joined: Jul 2008
Posts: 17,782
Likes: 3,711
From: The Sunshine State
2022 C5 of the Year Finalist - Modified
2021 C5 of the Year Finalist - Modified
C7 of the Year - Modified Finalist 2021
Finalist 2020 C7 of the Year -- Modified
2020 C5 of the Year Finalist - Modified
C5 of Year Finalist (appearance mods) 2019
2018 C5 of Year Finalist
A post I made a few days ago I related how my front air dam ripped off the first time I drove out my driveway after having front end body work done.
I am going to try and re-install this myself. The shop service manual has a very vague diagram that doesn't show all parts including springs and front clips.
I did find one photo on Vette but I was hoping to find something more detailed.
Doesn't anyone know of a internet location of better diagrams and or photos?
Todd
I am going to try and re-install this myself. The shop service manual has a very vague diagram that doesn't show all parts including springs and front clips.
I did find one photo on Vette but I was hoping to find something more detailed.
Doesn't anyone know of a internet location of better diagrams and or photos?
Todd
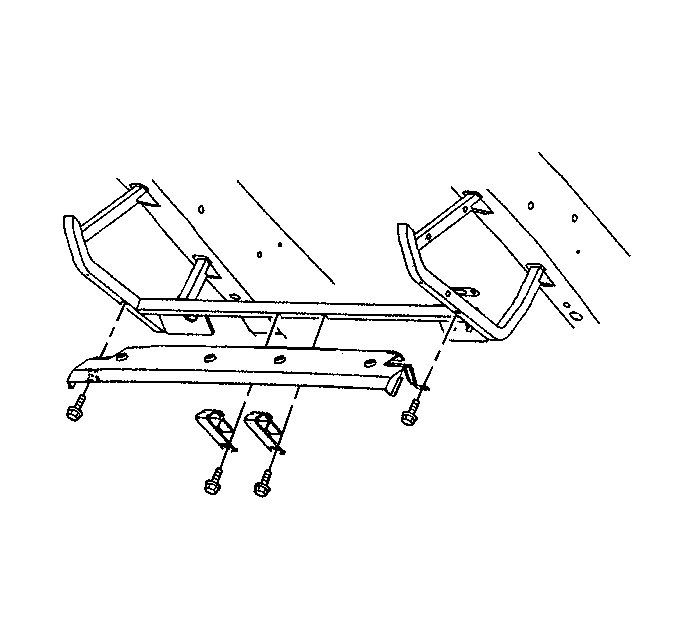
If just the center section, it's pretty straightforward how the dam fits into the slots with the pre-drilled holes. There are two aluminum supports that need to be clipped to the center spring air dam and the frame.
Drifting


Joined: Jan 2012
Posts: 1,341
Likes: 8
From: Hopatcong New Jersey
The front air damn center piece is only held on by 2 bolts. If you completely tore it up from the spring assembly you may be able to repair it or you can just buy a new center piece. You can find them used for around $30-40 and new for around $60.
Thread Starter
Advanced
Joined: Jun 2010
Posts: 84
Likes: 1
From: Pacifica CA
This is a long story and I am trying to keep it short.
I had some front bumper work done by a local body shop. I decided that since they had to remove the front bumper anyway along with all air dams I would buy a three piece kit and have them install all three new pieces.
I think they made some error on the install since it ripped off the first time through my driveway. The dam is new so I will not buy another kit.
I was able to find the springs or any of the 7mm bolts anywhere around.
Unfortunately I have a concrete dip in my driveway after the sidewalk for drainage purposes.
To deal with this I had to re-enforce the front frame with welded cold rolled steel plating and install not one but two sets of rollers.
I rarely has any trouble with the air dams before this.
Todd
Corvette Stories
The Best of Corvette for Corvette Enthusiasts

5 Best & 5 Worst Corvette Daily Drivers
Joe Kucinski
The Headlights of Every Corvette Generation Explained
Joe Kucinski
5 Best & 5 Most Overrated Corvette Track Packages of All Time!
Joe Kucinski
Every 2027 Corvette Engine Explained
Joe Kucinski
Designer Imagines A Corvette That Looks More Like a Corvette Than the Corvette
Verdad Gallardo
10 Ugly Corvettes That We Still Kinda Love
Joe Kucinski
Top 10 Most Expensive Corvettes Ever Sold on Bring A Trailer
Brett Foote
10 Things Every Corvette Owner Needs (2026 Edition)
Michael S. Palmer
8 Most "Only Corvette Owners Understand" Quirks and Problems
Pouria Savadkouei
Pro

Joined: Sep 2010
Posts: 629
Likes: 0
From: Grain Valley MO
I just replaced mine with a new set for $90 , my center one fell off and I drove it for a few weeks like that and my temp was a little higher than normal and then after I replaced it my car ran at least 7 to 9 degrees cooler while traveling at slow speeds , I had issues with mine as it was not a straight forward replacement the ones on the ends were easy but the center one was a pain because whoever owned it before I did really ran over a few things the bars were bent but it really made a difference and looks better with new parts.
Thread Starter
Advanced
Joined: Jun 2010
Posts: 84
Likes: 1
From: Pacifica CA
Update:
I crawled under the car last night. It seems that the metal frame supports were installed backwards. I will talk to my body shop. I don't know if they will help me or not.
Todd
I crawled under the car last night. It seems that the metal frame supports were installed backwards. I will talk to my body shop. I don't know if they will help me or not.
Todd
Race Director
Joined: Jul 2008
Posts: 17,782
Likes: 3,711
From: The Sunshine State
2022 C5 of the Year Finalist - Modified
2021 C5 of the Year Finalist - Modified
C7 of the Year - Modified Finalist 2021
Finalist 2020 C7 of the Year -- Modified
2020 C5 of the Year Finalist - Modified
C5 of Year Finalist (appearance mods) 2019
2018 C5 of Year Finalist

Tech Contributor


Joined: Dec 2003
Posts: 19,384
Likes: 87
From: Horncastle Lincolnshire, England
2023 C5 of the Year Finalist - Unmodified
Here's the regular procedure if it helps.
Air Deflector Replacement - Front Bumper Fascia
Removal Procedure
1. Raise and support the vehicle. Refer to Lifting and Jacking the Vehicle in General Information.
2. Remove the center air deflector bolts.
3. Remove the air deflector from the vehicle.
Installation Procedure
1. Position the center air deflector between the side valances.
Notice
Use the correct fastener in the correct location. Replacement fasteners must be the correct part number for that application. Fasteners requiring replacement or fasteners requiring the use of thread locking compound or sealant are identified in the service procedure. Do not use paints, lubricants, or corrosion inhibitors on fasteners or fastener joint surfaces unless specified. These coatings affect fastener torque and joint clamping force and may damage the fastener. Use the correct tightening sequence and specifications when installing fasteners in order to avoid damage to parts and systems.
2. Install the center air deflector and attaching bolts.
Tighten
Tighten the air deflector bolts to 7 N•m (62 lb in).
3. Lower the vehicle.
Race Director
Joined: Jul 2008
Posts: 17,782
Likes: 3,711
From: The Sunshine State
2022 C5 of the Year Finalist - Modified
2021 C5 of the Year Finalist - Modified
C7 of the Year - Modified Finalist 2021
Finalist 2020 C7 of the Year -- Modified
2020 C5 of the Year Finalist - Modified
C5 of Year Finalist (appearance mods) 2019
2018 C5 of Year Finalist
If only the spring attachment points broke off, just get a new center section and you should be fine. As long as the aluminum braces are still good.
Race Director


Joined: Aug 1999
Posts: 11,126
Likes: 673
From: SE Pennsylvania
St. Jude Donor '03 thru '26
Oldtimer
Now the two side sections, if you request the fasteners, you'll get a pack of 6mm bolts to hold the side section on, but there's no way they'll fit. I assume it was an assembly screw up and last factory workers decided they 'd fix it themselves, so they got a bucket of #6 hex head sheet metal screws and they just attach them and send them out the door.
FTIW, mine scraps every time I back out of my driveway it scrapes, but I have found if you back out on a 45 degree angle it won't scrap so badly. Anyway good luck. You always have to watch where your going and all the parking lots and even parking spaces, after a while of owning a C5 you get to know where and what kind of driveway or parking lots to look out for.

Drifting

Joined: Oct 2011
Posts: 1,872
Likes: 333
From: Olmsted Falls Ohio
St. Jude Donor '12 thru '24
I often use a file I downloaded for exploded diagrams of parts assemblies for the C5. If you Google 'C5 Parts Manual PDF' you should be able to get to the link to download your own copy. This not only has the diagrams but also the GM part numbers at the time the car was built. Using this and a service manual, there isn't much you can't do.
Le Mans Master


Joined: Feb 2007
Posts: 9,297
Likes: 1,531
From: Oviedo Florida
2024 C5 of the Year Finalist - Modified
2024 C2 of the Year Finalist - Modified
2023 C2 of the Year Finalist - Modified
2021 C2 of the Year Finalist - Modified
2016 C5 of Year Finalist
Well I will tell you I have a low vette too. Before you reinstall
trim 3/4 of a inch off your splitter and your dragging days are
over. Good luck.
trim 3/4 of a inch off your splitter and your dragging days are
over. Good luck.