






DRL fuse

Drifting


Joined: Oct 2011
Posts: 1,872
Likes: 333
From: Olmsted Falls Ohio
St. Jude Donor '12 thru '24

Okay, I'll bite. The under hood fuse block is on the passenger side, directly in front of the battery. Take that cover off and fuse #2 is between relays 34 and 36. By the way, removal of fuse #2 is a common way of disabling the DRLs that some, including me, employ to prevent heat buildup in the light housings which can damage the light sockets - you'll get a couple codes from the BCM but they are of no consequence.

Thread Starter
Racer


Joined: Sep 2012
Posts: 408
Likes: 19
From: O'Fallon MO
I know the location of the fuse and replaced it. It blew again, my simple question is,,,,,is there a common cause for the fuse to blow ie wires shorted etc?
I am not too concerned about having drls, I would like to isolate the cause.
I am not too concerned about having drls, I would like to isolate the cause.
Tech Contributor

Joined: Dec 2003
Posts: 19,384
Likes: 87
From: Horncastle Lincolnshire, England
2023 C5 of the Year Finalist - Unmodified
Melted turn signal housings are common and its a design problem on all C5s. The turn signal bulbs are dual filament and act as park, turn and DRLs. The heat of the DRLs being on constantly burns the housing. I had to inhibit the DRLs here in England as ambers are not legal here. I never have T/S bulb failures and my lenses are still sound. The most common symptom is that the bulbs fail regularly because water gets into the bulb holder.
You can inhibit the DRLs by pulling the A2 fuse but if you want to keep the DRLs, LEDs are the way to go. LED bulbs produce less heat and are less likely to damage the housing. If you fit LEDs you’ll need a ballast mod to prevent “hyperflashing” as the system doesn’t recognize the LED bulb and thinks it’s failed. (JWMotoring sell a harness which will fix that issue).
Pull the housing – I’ve attached a procedure below – and inspect it. Others prefer to go in through the headlight housing but its harder to see the fixtures. You’ll probably find a hole on top. If it’s not too bad seal it with silicon sealant and reinstall the housing. That should fix the problem for now and the silicon may be enough to stop it getting worse.
Document ID# 655625
2002 Chevrolet Corvette
________________________________________
Park/Turn Signal/Side Marker Lamp Replacement
Removal Procedure
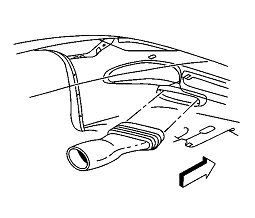
1. Raise and support the vehicle. Refer to Lifting and Jacking the Vehicle in General Information.
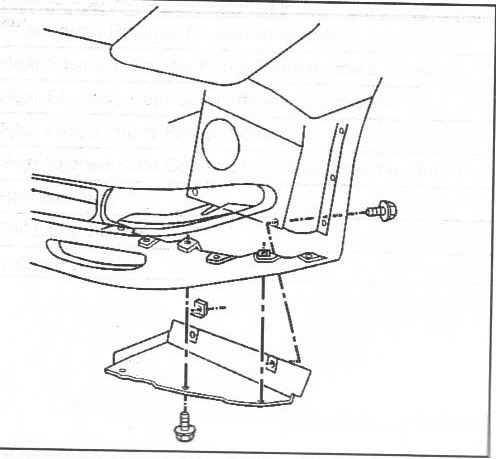
2. Remove the front fascia lower closeout panel.
3. Release the brake caliper cooling duct from the front fascia, and position the duct aside.
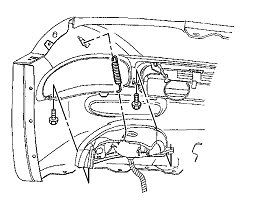
4. Remove the front turn signal lamp bracket retaining spring from the lamp bracket.
5. Remove the lamp bracket retaining spring from the front fascia.
6. Remove the front turn signal lamp bracket retaining screws.
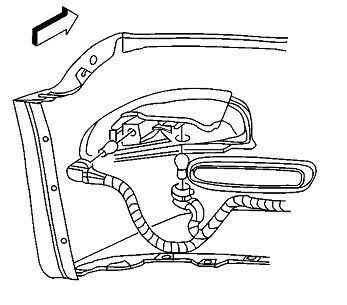
7. Disconnect the sockets from the lamp.
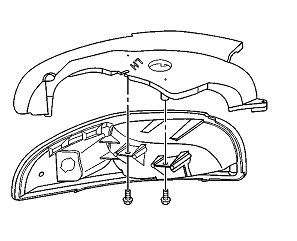
8. Remove the lamp, with the bracket, from the vehicle.
9. Remove the lamp to bracket retaining screws.
10. Remove the lamp from the bracket.
Installation Procedure
1. Install the front park/turn signal and sidemarker lamp into position on the front turn signal lamp bracket.
Notice
Use the correct fastener in the correct location. Replacement fasteners must be the correct part number for that application. Fasteners requiring replacement or fasteners requiring the use of thread locking compound or sealant are identified in the service procedure. Do not use paints, lubricants, or corrosion inhibitors on fasteners or fastener joint surfaces unless specified. These coatings affect fastener torque and joint clamping force and may damage the fastener. Use the correct tightening sequence and specifications when installing fasteners in order to avoid damage to parts and systems.
2. Install the front park/turn signal and sidemarker lamp to bracket retaining screws.
Tighten
Tighten the front park/turn signal and sidemarker lamp to bracket retaining screws to 2 N•m (18 lb in).
3. Install the sockets to the lamp.
4. Install the lamp, with the bracket, to the front fascia.
5. Align the lamp to the opening in the front fascia and hold the lamp firmly in place against the fascia, while installing the front turn signal lamp bracket retaining screws.
Tighten
Tighten the front turn signal lamp bracket retaining screws to 3 N•m (27 lb in).
6. Install the lamp bracket retaining spring to the front fascia.
7. Install the front turn signal lamp bracket retaining spring to the lamp bracket.
8. Position the brake caliper cooling duct to the front fascia and press the duct toward the fascia to secure.
9. Install the front fascia lower closeout panel. Refer to Close Out Panel - Front Bumper Fascia Lower in Bumpers.
You can inhibit the DRLs by pulling the A2 fuse but if you want to keep the DRLs, LEDs are the way to go. LED bulbs produce less heat and are less likely to damage the housing. If you fit LEDs you’ll need a ballast mod to prevent “hyperflashing” as the system doesn’t recognize the LED bulb and thinks it’s failed. (JWMotoring sell a harness which will fix that issue).
Pull the housing – I’ve attached a procedure below – and inspect it. Others prefer to go in through the headlight housing but its harder to see the fixtures. You’ll probably find a hole on top. If it’s not too bad seal it with silicon sealant and reinstall the housing. That should fix the problem for now and the silicon may be enough to stop it getting worse.
Document ID# 655625
2002 Chevrolet Corvette
________________________________________
Park/Turn Signal/Side Marker Lamp Replacement
Removal Procedure
1. Raise and support the vehicle. Refer to Lifting and Jacking the Vehicle in General Information.
2. Remove the front fascia lower closeout panel.
3. Release the brake caliper cooling duct from the front fascia, and position the duct aside.
4. Remove the front turn signal lamp bracket retaining spring from the lamp bracket.
5. Remove the lamp bracket retaining spring from the front fascia.
6. Remove the front turn signal lamp bracket retaining screws.
7. Disconnect the sockets from the lamp.
8. Remove the lamp, with the bracket, from the vehicle.
9. Remove the lamp to bracket retaining screws.
10. Remove the lamp from the bracket.
Installation Procedure
1. Install the front park/turn signal and sidemarker lamp into position on the front turn signal lamp bracket.
Notice
Use the correct fastener in the correct location. Replacement fasteners must be the correct part number for that application. Fasteners requiring replacement or fasteners requiring the use of thread locking compound or sealant are identified in the service procedure. Do not use paints, lubricants, or corrosion inhibitors on fasteners or fastener joint surfaces unless specified. These coatings affect fastener torque and joint clamping force and may damage the fastener. Use the correct tightening sequence and specifications when installing fasteners in order to avoid damage to parts and systems.
2. Install the front park/turn signal and sidemarker lamp to bracket retaining screws.
Tighten
Tighten the front park/turn signal and sidemarker lamp to bracket retaining screws to 2 N•m (18 lb in).
3. Install the sockets to the lamp.
4. Install the lamp, with the bracket, to the front fascia.
5. Align the lamp to the opening in the front fascia and hold the lamp firmly in place against the fascia, while installing the front turn signal lamp bracket retaining screws.
Tighten
Tighten the front turn signal lamp bracket retaining screws to 3 N•m (27 lb in).
6. Install the lamp bracket retaining spring to the front fascia.
7. Install the front turn signal lamp bracket retaining spring to the lamp bracket.
8. Position the brake caliper cooling duct to the front fascia and press the duct toward the fascia to secure.
9. Install the front fascia lower closeout panel. Refer to Close Out Panel - Front Bumper Fascia Lower in Bumpers.
Corvette Stories
The Best of Corvette for Corvette Enthusiasts

Top 10 Most Explosive Corvettes Ever Made: Power-to-Weight Ratio Ranked!
Joe Kucinski
150 hp to 1,250 hp: Every Corvette Generation Compared by the Specs That Matter
Joe Kucinski
8 Coolest Corvette Pace Cars (and Replicas) of All Time
Verdad Gallardo
Top 10 Corvette Engines RANKED by Peak Torque (70+ Years of Muscle!)
Joe Kucinski
Corvette ZR1X Will Be Pacing the Indy 500, And Could Probably Race, Too!
Verdad Gallardo
Top 10 Corvettes Coming to Mecum Indy 2026!
Brett Foote
Top 10 C9 Corvette MUST-HAVES to Fix These C8 Generation Flaws!
Michael S. Palmer
10 Revolutionary 'Corvette Firsts' Most People Don't Know
Joe Kucinski