


mod red interior dye/paint
Thread Starter
Le Mans Master


Joined: Apr 2012
Posts: 7,814
Likes: 2,266
From: Brighton MI
Posting a question to anyone with some experience in this area...
I want to convert my all black interior into a mod red interior and, given the difficulty in finding the right parts, I am thinking about painting/dyeing what I have.
I found this post in an older thread..
http://forums.corvetteforum.com/c5-p...or-panels.html
1-obtain materials from auto paint store. a-pint of torch red color SEM code 4793. b-base coat white in spray can SEM 15103. c-low gloss clear SEM 1302. d-wax/grease remover. e-tack rag
2-clean parts using wax/grease remover
3-mask off areas to receive color, tack wipe
4-spray white base, one coat at time till fully covered [2-3], allow flash dry between coats
5-spray color coat until coverage obtained, color will likely appear too cherry red and have excessive gloss level.
6-spray low gloss clear 1-2 coats, this will change the color from cherry red to orange red and reduce gloss level.
I wanted to ask a few questions if anyone might be able to help out...
First, I should point out that I don't have paint equipment, so I would be using spray cans. Hopefully, I can still achieve results close to what is seen here.
Should I use any kind of primer below the white? If so, what should I use?
What kind of wax/grease remover should I use? I seem to see that there is a difference in products depending on whether you are painting vinyl or plastic. I assume the door panels, knee bolster and glove box are all vinyl?
How much time between coats to allow proper flash? I assume this procedure is for the white, red and clear?
How much time between the last white and first red, then last red and first clear?
Sorry to ask so many questions - I appreciate whatever help anyone can give.
Thank you!
I want to convert my all black interior into a mod red interior
and, given the difficulty in finding the right parts, I am thinking about painting/dyeing what I have. I found this post in an older thread..
http://forums.corvetteforum.com/c5-p...or-panels.html
1-obtain materials from auto paint store. a-pint of torch red color SEM code 4793. b-base coat white in spray can SEM 15103. c-low gloss clear SEM 1302. d-wax/grease remover. e-tack rag
2-clean parts using wax/grease remover
3-mask off areas to receive color, tack wipe
4-spray white base, one coat at time till fully covered [2-3], allow flash dry between coats
5-spray color coat until coverage obtained, color will likely appear too cherry red and have excessive gloss level.
6-spray low gloss clear 1-2 coats, this will change the color from cherry red to orange red and reduce gloss level.
I wanted to ask a few questions if anyone might be able to help out...
First, I should point out that I don't have paint equipment, so I would be using spray cans. Hopefully, I can still achieve results close to what is seen here.
Should I use any kind of primer below the white? If so, what should I use?
What kind of wax/grease remover should I use? I seem to see that there is a difference in products depending on whether you are painting vinyl or plastic. I assume the door panels, knee bolster and glove box are all vinyl?
How much time between coats to allow proper flash? I assume this procedure is for the white, red and clear?
How much time between the last white and first red, then last red and first clear?
Sorry to ask so many questions - I appreciate whatever help anyone can give.
Thank you!
Last edited by 4XLR8N; Sep 30, 2013 at 07:10 PM.
Drifting

Joined: Nov 2011
Posts: 1,401
Likes: 141
From: Summerville South Carolina
his and he is a very helpful Forum member. In fact I plan to call him with some of the same questions. I want to add some more red to my torch red / black interior.
The instructions you cite are correct. A paint store can put your paint in aerosol cans for a price of course!!
You can get a good result with aerosol cans. I just repainted the bumper on a PT Cruiser with cans and it looks perfect. The white undercoat will serve as a primer. Ask the paint store about a first coat of adhesion promoter, not primer. Not mentioned in the post, but may be a good idea on plastic.
Dave
Hey, my girl friend is from Alpena , MI. Cold up that far.
Last edited by David Shiel; Sep 30, 2013 at 07:35 PM.
Le Mans Master


Joined: Nov 2009
Posts: 6,119
Likes: 156
From: Huntington tx
Preparation needed to ensure proper coating.
http://www.tcpglobal.com/autobodydepot/semprep.aspx
I know you want to be frugal, but buy twice the cans you think you need.
If you intend to do the whole interior better get 8 (Flame red)cans to be safe. One Soap will do, one can each of plastic/vinyl prep and adhesion promoter, 3 satin clear coats.
That should do you, but always locate a body shop supplier who likely carry's a SEM rack with the products.

Posting pics is mandatory!
http://www.tcpglobal.com/autobodydepot/semprep.aspx
I know you want to be frugal, but buy twice the cans you think you need.
If you intend to do the whole interior better get 8 (Flame red)cans to be safe. One Soap will do, one can each of plastic/vinyl prep and adhesion promoter, 3 satin clear coats.
That should do you, but always locate a body shop supplier who likely carry's a SEM rack with the products.
Posting pics is mandatory!
Thread Starter
Le Mans Master
Joined: Apr 2012
Posts: 7,814
Likes: 2,266
From: Brighton MI
Preparation needed to ensure proper coating.
http://www.tcpglobal.com/autobodydepot/semprep.aspx
I know you want to be frugal, but buy twice the cans you think you need.
If you intend to do the whole interior better get 8 (Flame red)cans to be safe. One Soap will do, one can each of plastic/vinyl prep and adhesion promoter, 3 satin clear coats.
That should do you, but always locate a body shop supplier who likely carry's a SEM rack with the products.
Posting pics is mandatory!
Is there a need for adhesion promoter on the vinyl or just the plastic pieces?
I assume the door panels use the vinyl prep and the knee bolster and glove box door use the plastic prep?
Sorry for all the questions, but I know the importance of proper prep and I'm tryin' to get it right the first time!
Yes - I will post pics as soon as I get 'er done...
Thanks again!
Le Mans Master
Joined: Nov 2009
Posts: 6,119
Likes: 156
From: Huntington tx
I would use the adhesion promoter, even if it's not required what's it going to hurt if you go that extra step?
One word of caution....Always clean the parts as many times as you can. I tried just the soap alone and found out you also need to use solvent to get "Everything" off.
Never try to short cut the cleaning steps.
Seems like you got it headed in the right direction. Once your done it will be awesome and people will hound you for pics and want to look at your interior.
You'll also want to get the sunvisors recovered in red leatherlike vinyl.
Last edited by sfc rick; Sep 30, 2013 at 10:04 PM.
Melting Slicks

Joined: Mar 2008
Posts: 2,962
Likes: 254
From: Richmond, Ky
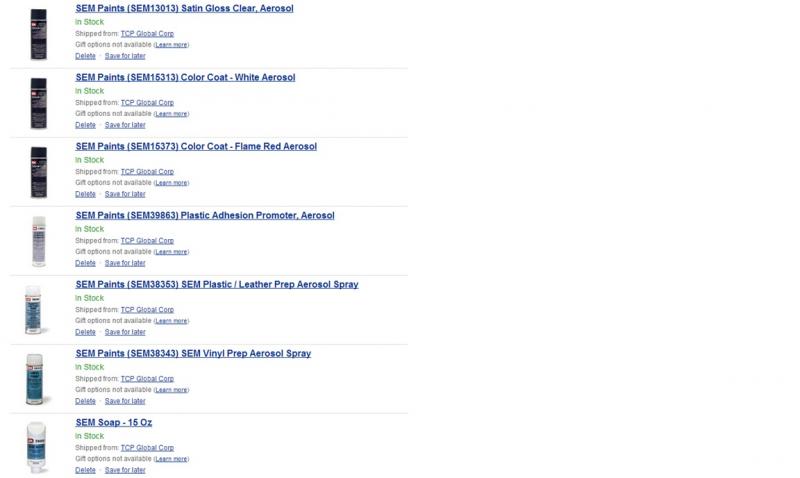
Thanks for the info...I have tried to put together a shopping list that maybe will help others too. Can you advise if I got everything right?
Attachment 47737484
Is there a need for adhesion promoter on the vinyl or just the plastic pieces?
I assume the door panels use the vinyl prep and the knee bolster and glove box door use the plastic prep?
Sorry for all the questions, but I know the importance of proper prep and I'm tryin' to get it right the first time!
Yes - I will post pics as soon as I get 'er done...
Thanks again!
I think you will find that the covering on the knee bolsters and glove box are the same material as the lower door panels.
Administrator


Joined: Mar 2001
Posts: 368,313
Likes: 24,776
From: In a parallel universe. Currently own 2014 Stingray Coupe.
C7 of the Year - Modified Finalist 2021
MO Events Coordinator
St. Jude Co-Organizer
St. Jude Donor '03 thru '25
NCM Sinkhole Donor
CI 5, 8 & 11 Veteran
Good luck with your transformation. Hope all goes well and be sure to post up pics of the process.
Corvette Stories
The Best of Corvette for Corvette Enthusiasts

Top 10 Most Expensive Corvettes Ever Sold on Bring A Trailer
Brett Foote
10 Things Every Corvette Owner Needs (2026 Edition)
Michael S. Palmer
8 Most "Only Corvette Owners Understand" Quirks and Problems
Pouria Savadkouei
10 Reasons the C6 Z06 is Still A Performance Benchmark After 20 Years
Joe Kucinski
How Much Horsepower Every Corvette Engine "LOST" in 1972
Joe Kucinski
Top 10 DOs and DON'Ts for Protecting Your Convertible Top!
Michael S. Palmer
Top 10 Most Explosive Corvettes Ever Made: Power-to-Weight Ratio Ranked!
Joe Kucinski
150 hp to 1,250 hp: Every Corvette Generation Compared by the Specs That Matter
Joe Kucinski
8 Coolest Corvette Pace Cars (and Replicas) of All Time
Verdad Gallardo
Thread Starter
Le Mans Master
Joined: Apr 2012
Posts: 7,814
Likes: 2,266
From: Brighton MI
Quick update - the interior is all apart, panels have been cleaned with SEM soap and are awaiting final prep and paint, which I hope to accomplish tomorrow. Will get it all back together this weekend and will post pics. Can't wait to see how it comes out!
While I have it apart, I am installing the Kicker speaker upgrade from DoubleD, so not only will it look better, it will sound better too!
While I have it apart, I am installing the Kicker speaker upgrade from DoubleD, so not only will it look better, it will sound better too!


Drifting


Joined: Jun 2013
Posts: 1,965
Likes: 343
From: Shell Point (Crawfordville) Florida
In another thread I used Duplicolor Vinyl and Fabric spray from a spray can to change the colour of my front bra from black to silver. That was over a month ago and it has held up well in the sun, driving once or twice in the rain, being bombarded by love bugs while driving, and washing those dried up remains off. I don't know how durable it would be on seats, constantly sliding and rubbing on them, but that's what this stuff is designed for, and so far with mine being constantly exposed to the elements, that paint seems pretty durable. Just offering another choice if anybody wants to try an easier solution rather than a custom - made paint or dye. It comes in many colours, so find something you like.
Drifting
Joined: Dec 2011
Posts: 1,422
Likes: 118
From: San Gabriel Valley California
St. Jude Donor '14-'15
I would use the adhesion promoter, even if it's not required what's it going to hurt if you go that extra step?
One word of caution....Always clean the parts as many times as you can. I tried just the soap alone and found out you also need to use solvent to get "Everything" off.
Never try to short cut the cleaning steps.
Seems like you got it headed in the right direction. Once your done it will be awesome and people will hound you for pics and want to look at your interior.
You'll also want to get the sunvisors recovered in red leatherlike vinyl.
That 'interior' of yours is so awesome! I have thought about some similar work/upgrade on mine. In silver/gray, to match or go with my Quicksilver exterior color.
I'm just so afraid I don't have the 'artistic skills' to pull it off, so it looks professionally done.


Le Mans Master
Joined: Nov 2009
Posts: 6,119
Likes: 156
From: Huntington tx
After seeing one of their cars park next to mine.....I knew right then I just accomplished the same interior color change they did, FOR REAL!
Le Mans Master

Joined: Dec 2000
Posts: 5,245
Likes: 25
From: Blue Ridge Georgia
I dyed a C3 and a 72 Camaro. Just make sure you do lite coats. I used a spray I think it was called Bulldog. It was a bonding spray to make the dye stick to the plastic. I also used a wax / silicone remover.
Thread Starter
Le Mans Master
Joined: Apr 2012
Posts: 7,814
Likes: 2,266
From: Brighton MI
DONE!!! 
The job was pretty straightforward, just followed the service manual procedures to remove the necessary panels & glove box. Best advice I can give is to take your time and be patient, especially with the prep and masking. All told, it took me about 12 hours of labor (I am purposefully slow and methodical - remembering the old adage, "there's never time to do it right, but always time to do it over."). But, that 12 hours also included a Kicker speaker upgrade from Double D and painting Grand Sport stripes on the console lid - more on that later).
First, the general stuff - I used all of the SEM products pictured with the exception of the third can of red, which I will return. All painted surfaces were washed twice with SEM Soap and then allowed to dry 24 hours. I then spent a fair amount of time rigging up a "clothes line" to hang the parts from for painting; also spent time experimenting with how to hang them for best positioning while painting. You don't want to find out you have a problem here once you start painting. Once that was done, I took each part down one at a time and masked it and rehung it. Then I went over each part twice with Vinyl Prep and then allowed to dry 2 hours before I began painting.
I started with four light coats of white, followed by four light coats of red, followed by two medium coats of low luster clear. I allowed 10 minutes between each coat - so basically once I finished a coat on all of the parts, I was ready to go back and start the next coat on the first part. Once the last coat of clear was applied, I allowed everything to dry for about 3 hours, then I removed all masking, pulling the tape off slowly, doubled back on itself at about a 45 degree angle to prevent lifting any paint edges. I moved all parts to a safe place and let them dry for 48 hours. I then reassembled everything in the opposite order that I took it apart.
Special notes - for the door panels, remove the reflectors and the speaker grilles. Remove the BOSE emblem from the grilles. Painting the grills separately from the doors allows for a much better paint job. For the glove box, remove the latch mechanism and the lock cylinder and paint it separately as well. Masking the glove box was a b*tch! Take your time!
The console lid mod is not part of the mod red interior. I am about halfway through a major mod project I call my C5 Grand Sport Project. I have a powerpoint presentation that goes through a brief history of the Grand Sport Corvettes and explains what this project is all about, but briefly it is essentially building the C5 Corvette Grand Sport that GM never did. I am trying to keep all of my mods in keeping with that theme - everything needs to look factory or, if it is a mod that was never offered by GM, it needs to look as if it could have been factory. When I have a chance, I will try to do a post of the project itself - need to figure out if I can post the powerpoint or not.
Anyway, that's it! Mod red interior for about a hundred bucks and 12 hours of my time...which is therapy for me, because I love working on my cars.
Last edited by 4XLR8N; Oct 13, 2013 at 09:08 PM.