


Headlamp adjustment tool question
Thread Starter
Drifting


Joined: Oct 2009
Posts: 1,725
Likes: 237
From: marietta, GA
What star size sockets will I need to adjust the headlights. I see one is for up/down and the other left/right but not clear on which one does what. Appreciate the help.

Melting Slicks

Joined: Jul 2013
Posts: 2,012
Likes: 23
From: Anaheim CA
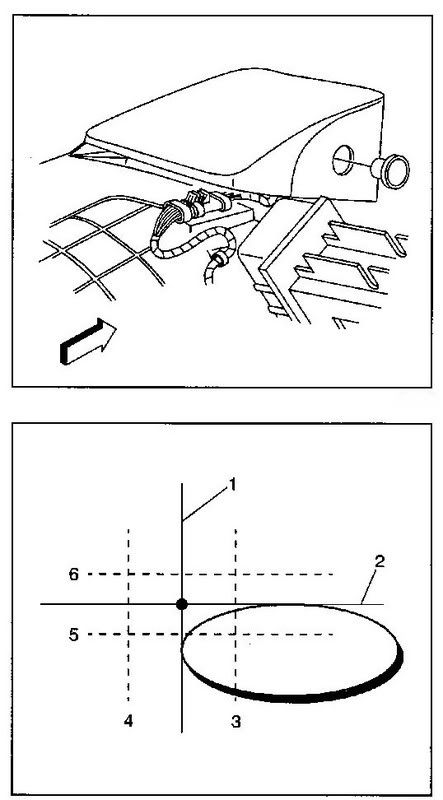
Odd little widget, innit? I have no idea what weird inverted Torx thingie fits over the outside, but the hole in the middle of the adjuster takes a standard T15 bit.
The one directly behind the plug is horizontal, the one below it is vertical.
The one directly behind the plug is horizontal, the one below it is vertical.
Last edited by Lee DeRaud; Jun 17, 2014 at 03:24 PM.
Instructor


Joined: Apr 2010
Posts: 216
Likes: 8
I just had to do one of mine - my state inspection indicated it was pointing too low and to much to one side. I opened the headlights - carefully put a little penetrating oil on the adjustment rods - and the next day - with a 1/4 socket on an extension - very ginergly turned a quarter turn to loosen, then 1/4 turn back to tighten just to work the adjustment rods - then a couple more - moving to 1/2 turn in and 1/2 turn out, etc - until I was confident (as confident as I could be) that the rods would not bind up. Then I made my adjustments. It is scary when you get a look at how long and thin that one adjuster is - knowing that to break it means a new headlamp bucket. Just be careful, as already stated by someone.
Last edited by seu318; Jun 18, 2014 at 09:28 AM.
Tech Contributor

Joined: Dec 2003
Posts: 19,384
Likes: 87
From: Horncastle Lincolnshire, England
2023 C5 of the Year Finalist - Unmodified
Does this help? I posted this a few years ago.
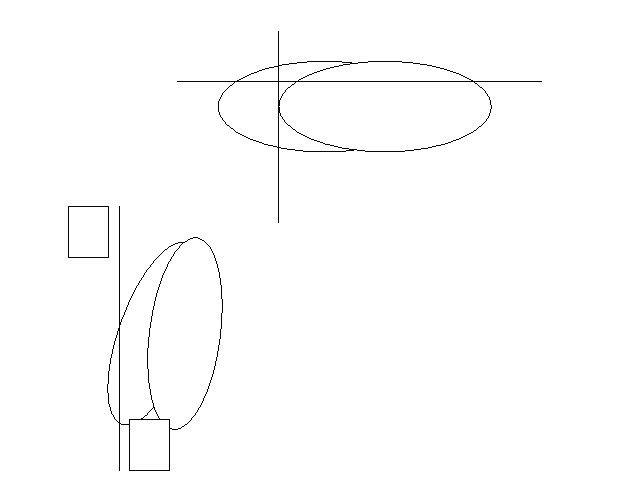
Aiming Stock Headlights
Preparation
Chose a white wall to project the lights onto
Mark a vertical centreline on the screen in line with the center of the car (black tape?)
(look over the roof of the car to get the line)
Measure the height from the floor to the center of the headlight capsule
Mark a horizontal aiming line on the screen
Measure the distance between the centreline of the right headlight module and the center of the left headlight module.
Position the vertical tapes this distance to the right and left of the screen centreline
Lubricate the adjustment screws before adjusting See Note
Adjustments
Raise the hood
Raise the headlights
Remove the headlamp adjustment screw plug
Turn on the low beam headlights and block the light from projecting onto the screen from the passenger headlight
Check the horizontal aim
Adjust the horizontal aim adjusting screw to align the left edge of the high intensity zone with the headlight vertical centreline
The left edge of the beam should lie within 4� to the left and 4� to the right
of the vertical centreline.
Check the vertical aim
Adjust the vertical aim adjusting screw to align the top edge of the high intensity zone with the headlight horizontal centreline
The left edge of the beam should lie within 2� above and 2.5� below the lamp horizontal centreline.
Reinstall the headlamp adjustment screw plug
Repeat for the other headlight
Turn off the lights and close the hood
This is the pattern you're looking for
Advice Frome LonestarFRC:
Lubrication may not be enough. The problem is that the spray can't actually penetrate to where it's needed. There's a little internal gear-drive mechanism involved.
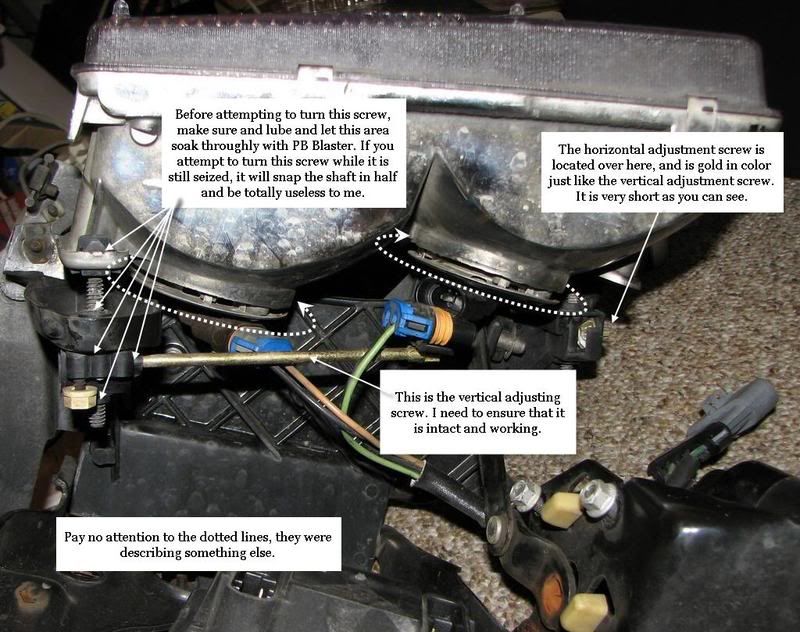
Important! If you attempt to make any adjustments, especially one involving the up/down adjuster and it doesn't move, or you meet a lot of resistance, stop right there. Do NOT attempt to force things. You will ABSOLUTELY break the long "goldenrod' (gold colored rod about 3" long). This is not an "if" or "maybe". Do NOT force it by twisting your wrench/nut-driver harder and harder. Once broken, these pieces are NOT available as a separate repair piece from GM. They will only sell you the entire headlight assembly.
If yours are frozen up, do a search on this issue. Many many posts about it. "Goldenrods" is one if the terms that may be helpful when doing a search. There IS a way to unfreeze the gear-drive mechanism but it involves removal of the headlight assembly to get access.
(Thanks to Junkman2008 for the picture)
Aiming Stock Headlights
Preparation
Chose a white wall to project the lights onto
Mark a vertical centreline on the screen in line with the center of the car (black tape?)
(look over the roof of the car to get the line)
Measure the height from the floor to the center of the headlight capsule
Mark a horizontal aiming line on the screen
Measure the distance between the centreline of the right headlight module and the center of the left headlight module.
Position the vertical tapes this distance to the right and left of the screen centreline
Lubricate the adjustment screws before adjusting See Note
Adjustments
Raise the hood
Raise the headlights
Remove the headlamp adjustment screw plug
Turn on the low beam headlights and block the light from projecting onto the screen from the passenger headlight
Check the horizontal aim
Adjust the horizontal aim adjusting screw to align the left edge of the high intensity zone with the headlight vertical centreline
The left edge of the beam should lie within 4� to the left and 4� to the right
of the vertical centreline.
Check the vertical aim
Adjust the vertical aim adjusting screw to align the top edge of the high intensity zone with the headlight horizontal centreline
The left edge of the beam should lie within 2� above and 2.5� below the lamp horizontal centreline.
Reinstall the headlamp adjustment screw plug
Repeat for the other headlight
Turn off the lights and close the hood
This is the pattern you're looking for
Advice Frome LonestarFRC:
Lubrication may not be enough. The problem is that the spray can't actually penetrate to where it's needed. There's a little internal gear-drive mechanism involved.
Important! If you attempt to make any adjustments, especially one involving the up/down adjuster and it doesn't move, or you meet a lot of resistance, stop right there. Do NOT attempt to force things. You will ABSOLUTELY break the long "goldenrod' (gold colored rod about 3" long). This is not an "if" or "maybe". Do NOT force it by twisting your wrench/nut-driver harder and harder. Once broken, these pieces are NOT available as a separate repair piece from GM. They will only sell you the entire headlight assembly.
If yours are frozen up, do a search on this issue. Many many posts about it. "Goldenrods" is one if the terms that may be helpful when doing a search. There IS a way to unfreeze the gear-drive mechanism but it involves removal of the headlight assembly to get access.
(Thanks to Junkman2008 for the picture)

Intermediate
Joined: Dec 2014
Posts: 27
Likes: 0
From: Washington
Does this help? I posted this a few years ago.
Aiming Stock Headlights
Preparation
Chose a white wall to project the lights onto
Mark a vertical centreline on the screen in line with the center of the car (black tape?)
(look over the roof of the car to get the line)
Measure the height from the floor to the center of the headlight capsule
Mark a horizontal aiming line on the screen
Measure the distance between the centreline of the right headlight module and the center of the left headlight module.
Position the vertical tapes this distance to the right and left of the screen centreline
Lubricate the adjustment screws before adjusting See Note
Adjustments
Raise the hood
Raise the headlights
Remove the headlamp adjustment screw plug
Turn on the low beam headlights and block the light from projecting onto the screen from the passenger headlight
Check the horizontal aim
Adjust the horizontal aim adjusting screw to align the left edge of the high intensity zone with the headlight vertical centreline
The left edge of the beam should lie within 4� to the left and 4� to the right
of the vertical centreline.
Check the vertical aim
Adjust the vertical aim adjusting screw to align the top edge of the high intensity zone with the headlight horizontal centreline
The left edge of the beam should lie within 2� above and 2.5� below the lamp horizontal centreline.
Reinstall the headlamp adjustment screw plug
Repeat for the other headlight
Turn off the lights and close the hood
This is the pattern you're looking for
Advice Frome LonestarFRC:
Lubrication may not be enough. The problem is that the spray can't actually penetrate to where it's needed. There's a little internal gear-drive mechanism involved.
Important! If you attempt to make any adjustments, especially one involving the up/down adjuster and it doesn't move, or you meet a lot of resistance, stop right there. Do NOT attempt to force things. You will ABSOLUTELY break the long "goldenrod' (gold colored rod about 3" long). This is not an "if" or "maybe". Do NOT force it by twisting your wrench/nut-driver harder and harder. Once broken, these pieces are NOT available as a separate repair piece from GM. They will only sell you the entire headlight assembly.
If yours are frozen up, do a search on this issue. Many many posts about it. "Goldenrods" is one if the terms that may be helpful when doing a search. There IS a way to unfreeze the gear-drive mechanism but it involves removal of the headlight assembly to get access.
(Thanks to Junkman2008 for the picture)
1/4 mile/AutoX


Joined: Jun 2014
Posts: 11,441
Likes: 2,186
From: Buffalo Texas
Does this help? I posted this a few years ago.
Aiming Stock Headlights
Preparation
Chose a white wall to project the lights onto
Mark a vertical centreline on the screen in line with the center of the car (black tape?)
(look over the roof of the car to get the line)
Measure the height from the floor to the center of the headlight capsule
Mark a horizontal aiming line on the screen
Measure the distance between the centreline of the right headlight module and the center of the left headlight module.
Position the vertical tapes this distance to the right and left of the screen centreline
Lubricate the adjustment screws before adjusting See Note
Adjustments
Raise the hood
Raise the headlights
Remove the headlamp adjustment screw plug
Turn on the low beam headlights and block the light from projecting onto the screen from the passenger headlight
Check the horizontal aim
Adjust the horizontal aim adjusting screw to align the left edge of the high intensity zone with the headlight vertical centreline
The left edge of the beam should lie within 4� to the left and 4� to the right
of the vertical centreline.
Check the vertical aim
Adjust the vertical aim adjusting screw to align the top edge of the high intensity zone with the headlight horizontal centreline
The left edge of the beam should lie within 2� above and 2.5� below the lamp horizontal centreline.
Reinstall the headlamp adjustment screw plug
Repeat for the other headlight
Turn off the lights and close the hood
This is the pattern you're looking for
Advice Frome LonestarFRC:
Lubrication may not be enough. The problem is that the spray can't actually penetrate to where it's needed. There's a little internal gear-drive mechanism involved.
Important! If you attempt to make any adjustments, especially one involving the up/down adjuster and it doesn't move, or you meet a lot of resistance, stop right there. Do NOT attempt to force things. You will ABSOLUTELY break the long "goldenrod' (gold colored rod about 3" long). This is not an "if" or "maybe". Do NOT force it by twisting your wrench/nut-driver harder and harder. Once broken, these pieces are NOT available as a separate repair piece from GM. They will only sell you the entire headlight assembly.
If yours are frozen up, do a search on this issue. Many many posts about it. "Goldenrods" is one if the terms that may be helpful when doing a search. There IS a way to unfreeze the gear-drive mechanism but it involves removal of the headlight assembly to get access.
(Thanks to Junkman2008 for the picture)
Aiming Stock Headlights
Preparation
Chose a white wall to project the lights onto
Mark a vertical centreline on the screen in line with the center of the car (black tape?)
(look over the roof of the car to get the line)
Measure the height from the floor to the center of the headlight capsule
Mark a horizontal aiming line on the screen
Measure the distance between the centreline of the right headlight module and the center of the left headlight module.
Position the vertical tapes this distance to the right and left of the screen centreline
Lubricate the adjustment screws before adjusting See Note
Adjustments
Raise the hood
Raise the headlights
Remove the headlamp adjustment screw plug
Turn on the low beam headlights and block the light from projecting onto the screen from the passenger headlight
Check the horizontal aim
Adjust the horizontal aim adjusting screw to align the left edge of the high intensity zone with the headlight vertical centreline
The left edge of the beam should lie within 4� to the left and 4� to the right
of the vertical centreline.
Check the vertical aim
Adjust the vertical aim adjusting screw to align the top edge of the high intensity zone with the headlight horizontal centreline
The left edge of the beam should lie within 2� above and 2.5� below the lamp horizontal centreline.
Reinstall the headlamp adjustment screw plug
Repeat for the other headlight
Turn off the lights and close the hood
This is the pattern you're looking for
Advice Frome LonestarFRC:
Lubrication may not be enough. The problem is that the spray can't actually penetrate to where it's needed. There's a little internal gear-drive mechanism involved.
Important! If you attempt to make any adjustments, especially one involving the up/down adjuster and it doesn't move, or you meet a lot of resistance, stop right there. Do NOT attempt to force things. You will ABSOLUTELY break the long "goldenrod' (gold colored rod about 3" long). This is not an "if" or "maybe". Do NOT force it by twisting your wrench/nut-driver harder and harder. Once broken, these pieces are NOT available as a separate repair piece from GM. They will only sell you the entire headlight assembly.
If yours are frozen up, do a search on this issue. Many many posts about it. "Goldenrods" is one if the terms that may be helpful when doing a search. There IS a way to unfreeze the gear-drive mechanism but it involves removal of the headlight assembly to get access.
(Thanks to Junkman2008 for the picture)
Corvette Stories
The Best of Corvette for Corvette Enthusiasts

Top 10 Most Expensive Corvettes Ever Sold on Bring A Trailer
Brett Foote
10 Things Every Corvette Owner Needs (2026 Edition)
Michael S. Palmer
8 Most "Only Corvette Owners Understand" Quirks and Problems
Pouria Savadkouei
10 Reasons the C6 Z06 is Still A Performance Benchmark After 20 Years
Joe Kucinski
How Much Horsepower Every Corvette Engine "LOST" in 1972
Joe Kucinski
Top 10 DOs and DON'Ts for Protecting Your Convertible Top!
Michael S. Palmer
Top 10 Most Explosive Corvettes Ever Made: Power-to-Weight Ratio Ranked!
Joe Kucinski
150 hp to 1,250 hp: Every Corvette Generation Compared by the Specs That Matter
Joe Kucinski
8 Coolest Corvette Pace Cars (and Replicas) of All Time
Verdad Gallardo
1/4 mile/AutoX
Joined: Jun 2014
Posts: 11,441
Likes: 2,186
From: Buffalo Texas
Burning Brakes


Joined: Apr 2010
Posts: 1,075
Likes: 4
From: Asheville NC
Here is something I found out. I had the golden rod problem in the stock headlights after not liking the Apex projectors which a former owner had put it. They were out of adjustment so bad that you could not see. I golden rods were froze. The P B Blaster didnt work and I broke one off. With nothing to loose I took the light golden rod gear box a part. It just snaps together. With the gear that is froze on the shaft out, you can work it loose. I never have seen on the forum that you can take them apart and fix them. With the broken shaft, I just cut a slot in the shaft end for a screw driver after I had it all loosened up. Now they both adjust. Took the other apart and fixed it too.

Intermediate
Joined: Dec 2014
Posts: 27
Likes: 0
From: Washington
I am full aware of how to aim headlights. The adjusting gear freezing up which I have seen no one post that you can just take it apart and free it. Been doing this over 50 yrs and only trying to fill in the hole on a fix that is the best and not that hard. Hope all the headlight aiming will help someone. I know most people have no idea on how to aim the headlights. I don't want my state to be like Caif. They have to take the cars in for emissions and they check brakes , lights and other stuff where I feel you are treated like an idiot.
Burning Brakes
Joined: Apr 2010
Posts: 1,075
Likes: 4
From: Asheville NC
I am full aware of how to aim headlights. The adjusting gear freezing up which I have seen no one post that you can just take it apart and free it. Been doing this over 50 yrs and only trying to fill in the hole on a fix that is the best and not that hard. Hope all the headlight aiming will help someone. I know most people have no idea on how to aim the headlights. I don't want my state to be like Caif. They have to take the cars in for emissions and they check brakes , lights and other stuff where I feel you are treated like an idiot.
Here is the link I went by. I thought at first I found it on here but it was the digital corvettes site I found my info from.
http://www.digitalcorvettes.com/foru...d.php?t=103322
Team Owner

Joined: May 2001
Posts: 36,836
Likes: 244
From: Dear Karma, I have a list of people you missed.
St. Jude Donor '08-'09-'10-'11-'12-'13-'14-'15-'16
For those interested, the correct socket that fits the adjuster rods are called "external Torx" sockets, which are configured the exact opposite of a regular "Torx" bit.
The sizes run the same as the regular Torx (which some people call "star" fasteners), except there is an "E" prefix, signifying "External".
Thus, a regular Torx bit of a size 20 is referred to as a "T20", and it's counterpart would be an "E20". You can either buy small inexpensive 1/4" drive socket sets, OR you can buy individual sockets of a particular size for the job. These are found at most all the popular AP stores.
HTH
Burning Brakes
Joined: Apr 2010
Posts: 1,075
Likes: 4
From: Asheville NC
For those interested, the correct socket that fits the adjuster rods are called "external Torx" sockets, which are configured the exact opposite of a regular "Torx" bit.
The sizes run the same as the regular Torx (which some people call "star" fasteners), except there is an "E" prefix, signifying "External".
Thus, a regular Torx bit of a size 20 is referred to as a "T20", and it's counterpart would be an "E20". You can either buy small inexpensive 1/4" drive socket sets, OR you can buy individual sockets of a particular size for the job. These are found at most all the popular AP stores.
HTH
The sizes run the same as the regular Torx (which some people call "star" fasteners), except there is an "E" prefix, signifying "External".
Thus, a regular Torx bit of a size 20 is referred to as a "T20", and it's counterpart would be an "E20". You can either buy small inexpensive 1/4" drive socket sets, OR you can buy individual sockets of a particular size for the job. These are found at most all the popular AP stores.
HTH
I actually got away with using a long extension and a 1/4" socket to adjust mine.
Le Mans Master

Joined: Jan 2004
Posts: 9,488
Likes: 1,743
From: Knoxville Tn
Instructor
Joined: Jul 2017
Posts: 147
Likes: 45
From: Highland Lakes NJ

Drifting
Joined: Dec 2012
Posts: 1,904
Likes: 151
I just had to do one of mine - my state inspection indicated it was pointing too low and to much to one side. I opened the headlights - carefully put a little penetrating oil on the adjustment rods - and the next day - with a 1/4 socket on an extension - very ginergly turned a quarter turn to loosen, then 1/4 turn back to tighten just to work the adjustment rods - then a couple more - moving to 1/2 turn in and 1/2 turn out, etc - until I was confident (as confident as I could be) that the rods would not bind up. Then I made my adjustments. It is scary when you get a look at how long and thin that one adjuster is - knowing that to break it means a new headlamp bucket. Just be careful, as already stated by someone.
Extremely cautious with those first one or two turns of the adjusting rods.
Even though they no longer need to be adjusted, I spray them with blaster every three months, just to keep them operational, if the time ever comes I need to adjust them again.
Bob.
