


Esser's 2002 M6 Coupe Progress Thread

Thread Starter
Instructor


Joined: Apr 2013
Posts: 190
Likes: 36
From: Evansville IN
 Updates
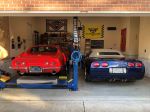
The winter weather is finally clearing up here and I was able to get some things done. First thing I did was repaint my garage. I just moved into this house and wanted to give the garage a new look. I went with some black metal cabinets from Costco for a pretty decent price and filled in all the imperfections on the walls:


I am also in the process of having the front of my driveway leveled to the street. As you all probably know a lowered vette has a lot of trouble with curbs, so I had mine completely removed lol. It now has a smooth transition to the street. I shouldn't have to worry about getting in and out of the driveway anymore!
They tore it all out and redid it:


While that was going on I have started the paint correction process! I am still taking some pictures for that, will update tomorrow.


I am also in the process of having the front of my driveway leveled to the street. As you all probably know a lowered vette has a lot of trouble with curbs, so I had mine completely removed lol. It now has a smooth transition to the street. I shouldn't have to worry about getting in and out of the driveway anymore!
They tore it all out and redid it:


While that was going on I have started the paint correction process! I am still taking some pictures for that, will update tomorrow.

3rd Gear
Joined: Feb 2016
Posts: 3
Likes: 0
Lol nice man! Sadly my family and I are living in our rental home or I'd do the same. My vet is an outside car currently. Would love to kick the wifes 14 camry out side. But her car could prolly sell for more and my vet needs a paintjob. Also between my evo or the vet the vets outside hands down.
Great to get the small issues out of the way if they bug you. I bought my vet from a owner like you and have had no issues other then the classic window reg and tail light issue.
Great to get the small issues out of the way if they bug you. I bought my vet from a owner like you and have had no issues other then the classic window reg and tail light issue.
Thread Starter
Instructor
Joined: Apr 2013
Posts: 190
Likes: 36
From: Evansville IN
Time to fix the paint
I finally got some time this week to focus on the paint correction on the vette. The paint was in pretty decent condition considering its age, but in the right lighting it still had some traces of swirl marks. The picture below will show some of the said swirls:

No good! My goal will be the 100% swirl elimination and a complete paint correction. While a bunch of people do detail jobs, I'm going the extra length on this one lol. Everyone has there own methods of washing and polishing and waxing etc, I will be showing you the method I use to create a great shine. I can honestly say that I challenge anyone to find imperfections in my paint when I'm done. The price for materials is not expensive, it just takes time and patience to get the perfect finish.
This is my process that I developed through a lot of trial and testing. I have found that there are a few instances when the high dollar products are simply overkill, and off the shelf items are perfectly fine. There are, however, several cases where the high dollar products are worlds ahead of anything you will be able to buy at the store.
First step in the process is to rid the paint of any previous wax or deposits. The wash and clay is always the first step. For a wash I use a microfiber hand mit and a grit guard bucket. The grit guard prevent any of the dirt and containments from diluting the wash water and going right back into the paint. My soap combination for this is a 50/50 mixture of dye free dawn dish soap and any light car wash soap. The dawn has some detergents and degreasers in it that will strip the wax from the paint.


Big point here is to do this on a sunless day. Cloudy warm days are the best car wash days! I hate getting water spots on fresh paint.

No extreme science here, wheels and tires first with a seperate rag. Then work from top to bottom. After the car is washed dry immediately and then bring it under cover. I always finish the drying process with a microfiber towel in the garage
After its in the garage and dry, I go ahead and start the clay bar process. I use a pinnacle poly clay bar and "wet" water. Wet water is just a mixture is isopropyl alcohol, water, and a drop of liquid soap. I just filled up the old pinnacle clay lubricant spray bottle with this solution with the same results.

I take one of the bars and make it into a pancake and rub. No science here either, just try to to press with your fingers, more your palm so you get the most surface area of force on the paint. I run until it glides smooth. I do the whole car.

And the girlfriend wanted to help out a little with the clay bar:

After each panel is done, wipe with a clean microfiber. I usually glide my hand over to make sure the surface is smooth after. Anything that is not smooth will tear up your polishing pad in the next steps. To be continued in the next post!

No good! My goal will be the 100% swirl elimination and a complete paint correction. While a bunch of people do detail jobs, I'm going the extra length on this one lol. Everyone has there own methods of washing and polishing and waxing etc, I will be showing you the method I use to create a great shine. I can honestly say that I challenge anyone to find imperfections in my paint when I'm done. The price for materials is not expensive, it just takes time and patience to get the perfect finish.
This is my process that I developed through a lot of trial and testing. I have found that there are a few instances when the high dollar products are simply overkill, and off the shelf items are perfectly fine. There are, however, several cases where the high dollar products are worlds ahead of anything you will be able to buy at the store.
First step in the process is to rid the paint of any previous wax or deposits. The wash and clay is always the first step. For a wash I use a microfiber hand mit and a grit guard bucket. The grit guard prevent any of the dirt and containments from diluting the wash water and going right back into the paint. My soap combination for this is a 50/50 mixture of dye free dawn dish soap and any light car wash soap. The dawn has some detergents and degreasers in it that will strip the wax from the paint.


Big point here is to do this on a sunless day. Cloudy warm days are the best car wash days! I hate getting water spots on fresh paint.

No extreme science here, wheels and tires first with a seperate rag. Then work from top to bottom. After the car is washed dry immediately and then bring it under cover. I always finish the drying process with a microfiber towel in the garage
After its in the garage and dry, I go ahead and start the clay bar process. I use a pinnacle poly clay bar and "wet" water. Wet water is just a mixture is isopropyl alcohol, water, and a drop of liquid soap. I just filled up the old pinnacle clay lubricant spray bottle with this solution with the same results.

I take one of the bars and make it into a pancake and rub. No science here either, just try to to press with your fingers, more your palm so you get the most surface area of force on the paint. I run until it glides smooth. I do the whole car.

And the girlfriend wanted to help out a little with the clay bar:

After each panel is done, wipe with a clean microfiber. I usually glide my hand over to make sure the surface is smooth after. Anything that is not smooth will tear up your polishing pad in the next steps. To be continued in the next post!
Last edited by Esser; Feb 4, 2016 at 08:17 PM.
Thread Starter
Instructor
Joined: Apr 2013
Posts: 190
Likes: 36
From: Evansville IN
Next Step!
The next step is to open all the doors, hood, and trunk to dry off any nooks where water likes to sit. The car must be 100% dry for the polishing. I sometimes let it sit overnight to make sure there are no remaining water that likes to hide. Once it's dry it's time to mask off the trim. The C5 has a lot more visible trim than its predecessors, so make sure you get lots of masking tape. Any hard plastic or rubber will need to be masked off. The polisher is going to be hard on the paint, we don't want it to take any plastic or rubber with it. The polish I will be using will also stain rubber, so take your time and mask it off well.


Now that everything is masked off, I do a isopropyl alcohol wipe on all the paint surface to prepare it for the cutting. You want to rid the paint of any dust or particles that may have fallen on it while sitting. You don't want to rub in more abrasives to the paint than needed. I make a mixture of half distiller water and 90% isopropyl alcohol. A light mist and a wipe with a microfiber is plenty.
For the cutting of the paint, I like to use Wolfgang total swirl remover and an orange CCS pad on my Porter Cable. The orange pad is fairly abrasive and should take out most swirls in the paint. The Wolfgang polish is really a necessity for this step, it is the perfect amount of abrasive for removing very light swirls. The orange pad compliments it well. For lighter swirls a white pad is fine to use.

Make sure to mask off the portion of paint you are working on. I sudoku mask off an area about 1x2 feet. This helps you keep track of where you are and doesn't let you get too far out of the range of compound for one pad.

Apply a light amount of compound and spread across the panel. For the cutting I turn the porter cable to a speed of 5.5 and apply enough force on the paint to keep the pad rotating at 1 Revolution per Second. No more and no less.
I work on each masked off section for about 30 seconds going back and forth and side to side at a slow rate. Then wipe off and move on to the next section. Remember to overlap areas to ensure no paint is left untouched. Refill the pad with a light amount of compound between each section.


After its wiped away the paint will be smoother than you've ever felt, and will shine like it's been waxed, but it's bare paint! Make sure you wipe away all the compound. If it does not get all the swirls, you can repeat the steps on the same panel. For the C5 vette I have found that: the paint on the hood, roof, and rear bumper is soft, and the front and rear fenders, and front bumper are rock hard.
Continue working the sections until the problem areas are done. I did the entire car because the Wolfgang swirl polish is not that abrasive so I switch to a white pad for the panels that don't need much work.

It should be visible how much clearer the piant is at this point, and should give you some motivation to do the rest of the back breaking work!

The next step will be to glaze the paint.


Now that everything is masked off, I do a isopropyl alcohol wipe on all the paint surface to prepare it for the cutting. You want to rid the paint of any dust or particles that may have fallen on it while sitting. You don't want to rub in more abrasives to the paint than needed. I make a mixture of half distiller water and 90% isopropyl alcohol. A light mist and a wipe with a microfiber is plenty.
For the cutting of the paint, I like to use Wolfgang total swirl remover and an orange CCS pad on my Porter Cable. The orange pad is fairly abrasive and should take out most swirls in the paint. The Wolfgang polish is really a necessity for this step, it is the perfect amount of abrasive for removing very light swirls. The orange pad compliments it well. For lighter swirls a white pad is fine to use.

Make sure to mask off the portion of paint you are working on. I sudoku mask off an area about 1x2 feet. This helps you keep track of where you are and doesn't let you get too far out of the range of compound for one pad.

Apply a light amount of compound and spread across the panel. For the cutting I turn the porter cable to a speed of 5.5 and apply enough force on the paint to keep the pad rotating at 1 Revolution per Second. No more and no less.
I work on each masked off section for about 30 seconds going back and forth and side to side at a slow rate. Then wipe off and move on to the next section. Remember to overlap areas to ensure no paint is left untouched. Refill the pad with a light amount of compound between each section.


After its wiped away the paint will be smoother than you've ever felt, and will shine like it's been waxed, but it's bare paint! Make sure you wipe away all the compound. If it does not get all the swirls, you can repeat the steps on the same panel. For the C5 vette I have found that: the paint on the hood, roof, and rear bumper is soft, and the front and rear fenders, and front bumper are rock hard.
Continue working the sections until the problem areas are done. I did the entire car because the Wolfgang swirl polish is not that abrasive so I switch to a white pad for the panels that don't need much work.

It should be visible how much clearer the piant is at this point, and should give you some motivation to do the rest of the back breaking work!

The next step will be to glaze the paint.
Thread Starter
Instructor
Joined: Apr 2013
Posts: 190
Likes: 36
From: Evansville IN
Glaze and Sealant
The glaze will be applied and will provide a light polish to finishe off any rough surfaces or very light swirls and prepare the paint surface for the sealant. For the glaze I use Wolfgang glaze and a white CCS pad on the porter cable.

I run the porter cable at about a speed of 4 and again try to get the pad to rotate at 1 revolution per second. I again went over the whole car again with the glaze. The girl helped a lot on this one!

Again repeat the same process as sectioning off a small section and wipe clean with a fresh microfiber after your done with the section. After the whole car is complete, it's time to clean up any left over glaze with an IPA wipe. I use my 50/50 mixture of water and isopropyl alcohol to wipe down the paint and get it back down the bare clearcoat. The sealant of choice that will be applied is the Wolfgang deep gloss paint sealant 3.0. It's simply the best sealant and can even be passed as a final wax for the shine it provides.

I use the blue pad for the sealant application. The blue of is super soft and doesn't do any type of cutting or polishing, it just glides over the paint and applies the sealant. I don't section off any of the pint for the sealant, just run the Porter cable at a speed of 3 and let it do all the work. You don't need to press down on the pad at all, let the weight of the Porter cable apply its own pressure. I cover the whole car in about 15 minutes, covering each section 2-3 times with a fresh pad of product.


Once the sealant is covered over the entire vehicle, it must be left to dry for at least 40 minutes. I usually let it sit for about an hour and then come back to wipe it all off.
After it has set I come back with a wool cloth and remove the surface of dry sealant. It should come off super easy and have very minimal dusting. The before and after of the wipe down will blow you away.


The shine that the deep gloss sealant provides is really unmatched. At this point you must let the sealant sit for 12 hours without getting any moisture on it to completely dry. I let it sit in the garage overnight and come out and give it another wipe down to get any dust off.
The first coat of sealant will be super glossy, but a second coat of the super gloss sealant will really give the paint an extreme depth.

I run the porter cable at about a speed of 4 and again try to get the pad to rotate at 1 revolution per second. I again went over the whole car again with the glaze. The girl helped a lot on this one!

Again repeat the same process as sectioning off a small section and wipe clean with a fresh microfiber after your done with the section. After the whole car is complete, it's time to clean up any left over glaze with an IPA wipe. I use my 50/50 mixture of water and isopropyl alcohol to wipe down the paint and get it back down the bare clearcoat. The sealant of choice that will be applied is the Wolfgang deep gloss paint sealant 3.0. It's simply the best sealant and can even be passed as a final wax for the shine it provides.

I use the blue pad for the sealant application. The blue of is super soft and doesn't do any type of cutting or polishing, it just glides over the paint and applies the sealant. I don't section off any of the pint for the sealant, just run the Porter cable at a speed of 3 and let it do all the work. You don't need to press down on the pad at all, let the weight of the Porter cable apply its own pressure. I cover the whole car in about 15 minutes, covering each section 2-3 times with a fresh pad of product.


Once the sealant is covered over the entire vehicle, it must be left to dry for at least 40 minutes. I usually let it sit for about an hour and then come back to wipe it all off.
After it has set I come back with a wool cloth and remove the surface of dry sealant. It should come off super easy and have very minimal dusting. The before and after of the wipe down will blow you away.


The shine that the deep gloss sealant provides is really unmatched. At this point you must let the sealant sit for 12 hours without getting any moisture on it to completely dry. I let it sit in the garage overnight and come out and give it another wipe down to get any dust off.
The first coat of sealant will be super glossy, but a second coat of the super gloss sealant will really give the paint an extreme depth.
Thread Starter
Instructor
Joined: Apr 2013
Posts: 190
Likes: 36
From: Evansville IN
Second coat applied after 24 hours of letting the first coat dry. The second coat must sit for about an hour and then be wiped off.

The paint is slick and glossy. Its hard to get a good picture of the gloss, as the sun picks up the affect better than natural light. It has been rainy here for the last few days so I will get pictures when it clears up.

I have to let my driveway cure for at least 7 days before I can drive on it. It doesn't help that it's cold and rainy outside so the concrete is staying damp and slowing down the curing process.

The paint is slick and glossy. Its hard to get a good picture of the gloss, as the sun picks up the affect better than natural light. It has been rainy here for the last few days so I will get pictures when it clears up.

I have to let my driveway cure for at least 7 days before I can drive on it. It doesn't help that it's cold and rainy outside so the concrete is staying damp and slowing down the curing process.

Instructor
Joined: Nov 2015
Posts: 136
Likes: 10
From: Oregon
Very good post. I just got finished with the same process and the final coat of wax went on last night. U going to top that Wolfgang with a wax? Here's what I used for a process. The results are pretty good but haven't seen it finished in full sun yet.
Wash with Dawn
Clay bar
Wash again
Ipa wash
3m perfect it compound with orange pad
V36 w orange pad
Ipa wash
V36 with white pad
V38 with white pad
Ipa wash
Cg black light 2 coats
2 coats Pete's 53 wax
1 coat of v7 QD
Wash with Dawn
Clay bar
Wash again
Ipa wash
3m perfect it compound with orange pad
V36 w orange pad
Ipa wash
V36 with white pad
V38 with white pad
Ipa wash
Cg black light 2 coats
2 coats Pete's 53 wax
1 coat of v7 QD
Corvette Stories
The Best of Corvette for Corvette Enthusiasts

10 Reasons the C6 Z06 is Still A Performance Benchmark After 20 Years
Joe Kucinski
How Much Horsepower Every Corvette Engine "LOST" in 1972
Joe Kucinski
Top 10 DOs and DON'Ts for Protecting Your Convertible Top!
Michael S. Palmer
Top 10 Most Explosive Corvettes Ever Made: Power-to-Weight Ratio Ranked!
Joe Kucinski
150 hp to 1,250 hp: Every Corvette Generation Compared by the Specs That Matter
Joe Kucinski
8 Coolest Corvette Pace Cars (and Replicas) of All Time
Verdad Gallardo
Top 10 Corvette Engines RANKED by Peak Torque (70+ Years of Muscle!)
Joe Kucinski
Corvette ZR1X Will Be Pacing the Indy 500, And Could Probably Race, Too!
Verdad Gallardo
Top 10 Corvettes Coming to Mecum Indy 2026!
Brett Foote
Thread Starter
Instructor
Joined: Apr 2013
Posts: 190
Likes: 36
From: Evansville IN
Very good post. I just got finished with the same process and the final coat of wax went on last night. U going to top that Wolfgang with a wax? Here's what I used for a process. The results are pretty good but haven't seen it finished in full sun yet.
Wash with Dawn
Clay bar
Wash again
Ipa wash
3m perfect it compound with orange pad
V36 w orange pad
Ipa wash
V36 with white pad
V38 with white pad
Ipa wash
Cg black light 2 coats
2 coats Pete's 53 wax
1 coat of v7 QD
Wash with Dawn
Clay bar
Wash again
Ipa wash
3m perfect it compound with orange pad
V36 w orange pad
Ipa wash
V36 with white pad
V38 with white pad
Ipa wash
Cg black light 2 coats
2 coats Pete's 53 wax
1 coat of v7 QD
Sounds like a solid setup. I used to have a very similar process with varying compounds and brands, but the formula is sound. And to answer your question about the wax... I won't be topping it with anything over the sealant. I used to always top off my sealant with wax, but after Wolfgang released this sealant I have never noticed a difference that was worth it. Even with a high dollar wax over the sealant, the result to me is not worth the price and I don't think it adds to the durability. I have just been sticking with the two coats of sealant, and it always shines the same until it wears off. This sealant is really hard to beat!
I do however apply a liquid gloss spray after the first wash. It's not considered a wax, but it does form a coat over the sealant, and does add a bit of gloss. I'll try to get some pictures in the sun this week if it ever comes out!
Instructor
Joined: Nov 2015
Posts: 136
Likes: 10
From: Oregon
Sounds like a solid setup. I used to have a very similar process with varying compounds and brands, but the formula is sound. And to answer your question about the wax... I won't be topping it with anything over the sealant. I used to always top off my sealant with wax, but after Wolfgang released this sealant I have never noticed a difference that was worth it. Even with a high dollar wax over the sealant, the result to me is not worth the price and I don't think it adds to the durability. I have just been sticking with the two coats of sealant, and it always shines the same until it wears off. This sealant is really hard to beat!
I do however apply a liquid gloss spray after the first wash. It's not considered a wax, but it does form a coat over the sealant, and does add a bit of gloss. I'll try to get some pictures in the sun this week if it ever comes out!
I do however apply a liquid gloss spray after the first wash. It's not considered a wax, but it does form a coat over the sealant, and does add a bit of gloss. I'll try to get some pictures in the sun this week if it ever comes out!

Thread Starter
Instructor
Joined: Apr 2013
Posts: 190
Likes: 36
From: Evansville IN
Yes! This same process on a black car is actually a lot more profound. I detailed a black C5 and the results were way more easier to see than on any color. All black paint show swirls so much easier than any other color, so when it's crystal clear the results really pop.
Burning Brakes


Joined: Nov 2005
Posts: 1,137
Likes: 51
From: Cartersville GA
Great write up. I plan on polishing my '04 CE this spring, and also my '69 coupe. Paint on both is now 11 years old +/-. Regarding the speed settings on your polisher, what are the related RPM's of each setting? I have a different polisher, so I'm trying to get a comparison.
Thread Starter
Instructor
Joined: Apr 2013
Posts: 190
Likes: 36
From: Evansville IN
Great write up. I plan on polishing my '04 CE this spring, and also my '69 coupe. Paint on both is now 11 years old +/-. Regarding the speed settings on your polisher, what are the related RPM's of each setting? I have a different polisher, so I'm trying to get a comparison.
So when it comes to polishers, there are two distinct kinds: a normal rotary polisher which will spin a single rotation and a constant rpm, and then there is the dual action polisher (DA). The dual action actually has a clutch in it, so the settings on the polisher control the motor speed but don't affect the speed of the pad, just the force. It's hard to explain but if you press lightly or hard on a basic rotary it will try to spin the same rate. While with a DA polisher you can press down hard and actually stop the polisher from spinning completely, while the motor is still going. I adjust my speed level until I can use enough force to almost stop the polisher from spinning and slow it down to a 1 revolution per second. So to answer your question it would depend on what type of rotary tool you have.
It's easy to burn through paint with a normal rotary tool. The dual action is safer due to the clutch, and it will stop before you die any real damage. The dual action orbits in a circle while it spins, so it just appears to be vibrating if you were to hold it in the air or stop it completely against the paint.
Thread Starter
Instructor
Joined: Apr 2013
Posts: 190
Likes: 36
From: Evansville IN
I recently decided to do some work to the emblems using some 3M carbon fiber wrap. It's pretty easy to work with this stuff, and it's relatively cheap. I am trying to go with a red and black theme. I've done this to other cars before and it sticks pretty good to most surfaces.

I use the heat gun to let the wrap fall into the crevices and then use an exacto knife to trim away at it.


I use the heat gun to let the wrap fall into the crevices and then use an exacto knife to trim away at it.


Drifting


Joined: Apr 2015
Posts: 1,893
Likes: 295
From: Buffalo NY
Thanks for the post on the vinyl wrap! I picked up a roll of the stuff to do the headlight surrounds and a few other small pieces, and was wondering if it was possible to do the emblems. It seemed like it might be difficult due to the small crevices, but yours turned out fantastic.
Love the attention to detail and step by step how to for the paint correction. Keep the posts coming! Car looks great.
Love the attention to detail and step by step how to for the paint correction. Keep the posts coming! Car looks great.




1/4 mile/AutoX

Joined: Jun 2014
Posts: 11,441
Likes: 2,186
From: Buffalo Texas
I recently decided to do some work to the emblems using some 3M carbon fiber wrap. It's pretty easy to work with this stuff, and it's relatively cheap. I am trying to go with a red and black theme. I've done this to other cars before and it sticks pretty good to most surfaces.
I use the heat gun to let the wrap fall into the crevices and then use an exacto knife to trim away at it.
I use the heat gun to let the wrap fall into the crevices and then use an exacto knife to trim away at it.
Burning Brakes
Joined: Nov 2005
Posts: 1,137
Likes: 51
From: Cartersville GA
So when it comes to polishers, there are two distinct kinds: a normal rotary polisher which will spin a single rotation and a constant rpm, and then there is the dual action polisher (DA). The dual action actually has a clutch in it, so the settings on the polisher control the motor speed but don't affect the speed of the pad, just the force. It's hard to explain but if you press lightly or hard on a basic rotary it will try to spin the same rate. While with a DA polisher you can press down hard and actually stop the polisher from spinning completely, while the motor is still going. I adjust my speed level until I can use enough force to almost stop the polisher from spinning and slow it down to a 1 revolution per second. So to answer your question it would depend on what type of rotary tool you have.
It's easy to burn through paint with a normal rotary tool. The dual action is safer due to the clutch, and it will stop before you die any real damage. The dual action orbits in a circle while it spins, so it just appears to be vibrating if you were to hold it in the air or stop it completely against the paint.
It's easy to burn through paint with a normal rotary tool. The dual action is safer due to the clutch, and it will stop before you die any real damage. The dual action orbits in a circle while it spins, so it just appears to be vibrating if you were to hold it in the air or stop it completely against the paint.
Instructor
Joined: Nov 2015
Posts: 136
Likes: 10
From: Oregon
As esser said a da is much safer than a rotary. I use both but I have been using a rotary for work for many years and am very good with controlling it. A novice would have a hard start as its a powerful machine and you will cut paint fast. I usually do heavy compounding with a rotary for the quickness of the cutting. Then my polishing, jeweling and sealant steps I switch to a porter cable DA as I like the finish it leaves better but it is very slow compared to the rotary. Most products that are designed to be used with a DA say what speed setting and pressure to use as a recommendation. Every DA and rotary I have used was a 1-6 speed settings. On the DA I use 5-6 for any buffing compound and polishing. Then glazes, sealants and such I do 3-4. These passes are very slow and you need to make sure that your pad is still spinning if you put too much pressure on the machine the circular rotation of the pad will stop and you need to lighten up to get the pad rotating again. On a rotary I usually use speed 2-2.5 because it is so much faster of a machine. Hope that helps.