


[Z06] Cipher CPA2009 seat install.
Thread Starter
Racer

Joined: Jul 2013
Posts: 450
Likes: 65
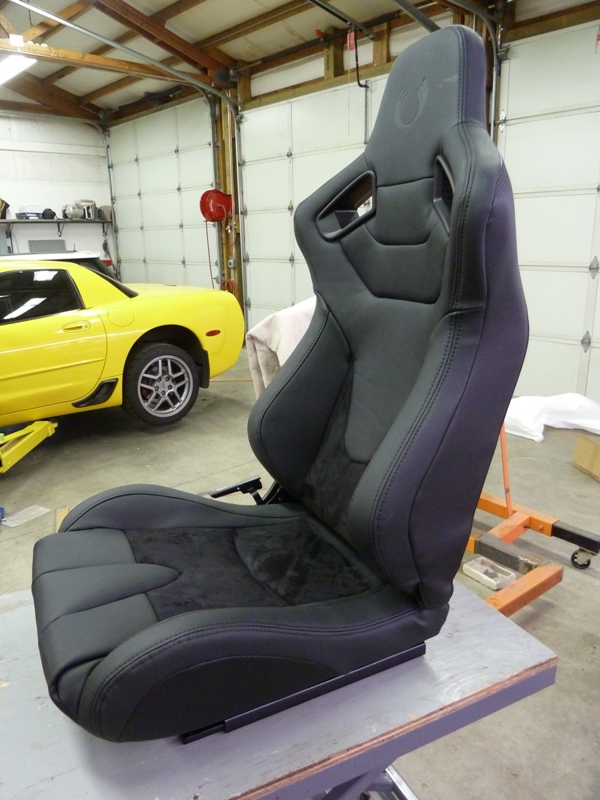
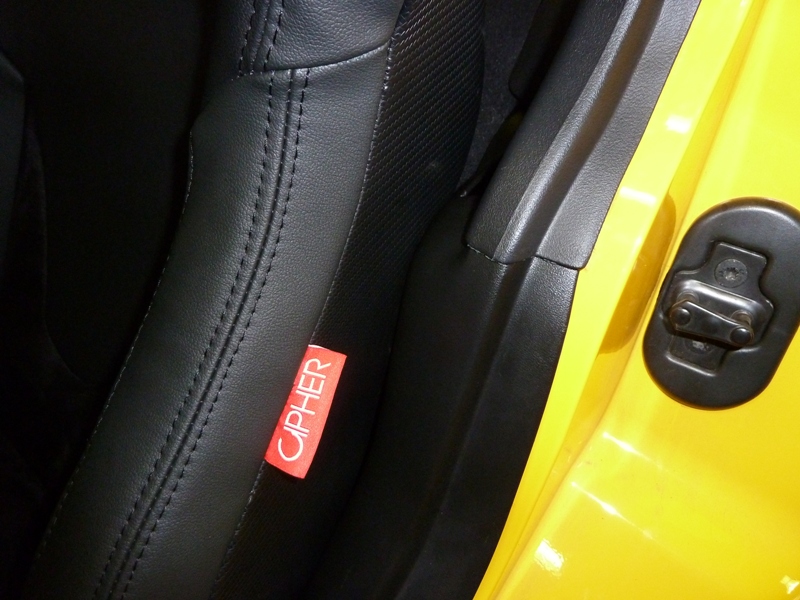
My 02 ZO6 is a dual purpose vehicle, both street and HPDE track days. The stock seats do not give enough support on the track so I have been on the hunt for a new seat. I am older so getting in and out is a concern so a fixed back race seat with fixed mounts just didn't make sense to me. While doing research I found a seat sold by Cipher that has suede inserts which would be a big help for sticking in the seat when on the track.
I have a well equipped shop so buying mounts wasn't an option for me. I knew that I would be installing C6 seat belts and I also integrated a set of 4 point Schroth Profi II ASM harness's.
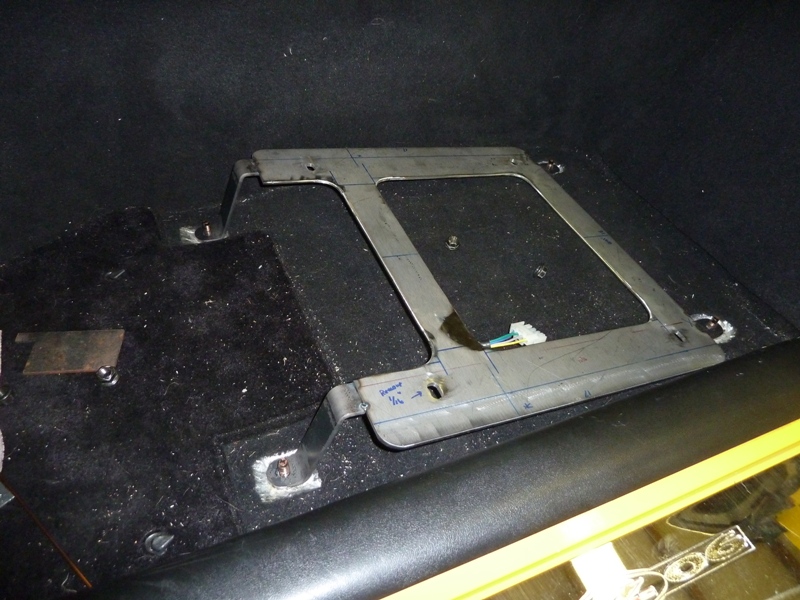
I started by mocking up the seat position using wood spacers to determine the seat angle and height. I piece of 1/4" plywood stood in for the future steel plate.
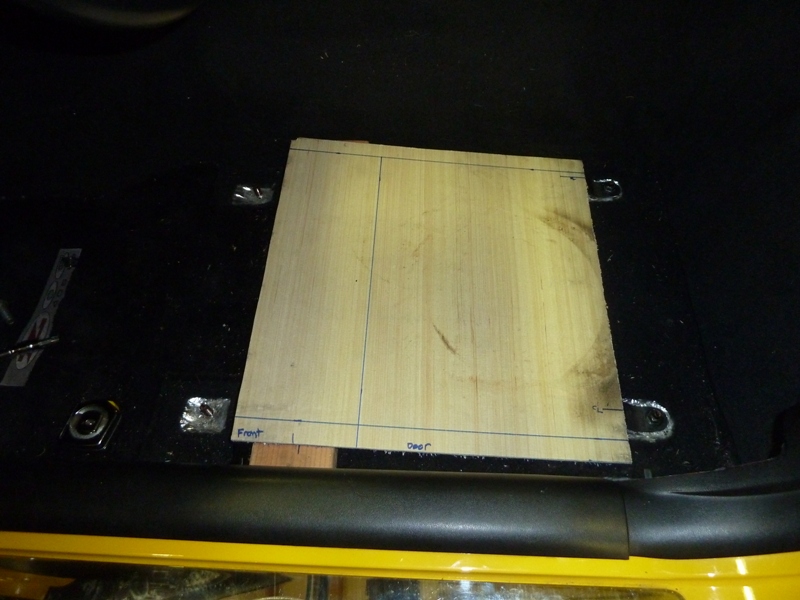
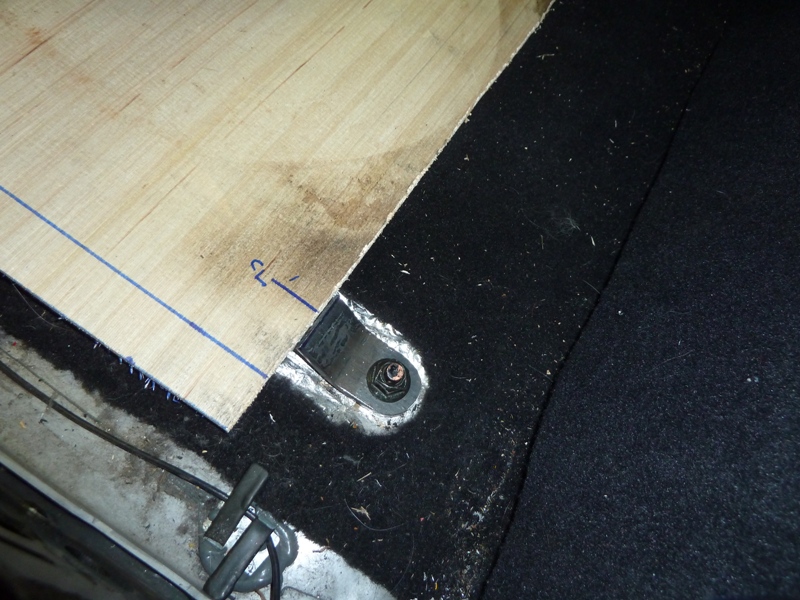

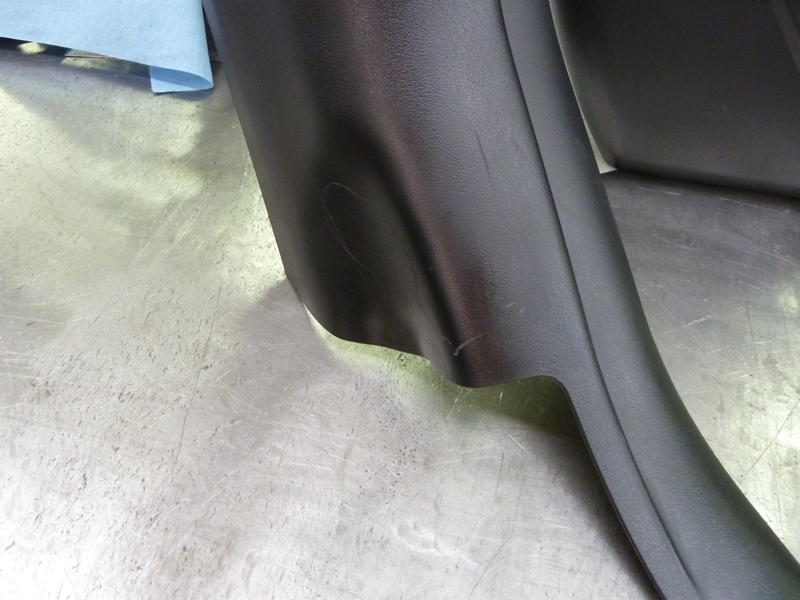
To get the seat far enough back for my legs I found there were 2 pinch points. One being the upper seat belt reel and the other was the inside tunnel where it flares out. I located the bolt locations for the seat tracks with the seat in the optimum position.
I have a well equipped shop so buying mounts wasn't an option for me. I knew that I would be installing C6 seat belts and I also integrated a set of 4 point Schroth Profi II ASM harness's.
I started by mocking up the seat position using wood spacers to determine the seat angle and height. I piece of 1/4" plywood stood in for the future steel plate.
To get the seat far enough back for my legs I found there were 2 pinch points. One being the upper seat belt reel and the other was the inside tunnel where it flares out. I located the bolt locations for the seat tracks with the seat in the optimum position.
Thread Starter
Racer
Joined: Jul 2013
Posts: 450
Likes: 65
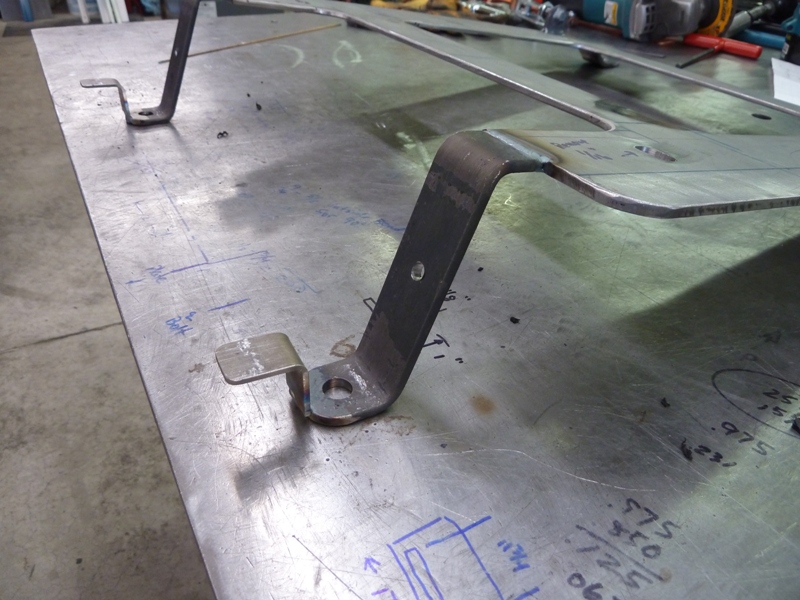
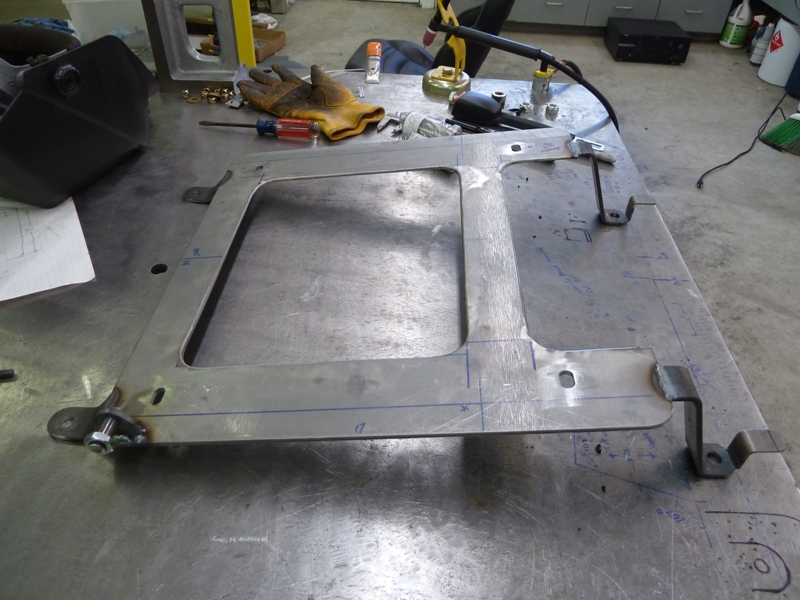
All the pieces are 3/16" steel, the main plate cut out using my plasma torch and the end mounts cut and bent using my press brake.

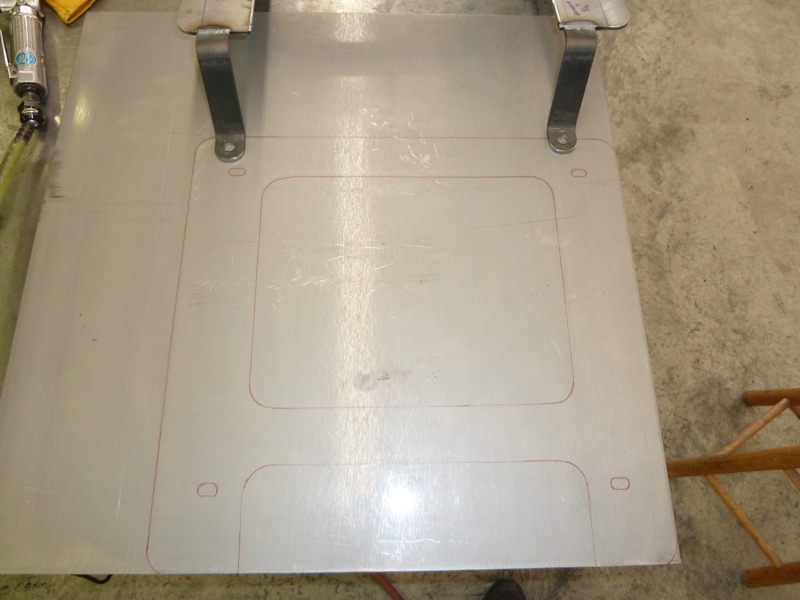
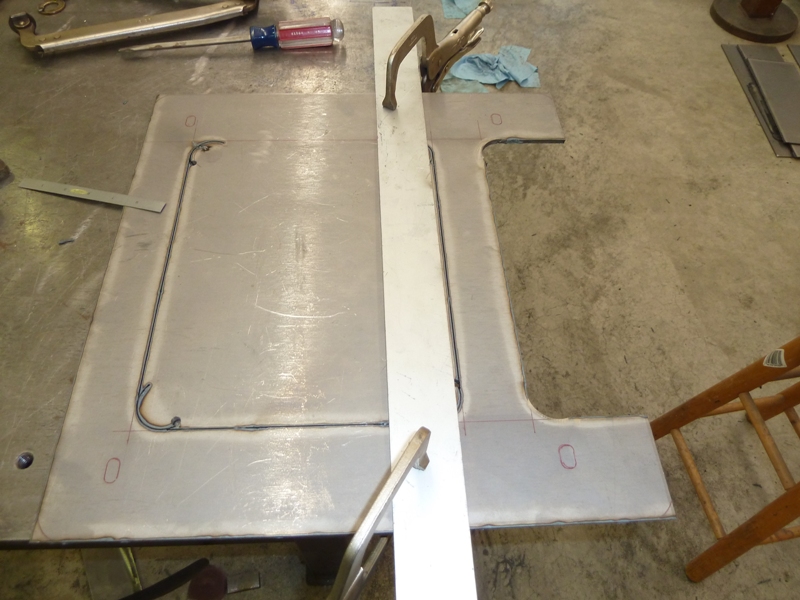
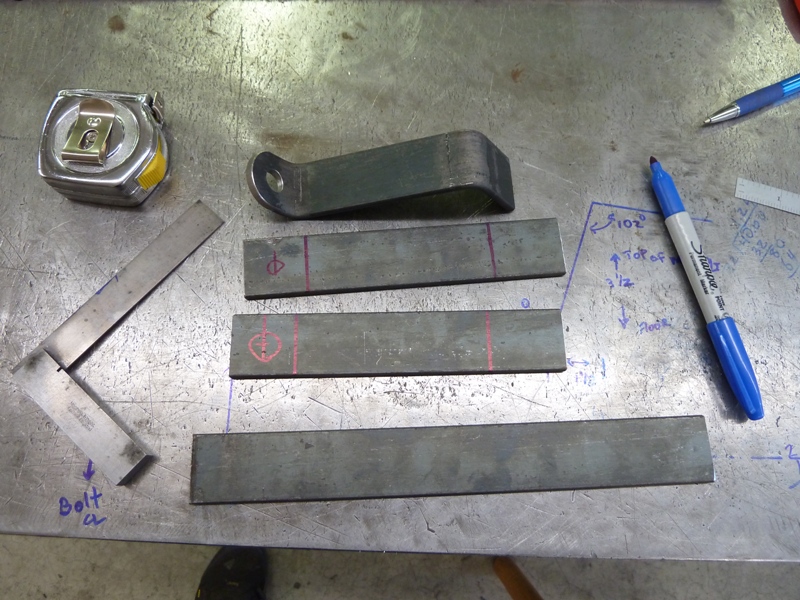
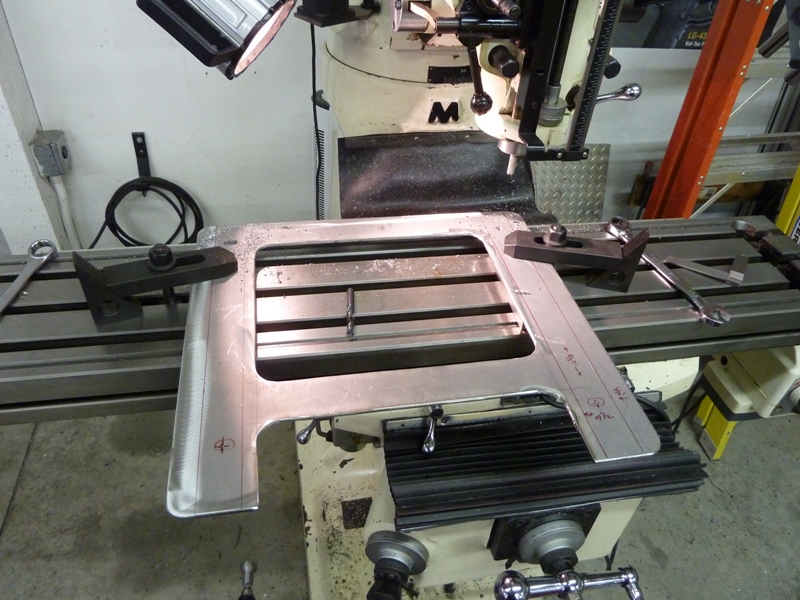
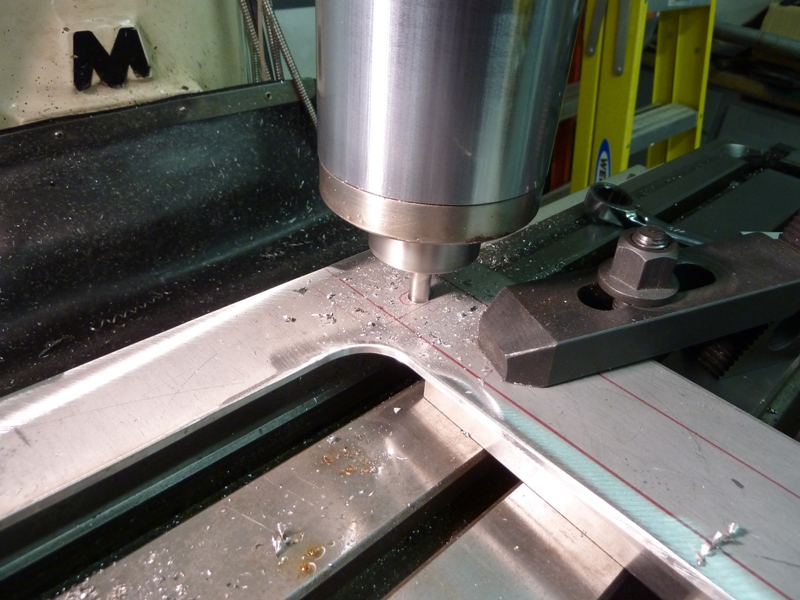
Next I milled slots in the main plate. I also cutout some areas to remove excess weight.
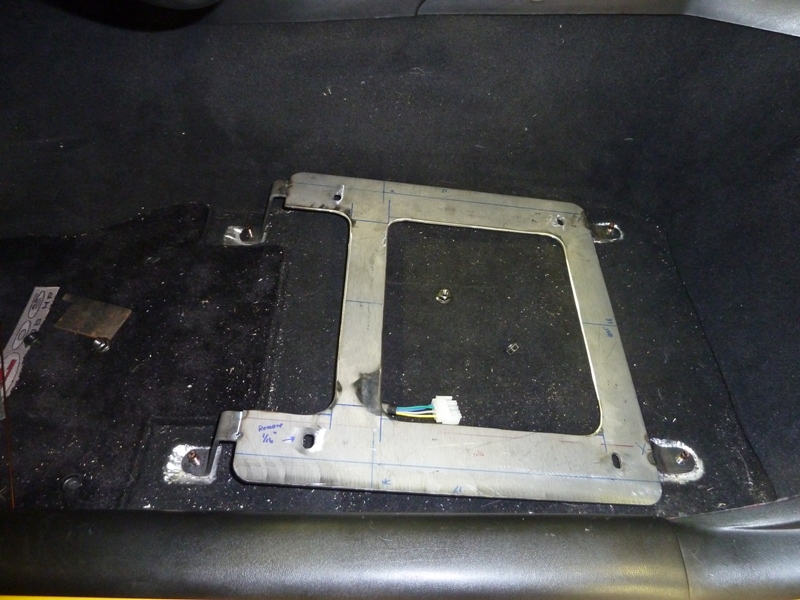
Mounts are tacked in place and checked for fit. I am 6' and 225 lbs so I needed the seat to be as far back as possible with this seat and as low as I could make it so I had helmet clearance.
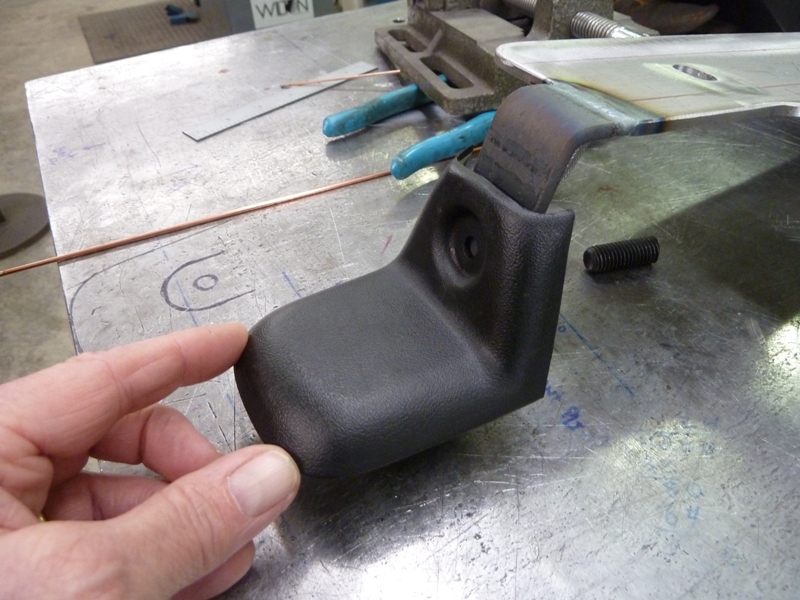
I wanted to use the stock trim piece that covers the front bolts so I fabbed up some L shaped brackets and welded them on. That and some drilled holes did the trick.
Next I milled slots in the main plate. I also cutout some areas to remove excess weight.
Mounts are tacked in place and checked for fit. I am 6' and 225 lbs so I needed the seat to be as far back as possible with this seat and as low as I could make it so I had helmet clearance.
I wanted to use the stock trim piece that covers the front bolts so I fabbed up some L shaped brackets and welded them on. That and some drilled holes did the trick.
Last edited by danh52; Mar 20, 2017 at 11:30 PM.
Thread Starter
Racer
Joined: Jul 2013
Posts: 450
Likes: 65
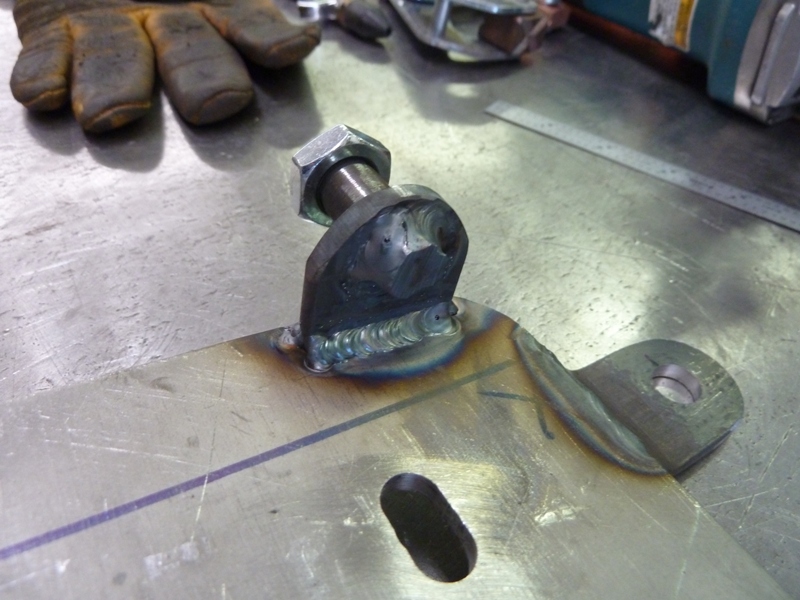
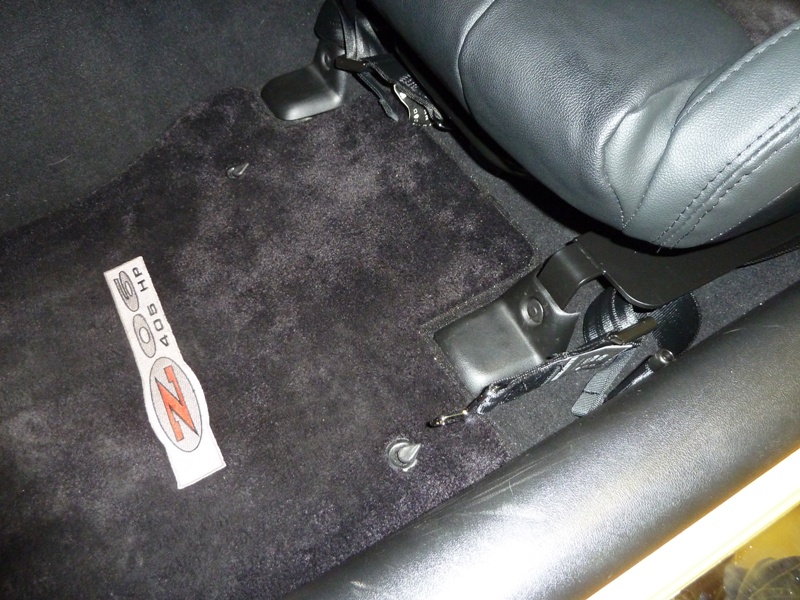
I fabbed a mount for the seat belt receiver. I didn't get any pictures of the belts installed but the stud is long enough to sandwich the belt receiver 2 nylon washers and the Schroth belt.
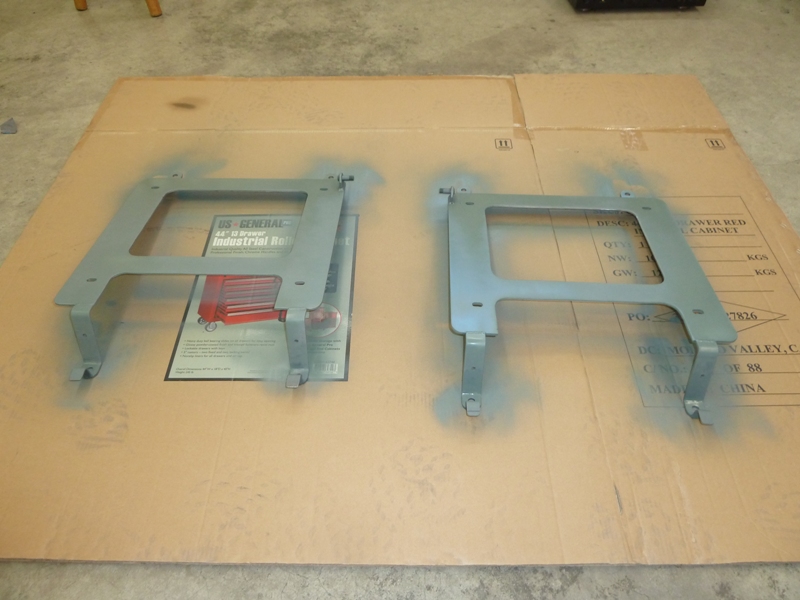
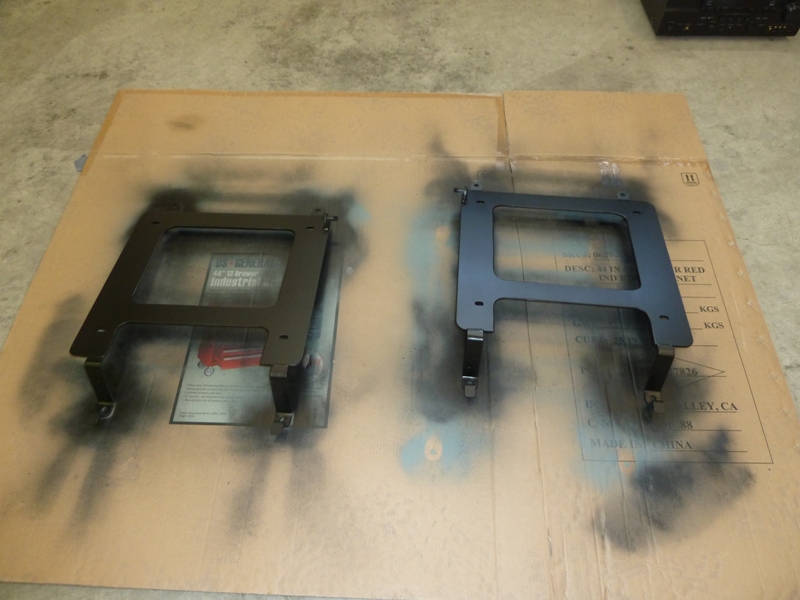
One down, next I duplicated the design for the passenger side. It's a mirror image so just rinse and repeat.
Some primer and black trim paint and the mounts are done.
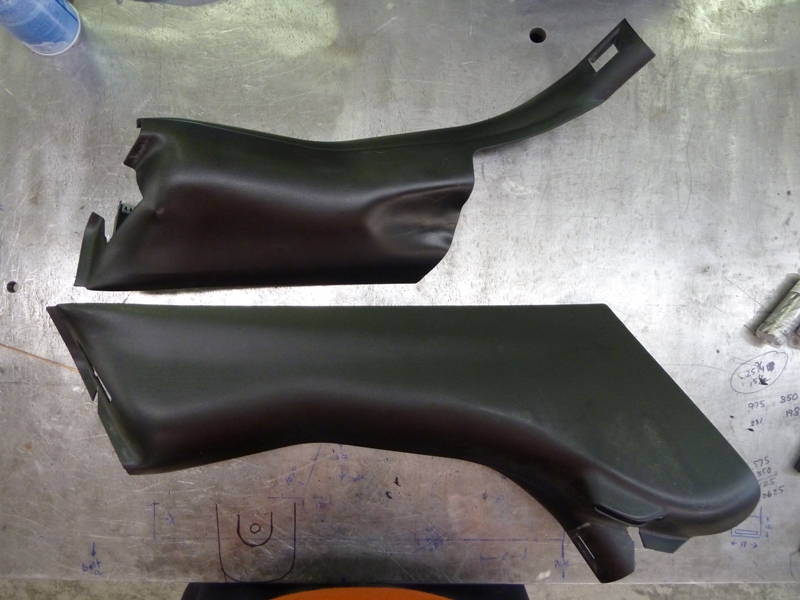
I modified the plastic trim panels to clear the seat adjust mechanism. This was a real pain to figure out requiring many test fits as I didn't want to cut too much. I also used a heat gun to form a recess to clean the seat back. In my case this is all hidden when the seat is in position.
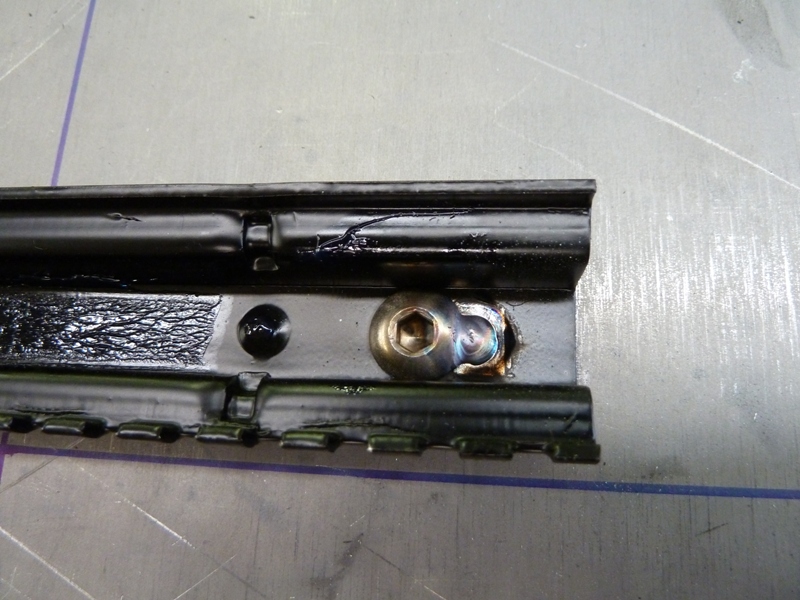
I also tack welded button head bolts to the seat tracks so I could tighten the nuts without a second wrench.
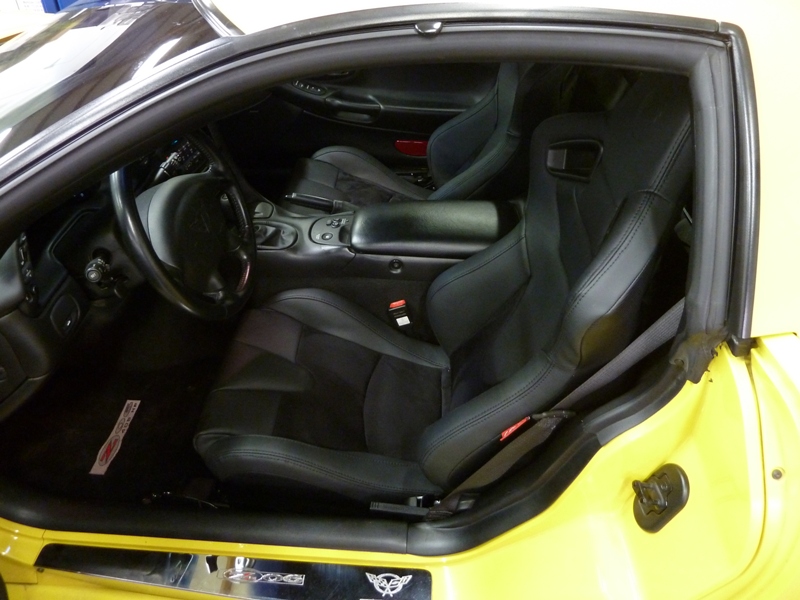
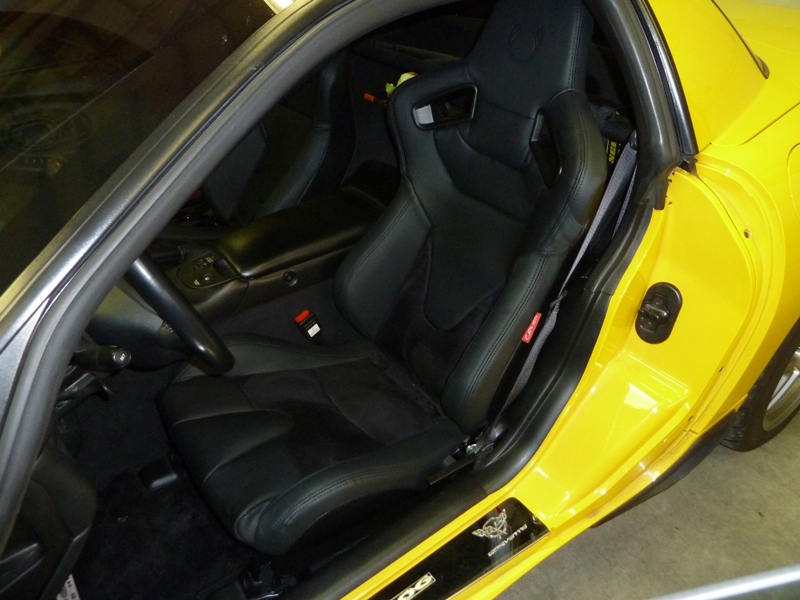
Both seats are in and look great. I have enough leg room and plenty of room for my helmet. Now if the rain would only stop for awhile I could try them out on the road.
One down, next I duplicated the design for the passenger side. It's a mirror image so just rinse and repeat.
Some primer and black trim paint and the mounts are done.
I modified the plastic trim panels to clear the seat adjust mechanism. This was a real pain to figure out requiring many test fits as I didn't want to cut too much. I also used a heat gun to form a recess to clean the seat back. In my case this is all hidden when the seat is in position.
I also tack welded button head bolts to the seat tracks so I could tighten the nuts without a second wrench.
Both seats are in and look great. I have enough leg room and plenty of room for my helmet. Now if the rain would only stop for awhile I could try them out on the road.
Last edited by danh52; Mar 20, 2017 at 11:42 PM.
Thread Starter
Racer
Joined: Jul 2013
Posts: 450
Likes: 65
Thanks for the comments.
My hobby is making things so buying brackets I can make was never a consideration. That said, it was a lot of work as I was designing as I went along. It would be easier to make a second set as I can copy the dimensions from the prototype versions. Not that I plan on making more. LOL
One feature I think the aftermarket should add to their offerings is the L shaped tab on the front feet that allows the use of the factory trim piece. It gives a more finished look to the install and is easy enough to add.

Racer
Joined: Aug 2015
Posts: 323
Likes: 68
From: Sacramento California
Thats the thing about spending thousands of dollars on tooling and developing the skills to use them. You can have things the way you want. It may end up costing way more and take two weeks but you got exactly what you wanted.
Corvette Stories
The Best of Corvette for Corvette Enthusiasts

Top 10 Most Expensive Corvettes Ever Sold on Bring A Trailer
Brett Foote
10 Things Every Corvette Owner Needs (2026 Edition)
Michael S. Palmer
8 Most "Only Corvette Owners Understand" Quirks and Problems
Pouria Savadkouei
10 Reasons the C6 Z06 is Still A Performance Benchmark After 20 Years
Joe Kucinski
How Much Horsepower Every Corvette Engine "LOST" in 1972
Joe Kucinski
Top 10 DOs and DON'Ts for Protecting Your Convertible Top!
Michael S. Palmer
Top 10 Most Explosive Corvettes Ever Made: Power-to-Weight Ratio Ranked!
Joe Kucinski
150 hp to 1,250 hp: Every Corvette Generation Compared by the Specs That Matter
Joe Kucinski
8 Coolest Corvette Pace Cars (and Replicas) of All Time
Verdad GallardoMelting Slicks


Joined: Nov 2004
Posts: 2,592
Likes: 393
St. Jude Donor 05-'06-'07-'08-'09-'10-'11-'12-'13-'14-'15-'16-'17
Dan, you should make me a set to help offset the cost of all your beautiful equipment.
If interested PM me a price. I'm not in a big hurry and could paypal in advance.
Thank you, Larry
PS I have a yellow 2004 Z06.
If interested PM me a price. I'm not in a big hurry and could paypal in advance.
Thank you, Larry
PS I have a yellow 2004 Z06.
Last edited by *C7*; Mar 21, 2017 at 09:09 PM. Reason: added car model
Thread Starter
Racer
Joined: Jul 2013
Posts: 450
Likes: 65
Thanks for the nice comments.
My brackets are made to fit the cipher seats using their bolt spacing and the seats themselves to determine the location of the slots. Fitting any other brand seat couldn't be confirmed by me (I don't have any others to try).
At this time I don't have any plans to make additional mounts but I hate to say never. Doing them the same way I did the first set would be cost prohibitive. Very labor intensive as all of the hand plasma cut edges had to be cleaned up with grinders and hand files.
If I was to do a larger run of parts I would put them put on cad and laser cut them. No clean up or machining required then. Without tooling there is still a lot of fit up required.

Drifting


Joined: Apr 2015
Posts: 1,893
Likes: 295
From: Buffalo NY
Very nice install, the front covers are a nice touch. I like the trick of using heat to mold that side panel, looks way nicer. I wish I had done that rather than cutting mine to fit the belts/seats.
Thread Starter
Racer
Joined: Jul 2013
Posts: 450
Likes: 65
Well, the weather has finely cooperated and it was dry enough to get some seat time today and I have some like's and some dislike's.
Like's:
The seats are very supportive and comfortable. Even during hard cornering and braking there wasn't any movement, very different from the stock seats. I'm 6' tall and 225 lbs with a large (read fat) waist and I have plenty of hip room, though the mid section of the seat back is tight.
Enough leg room for me, barely. Making my own seat mounts allowed me to put the seat where it had the most leg room. More on that later.
They look great.
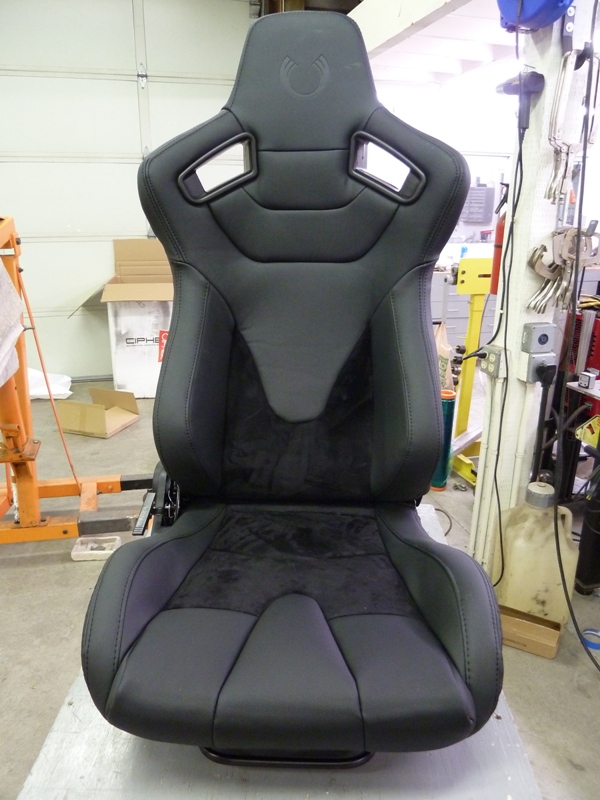
Very happy with the suede inserts, wish they were a little bigger.
Dislike's:
The seat is not aligned with the center of the steering wheel. Due to the way the tunnel tapers, as the seat is pushed back it runs into the tunnel. To get the maximum leg room the seat had to move toward the door enough to be noticeable when driving. I moved the steering wheel further away than it was with the stock seats and that helped. A smaller diameter steering wheel would also help with the ergonomics, it's on the list of mods to complete before the summer track season. It's not a deal breaker for me at this point, I need to get more time driving before doing anything about it.
My upper back got a little sweaty, above the suede area where it's PVC. Not surprising since it won't breathe like leather. That's where more suede would be an improvement.
This seat must be wider or a different shape than other seats that look similar (such as Corbeau Evolution X) causing the fit issues at the back of the seat. It can work for up to 6' tall driver but not so much for taller ones.
Like's:
The seats are very supportive and comfortable. Even during hard cornering and braking there wasn't any movement, very different from the stock seats. I'm 6' tall and 225 lbs with a large (read fat) waist and I have plenty of hip room, though the mid section of the seat back is tight.
Enough leg room for me, barely. Making my own seat mounts allowed me to put the seat where it had the most leg room. More on that later.
They look great.
Very happy with the suede inserts, wish they were a little bigger.
Dislike's:
The seat is not aligned with the center of the steering wheel. Due to the way the tunnel tapers, as the seat is pushed back it runs into the tunnel. To get the maximum leg room the seat had to move toward the door enough to be noticeable when driving. I moved the steering wheel further away than it was with the stock seats and that helped. A smaller diameter steering wheel would also help with the ergonomics, it's on the list of mods to complete before the summer track season. It's not a deal breaker for me at this point, I need to get more time driving before doing anything about it.
My upper back got a little sweaty, above the suede area where it's PVC. Not surprising since it won't breathe like leather. That's where more suede would be an improvement.
This seat must be wider or a different shape than other seats that look similar (such as Corbeau Evolution X) causing the fit issues at the back of the seat. It can work for up to 6' tall driver but not so much for taller ones.
Drifting

Joined: Oct 2008
Posts: 1,595
Likes: 191
From: Wilmington DE
Damn great work I wish I had access to all that equipment. The tab for the bolt covers is a nice touch.
Me being shorter I was able to keep mine tighter against the tunnel keeping it centered. A new smaller steering wheel will help as well plus will complete the package of feel on the road
Me being shorter I was able to keep mine tighter against the tunnel keeping it centered. A new smaller steering wheel will help as well plus will complete the package of feel on the road