
Catch-can Installation Instructions

Thread Starter
Melting Slicks


Joined: Jul 2004
Posts: 2,340
Likes: 35
From: Folsom Lake CA
I've been getting quite a few requests on how I installed my catch-can, so I started a new thread to help my brethren. I apologize to those for whom I am beating a dead horse. If it's a Mustang that I'm beating, would that at least garner your forgiveness? 
Preface
Here are my instructions for installing a catch-can. While I installed an AMW can in these instructions, you can install just about any can this way. Read these instructions in their entirety before proceeding, in case you need to get some extra little parts or hose. The one thing I hate is having to stop in the middle of a project to get some stupid little parts!
Note that a catch-can gets installed "inline" in the PCV system. In other words, the can is really a filter, thus, do NOT use a T connector to try to split the airflow to the catch-can. The can MUST be installed inline to filter the PCV vapors.
Getting Started
While first reading these instructions, try to visualize if you'll need any hose clamps or connectors. I needed two connectors; I opted for 1/2" brass connectors for a snugger-than-stock fit, even though the hose sizes are 3/8". I also got a bag of hose clamps to fit the 3/8" hose, even though my kit came with some of those spring-type clamps. You can never have too many clamps, right? (Go, Home Depot stock!)
Note that I also included some variations on plumbing below, as well. Although I originally used just rubber hose (the AMW kit includes hose), I later got some aluminum tubing from a hardware store to use as hard tubing in some places instead. I didn't NEED to do it; I just did it because I could! :-) I must've been in DIY mode at the time, because when I came across the metal tubing at the hardware store one day, I thought it would be cool to run the metal tubing in some places. With that said, here goes:
Mounting the Catch-can
First, mount the catch-can. Do this first so that when "plumbing" to it, you can cut your hoses perfectly. Mount it loosely at this point, because you might want to remove it again to give yourself room to route your hoses, once you've measured your hose distance.
To give yourself more room to mount the catch-can, loosen the bolt that clamps down on the front lower edge of the battery (the clamp holds the battery in place). Slide the battery toward the fender (there's plenty of room to slide the battery and still have the battery within the confines of the battery tray). I moved my battery as far to the right-side of the car as possible. Tighten the bolt.
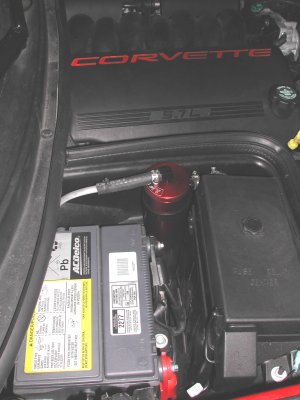
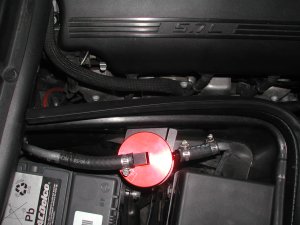
You want to mount the catch-can along the battery side of the wall that separates the battery from the engine compartment, which will keep it cooler than if it was mounted directly inside the engine compartment. The cooler the better for optimum oil extraction from the PCV vapors. This location will also make it super easy to remove and drain. The optimum location is on the wall in the gap between the battery and the computer housing. This may be a stupid note, but be sure to position the can vertically because it won't work effectively in any other position, and I've heard of people mounting these cans horizontally, then later wondering why there was still oil going into their intakes!
See the pics below for correct vertical positioning of the unit, and what I believe to be an excellent location. Rather than using the self-tapping screws included in the AMW kit, I used bolts and nuts to attach the can to the battery compartment separator.
Routing Your Hose/Plumbing
The stock PCV routing consists of 3 hoses: two rubber hoses, a hard plastic hose, and the PCV valve itself, which is located on the passenger side of the intake manifold, up by the throttle body.
All three hoses connect at a Y connector located behind the intake near the firewall. Each rubber hose goes from the Y connector directly into the valve covers. The hard plastic hose goes from the Y connector along the passenger side of the intake manifold to the PCV valve.
Remove the hard plastic hose that runs from the PCV valve on the passenger side of the intake manifold to the Y connector behind the intake. All you do is pull it out of the PCV valve rubber boot, leaving the PCV valve right where it is, then pull the other end of the plastic hose straight out of the Y connector at the rear of the intake. Note to all the ADD people (like me): Try not to just yank violently on the hard plastic hose to disconnect it from the Y connector, because you don't want to cause the Y connector work some nearby vaccum and electrical connections loose. Although you can actually disconnect the other two hoses from the Y connector to get the Y connector itself out from behind the intake if you like, I just pulled the hard plastic hose right out of the Y connector, and left the Y connector in place.
I bought two 1/2" brass barbed connectors at the hardware store, attached 3/8" rubber hose I already had (you can use the hose that comes with the AMW kit) to the brass connector, and simply stuck the other end of the brass connector into the Y connector where I removed the hard plastic hose. I then ran the rubber hose to the battery compartment wall that separates the battery compartment from the engine bay. I threaded the rubber hose between the battery compartment separator and the firewall, then ran it to the catch-can.
Here is a variation: You can cut the hose right before you route it under the battery compartment wall, and attach to the hose a piece of 3/8" metal tubing (which you can get cheap at a hardware store), then route the metal tubing between the battery compartment separator and the firewall (the hardware store also sells a cheap tool for bending metal tubing). Bend the tubing toward the front of the car, so that it comes forward up along the battery compartment side of the separator. Attach another smaller piece of the rubber 3/8" hose to the end of the metal tubing near the catch-can, and slide that rubber hose over the input connector on the catch-can.
I inserted the other brass connector into the PCV valve boot, connected some rubber hose to that brass connector, then ran the hose under the front part of the battery compartment separator and up to the output side of the catch-can.
Another variation: Again, you can cut the rubber hose right at the front of the battery compartment separator. Add another short piece of metal tubing, route it under the front part of the battery compartment separator and bend it up toward the rear of the car. Use another small piece of rubber hose to connect the metal tubing to the output side of the catch-can.
Rather than just leave the hard plastic hose sitting unattached along the passenger side of the intake, I removed it and saved it in case I ever want to put the system back to stock and let oil get back into my intake.
If you want more details, just ask. :-)
Preface
Here are my instructions for installing a catch-can. While I installed an AMW can in these instructions, you can install just about any can this way. Read these instructions in their entirety before proceeding, in case you need to get some extra little parts or hose. The one thing I hate is having to stop in the middle of a project to get some stupid little parts!
Note that a catch-can gets installed "inline" in the PCV system. In other words, the can is really a filter, thus, do NOT use a T connector to try to split the airflow to the catch-can. The can MUST be installed inline to filter the PCV vapors.
Getting Started
While first reading these instructions, try to visualize if you'll need any hose clamps or connectors. I needed two connectors; I opted for 1/2" brass connectors for a snugger-than-stock fit, even though the hose sizes are 3/8". I also got a bag of hose clamps to fit the 3/8" hose, even though my kit came with some of those spring-type clamps. You can never have too many clamps, right? (Go, Home Depot stock!)
Note that I also included some variations on plumbing below, as well. Although I originally used just rubber hose (the AMW kit includes hose), I later got some aluminum tubing from a hardware store to use as hard tubing in some places instead. I didn't NEED to do it; I just did it because I could! :-) I must've been in DIY mode at the time, because when I came across the metal tubing at the hardware store one day, I thought it would be cool to run the metal tubing in some places. With that said, here goes:
Mounting the Catch-can
First, mount the catch-can. Do this first so that when "plumbing" to it, you can cut your hoses perfectly. Mount it loosely at this point, because you might want to remove it again to give yourself room to route your hoses, once you've measured your hose distance.
To give yourself more room to mount the catch-can, loosen the bolt that clamps down on the front lower edge of the battery (the clamp holds the battery in place). Slide the battery toward the fender (there's plenty of room to slide the battery and still have the battery within the confines of the battery tray). I moved my battery as far to the right-side of the car as possible. Tighten the bolt.
You want to mount the catch-can along the battery side of the wall that separates the battery from the engine compartment, which will keep it cooler than if it was mounted directly inside the engine compartment. The cooler the better for optimum oil extraction from the PCV vapors. This location will also make it super easy to remove and drain. The optimum location is on the wall in the gap between the battery and the computer housing. This may be a stupid note, but be sure to position the can vertically because it won't work effectively in any other position, and I've heard of people mounting these cans horizontally, then later wondering why there was still oil going into their intakes!
See the pics below for correct vertical positioning of the unit, and what I believe to be an excellent location. Rather than using the self-tapping screws included in the AMW kit, I used bolts and nuts to attach the can to the battery compartment separator.
Routing Your Hose/Plumbing
The stock PCV routing consists of 3 hoses: two rubber hoses, a hard plastic hose, and the PCV valve itself, which is located on the passenger side of the intake manifold, up by the throttle body.
All three hoses connect at a Y connector located behind the intake near the firewall. Each rubber hose goes from the Y connector directly into the valve covers. The hard plastic hose goes from the Y connector along the passenger side of the intake manifold to the PCV valve.
Remove the hard plastic hose that runs from the PCV valve on the passenger side of the intake manifold to the Y connector behind the intake. All you do is pull it out of the PCV valve rubber boot, leaving the PCV valve right where it is, then pull the other end of the plastic hose straight out of the Y connector at the rear of the intake. Note to all the ADD people (like me): Try not to just yank violently on the hard plastic hose to disconnect it from the Y connector, because you don't want to cause the Y connector work some nearby vaccum and electrical connections loose. Although you can actually disconnect the other two hoses from the Y connector to get the Y connector itself out from behind the intake if you like, I just pulled the hard plastic hose right out of the Y connector, and left the Y connector in place.
I bought two 1/2" brass barbed connectors at the hardware store, attached 3/8" rubber hose I already had (you can use the hose that comes with the AMW kit) to the brass connector, and simply stuck the other end of the brass connector into the Y connector where I removed the hard plastic hose. I then ran the rubber hose to the battery compartment wall that separates the battery compartment from the engine bay. I threaded the rubber hose between the battery compartment separator and the firewall, then ran it to the catch-can.
Here is a variation: You can cut the hose right before you route it under the battery compartment wall, and attach to the hose a piece of 3/8" metal tubing (which you can get cheap at a hardware store), then route the metal tubing between the battery compartment separator and the firewall (the hardware store also sells a cheap tool for bending metal tubing). Bend the tubing toward the front of the car, so that it comes forward up along the battery compartment side of the separator. Attach another smaller piece of the rubber 3/8" hose to the end of the metal tubing near the catch-can, and slide that rubber hose over the input connector on the catch-can.
I inserted the other brass connector into the PCV valve boot, connected some rubber hose to that brass connector, then ran the hose under the front part of the battery compartment separator and up to the output side of the catch-can.
Another variation: Again, you can cut the rubber hose right at the front of the battery compartment separator. Add another short piece of metal tubing, route it under the front part of the battery compartment separator and bend it up toward the rear of the car. Use another small piece of rubber hose to connect the metal tubing to the output side of the catch-can.
Rather than just leave the hard plastic hose sitting unattached along the passenger side of the intake, I removed it and saved it in case I ever want to put the system back to stock and let oil get back into my intake.
If you want more details, just ask. :-)
Last edited by MrLeadFoot; Nov 16, 2004 at 05:01 PM.
Instructor

Joined: Nov 2004
Posts: 200
Likes: 0
I did something similar to this for both of my cars but I went for a more affordable solution. I purchased a fuel filter for $3.95 bucks and it works just fine catching that pesky oil.
The Acura likes to spill a bit more oil than the Vette does which is barely nothing.
The Acura likes to spill a bit more oil than the Vette does which is barely nothing.


