
PCM not reading Oxygen Sensors?
 04-17-2010, 06:56 PM
#1
Heel & Toe

Thread Starter

Member Since: Apr 2005
Location: Glenn Dale Maryland
Posts: 21
Likes: 0
Received 0 Likes
on
0 Posts

Hello, I have a ’99 Vette 6spd with modest (not radical) engine mods and the LG Pro long tube headers. Last Summer it was running fine but come Fall it started to run poorly with a very obvious rich fuel smell. I checked my codes and got P0134 (HO2S Circuit Insufficient Activity Bank 1 Sensor 1) and P0154 (HO2S Circuit Insufficient Activity Bank 2 Sensor 1). So I replaced my Oxygen Sensors which resulted in no improvement. Fed up, I just winterized the car and left it for next Spring.
Well, it is next Spring. I have the AutoEnginuity ScanTool and hooked it up and monitored my front two Oxygen Sensors (the rear two have been shut off), and the scan tool indicates that both are reading 0.45vdc and not fluctuating at all. I have disconnected the Oxygen Sensors and connected a volt meter to them and get a voltage from 0.1 to 0.9 vdc dependent upon the acceleration of the vehicle. That tells me the Oxygen Sensors are working (and the fact they are new after replacing them last year), but the PCM is simply not reading them. So clearly there is some disconnect between the Oxygen Sensors and the PCM.
To further clarify what is at fault, I connected a O2 Simulator that I have and an odd thing happened, the PCM sees the damn thing showing an oscillating voltage from 0.1 to 0.9 vdc (as seen on my AutoEnginuity ScanTool). Scratching my head, I grab one of my older Oxygen Sensors, connect up a volt meter and hit the tip with my propane torch. The result being that it reads between 0.1 to 0.9 vdc dependent upon how close I have the flame to the Oxygen Sensor’s tip.
Seeing that this bench tested sensor is generating voltage, I temporarily connect it to the passenger front Oxygen Sensor connection to the PCM (letting the bench tested Oxygen Sensor dangle) and do the same bench test again with my propane torch. All I see from the PCM (via my AutoEnginuity ScanTool) is an unfluctuating 0.45 vdc – no good. So I connect back up my O2 Simulator, and I get the oscillating 0.1 to 0.9 vdc signal again. WTF?!?!
How can my PCM be reading an O2 Simulator, but not a slew of new and bench tested Oxygen Sensors. Someone please clue me in here. Thanks, -blake
Last edited by Blakeman; 04-21-2010 at 01:05 AM.
 04-19-2010, 01:26 PM
#2
Former Vendor
check the fuse box - there is an O2 fuse and it sounds like yours has bit the dust - of course, if that's it, you need to diagnose what condition blew the fuse
Hello, I have a �99 Vette 6spd with modest (not radical) engine mods and the LG Pro long tube headers. Last Summer it was running fine but come Fall it started to run poorly with a very obvious rich fuel smell. I checked my codes and got P0134 (HO2S Circuit Insufficient Activity Bank 1 Sensor 1) and P0154 (HO2S Circuit Insufficient Activity Bank 2 Sensor 1). So I replaced my Oxygen Sensors which resulted in no improvement. Fed up, I just winterized the car and left it for next Spring.
Well, it is next Spring. I have the AutoEnginuity ScanTool and hooked it up and monitored my front two Oxygen Sensors (the rear two have been shut off), and the scan tool indicates that both are reading 0.45vdc and not fluctuating at all. I have disconnected the Oxygen Sensors and connected a volt meter to them and get a voltage from 0.1 to 0.9 vdc dependent upon the acceleration of the vehicle. That tells me the Oxygen Sensors are working (and the fact they are new after replacing them last year), but the PCM is simply not reading them. So clearly there is some disconnect between the Oxygen Sensors and the PCM.
To further clarify what is at fault, I connected a O2 Simulator that I have and an odd thing happened, the PCM sees the damn thing showing an oscillating voltage from 0.1 to 0.9 vdc (as seen on my AutoEnginuity ScanTool). Scratching my head, I grab one of my older Oxygen Sensors, connect up a volt meter and hit the tip with my propane torch. The result being that it reads between 0.1 to 0.9 vdc dependent upon how close I have the flame to the Oxygen Sensor�s tip.
Seeing that this bench tested sensor is generating voltage, I temporarily connect it to the passenger front Oxygen Sensor connection to the PCM (letting the bench tested Oxygen Sensor dangle) and do the same bench test again with my propane torch. All I see from the PCM (via my AutoEnginuity ScanTool) is an unfluctuating 0.45 vdc � no good. So I connect back up my O2 Simulator, and I get the oscillating 0.1 to 0.9 vdc signal again. WTF?!?!
How can my PCM be reading an O2 Simulator, but not a slew of new and bench tested Oxygen Sensors. Someone please clue me in here. Thanks, -blake
04-19-2010, 02:47 PM
#3
Heel & Toe
Thread Starter
Member Since: Apr 2005
Location: Glenn Dale Maryland
Posts: 21
Likes: 0
Received 0 Likes
on
0 Posts
If there is another fuse you think I should check, please let me know. Thanks for the suggestion, -blake
Last edited by Blakeman; 04-19-2010 at 02:50 PM.
04-19-2010, 09:59 PM
#4
Tech Contributor


Member Since: Dec 1999
Location: Anthony TX
Posts: 32,736
Received 2,180 Likes
on
1,583 Posts
CI 6,7,8,9,11 Vet
St. Jude Donor '08

What does the heater ground read to chassis ground???????????
BC
BC
04-20-2010, 03:34 PM
#6
Le Mans Master

Member Since: Aug 2005
Location: CA.
Posts: 5,255
Likes: 0
Received 281 Likes
on
258 Posts
St. Jude Donor '13-'14-'15
Your inherent problem lies with your LT headers--- Long tubes are illegal in most states because the 02 bung locations are moved further back then they were with the stock manifolds-- This gives you erroneous 02 voltage readings and typically makes you engine run way rich in closed loop---H/C goes way up and it won't pass smog---
If your 02's are flatlined at .450 and you can verify that the fuse is Ok then the 02's are fouled and junk----An 02 will foul permanently sometimes only after 50-100 miles of driving when they aren't heating up properly or switching prperly---Many people will replace the FRONT 02's with the REAR 02's off a C5---The rear ones are much more sensitive and will heat up and switch better ( due to there stock location way back on the exhaust) Tuning can help with getting your 02's to work better--but it is difficult and no one really knows exactly to tune them----I have had some success with lowering the 02 "switching point" table ---Yout actual C/L AFR with LT's may be like in the 14.2 range--you have to find a way ( for example) to trick your ECM by commanding a leaner 15.2 in order to achieve the stoich. 14.68
ALSO for cold starts--With LT's you need to lean out the "commanded AFR in open loop normal" somewhat to help it start better -- i usually will add .25 to .45 in the cold start coolant temp ranges--- The ECM uses this table for all starts and sometimes as a default table in PE
04-20-2010, 05:59 PM
#7
Melting Slicks


Are you using O2 extenders? If so, check your voltage after the extenders, where it connects to the vehicle's harness. Also, while you're there, look VERY CAREFULLY at the female pins in the connectors. They are famous for spreading open, causing an open circuit. And, incidentally, 445 mv is exactly what your scanner will read with an open circuit. Unplug them, and look at your scanner. If I had to guess, these female pins are spread open.
04-21-2010, 01:23 AM
#8
Heel & Toe
Thread Starter
Member Since: Apr 2005
Location: Glenn Dale Maryland
Posts: 21
Likes: 0
Received 0 Likes
on
0 Posts
Gents, I would suggest reading my first post again as it answers some of your questions and negates some of your proposed issues.
No, I am not using O2 extenders. I am using a set of the longer rear O2 Sensors and have replaced the factory front flat O2 connectors with the square O2 connectors that fit the rear O2 Sensors. And yes, they have air tight connections and are not incorrectly wired.
I am pondering if there is a current issue � as in, I can get good voltages from these sensors, but the PCM may need more amperage from them. Anyone ever hear of some silly issue like that? Anyone ever hear of the PCM going bad and not reading the O2 Sensors correctly?
Thanks for the suggestions guys, -blake
- I have measured the heater voltage and it is good.
- I have bench tested a spare O2 Sensor that proved good, then connected it to the front O2 connections letting it dangle and after turning on the ignition switch and waiting a minute, the O2 Sensor got very warm (too hot to touch). I then used my propane torch to increase and decrease the voltage level of the O2 Sensor � just like I did on the bench with my voltage meter and I got no fluctuation when looking at my AutoEnginuity ScanTool.
- I have connected a simulator to the front O2 connections and verified oscillating voltages, thus determining that my connection, pins, and wiring are good.
- My Vette ran fine all last summer on these same LG Pro long tube headers, and yes the O2 Sensors worked fine in them.
No, I am not using O2 extenders. I am using a set of the longer rear O2 Sensors and have replaced the factory front flat O2 connectors with the square O2 connectors that fit the rear O2 Sensors. And yes, they have air tight connections and are not incorrectly wired.
I am pondering if there is a current issue � as in, I can get good voltages from these sensors, but the PCM may need more amperage from them. Anyone ever hear of some silly issue like that? Anyone ever hear of the PCM going bad and not reading the O2 Sensors correctly?
Thanks for the suggestions guys, -blake
04-21-2010, 08:27 AM
#9
Melting Slicks
I am pondering if there is a current issue � as in, I can get good voltages from these sensors, but the PCM may need more amperage from them. Anyone ever hear of some silly issue like that? Anyone ever hear of the PCM going bad and not reading the O2 Sensors correctly?
Thanks for the suggestions guys, -blake
Thanks for the suggestions guys, -blake
Can you post a scanner screen shot of the O2s in the car and operational? I'd like to see exactly what they look like. Idling and going down the road if possible.
04-21-2010, 09:11 AM
#10
Heel & Toe
Thread Starter
Member Since: Apr 2005
Location: Glenn Dale Maryland
Posts: 21
Likes: 0
Received 0 Likes
on
0 Posts
Well, it is simple enough without the screen shot. Both HO2S Bank 1 Sensor 1 & HO2S Bank 2 Sensor 2 show a dead flat-line of 0.45 vdc. No dancing what so ever regardless of idling or cruising down the road. I have yet to verify what the voltages do while the vehicle is on fire, but I am contemplating it...
If I connect up the O2 simulator - that throws out good voltages like the HO2S are supposed to do - which is the thing throwing me off. Why is the simulator being read, and not the O2 Sensors, particularly a good bench tested one?
I am thinking about rigging up a voltage divider with a potentiometer so I can variate the voltage potential (0 to 1 vdc) on pins A (HO2S Low) and B (HO2S High). See if my little PITA PCM can pick that up.
Thanks, -blake
Last edited by Blakeman; 04-21-2010 at 09:17 AM.
04-21-2010, 12:56 PM
#11
Le Mans Master
Member Since: Aug 2005
Location: CA.
Posts: 5,255
Likes: 0
Received 281 Likes
on
258 Posts
St. Jude Donor '13-'14-'15
If you have access to a wideband---try connecting the wideband 02 into one of the front 02 bungs- See if it works there - If it does work-that should eliminate any grounding diagnosis---
04-21-2010, 02:34 PM
#12
Melting Slicks
Well, it is simple enough without the screen shot. Both HO2S Bank 1 Sensor 1 & HO2S Bank 2 Sensor 2 show a dead flat-line of 0.45 vdc. No dancing what so ever regardless of idling or cruising down the road. I have yet to verify what the voltages do while the vehicle is on fire, but I am contemplating it...
Yes, the LGs are known for causing slow response issues and codes, but the O2s will still vary +/- from 445mv.
04-21-2010, 05:17 PM
#13
Tech Contributor
Member Since: Dec 1999
Location: Anthony TX
Posts: 32,736
Received 2,180 Likes
on
1,583 Posts
CI 6,7,8,9,11 Vet
St. Jude Donor '08
Im trying to think out of the box so, bare with me:
- Do you have ANY other DTCs??
- Is your battery voltage ENGINE RUNNING in SPEC?
- Does everything else in the car work normaly?
BC
- Do you have ANY other DTCs??
- Is your battery voltage ENGINE RUNNING in SPEC?
- Does everything else in the car work normaly?
BC
04-21-2010, 07:14 PM
#14
Heel & Toe
Thread Starter
Member Since: Apr 2005
Location: Glenn Dale Maryland
Posts: 21
Likes: 0
Received 0 Likes
on
0 Posts
OK, I will start from the beginning again this weekend on my troubleshooting and diagnosis. Thus I will:
Thanks, -blake
- Verify proper battery and charging voltage levels.
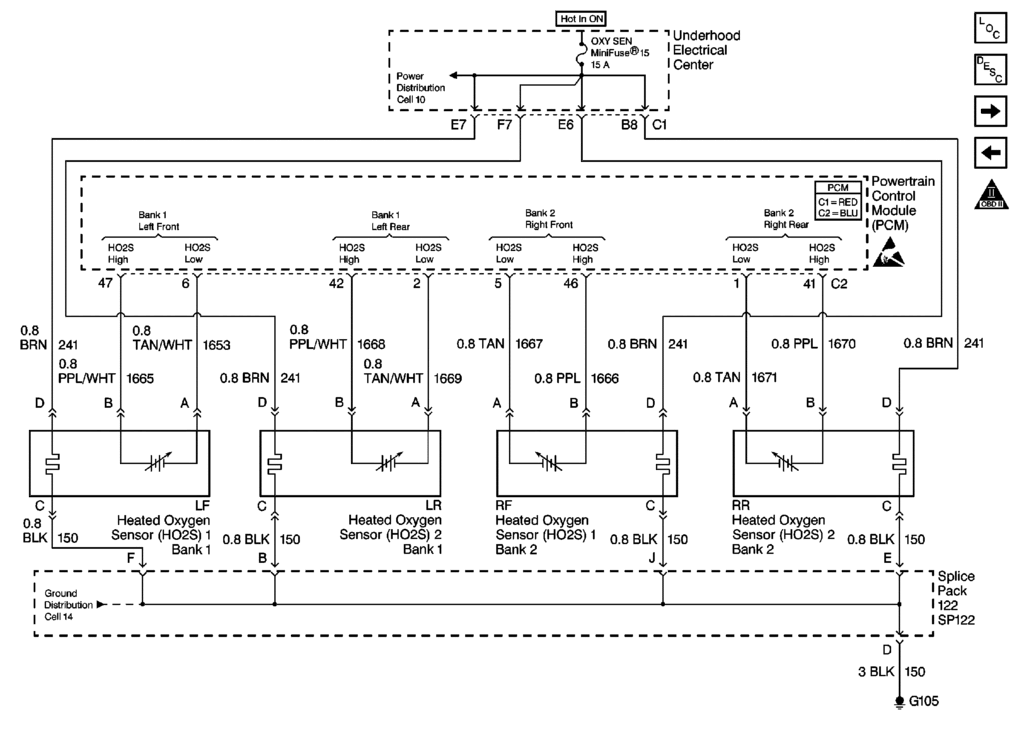
- Verify the wiring is correct and not open or intermittent. Does anyone have a schematic or pinout that definitively tells me where the other end of the four O2 Sensor connector wires go to. As I understand it, A & B go to the PCM, C goes to a ground distribution cell, and D goes to the fuse panel. Further clarity would be greatly appreciated.
- When wiring has been verified good, then recheck the voltage level to the O2 Sensor heater.
- Verify that the PCM connections are good? Anyone know what the static resistance should be across pins A & B on the O2 Sensor connector? I was also debating on running by Radio Shack and building myself a voltage divider – rheostat circuit that I can adjust from 0 to 1 vdc. Any other thoughts on how to induce a O2 voltage to the PCM? I do have a simulator and many O2 Sensors I can test with.
- Any other thoughts?
Thanks, -blake
04-21-2010, 07:35 PM
#15
Tech Contributor
Member Since: Dec 1999
Location: Anthony TX
Posts: 32,736
Received 2,180 Likes
on
1,583 Posts
CI 6,7,8,9,11 Vet
St. Jude Donor '08
Any other DTCs showing on any modules???
BC
BC
04-21-2010, 07:40 PM
#16
Tech Contributor
Member Since: Dec 1999
Location: Anthony TX
Posts: 32,736
Received 2,180 Likes
on
1,583 Posts
CI 6,7,8,9,11 Vet
St. Jude Donor '08
 04-21-2010, 07:49 PM
#17
Tech Contributor
Member Since: Dec 1999
Location: Anthony TX
Posts: 32,736
Received 2,180 Likes
on
1,583 Posts
CI 6,7,8,9,11 Vet
St. Jude Donor '08
DTC P0134 or P0154
Circuit Description
The powertrain control module (PCM) supplies a voltage of approximately 450 mV between the heated oxygen sensor (HO2S) high and low signal circuits. The heated oxygen sensor varies the voltage from approximately 1,000 mV when the exhaust is rich, to approximately 10 mV when the exhaust is lean.
The PCM monitors and stores the heated oxygen sensor (HO2S) voltage information. The PCM evaluates the HO2S voltage samples in order to determine the time that the HO2S voltage was out of range. The PCM compares the stored HO2S voltage samples taken within each sample period, and determines if the majority of the samples are out of the operating range.
The PCM monitors the HO2S voltage and detects if the voltage goes out of the bias range. If the PCM does not detect that the voltage went out of the bias range, a DTC sets.
Conditions for Running the DTC
DTCs P0101, P0102, P0103, P0106, P0107, P0108, P0112, P0113, P0116, P0117, P0118, P0200, P0300, P0410, P0440, P0442, P0446, P0452, P0453, P1120, P1125, P1220, P1221, P1258, P1415, P1416, P1441, P1514, P1515, P1516, P1517, or P1518 are not set.
The ignition 1 signal is between 9-18 volts.
The loop status is Closed.
Intrusive tests are not in progress.
Scan tool output controls are not active.
The engine run time is more than 409 seconds.
Conditions for Setting the DTC
The HO2S signal voltage remains between 350-550 mV.
The conditions are present for 60 seconds.
Action Taken When the DTC Sets
The control module illuminates the malfunction indicator lamp (MIL) on the second consecutive ignition cycle that the diagnostic runs and fails.
The control module records the operating conditions at the time the diagnostic fails. The first time the diagnostic fails, the control module stores this information in the Failure Records. If the diagnostic reports a failure on the second consecutive ignition cycle, the control module records the operating conditions at the time of the failure. The control module writes the operating conditions to the Freeze Frame and updates the Failure Records.
The control module commands open loop.
Conditions for Clearing the MIL/DTC
The control module turns OFF the malfunction indicator lamp (MIL) after 3 consecutive ignition cycles that the diagnostic runs and does not fail.
A current DTC, Last Test Failed, clears when the diagnostic runs and passes.
A history DTC clears after 40 consecutive warm-up cycles, if no failures are reported by this or any other emission related diagnostic.
Clear the MIL and the DTC with a scan tool.
Diagnostic Aids
Important
Before you service the PCM and throttle actuator control (TAC) module, remove any debris from the module connector surfaces. Inspect the module connector gaskets when you diagnose or replace the modules. Ensure that the gaskets are installed correctly. The gaskets prevent contaminate intrusion into the modules.
Use the J 35616-A Connector Test Adapter Kit for any test that requires probing the PCM or probing a component harness connector. Using this kit prevents damage to the harness and component terminals. Refer to Using Connector Test Adapters in Wiring Systems.
An oxygen supply inside the HO2S is necessary for proper operation. The HO2S wires provide the supply of oxygen. Inspect the HO2S wires and connections for breaks or contamination. Refer to Testing for Intermittent and Poor Connections in Wiring Systems.
For an intermittent condition, refer to Intermittent Conditions .
Test Description
The numbers below refer to the step numbers on the diagnostic table.
The engine must be at the normal operating temperature before you perform this test.
Using the Freeze Frame and/or Failure Records data may help to locate an intermittent condition. If you cannot duplicate the DTC, the information included in the Freeze Frame and/or Failure Records data can help to determine how many miles since the DTC set. The Fail Counter and Pass Counter can also be used to determine the number of ignition cycles in which the diagnostic reported a pass and/or a fail. Operate the vehicle within the same freeze frame conditions that the PCM recorded, including the RPM, the vehicle load, the vehicle speed, and the temperature. This procedure isolates when the DTC failed.
If the scan tool indicates the HO2S voltage goes below 200 mV, this indicates the HO2S circuits and PCM are OK.
This step verifies whether the low signal circuit from the PCM is OK. A voltage indicates the PCM and wiring are OK.
This step verifies whether the signal circuit from the PCM is OK.
Disconnecting the PCM allows using a DMM in order to test the circuit continuity. This procedure helps to locate an open or a shorted circuit.
Step
Action
Values
Yes
No
Schematic Reference: Engine Controls Schematics
1
Did you perform the Diagnostic System Check-Engine Controls?
--
Go to Step 2
Go to Diagnostic System Check - Engine Controls
2
Important
Inspect the HO2S for being secure before proceeding with this DTC. A loose sensor could cause this DTC to set.
Install a scan tool.
Start the engine and idle the engine at the normal operating temperature.
Operate the engine above 1200 RPM for 2 minutes.
Observe the HO2S voltage on the scan tool.
Does the HO2S voltage vary outside the specified range?
350-550 mV
Go to Step 3
Go to Step 4
3
Observe the Freeze Frame/Failure Records data for this DTC.
Turn OFF the ignition for 30 seconds.
Start the engine.
Operate the vehicle within the Conditions for Running the DTC as specified in the supporting text or as close to the Freeze Frame/Failure Records data that you observed.
Does the DTC fail this ignition?
--
Go to Step 4
Go to Intermittent Conditions
4
Turn ON the ignition with the engine OFF.
Disconnect the HO2S.
Jumper the HO2S high signal circuit to a known good ground.
Jumper the HO2S low signal circuit to a known good ground.
Use the scan tool in order to monitor the HO2S voltage.
Is the HO2S voltage below the specified value?
200 mV
Go to Step 8
Go to Step 5
5
Remove both jumper wires.
Use the DMM in order to measure the voltage from the HO2S low signal circuit to a battery ground.
Is the voltage near the specified value?
5 V
Go to Step 6
Go to Step 7
6
Turn OFF the ignition.
Disconnect the PCM connector C1. Refer to Powertrain Control Module (PCM) Replacement .
Test for continuity of the HO2S high signal circuit. Refer to Testing for Continuity in Wiring Systems.
If no continuity is indicated on the DMM, repair the open circuit. Refer to Wiring Repairs in Wiring Systems.
Did you find and correct the condition?
--
Go to Step 12
Go to Step 10
7
Turn OFF the ignition.
Disconnect the PCM connector C1. Refer to Powertrain Control Module (PCM) Replacement .
Test for continuity of the HO2S low signal circuit. Refer to Testing for Continuity in Wiring Systems.
If no continuity is indicated on the DMM, repair the open or the faulty connection. Refer to Wiring Repairs in Wiring Systems.
Did you find and correct the condition?
--
Go to Step 12
Go to Step 10
8
Test the HO2S circuits for a faulty connection at the HO2S harness connector. Refer to Testing for Intermittent and Poor Connections in Wiring Systems.
If you find a faulty connection, replace or repair the terminal as necessary. Refer to Repairing Connector Terminals in Wiring Systems.
Did you find and correct the condition?
--
Go to Step 12
Go to Step 9
9
Replace the affected HO2S. Refer to Heated Oxygen Sensor (HO2S) Replacement Bank 1 Sensor 1 or Heated Oxygen Sensor (HO2S) Replacement Bank 2 Sensor 1 .
Did you complete the replacement?
--
Go to Step 12
--
10
Inspect the HO2S circuits for a faulty connection at the PCM. Refer to Testing for Intermittent and Poor Connections in Wiring Systems.
If you find a faulty connection, replace or repair the terminal as necessary. Refer to Repairing Connector Terminals in Wiring Systems.
Did you find and correct the condition?
--
Go to Step 12
Go to Step 11
11
Replace the PCM. Refer to Powertrain Control Module (PCM) Replacement .
Did you complete the replacement?
--
Go to Step 12
--
12
Use a scan tool in order to clear the DTCs.
Turn OFF the ignition for 30 seconds.
Start the engine.
Operate the vehicle within the Conditions for Running the DTC as specified in the supporting text.
Does the DTC run and pass?
--
Go to Step 13
Go to Step 2
13
With a scan tool, observe the stored information, Capture Info.
Does the scan tool display any DTCs that you have not diagnosed?
--
Go to Diagnostic Trouble Code (DTC) List
System OK
--------------------------------------------------------------------------------
Document ID# 791395
04-26-2010, 09:46 AM
#19
Vettaholic
Member Since: Jun 2006
Location: Wherever I drive my vette
Posts: 183
Likes: 0
Received 0 Likes
on
0 Posts

Very interesting thread
I would suggest you read continuity/voltage between PCM pins 28 and 68 (bank 1 sensor 1), 29 and 69 (bank 2 sensor 1) with the O2s connected.
Okay thats not easy you have to pull the passenger side front fender and remove the PCM but in the end its the only way I think to ascertain the integrity of your harness, end to end. Also that will tell you, if the voltages are correct, whether your PCM is faulty or not.
Also I have seen strange PCM behavior due to the dreaded acid leak from the battery on the PCM harness, causing randomness sometimes.
Good luck
04-29-2010, 01:37 AM
#20
Heel & Toe
I have been following Bill's advice and was getting ready to pull the ignition switch and clean it up real well. I have had all the similar issues with it throwing DTC's all the time. I have had it go into the "reduced engine power" twice that I can remember where it wouldn't start back up. Once recently and the way we got it to start back up was to run the battery dead and then charge it and it would run.
Back in July I took the car to a supposed Hi-Performance speed shop who kept the car for 4-months and charged me $2200 to fix the DTC's, the headlights stopped raising and lowering and the battery was constantly discharging. When I got it back the headlights worked for about two weeks, the DTC's were there and I got the "reduced engine power" again.
When I cleared all the DTC's and the ones that stayed in history are P0102, P0522 and P1432 and are still giving me the H C status. The car would run really well and then it would sound like it would be loading up. The exhaust smells rich and the tips of my exhaust turn black and it leaves deposits on the rear end. My fuel usage has gone from 14 MPG to about 8.
I rechecked the DTC's and besides the ones listed above I am also now getting P0160, P0140, P0410 and one in history for P1571. I let the car sit for a few days and when I went to start it, the battery was dead. This use to happen to me every 3 or 4 days.
On the digital read out it is constantly telling me, low fuel level, service engine soon and about 5 or 6 other things. It is constantly scrolling through them.
The car has been so modified that I wonder if someone putting in the stereo, 2000 watt system, or the alarm, etc. hasn't tied onto something that is draining the battery among other things.
The car runs OK for about 1 quarter mile and then it sounds like it's loading up. If I keep my foot on it, it doesn't make the sound but as soon as I level off it goes back to the crappy sound.
Should I follow the rest of this post and go through everything after pulling the ignition switch.
Thanking you in advance,
Mike
Last edited by NasteVette; 04-29-2010 at 01:40 AM.