


vacuum hose diagram?

Thread Starter
8th Gear

Joined: Oct 2005
Posts: 8
Likes: 0
From: Dallas TX
I'm trying to repair my C5's (2002 Z06) AC system (victim of leaky battery...). In this process I found the vacuum line from the interior leading to the 3-way tee on the vacuum reservoir. I replaced this line, but I also noticed that there is a missing line coming off the tee...? Not sure what it's suppose to be connected to. The other line (middle branch off tee) is connected to something near the top of the fender well...
I seem to have disturbed something in the process of replacing the broken line, because now I'm getting a code P0410 (I'm assuming since I have a vacuum leak...)
So, does anyone have a vacuum line diagram I can peek at? Where should the 3rd line go to? help.
Greatly appreciated.
Brian
I seem to have disturbed something in the process of replacing the broken line, because now I'm getting a code P0410 (I'm assuming since I have a vacuum leak...)
So, does anyone have a vacuum line diagram I can peek at? Where should the 3rd line go to? help.
Greatly appreciated.
Brian
Last edited by brianbirk; Apr 17, 2006 at 10:58 PM.
Racer

Joined: Jan 2006
Posts: 479
Likes: 2
From: Hollywood Maryland
Brian, I had the same problem on my '99 FRC, the battery ate my HVAC Vacuum lines. If you have access to a shop manual, they should have a drawing or illustration of the vacuum lines. For a '99 FRC, vacuum is pulled from the MAP sensor on the back of the intake manifold. A 1/8 " black vacuum line is routed from the MAP sensor to a three way check valve inside the passenger fender. The line is buried in the wiring harness (it's easy to spot, it's the thickest line in the wiring harness). There's a vacuum holding tank mounted inside the passenger fender well that the vacuum is routed to through the check valve. The third connection to this check valve goes back up and into the firewall wiring harness by the A/C evaporator cannister for the HVAC controller in your interior. The vacuum lines are buried in the wiring harnesses which are covered by a perforated wrap that allows the battery acid to permeate and 'eat' the vacuum lines. In lieu of shop manuals, I joined www.alldata.com ($15.00 subscription) and pulled the vacuum illustrations. To fix the problem, I unwrapped the wiring harnesses until I found the supply line coming from the MAP sensor (MAP sensor is mounted on the back of the intake manifold). I then found the vacuum line for the HVAC control head in the wiring harness going into the firewall. Battery acid had eaten all of the vacuum line material in between all this. I cleaned up everything using CRC Battery Cleaner (less messy than baking soda and water, available at your local auto parts store), spliced (using 1/8" vacuum hose splices you can get from any Auto Zone, Advanced Auto etc and 1/8" vacuum (emissions) hose they sell) in new hose and it worked fine. I wrapped everything up using ties to secure the new vacuum lines to the wiring harnesses. I chose to SPLICE the vacuum supply line because you have to slide the intake manifold forward in order to get to the MAP sensor, the vacuum source, in order to run a new supply line. It's a bitch to do, so I chose to splice and use shrink warp to enure proper sealing. As a side note, I bought a new conventional battery and it also leaked destroying my intial repair. The vacuum lines sold at your local auto store is a lot thinner and cheaper than OEM and fail quicker. Learned my lesson and bought an Optima Red Top and took care of leaking battery issue. I will be re-repairing my vacuum system again this weekend. I initially did this repair from the top with just the battery removed. This time I plan to put the car on jacks, remove the wheel, and open the right fender access panel to get to the vacuum resorvoir. This makes it easier. Clean everything and check the condition of your PCM, some threads reported damage from battery acid to their PCM which lies directly below the battery tray. You can reach the vacuum resorvoir from above, but it is harder. I plan to use corrugated electrical tubing on all wiring harnesses under the battery after I'm done so I never have to deal with this again. You'll also find the car runs smoother after the fix (at least mine did), my guess is an OPEN vacuum (when the lines are eaten away) probably drove the computer crazy trying to compenstae. Remember this was for a '99. Hope this helps. Seach on Vacuum Line or Vacuum Lines for other data. I have non dual zone (i.e., manual) A/C control so yours may be different. Best of luck.

Thread Starter
8th Gear
Joined: Oct 2005
Posts: 8
Likes: 0
From: Dallas TX
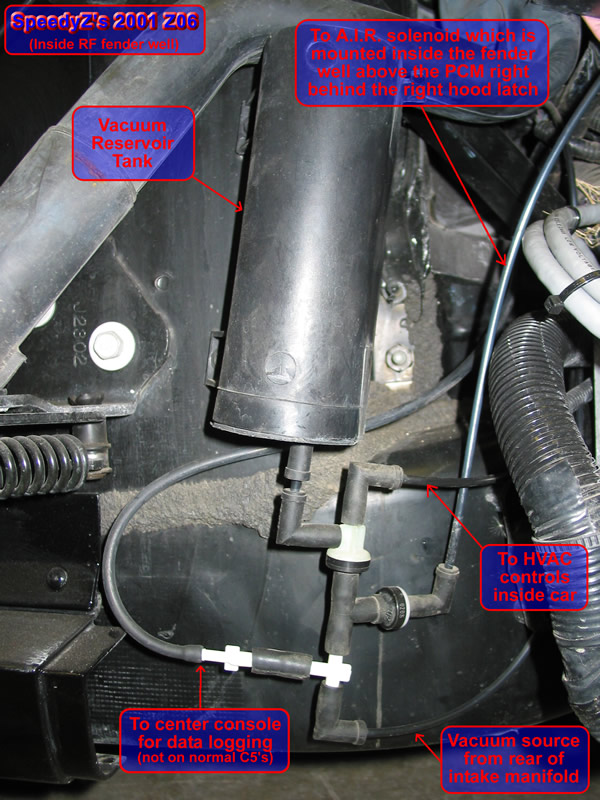
Ok, I got the alldata subscription....but...from their diagram, the vacuum resevoir connects to a check valve. The check valve connects to the HVAC stuff inside the car, and the engine... Well... Unless I'm crazy, my car has another connection on the check valve that from what I can tell is connected to the AIR vacuum control solenoid valve above the PCM. But, they don't show this connection... hmm. ideas?

Tech Contributor


Joined: Dec 1999
Posts: 32,910
Likes: 2,402
From: Anthony TX
CI 6,7,8,9,11 Vet
St. Jude Donor '08
The reason that your getting code P0410 is that there is a vacuum line that controls the A.I.R. solenoid valve for the A.I.R. Air pump that is missing. The pump is located below the drivers headlight assay. The 3/4" rubber fitting and hose that goes into the side of the air filter is the intake line for the A.I.R air pump. Find the air pump and you will find the vacuum solenoid and vacuum line. That line is probably cut/eaten up by acid and the A.I.R system is not functioning correctly thus the code!
BC
BC
Thread Starter
8th Gear
Joined: Oct 2005
Posts: 8
Likes: 0
From: Dallas TX
Thanks guys, that picture is what I needed! I'll tear back into it this weekend. BTW How do you remove the PCM without removing the fender? It looked like the mounting screws were blocked, am I overlooking the obvious? Thanks again.

Tech Contributor
Joined: Dec 1999
Posts: 32,910
Likes: 2,402
From: Anthony TX
CI 6,7,8,9,11 Vet
St. Jude Donor '08
remove the passengers front tire and you will find an access panel inthe wheel well. You can remove it throught that access. You will need a 1/4" drive ratchet set!!
Drifting


Joined: Oct 2004
Posts: 1,384
Likes: 8
From: Southwest Virginia
The A.I.R solenoid is the solenoid right above the PCM.
Once you remove the access panel in the back of the right front fender well you will see the PCM and the TAC module. The TAC module is the black box mounted in front of the PCM, you will probably have to unbolt that first, three screws 7mm socket. Then there is two screws (7mm socket) on each side of the PCM that holds the bracket over the front of the PCM, remove that plastic bracket and the PCM will slide out of its mount. Sometimes you have to pry the PCM a little if it is stuck in the mount which yours may be since you had the battery leak down through there.
Once you remove the access panel in the back of the right front fender well you will see the PCM and the TAC module. The TAC module is the black box mounted in front of the PCM, you will probably have to unbolt that first, three screws 7mm socket. Then there is two screws (7mm socket) on each side of the PCM that holds the bracket over the front of the PCM, remove that plastic bracket and the PCM will slide out of its mount. Sometimes you have to pry the PCM a little if it is stuck in the mount which yours may be since you had the battery leak down through there.
Corvette Stories
The Best of Corvette for Corvette Enthusiasts

Top 10 Most Expensive Corvettes Ever Sold on Bring A Trailer
Brett Foote
10 Things Every Corvette Owner Needs (2026 Edition)
Michael S. Palmer
8 Most "Only Corvette Owners Understand" Quirks and Problems
Pouria Savadkouei
10 Reasons the C6 Z06 is Still A Performance Benchmark After 20 Years
Joe Kucinski
How Much Horsepower Every Corvette Engine "LOST" in 1972
Joe Kucinski
Top 10 DOs and DON'Ts for Protecting Your Convertible Top!
Michael S. Palmer
Top 10 Most Explosive Corvettes Ever Made: Power-to-Weight Ratio Ranked!
Joe Kucinski
150 hp to 1,250 hp: Every Corvette Generation Compared by the Specs That Matter
Joe Kucinski
8 Coolest Corvette Pace Cars (and Replicas) of All Time
Verdad GallardoMelting Slicks

Joined: Nov 2005
Posts: 2,071
Likes: 0
From: clackamas oregon
Originally Posted by Bill Curlee
The reason that your getting code P0410 is that there is a vacuum line that controls the A.I.R. solenoid valve for the A.I.R. Air pump that is missing. The pump is located below the drivers headlight assay. The 3/4" rubber fitting and hose that goes into the side of the air filter is the intake line for the A.I.R air pump. Find the air pump and you will find the vacuum solenoid and vacuum line. That line is probably cut/eaten up by acid and the A.I.R system is not functioning correctly thus the code!
BC
BC
Tech Contributor
Joined: Dec 1999
Posts: 32,910
Likes: 2,402
From: Anthony TX
CI 6,7,8,9,11 Vet
St. Jude Donor '08
Check the vacuum signal at the AIR pump vacuum valve. You should see a vacuum signal any time the engine is running. The pump is under the drivers head light. It easy to access it if you jack up the front and remove the panel under the fascia.
BC
BC

Pro

Joined: Jun 2005
Posts: 593
Likes: 1
AIR design is not the same. Changes were made around 2001.
Pre 2001 does not have a vaccum line for the relay is built into the pump where newer C5s have the relay off passenger A pillar and then a control vaccum line to pump
Do not take TAC off just to remove PCM and do NOT take the left screw out for the PCM bracket for if you do you'll play hell getting it back in since its hidden from view.
You loosen that one, take the 2 80 pin connectors off the PCM and remove the right bracket screw and let the front bracket with TAC still on it drop down. PCM will be jammed in back bracket so force is needed to yank it up and off
Its easy to know if HVAC router hose is off or broke for if it is the HVAC doors will not work.
Originally Posted by SpeedyZ
The A.I.R solenoid is the solenoid right above the PCM.
Once you remove the access panel in the back of the right front fender well you will see the PCM and the TAC module. The TAC module is the black box mounted in front of the PCM, you will probably have to unbolt that first, three screws 7mm socket. Then there is two screws (7mm socket) on each side of the PCM that holds the bracket over the front of the PCM, remove that plastic bracket and the PCM will slide out of its mount. Sometimes you have to pry the PCM a little if it is stuck in the mount which yours may be since you had the battery leak down through there.
Once you remove the access panel in the back of the right front fender well you will see the PCM and the TAC module. The TAC module is the black box mounted in front of the PCM, you will probably have to unbolt that first, three screws 7mm socket. Then there is two screws (7mm socket) on each side of the PCM that holds the bracket over the front of the PCM, remove that plastic bracket and the PCM will slide out of its mount. Sometimes you have to pry the PCM a little if it is stuck in the mount which yours may be since you had the battery leak down through there.


Drifting
Joined: Oct 2004
Posts: 1,384
Likes: 8
From: Southwest Virginia
Originally Posted by Face
What is the "solenoid above PCM"?
Guess I need to edit that image a little better!

That image is from a 2001 Z06, I don't know what the pre 2001 look like.

Racer


Joined: Jul 2006
Posts: 277
Likes: 1
From: waco tx
ok, i just wanted to bump this because my ac was blowing out of all the vents and it ended up being the small vacuum line that runs from the map sensor to the passenger side fender! thanks guys!!!!! ive been beating my head bout this!
Safety Car

Joined: Aug 2007
Posts: 4,506
Likes: 0
From: This is not a Song, It's an Outburst: Or, The Establishment Blues; Sixto Diaz Rodriguez
Look at my post here guys, I broke the line going into the bottom of the Vacuum Reservoir tank, does the fender need to come off to replace the tank? Thanks...
http://forums.corvetteforum.com/c5-t...roken-off.html
OK, I've got all the info I need to remove it, "PATCHES" has a thread showing to remove it from between the fender-well, and passenger door, now I just have to find a Reservoir.
UP-DATE::: Bill Curlee and a few other guys have me on the right track. Thanks guys!!!
Last edited by renegad44; Nov 12, 2012 at 06:37 PM. Reason: Found info for removing reservoir....