


Horn Membrane Fix!!

Heel & Toe

Joined: Sep 2005
Posts: 16
Likes: 1
Thanks, Old Stingray! (How old? I'm 60, chronologically, but will be 17 next month, emotionally!  My first Vette was a '57, which I had from 1969 to 1978! Originally a 283 single 4 barrel with 3 spd tranny ... evolved to a 375 HP 327 (with Rochester FI -- thank you, Zora, you are my hero!!!) close ratio M-22 (I can't believe I can remember that!!) "rock crusher" close ratio (2:20 1st gear) with headers, traction bars, 4:56 rear end .... could pull the left front wheel shifting into second.... Sweeeet, eh?
OK, enough babbling .... Here's the dillyo .... Just want to say that I am SOOOO gratefull for the posts on this forum (and, to a lesser extent, the forums at www.z06vette.com ) ... I mean, how else would I have known how to fix a dimming climate control display? How would I have had the chutzpa (check your Yiddish!! ) to tackle replacing my my clutch, the easy if not perfect clutch master cylinder flush, seats rocking?? The list goes on, but you get the idea .....
SOOOOOO..... I try to give back to our members when I think I can add something that will be of benefit.
My philosophy: If any of us are going to survive, we all need to help each other. And here, on this forum, we DO help each other, incredibly so!!!
In speaking of my appreciation, I know I speak for many thousands of members, whether they are contributors or just "finding answers."
Sorry if this post should be somewhere else.... a "grateful members" thread or something....
My first Vette was a '57, which I had from 1969 to 1978! Originally a 283 single 4 barrel with 3 spd tranny ... evolved to a 375 HP 327 (with Rochester FI -- thank you, Zora, you are my hero!!!) close ratio M-22 (I can't believe I can remember that!!) "rock crusher" close ratio (2:20 1st gear) with headers, traction bars, 4:56 rear end .... could pull the left front wheel shifting into second.... Sweeeet, eh?OK, enough babbling .... Here's the dillyo .... Just want to say that I am SOOOO gratefull for the posts on this forum (and, to a lesser extent, the forums at www.z06vette.com ) ... I mean, how else would I have known how to fix a dimming climate control display? How would I have had the chutzpa (check your Yiddish!!
) to tackle replacing my my clutch, the easy if not perfect clutch master cylinder flush, seats rocking?? The list goes on, but you get the idea ..... SOOOOOO..... I try to give back to our members when I think I can add something that will be of benefit.
My philosophy: If any of us are going to survive, we all need to help each other. And here, on this forum, we DO help each other, incredibly so!!!
In speaking of my appreciation, I know I speak for many thousands of members, whether they are contributors or just "finding answers."
Sorry if this post should be somewhere else.... a "grateful members" thread or something....
Last edited by docimastic; Oct 26, 2009 at 08:58 PM.

Drifting

Joined: Apr 2007
Posts: 1,760
Likes: 4
From: Broward County Florida
First, thanks for the kind words, Bill! Yes, I AM a patriot! 
Put in the replacement reproduction horn membrane switch for C&S Corvettes today (see my post just above this one.) Works great, just as it should.
A few thoughts on doing the replacement....
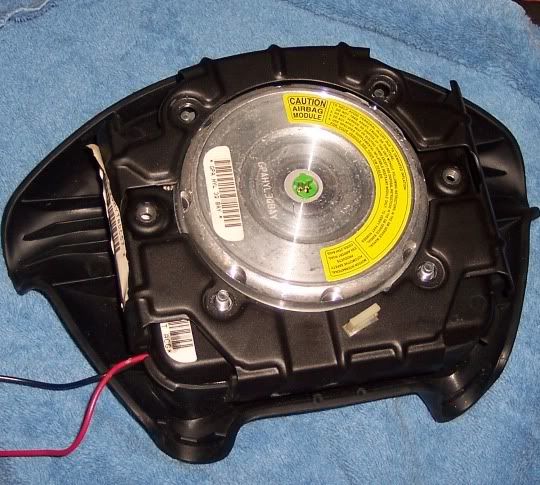
First... re: accessing the 2 T-30 screws from the back of the steering wheel. (I used a T-30 bit in a 1/4 inch drive socket with a 3" extension and a ratchet. Yes, there IS enough room for the bit to drop into the wheel, so secure it, i.e, use a piece of paper towel over the bit as you push it into the socket. hahaha Happened to me and had to go buy another bit. And yes, I DID retrieve the "dropped" one!) Despite what the factory shop manual says, turn the wheel 90 degrees and access one at a time from the top, i.e. from in front of the instrument panel. Otherwise the screw can't be accessed straight enough. Downside of this is that you need to re-connect the battery to unlock the wheel (with the ignition on, obviously) to turn it 180 degrees after doing one of the screws, and then wait another 30 minutes. (Yes, I AM parnoid about working on an airbag, even though I pulled the #16 (airbag) fuse.....)
Disconnecting the airbag: After you remove the screws and pull the airbag from the wheel, pull the the PCA (position connector assurance - a/k/a the locking thingy) straight up, then the yellow plastic connector can be pulled straight out from the metal thingy part of the airbag. No turning it!) When re-assembling, make sure the connector is ALL the way in before inserting the PCA.
Last.... The biggest pain in the **** about doing this is trying to get the rubber "nibs" up through the nylon plates. Oy! I used a 90 degree pick (do YOu have a set of picks... man... I use them ALL the time..... check out Harbor Freight) to pull them up, BUT .... if i had it to do over again, I think I would pull them up with needlenose, cut them off, and then use silicone on them after the plates were in position, to secure the plates. The airbag DOES (pretty much ??) hold everything in place, but ....
Hope this helps!
80,000 miles on my Z06 - and going STRONG!!! (Can you say "powershift??!!! - I can! )
Put in the replacement reproduction horn membrane switch for C&S Corvettes today (see my post just above this one.) Works great, just as it should.
A few thoughts on doing the replacement....
First... re: accessing the 2 T-30 screws from the back of the steering wheel. (I used a T-30 bit in a 1/4 inch drive socket with a 3" extension and a ratchet. Yes, there IS enough room for the bit to drop into the wheel, so secure it, i.e, use a piece of paper towel over the bit as you push it into the socket. hahaha Happened to me and had to go buy another bit. And yes, I DID retrieve the "dropped" one!) Despite what the factory shop manual says, turn the wheel 90 degrees and access one at a time from the top, i.e. from in front of the instrument panel. Otherwise the screw can't be accessed straight enough. Downside of this is that you need to re-connect the battery to unlock the wheel (with the ignition on, obviously) to turn it 180 degrees after doing one of the screws, and then wait another 30 minutes. (Yes, I AM parnoid about working on an airbag, even though I pulled the #16 (airbag) fuse.....)
Disconnecting the airbag: After you remove the screws and pull the airbag from the wheel, pull the the PCA (position connector assurance - a/k/a the locking thingy) straight up, then the yellow plastic connector can be pulled straight out from the metal thingy part of the airbag. No turning it!) When re-assembling, make sure the connector is ALL the way in before inserting the PCA.
Last.... The biggest pain in the **** about doing this is trying to get the rubber "nibs" up through the nylon plates. Oy! I used a 90 degree pick (do YOu have a set of picks... man... I use them ALL the time..... check out Harbor Freight) to pull them up, BUT .... if i had it to do over again, I think I would pull them up with needlenose, cut them off, and then use silicone on them after the plates were in position, to secure the plates. The airbag DOES (pretty much ??) hold everything in place, but ....
Hope this helps!
80,000 miles on my Z06 - and going STRONG!!! (Can you say "powershift??!!! - I can!
)

Safety Car

Joined: Jan 2009
Posts: 3,704
Likes: 2
Not to take anything away from Nastymant's awesome post on fixing the horn membrane switch... Here is exciting news ... C&S Corvettes 5317 Ashton Ct, Sarasota, FL (941) 923-5064 corvettepartscenter@comcast.net has just received their first aftermarket repro C5 horn membrane switches, complete with electrical connectors. Replace using same basic procedure as Nastymant outlined at the beginning of this thread (re cutting the "nibs" etc.) Replacement switches are 59.95 (plus S&H, I assume.) I have done business (locally) with these guys (Lyle and Steve) for years, and highly recommend them. Just bought my switch yesterday, so I haven't installed yet, but Steve told me that they pulled about 20 and tested them, and all tested good. They will be wholesaling to Mid-America and likely others. (And no, I have no business relationship with them. Just trying to "help the hornless.") Beep Beep!


Advanced
Joined: Dec 2009
Posts: 53
Likes: 0
From: Auto Tech
I used a hot glue gun instead of super glue
Great write up !
Great write up !
Well, i got tired of not having a horn here in houston..there's plenty of A-holes that needed honking at for doing stupid stuff...
so i figured what the hell! i'll try and fix it since i'm on downtime (middle of head/cam/headers install in a '98)
for starters i knew that the RH side membrane was bad, wasnt sure about the left.
So, if you decide to try this..try it at your own risk!!! Airbag deployment velocity is probably >300 ft/sec!!!
i didn't get pictures of actually removing from the steering wheel, but it's pretty staight forward when you get it loose from the wheel.
1. there are 2 torx T-30 screws that are on fairly tight from the back of the steering wheel. be patient, it takes some time to get them out!.
2. The horn positive lead is held in the steering wheel by a plastic twist lock. just push & turn about a 1/4 turn to remove. unbolt the negative lead from the grounding eye.
3. I didn't bother with the SIR disassembly instructions in the service manuals where they tell you disconnect fuses & connectors & blah blah since i've had my battery disconnected for some time now. The airbag plug just pulls straight away after unplugging the plastic lock retainer.
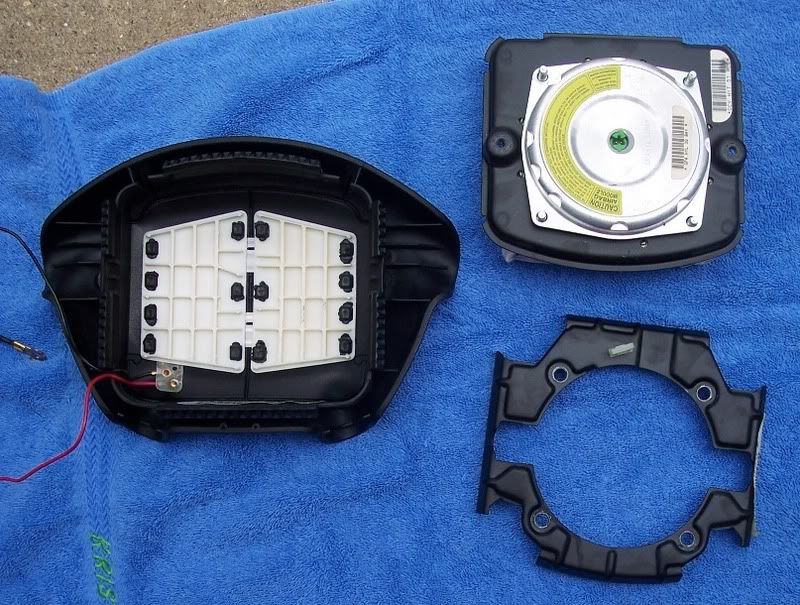
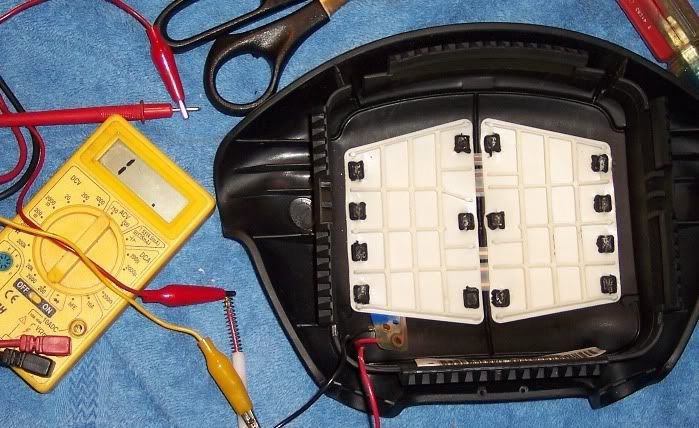
4.Now that we have the horn/airbag module out, here's what we do next. remove the 4 nuts on back.

5. Remove the metal retainer.
6. Now carefully pry the rubber apart on all 4 sides while lifting the airbag assembly out.
7. Now get a razor blade and with just a little pressure cut through the center of the molded rubber holding the nylon plates on. Don't cut the outboard ones like i did in this picture!!! All you need to cut are the 6 in the inner 2 columns!!
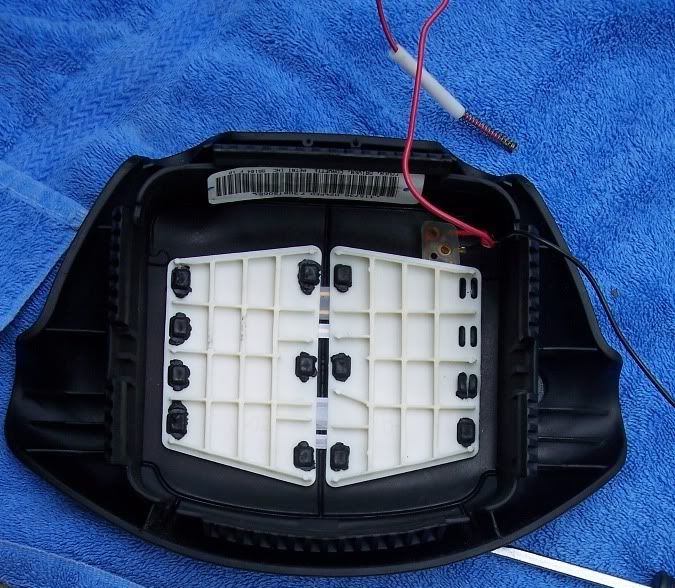
8. you should be able to separate the molded rubber and pull the nylon plates though the slit you previously made. (from the center & not the outside like i have shown!)
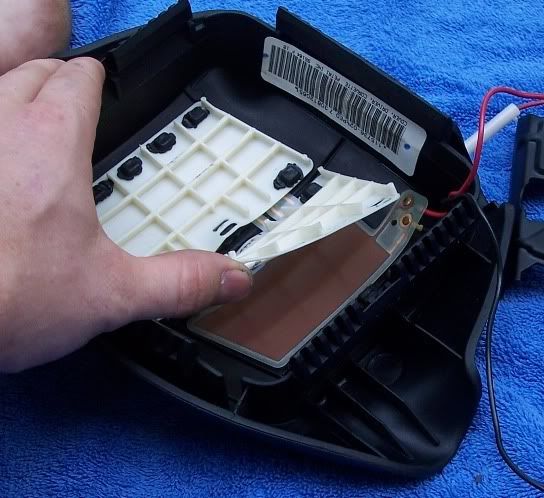
9. Ok with the horn membranes out, i checked both sides..Sure enough it was the rh side. Notice it's not an open circuit after removing finger.
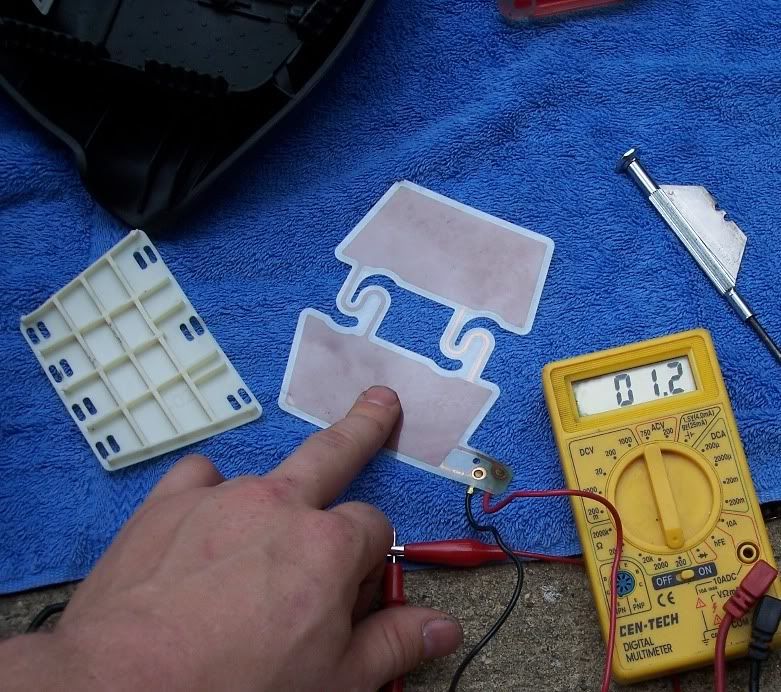
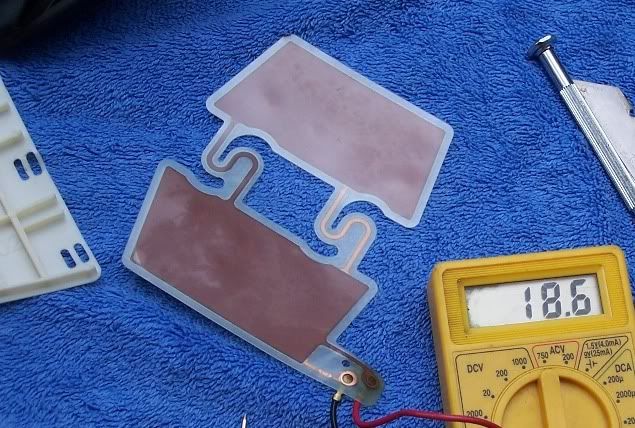
10. I forgot to get a picture of the next step, but there's nothing to it...I separated the plastic from the bad membrane side and put 2 layers of electrical tape on the whole copper conducter for that side. effectively isolating it. this was easier than cutting & soldering. now the piece taped back together.
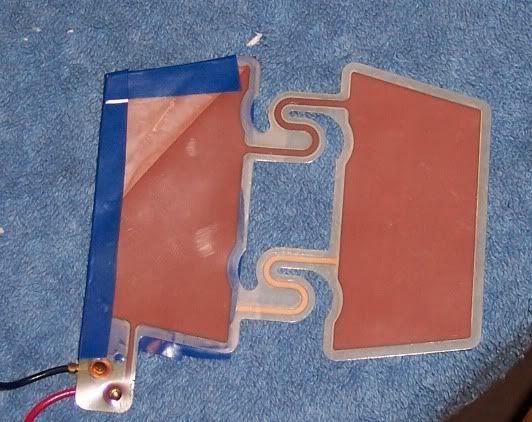
11. Its a pain in the *** to get the nylon plates back into the cover, but it's not impossible..just use a nice big bladed flathead screwdriver to push it into the cut rubber where it used to be..
check it after putting back into cover & super glueing the rubber
together.
Success!!! (for now until this one fails also!!)
12. Reward yourself (if you already haven't been doing that) before assembling the reverse steps...Just make sure the glue is completely dry before putting the airbag assy back into the horn cover!!!!

so i figured what the hell! i'll try and fix it since i'm on downtime (middle of head/cam/headers install in a '98)
for starters i knew that the RH side membrane was bad, wasnt sure about the left.
So, if you decide to try this..try it at your own risk!!! Airbag deployment velocity is probably >300 ft/sec!!!
i didn't get pictures of actually removing from the steering wheel, but it's pretty staight forward when you get it loose from the wheel.
1. there are 2 torx T-30 screws that are on fairly tight from the back of the steering wheel. be patient, it takes some time to get them out!.
2. The horn positive lead is held in the steering wheel by a plastic twist lock. just push & turn about a 1/4 turn to remove. unbolt the negative lead from the grounding eye.
3. I didn't bother with the SIR disassembly instructions in the service manuals where they tell you disconnect fuses & connectors & blah blah since i've had my battery disconnected for some time now. The airbag plug just pulls straight away after unplugging the plastic lock retainer.
4.Now that we have the horn/airbag module out, here's what we do next. remove the 4 nuts on back.
5. Remove the metal retainer.
6. Now carefully pry the rubber apart on all 4 sides while lifting the airbag assembly out.
7. Now get a razor blade and with just a little pressure cut through the center of the molded rubber holding the nylon plates on. Don't cut the outboard ones like i did in this picture!!! All you need to cut are the 6 in the inner 2 columns!!
8. you should be able to separate the molded rubber and pull the nylon plates though the slit you previously made. (from the center & not the outside like i have shown!)
9. Ok with the horn membranes out, i checked both sides..Sure enough it was the rh side. Notice it's not an open circuit after removing finger.
10. I forgot to get a picture of the next step, but there's nothing to it...I separated the plastic from the bad membrane side and put 2 layers of electrical tape on the whole copper conducter for that side. effectively isolating it. this was easier than cutting & soldering. now the piece taped back together.
11. Its a pain in the *** to get the nylon plates back into the cover, but it's not impossible..just use a nice big bladed flathead screwdriver to push it into the cut rubber where it used to be..
check it after putting back into cover & super glueing the rubber
together.
Success!!! (for now until this one fails also!!)
12. Reward yourself (if you already haven't been doing that) before assembling the reverse steps...Just make sure the glue is completely dry before putting the airbag assy back into the horn cover!!!!
Corvette Stories
The Best of Corvette for Corvette Enthusiasts

Top 10 Most Expensive Corvettes Ever Sold on Bring A Trailer
Brett Foote
10 Things Every Corvette Owner Needs (2026 Edition)
Michael S. Palmer
8 Most "Only Corvette Owners Understand" Quirks and Problems
Pouria Savadkouei
10 Reasons the C6 Z06 is Still A Performance Benchmark After 20 Years
Joe Kucinski
How Much Horsepower Every Corvette Engine "LOST" in 1972
Joe Kucinski
Top 10 DOs and DON'Ts for Protecting Your Convertible Top!
Michael S. Palmer
Top 10 Most Explosive Corvettes Ever Made: Power-to-Weight Ratio Ranked!
Joe Kucinski
150 hp to 1,250 hp: Every Corvette Generation Compared by the Specs That Matter
Joe Kucinski
8 Coolest Corvette Pace Cars (and Replicas) of All Time
Verdad GallardoRace Director


Joined: May 2005
Posts: 15,960
Likes: 21
From: West Norriton PA
St. Jude Donor '08
http://www.ecklers.com/product.asp?p...dept%5Fid=1717
A whole lot better than buying an airbag.

Racer

Joined: Nov 2005
Posts: 346
Likes: 0
I skimmed through the threads and saw no one commented on the way you placed the airbag after removal. That thing is dangerous, it should not be placed on a table face down! Should it activate inside your house, it will be a projectile! Place it with the warning label facing down, and leave it out in your garage, till time to put it back in. Just my .02 cents
Pro


Joined: Apr 2006
Posts: 502
Likes: 0
From: Stn Mtn GA
Ecklers sells them now
http://www.ecklers.com/product.asp?p...dept%5Fid=1717
A whole lot better than buying an airbag.
http://www.ecklers.com/product.asp?p...dept%5Fid=1717
A whole lot better than buying an airbag.
http://www.parts123.com/parts123/yb....Z5Z5Z50000050D
1st Gear
Joined: Apr 2010
Posts: 1
Likes: 0
From: Port Chester NY
I followed some of the steps in nastymant's thread to replace the horn membrane (which I got from Corvette Central - corvettecentral.com - item# 565100 for $59.95+shipping) and the horn works great!
Before doing any work around the airbag, I disconnected the negative battery cable, and pulled the #16 fuse located in the IP fuse panel in the passenger footwell. I let the car sit overnight with no power.
The sensing and diagnostic module (a.k.a. SDM) that triggers the airbag to deploy can supply power up to 10 seconds after the battery is disconnected. I've read 30 minutes is the least amount of time to wait before touching anything near or connected to the airbag.
To remove the bolts that hold the inflatable restraint steering module (a.k.a airbag assembly) to the steering wheel, I used a Torx T-30 power bit that's 3.5" (90mm) long and 1/4" bit size. I got it from WihaTools - wihatools.com - part # 74581.
You insert this bit into a 1/4" socket (1/4" bolt size), and use on a 1/4" ratchet that's no longer than 5.25" in length. Smaller length bits could fall inside, and you'd have to get another T-30 bit. The longer length of this bit prevents that problem.
I used a 10mm socket to remove the 4 nuts that clamp the airbag retainer down on top of the airbag. When storing the airbag while doing this membrane repair, DO NOT let the airbag sit with the metal ring facing up. The metal ring should be facing down and away from your work area and any source of heat, fire, or static electricity.
Before inserting the red horn power wire into the twist-and-turn fitting in the steering wheel housing, blow out any debris there may be inside the connector hole, and apply some dielectric grease to the end of the connector on the red horn wire.
After you've replaced the horn contact membrane and the airbag is reinstalled in the airbag assembly, checked to see that it works when you press the horn pad area. Do this BEFORE you reinstall the airbag assembly in the car. Connect a voltmeter (set for continuity) red (+) probe to the red horn wire and black (-) to the black ground wire. If everything works, the voltmeter will tell you.
Before you put the airbag assembly back in the car, take a T-30 bit and tighten the Torx bolts (you previously removed at the beginning) down to 54 lb/in. in the remaining holes on the left and right of the airbag assembly.
Connect the yellow, black, and red wires, then pop the airbag assembly onto the steering wheel. It will snap back in.
Pop the #16 fuse back in, reconnect the negative battery cable, turn the ignition to ON and make sure the airbag light doesn't stay on for too long.
I hope this helps!
Tech Contributor
Joined: Aug 2008
Posts: 2,902
Likes: 21
From: Oak Hill Virginia
Thanks for the post! I just replaced my damaged membrane with a new one from ecklers and the horn works perfectly.
The only problem is my airbag light now flashes a few times on start-up then stays lit... Anyone have any suggestions?
The only problem is my airbag light now flashes a few times on start-up then stays lit... Anyone have any suggestions?
Tech Contributor
Joined: Aug 2008
Posts: 2,902
Likes: 21
From: Oak Hill Virginia
Tech Contributor
Joined: Aug 2008
Posts: 2,902
Likes: 21
From: Oak Hill Virginia
That is the cause of the light staying on.
Here is a link that may help diagnose the cause:
http://forums.corvetteforum.com/c5-s...rbag-code.html
then scroll to post #3.
Here is a link that may help diagnose the cause:
http://forums.corvetteforum.com/c5-s...rbag-code.html
then scroll to post #3.
and someone just posted that info. I'm only half way through reading, but I'm guessing something didn't get put back on tight enough... I guess I'll be pulling it apart again later to check the wiring...
Tech Contributor
Joined: Aug 2008
Posts: 2,902
Likes: 21
From: Oak Hill Virginia
Thanks. I didn't get to it tonight, but I'm planning on pulling it apart again tomoorow to check the connection. I'm assuming you mean the big yellow connector that plugs into the center of the steering wheel behind the airbag right?

7th Gear
Joined: Jul 2010
Posts: 7
Likes: 0
Yes - My first try the yellow plug wasn't seated correctly
Tech Contributor
Joined: Aug 2008
Posts: 2,902
Likes: 21
From: Oak Hill Virginia
I pulled the steering wheel apart again last night and it turns out that the yellow connector that runs from the airbag to the center of the steering wheel wasn't seated properly. I fixed it and... no more airbag light 
Thanks again for the responses guys.
Thanks again for the responses guys.