


Front wheelhouse installation question
Thread Starter
Burning Brakes


Joined: Aug 2006
Posts: 887
Likes: 15
From: Central CT
St. Jude Donor '16
I'm putting on both new wheelhouses (inner fenders) on and wanted to see if anyone else, or the shop guys, could give me some pointers. I was told to use 3M 8115 with the gun. Is there any reference points on putting these on ? Should the hood be put on first and align everything to it, or the wheelhouses and then the rest? Any suggestions would be appreciated.
Konrad L.
Konrad L.
Thread Starter
Burning Brakes
Joined: Aug 2006
Posts: 887
Likes: 15
From: Central CT
St. Jude Donor '16
Team Owner


Joined: Sep 2001
Posts: 23,283
Likes: 906
From: Lake Elsinore, CA
From the C5 body repair manual:
3-4 1997/98 Chevrolet Corvette Collision Repair
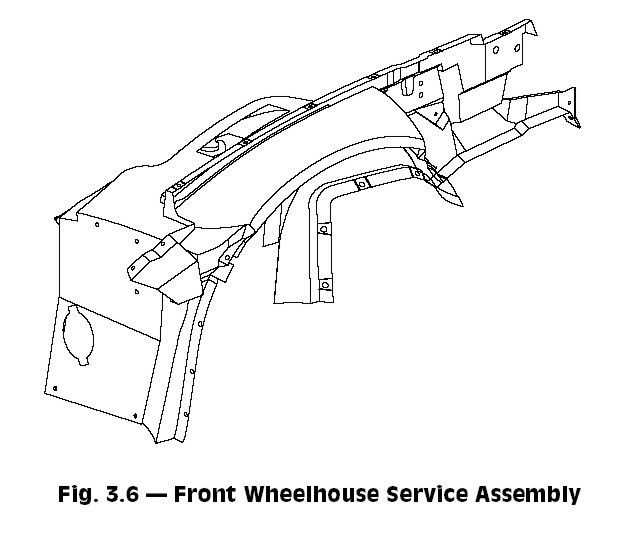
Front Wheelhouse
The wheelhouse consists of two pieces, an outer
portion that rivets and bonds to a larger inner
portion (Fig. 3.6). The wheelhouse is the inner
mounting structure for the front fender.
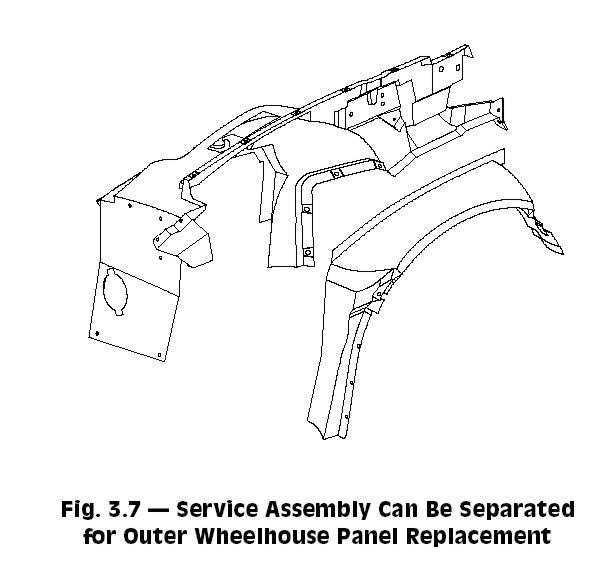
The wheelhouse mounting surfaces vary from left
to right. The left side (driver�s side) has more
bonded surface area than the right side, and is
bonded to the cowl. Also, both sides bond and
bolt to the front hinge pillar. The outer
wheelhouse can be separated for partial
installation (Fig. 3.7).
Notice: Do not replace any SMC body panels
until the frame rails have been replaced or
repaired, mounting SMC panels requires the
rails to be positioned accurately.
� REMOVE OR DISCONNECT �
1 Remove all panels and components to gain
access to the front wheelhouse. This may
include removing front wheel, fender, fender
splash panel, bumper cover, battery, and
headlamp mounting brackets.
2 Visually inspect, if any damage to the frame
rails or wheelhouse mounting areas exist,
then restore as much of the damage as
possible to specifications using
three-dimensional measuring procedures.
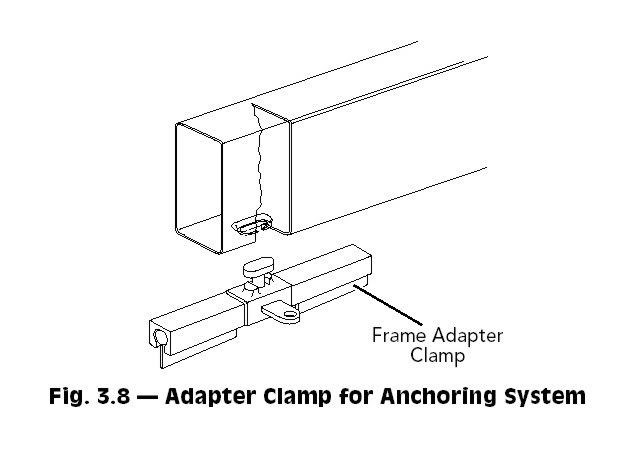
Notice: Use Kent Moore Tools Frame
Adapter Clamp (P/N J42058) to secure the
vehicle if pulling and straightening is
required (Fig. 3.8).
3 Relocate wiring as necessary to avoid
damage.
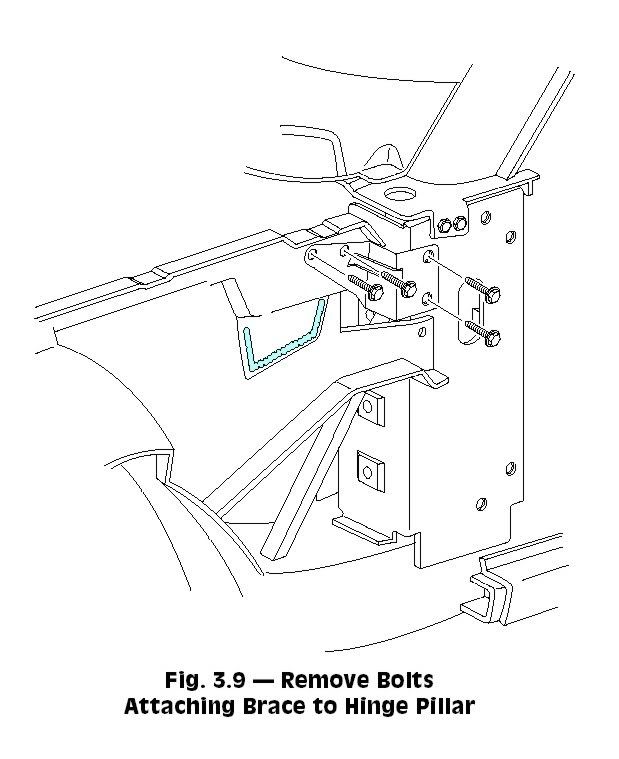
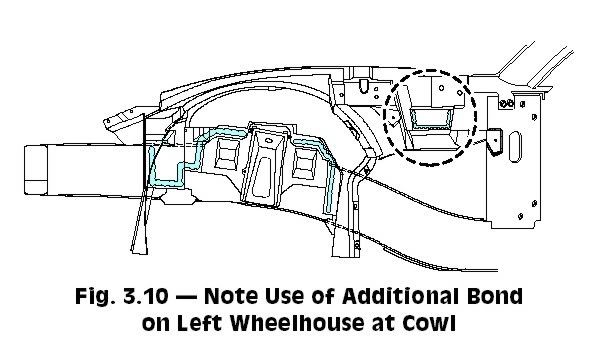
4 Remove the four bracket bolts attaching the
wheelhouse to the front hinge pillar (Fig. 3.9).
Heat and pry to remove or dislodge adhesive
beads attaching the wheelhouse to the
vehicle, see Fig. 3.10. Remove the damaged
wheelhouse.
� INSTALL OR CONNECT �
Important: Use US Chemical and Plastics
821014B System 2000 Structural Adhesive, a
PLIOGRIP� adhesive manufactured by Ashland
Chemical Company, or equivalent. Note the 9
minute working time and 1 hour cure time.
Notice: DO NOT adjust the fender by
compromising the wheelhouse to rail gap. This
gap must remain a nominal width to maintain
the correct adhesive strength. The gap should
be correct if the rails are properly located.
Notice: If possible, when prepping area for
service part leave small portions of original
adhesive in various places to act as shimming
for wheelhouse spacing from frame rails. If
original adhesive is not usable for shimming,
use paint stir sticks, or equivalent, and shim
according to body dimensions and body panel
alignment.
1 Remove all remaining adhesive, and scuff all
bonding surfaces to ensure proper adhesion.
(Refer to SMC Repair Procedures.)
2 Clean and prepare all bonding surfaces as
necessary. (Refer to SMC Repair Procedures.)
Important: Prior to refinishing, refer to
GM P/N 4901 Refinish Manual for
recommended products.
3 Apply approved anti-corrosion primer.
Notice: DO NOT top-coat any bonding
surface.
4 Temporarily attach the fender to the
wheelhouse. Align the fender to door and
hood by clamping the wheelhouse assembly
into place. Scribe line on rail to locate
wheelhouse.
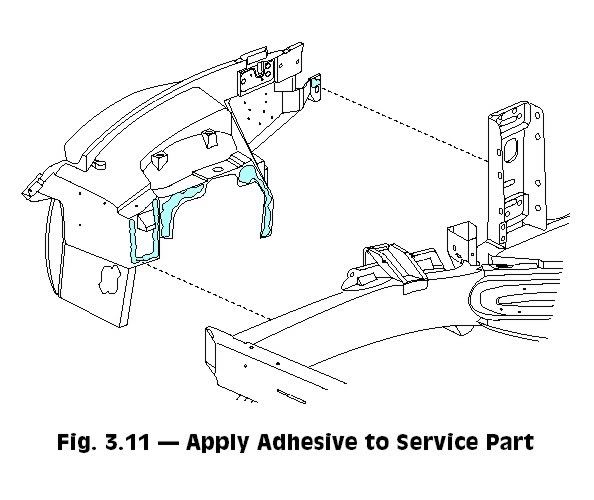
5 Apply adhesive to the wheelhouse as shown
in Fig. 3.11. Position front wheelhouse
service part according to the scribe lines on
the rail. Install the four bracket bolts which
attach the wheelhouse to the front hinge
pillar, and clamp the wheelhouse to the rail.
Install headlamp mounting bracket. Trowel
around perimeter of bonding area to remove
excess adhesive and restore original
appearance.
6 Install all related panels and components.
3-4 1997/98 Chevrolet Corvette Collision Repair
Front Wheelhouse
The wheelhouse consists of two pieces, an outer
portion that rivets and bonds to a larger inner
portion (Fig. 3.6). The wheelhouse is the inner
mounting structure for the front fender.
The wheelhouse mounting surfaces vary from left
to right. The left side (driver�s side) has more
bonded surface area than the right side, and is
bonded to the cowl. Also, both sides bond and
bolt to the front hinge pillar. The outer
wheelhouse can be separated for partial
installation (Fig. 3.7).
Notice: Do not replace any SMC body panels
until the frame rails have been replaced or
repaired, mounting SMC panels requires the
rails to be positioned accurately.
� REMOVE OR DISCONNECT �
1 Remove all panels and components to gain
access to the front wheelhouse. This may
include removing front wheel, fender, fender
splash panel, bumper cover, battery, and
headlamp mounting brackets.
2 Visually inspect, if any damage to the frame
rails or wheelhouse mounting areas exist,
then restore as much of the damage as
possible to specifications using
three-dimensional measuring procedures.
Notice: Use Kent Moore Tools Frame
Adapter Clamp (P/N J42058) to secure the
vehicle if pulling and straightening is
required (Fig. 3.8).
3 Relocate wiring as necessary to avoid
damage.
4 Remove the four bracket bolts attaching the
wheelhouse to the front hinge pillar (Fig. 3.9).
Heat and pry to remove or dislodge adhesive
beads attaching the wheelhouse to the
vehicle, see Fig. 3.10. Remove the damaged
wheelhouse.
� INSTALL OR CONNECT �
Important: Use US Chemical and Plastics
821014B System 2000 Structural Adhesive, a
PLIOGRIP� adhesive manufactured by Ashland
Chemical Company, or equivalent. Note the 9
minute working time and 1 hour cure time.
Notice: DO NOT adjust the fender by
compromising the wheelhouse to rail gap. This
gap must remain a nominal width to maintain
the correct adhesive strength. The gap should
be correct if the rails are properly located.
Notice: If possible, when prepping area for
service part leave small portions of original
adhesive in various places to act as shimming
for wheelhouse spacing from frame rails. If
original adhesive is not usable for shimming,
use paint stir sticks, or equivalent, and shim
according to body dimensions and body panel
alignment.
1 Remove all remaining adhesive, and scuff all
bonding surfaces to ensure proper adhesion.
(Refer to SMC Repair Procedures.)
2 Clean and prepare all bonding surfaces as
necessary. (Refer to SMC Repair Procedures.)
Important: Prior to refinishing, refer to
GM P/N 4901 Refinish Manual for
recommended products.
3 Apply approved anti-corrosion primer.
Notice: DO NOT top-coat any bonding
surface.
4 Temporarily attach the fender to the
wheelhouse. Align the fender to door and
hood by clamping the wheelhouse assembly
into place. Scribe line on rail to locate
wheelhouse.
5 Apply adhesive to the wheelhouse as shown
in Fig. 3.11. Position front wheelhouse
service part according to the scribe lines on
the rail. Install the four bracket bolts which
attach the wheelhouse to the front hinge
pillar, and clamp the wheelhouse to the rail.
Install headlamp mounting bracket. Trowel
around perimeter of bonding area to remove
excess adhesive and restore original
appearance.
6 Install all related panels and components.
Corvette Stories
The Best of Corvette for Corvette Enthusiasts

5 Best & 5 Worst Corvette Daily Drivers
Joe Kucinski
The Headlights of Every Corvette Generation Explained
Joe Kucinski
5 Best & 5 Most Overrated Corvette Track Packages of All Time!
Joe Kucinski
Every 2027 Corvette Engine Explained
Joe Kucinski
Designer Imagines A Corvette That Looks More Like a Corvette Than the Corvette
Verdad Gallardo
10 Ugly Corvettes That We Still Kinda Love
Joe Kucinski
Top 10 Most Expensive Corvettes Ever Sold on Bring A Trailer
Brett Foote
10 Things Every Corvette Owner Needs (2026 Edition)
Michael S. Palmer
8 Most "Only Corvette Owners Understand" Quirks and Problems
Pouria Savadkouei
Thread Starter
Burning Brakes
Joined: Aug 2006
Posts: 887
Likes: 15
From: Central CT
St. Jude Donor '16

Intermediate


Joined: May 2012
Posts: 46
Likes: 2
From: Drumheller Alberta
I have a 2004 C5 convertible with damage to the outer portion of the drivers side wheelhouse, the inner portion is in good shape, but the outer portion is gone at the joiner strip. The outer fender and attach screws are visible from the wheel opening. Is the outer wheelhouse panel shown in figure 3.7 available for the 2004 C5? I can not seem to find it in any parts list. I bought the car partially repaired and everything on the engine side of the wheelhouse appears perfect. The fender fits on perfectly, but there are a few openings that should be enclosed to keep out the road dirt.
This will be my Arizona car and we leave for Canada in a few days, so it is next falls project, just trying to line up all the parts and knowledge.
Thanks
This will be my Arizona car and we leave for Canada in a few days, so it is next falls project, just trying to line up all the parts and knowledge.
Thanks
From the C5 body repair manual:
3-4 1997/98 Chevrolet Corvette Collision Repair
Front Wheelhouse
The wheelhouse consists of two pieces, an outer
portion that rivets and bonds to a larger inner
portion (Fig. 3.6). The wheelhouse is the inner
mounting structure for the front fender.
The wheelhouse mounting surfaces vary from left
to right. The left side (driver�s side) has more
bonded surface area than the right side, and is
bonded to the cowl. Also, both sides bond and
bolt to the front hinge pillar. The outer
wheelhouse can be separated for partial
installation (Fig. 3.7).
Notice: Do not replace any SMC body panels
until the frame rails have been replaced or
repaired, mounting SMC panels requires the
rails to be positioned accurately.
� REMOVE OR DISCONNECT �
1 Remove all panels and components to gain
access to the front wheelhouse. This may
include removing front wheel, fender, fender
splash panel, bumper cover, battery, and
headlamp mounting brackets.
2 Visually inspect, if any damage to the frame
rails or wheelhouse mounting areas exist,
then restore as much of the damage as
possible to specifications using
three-dimensional measuring procedures.
Notice: Use Kent Moore Tools Frame
Adapter Clamp (P/N J42058) to secure the
vehicle if pulling and straightening is
required (Fig. 3.8).
3 Relocate wiring as necessary to avoid
damage.
4 Remove the four bracket bolts attaching the
wheelhouse to the front hinge pillar (Fig. 3.9).
Heat and pry to remove or dislodge adhesive
beads attaching the wheelhouse to the
vehicle, see Fig. 3.10. Remove the damaged
wheelhouse.
� INSTALL OR CONNECT �
Important: Use US Chemical and Plastics
821014B System 2000 Structural Adhesive, a
PLIOGRIP� adhesive manufactured by Ashland
Chemical Company, or equivalent. Note the 9
minute working time and 1 hour cure time.
Notice: DO NOT adjust the fender by
compromising the wheelhouse to rail gap. This
gap must remain a nominal width to maintain
the correct adhesive strength. The gap should
be correct if the rails are properly located.
Notice: If possible, when prepping area for
service part leave small portions of original
adhesive in various places to act as shimming
for wheelhouse spacing from frame rails. If
original adhesive is not usable for shimming,
use paint stir sticks, or equivalent, and shim
according to body dimensions and body panel
alignment.
1 Remove all remaining adhesive, and scuff all
bonding surfaces to ensure proper adhesion.
(Refer to SMC Repair Procedures.)
2 Clean and prepare all bonding surfaces as
necessary. (Refer to SMC Repair Procedures.)
Important: Prior to refinishing, refer to
GM P/N 4901 Refinish Manual for
recommended products.
3 Apply approved anti-corrosion primer.
Notice: DO NOT top-coat any bonding
surface.
4 Temporarily attach the fender to the
wheelhouse. Align the fender to door and
hood by clamping the wheelhouse assembly
into place. Scribe line on rail to locate
wheelhouse.
5 Apply adhesive to the wheelhouse as shown
in Fig. 3.11. Position front wheelhouse
service part according to the scribe lines on
the rail. Install the four bracket bolts which
attach the wheelhouse to the front hinge
pillar, and clamp the wheelhouse to the rail.
Install headlamp mounting bracket. Trowel
around perimeter of bonding area to remove
excess adhesive and restore original
appearance.
6 Install all related panels and components.