


2000 C5: Chronic Starting Issue
Drifting


Joined: Apr 2002
Posts: 1,941
Likes: 0
From: Stealth So Cal GOCC ...comming to invade your neighborhood soon
I've also been dealing with intermittent starting issues acting like low battery. After doing numerous repairs and mods (3 different optimas, shedding potential non-running loads, turning of all memory items, etc) to try to solve the issue including using a tricklecharger religiously I finally solved the issue. It ended up being the starter. Installed a new one and all issues are gone. Hope it stays that way. FWIW this is on an '02 with 40K.
Well my intermittent starting issue came back. Fortunately I ended up being able to push start it so....Eventually tracked it down to a loose mount for the clutch pedal safety switch.
Glad I got the extended warranty. It has more than paid for itself so far. Once it runs out though...


1st Gear

Joined: Oct 2007
Posts: 1
Likes: 0
which one of the three relays is the anti-theft?
I have three of them and they all look the same.
I have the same problems with starting once every 20 turns and hope to have a cheap fix as well.
I also tried multiple keys with no success.
I have three of them and they all look the same.
I have the same problems with starting once every 20 turns and hope to have a cheap fix as well.
I also tried multiple keys with no success.
Intermediate
Joined: Sep 2007
Posts: 44
Likes: 0
From: Baton Rouge Louisiana
Bump.
I'm still fighting this same issue. Took it to the stealership, they said it was the ignition switch itself. They changed it and hit me for $600. IT STILL WONT START. I deal with this every day, as I have not had the time to take it back to them. I am considering replacing the TDR and/or starter myself to see if that remedies the problem.
I'm still fighting this same issue. Took it to the stealership, they said it was the ignition switch itself. They changed it and hit me for $600. IT STILL WONT START. I deal with this every day, as I have not had the time to take it back to them. I am considering replacing the TDR and/or starter myself to see if that remedies the problem.
Drifting

Joined: Jul 2002
Posts: 1,329
Likes: 8
From: Corpus Christi Tx.
For complete with pics visit http://www.c5help.com/c5_no_start.htm
Troubleshooting C5 No start Issues
Let�s start troubleshooting why you car won�t start or has intermittent starting issues. If you turn the Key to the start position and hear a few clicks from the passenger footwell but the STARTER does not engage this guide may assist you. We start with the easiest checks and proceed to the pain in the *** checks.
1. First of all you want to check the DIC for codes that may help you track down the issue
The Diagnostic Display Mode is entered with the following procedure:
1) Turn on the ignition but don't start the engine.
2) Press the RESET button to turn off any warning messages
3) Press and hold OPTIONS
4) While holding OPTIONS, press FUEL four times within a 10-second period.
Initially, on-board diagnostics go into an Automatic Mode which shows diagnostic codes in a pre-set sequence: PCM - TCS - RTD - BCM - IPC - RADIO - HVAC - LDCM - RDCM - SCM - RFA. All codes will be displayed for each
If none are present in a given module, you will see No More Codes on the display.
There are two kinds of diagnostic codes, Current and History designated with a letter suffix, C or ;H. A current code indicates a malfunction is present in the module displaying data. A history code indicates a problem existed sometime in the last 40 or 50 ignition cycles. When not accompanied by a current code of the same number, it's potential evidence of a previous problem, now resolved, that was not removed by clearing the codes.
More likely it's an indication of an intermittent malfunction.
Intermittent codes are the most challenging of the diagnostics. An intermittent code may have happened once, may have happened more than once but is inconsistent or may be happening on a regular basis but not at the time the codes are displayed. History codes can also be caused by a current malfunction in a system that is not operating at the time codes are displayed. An example is the rear window defogger which doesn't operate until the Body Control Module detects engine rpm. For history codes set by a module that does not operate with the key on and engine off, a special diagnostic tool called a Scan Tester is necessary to properly diagnose the malfunction.
Once the system has displayed all modules, it goes into the manual mode which allows selection of each module using combinations of Driver Information Center buttons. Manual mode can also be entered during the automatic sequence by pressing any button except E/M. Once the display shows Manual Diagnostics, select a module by pressing the OPTIONS button to go forward or the TRIP button to go back. Once a module is selected, a code is displayed, and if more than one are present;
press GAGES to go forward or FUEL to go back.
To exit the diagnostic mode at any time, press E/M. If you want to erase codes in a given module, press RESET
To reset the codes once in manual mode, press and hold RESET until it displays NO CODES Press OPTIONS to go to the next module. Repeat the steps until you have reset the codes in all the computer modules.
NOTE!! Only reset the codes IF you want to - it is NOT necessary to do this. Clearing a code does not repair a problem. You are simply erasing the evidence of it in the module's memory.
Once you have the codes, the next question is: What to do with the information?
First, consult the factory service manual. Any serious C5 Do-It-Yourself owner should invest in the Corvette Service Manual of the appropriate model year. The Service Manual is really a requirement if you want to understand and work on your C5. They are available through Chevrolet dealers and mail order sources, such as Ecklers and Mid America.
The diagnostics for some diagnostic codes call for a scan tester. Also known as scan tools or scanners these units are really hand-held diagnostic computers. A little larger than a portable cassette recorder, powered by the car battery and connected to the diagnostic link connector (DLC); they collect computer module data and display it on a small screen. Scan testers are operated by a small keypad. Software is usually in plug-in cartridges covering a specific model year.
Where you might get stuck needing one of these pieces of equipment is when the Service Manual calls for operating a specific module with a scan tester. If you are trying to solve a diagnostic code and determine that a scan tester is required but don't have access to one; take the car to a service facility for repairs.
The following is a list of all valid DTCs for Corvette C5: The ones shown in RED can be the cause of a NO START situation. However there are others that might also cause this. Those listed are simply the MOST COMMON issues.
DTC B0605 BCM Internal Memory Malfunction
DTC B0851 Battery 1 Out of Range
DTC B0856 Ba
DTC B2252 Key Cylinder Switch Circuit
DTC B2253 Key Cylinder Switch Circuit
DTC B2282 Battery #1 Circuit
DTC B2283 Battery #1 Circuit
DTC B2284 Battery #2 Circuit
DTC B2285 Battery #2 Circuit
DTC B2721 PASS-Key Detection Circuit
DTC B2722 PASS-Key Detection Circuit
DTC B2723 PASS-Key Detection Circuit
DTC B2735 PASS-Key Programming Mode Active
DTC P0230 Fuel Pump Relay Control Circuit
DTC P0562 System Voltage Low
DTC P0563 System Voltage High
DTC P1626 Theft Deterrent Fuel Enable Signal Lost
DTC P1630 Theft Deterrent Learn Mode Active
DTC P1631 Theft Deterrent Start Enable Signal Not Correct
If any of the DTC Codes shown in RED are set, you can find information and troubleshooting at Gearchatter.com www.gearchatter.com
2. Check for loose (proper torque is 71 inch lbs) or corroded connectors on the Battery and Load Test the Battery ! Most Auto Parts Stores will perform a LOAD TEST for little or no charge. Do not Assume that because the connectors look clean they are. Better to use a wire brush and baking soda here to clean the terminals.
3. Try to reset the VATS system using the following procedure:
The typical 1998+ Passkey relearn procedure is this:
1. Disable your headlamps. Attempt to start the vehicle. Vehicle may or may not 'fire' and quit. Some vehicles will not engage the starter. This is normal. DO NOT TURN OFF KEY YET !!
2. Leave the key in the "on" position, until the 'security' light goes out or quits alternately flashing between "Security" and "Battery". This relearn period always takes 10 minutes. How long does this take ? 10 minutes. How long do I have to wait ? 10 minutes.
3. After security light is no longer displayed, shut the key off ! Wait 5-10 seconds and repeat the above procedure (steps 1 through 3) another two completed times for a total of 3 start-relearn-attempts, remembering to shut the key off between each 10 minute relearn procedure. This will take 30 minutes--no less. If the 4th start attempt fails to start the vehicle you did one relearn step (or all of them incorrectly). If you left your headlamps on until the battery went dead and voltage dropped below 10.5 volts, no amount of relearn attempts will be learned !!
Don't read too much into this. Most people cannot seem to grasp the simplicity of this relearn procedure.
4. Check the VATS pellet in the key. Try using your spare key to resolve the issue. If the car starts using the spare key then you want to try cleaning the pellet on the key causing the issue. You can do this by simply using Isopropyl Alcohol on a damp cloth, followed by sliding the resistor back and forth between a piece of folded paper.
If the car continues to start using the spare key but does not start using the original key after cleaning you need to buy a new key !
Determine your VATS code ( A GM dealer should do this for no charge) or
If you have a digital volt meter, set it on ohms mode and measure the resistance of the pellet on your key. The BCM is programmed for a specific resistance value. The BCM measures the voltage drop across the key pellet. If it is within +/-10%, then the car will start.
The 15 resistor codes are:
Key# Value (Ohms)
1 392
2 523
3 681
4 887
5 1130
6 1470
7 1870
8 2370
9 3010
10 3740
11 4750
12 6040
13 7500
14 9530
15 11800
If you're getting 1460, you probably have a VATS code 6. You can set where the decimal point goes, but the point is the number is within +/- 10% of the value for #6.
Once you have this number...
Follow this link to buy a double sided GM VATS key.
One good source for the blank key is http://stores.ebay.com/Locksmith-Source The number key you want is your VATS code #
Once the key arrives Take it to a local locksmith. he should charge you $2.00 to cut it
5. Bad ignition switch. Try to wiggle and pull on the key while holding it in the crank position, also try just holding the switch in the crank position for an extended period of time and see if it will start.
Instructions and photo's on accessing the Ignition switch assembly can be found HERE
6. Check Minifuse 14 (10 amp) and Maxifuse 52 (60 amp) in the passenger toeboard fuse panel Located on the passenger side under the carpet, remove floor cover then fuse housing cover.
7. Check the Theft Deterent Relay TDR relay which is GM part number# 12177233 (Superseded by Gm part Number 12177235 which is a direct replacement) located above the BCM in the same location. The easiest method to check this is to remove the relay and jump between the purple and red wires on the connector, If the car starts with a jumper in place you need a new relay ! Do not operate the car with the jumper in place, This is for troubleshooting ONLY. Attempting to drive the vehicle with any troubleshooting fix could result in permanent damage or FIRE !
This relay is located right above the BCM in the pass. side footwell. It has 4 wires attached to it:
Coil side:
Yellow - +12v from ignition switch during starting.
Yellow/black stripe - Ground signal supplied by BCM.
Note this will only show continuity to ground during starting (assuming no theft protection is occurring...the BCM has the ability to prevent starting by not supplying this ground signal).
Load side:
Red - +12v from battery
Purple - +12v to starter solenoid during starting.
8. Bad Clutch Safety Switch Just disconnect the clutch safety switch connector from the switch, use a small piece if wire and jumper the TWO connections in the plug. If the switch is bad, the jumper wire will allow the car to start! ***Remember*** if you jumper that switch out, the car will start IN GEAR with the clutch OUT!
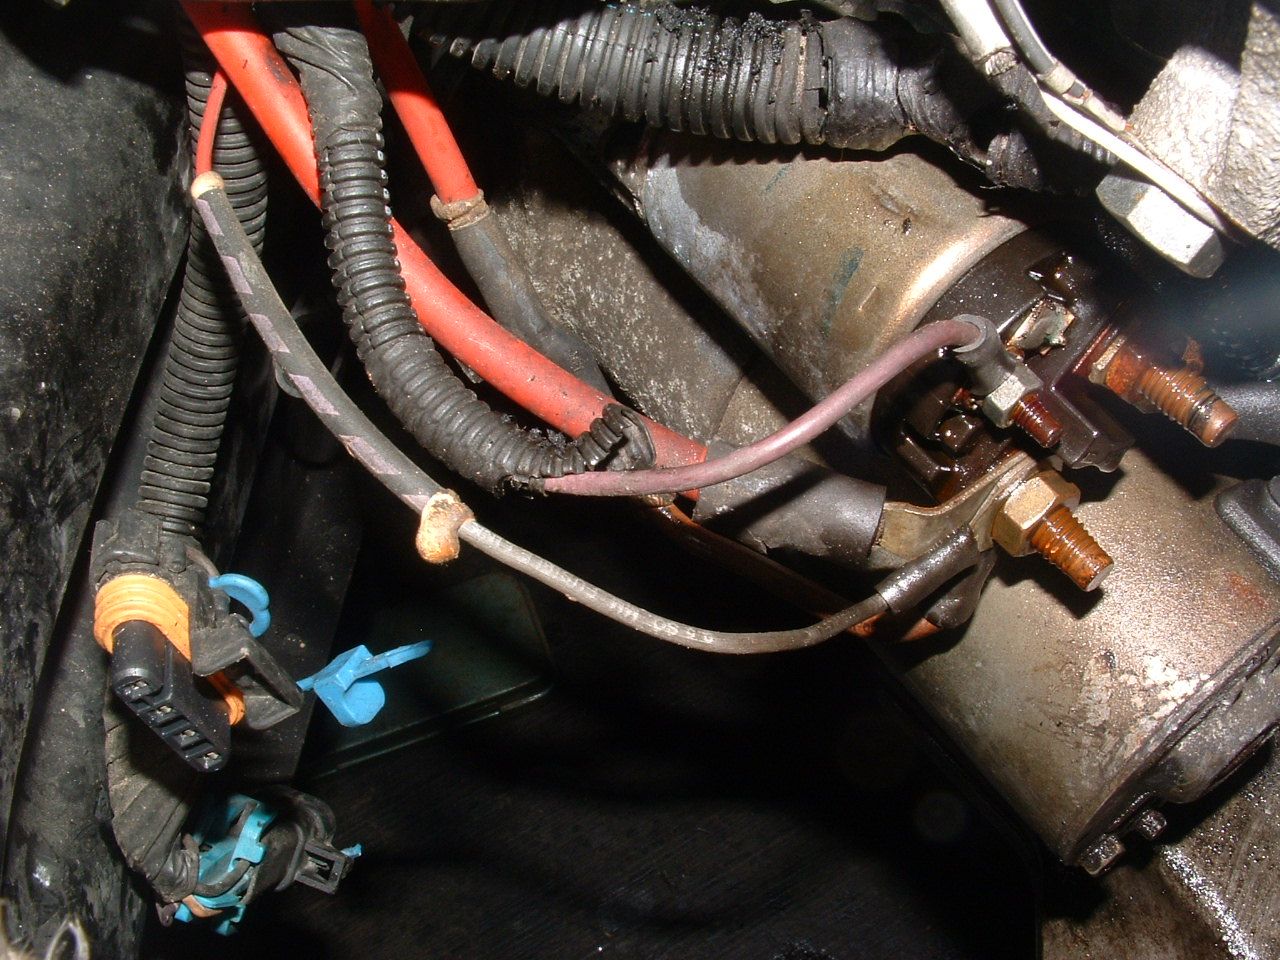
9. Loose starter connections. VERY COMMON ISSUE!!! Loose wires on the starter and solenoid will cause this issue! If there loose, it will eventually cause the wire and solenoid to burn up! (get crispy) Then it will FAIL! Put the car on jack stands or a lift and check all the wires on the starter solenoid. Located on the Passenger Side Engine Compartment.
10. Starter solenoid. If the TDR isn't bad, then the solenoid is probably bad If it fails to start and trying the ignition switch a few times doesn't work and you�re stuck, whack the starter with a hammer or a wrench. Quick check to rule out the starter and solenoid is to jump the terminals on the solenoid with a screw driver or remote starter button, (preferred method).
If the starter engages it's not the starter or solenoid.
11. Starter. If the brushes inside the starter are worn or the commentator ring is corroded or burnt, the same mechanical agitation described in # 10 will also alleviate that issue (temporarily)
12. Check the Block Ground located directly above the starter Make sure you have two wires attached to that ground ,it is clean , corrosion free and tight.
Troubleshooting C5 No start Issues
Let�s start troubleshooting why you car won�t start or has intermittent starting issues. If you turn the Key to the start position and hear a few clicks from the passenger footwell but the STARTER does not engage this guide may assist you. We start with the easiest checks and proceed to the pain in the *** checks.
1. First of all you want to check the DIC for codes that may help you track down the issue
The Diagnostic Display Mode is entered with the following procedure:
1) Turn on the ignition but don't start the engine.
2) Press the RESET button to turn off any warning messages
3) Press and hold OPTIONS
4) While holding OPTIONS, press FUEL four times within a 10-second period.
Initially, on-board diagnostics go into an Automatic Mode which shows diagnostic codes in a pre-set sequence: PCM - TCS - RTD - BCM - IPC - RADIO - HVAC - LDCM - RDCM - SCM - RFA. All codes will be displayed for each
If none are present in a given module, you will see No More Codes on the display.
There are two kinds of diagnostic codes, Current and History designated with a letter suffix, C or ;H. A current code indicates a malfunction is present in the module displaying data. A history code indicates a problem existed sometime in the last 40 or 50 ignition cycles. When not accompanied by a current code of the same number, it's potential evidence of a previous problem, now resolved, that was not removed by clearing the codes.
More likely it's an indication of an intermittent malfunction.
Intermittent codes are the most challenging of the diagnostics. An intermittent code may have happened once, may have happened more than once but is inconsistent or may be happening on a regular basis but not at the time the codes are displayed. History codes can also be caused by a current malfunction in a system that is not operating at the time codes are displayed. An example is the rear window defogger which doesn't operate until the Body Control Module detects engine rpm. For history codes set by a module that does not operate with the key on and engine off, a special diagnostic tool called a Scan Tester is necessary to properly diagnose the malfunction.
Once the system has displayed all modules, it goes into the manual mode which allows selection of each module using combinations of Driver Information Center buttons. Manual mode can also be entered during the automatic sequence by pressing any button except E/M. Once the display shows Manual Diagnostics, select a module by pressing the OPTIONS button to go forward or the TRIP button to go back. Once a module is selected, a code is displayed, and if more than one are present;
press GAGES to go forward or FUEL to go back.
To exit the diagnostic mode at any time, press E/M. If you want to erase codes in a given module, press RESET
To reset the codes once in manual mode, press and hold RESET until it displays NO CODES Press OPTIONS to go to the next module. Repeat the steps until you have reset the codes in all the computer modules.
NOTE!! Only reset the codes IF you want to - it is NOT necessary to do this. Clearing a code does not repair a problem. You are simply erasing the evidence of it in the module's memory.
Once you have the codes, the next question is: What to do with the information?
First, consult the factory service manual. Any serious C5 Do-It-Yourself owner should invest in the Corvette Service Manual of the appropriate model year. The Service Manual is really a requirement if you want to understand and work on your C5. They are available through Chevrolet dealers and mail order sources, such as Ecklers and Mid America.
The diagnostics for some diagnostic codes call for a scan tester. Also known as scan tools or scanners these units are really hand-held diagnostic computers. A little larger than a portable cassette recorder, powered by the car battery and connected to the diagnostic link connector (DLC); they collect computer module data and display it on a small screen. Scan testers are operated by a small keypad. Software is usually in plug-in cartridges covering a specific model year.
Where you might get stuck needing one of these pieces of equipment is when the Service Manual calls for operating a specific module with a scan tester. If you are trying to solve a diagnostic code and determine that a scan tester is required but don't have access to one; take the car to a service facility for repairs.
The following is a list of all valid DTCs for Corvette C5: The ones shown in RED can be the cause of a NO START situation. However there are others that might also cause this. Those listed are simply the MOST COMMON issues.
DTC B0605 BCM Internal Memory Malfunction
DTC B0851 Battery 1 Out of Range
DTC B0856 Ba
DTC B2252 Key Cylinder Switch Circuit
DTC B2253 Key Cylinder Switch Circuit
DTC B2282 Battery #1 Circuit
DTC B2283 Battery #1 Circuit
DTC B2284 Battery #2 Circuit
DTC B2285 Battery #2 Circuit
DTC B2721 PASS-Key Detection Circuit
DTC B2722 PASS-Key Detection Circuit
DTC B2723 PASS-Key Detection Circuit
DTC B2735 PASS-Key Programming Mode Active
DTC P0230 Fuel Pump Relay Control Circuit
DTC P0562 System Voltage Low
DTC P0563 System Voltage High
DTC P1626 Theft Deterrent Fuel Enable Signal Lost
DTC P1630 Theft Deterrent Learn Mode Active
DTC P1631 Theft Deterrent Start Enable Signal Not Correct
If any of the DTC Codes shown in RED are set, you can find information and troubleshooting at Gearchatter.com www.gearchatter.com
2. Check for loose (proper torque is 71 inch lbs) or corroded connectors on the Battery and Load Test the Battery ! Most Auto Parts Stores will perform a LOAD TEST for little or no charge. Do not Assume that because the connectors look clean they are. Better to use a wire brush and baking soda here to clean the terminals.
3. Try to reset the VATS system using the following procedure:
The typical 1998+ Passkey relearn procedure is this:
1. Disable your headlamps. Attempt to start the vehicle. Vehicle may or may not 'fire' and quit. Some vehicles will not engage the starter. This is normal. DO NOT TURN OFF KEY YET !!
2. Leave the key in the "on" position, until the 'security' light goes out or quits alternately flashing between "Security" and "Battery". This relearn period always takes 10 minutes. How long does this take ? 10 minutes. How long do I have to wait ? 10 minutes.
3. After security light is no longer displayed, shut the key off ! Wait 5-10 seconds and repeat the above procedure (steps 1 through 3) another two completed times for a total of 3 start-relearn-attempts, remembering to shut the key off between each 10 minute relearn procedure. This will take 30 minutes--no less. If the 4th start attempt fails to start the vehicle you did one relearn step (or all of them incorrectly). If you left your headlamps on until the battery went dead and voltage dropped below 10.5 volts, no amount of relearn attempts will be learned !!
Don't read too much into this. Most people cannot seem to grasp the simplicity of this relearn procedure.
4. Check the VATS pellet in the key. Try using your spare key to resolve the issue. If the car starts using the spare key then you want to try cleaning the pellet on the key causing the issue. You can do this by simply using Isopropyl Alcohol on a damp cloth, followed by sliding the resistor back and forth between a piece of folded paper.
If the car continues to start using the spare key but does not start using the original key after cleaning you need to buy a new key !
Determine your VATS code ( A GM dealer should do this for no charge) or
If you have a digital volt meter, set it on ohms mode and measure the resistance of the pellet on your key. The BCM is programmed for a specific resistance value. The BCM measures the voltage drop across the key pellet. If it is within +/-10%, then the car will start.
The 15 resistor codes are:
Key# Value (Ohms)
1 392
2 523
3 681
4 887
5 1130
6 1470
7 1870
8 2370
9 3010
10 3740
11 4750
12 6040
13 7500
14 9530
15 11800
If you're getting 1460, you probably have a VATS code 6. You can set where the decimal point goes, but the point is the number is within +/- 10% of the value for #6.
Once you have this number...
Follow this link to buy a double sided GM VATS key.
One good source for the blank key is http://stores.ebay.com/Locksmith-Source The number key you want is your VATS code #
Once the key arrives Take it to a local locksmith. he should charge you $2.00 to cut it
5. Bad ignition switch. Try to wiggle and pull on the key while holding it in the crank position, also try just holding the switch in the crank position for an extended period of time and see if it will start.
Instructions and photo's on accessing the Ignition switch assembly can be found HERE
6. Check Minifuse 14 (10 amp) and Maxifuse 52 (60 amp) in the passenger toeboard fuse panel Located on the passenger side under the carpet, remove floor cover then fuse housing cover.
7. Check the Theft Deterent Relay TDR relay which is GM part number# 12177233 (Superseded by Gm part Number 12177235 which is a direct replacement) located above the BCM in the same location. The easiest method to check this is to remove the relay and jump between the purple and red wires on the connector, If the car starts with a jumper in place you need a new relay ! Do not operate the car with the jumper in place, This is for troubleshooting ONLY. Attempting to drive the vehicle with any troubleshooting fix could result in permanent damage or FIRE !
This relay is located right above the BCM in the pass. side footwell. It has 4 wires attached to it:
Coil side:
Yellow - +12v from ignition switch during starting.
Yellow/black stripe - Ground signal supplied by BCM.
Note this will only show continuity to ground during starting (assuming no theft protection is occurring...the BCM has the ability to prevent starting by not supplying this ground signal).
Load side:
Red - +12v from battery
Purple - +12v to starter solenoid during starting.
8. Bad Clutch Safety Switch Just disconnect the clutch safety switch connector from the switch, use a small piece if wire and jumper the TWO connections in the plug. If the switch is bad, the jumper wire will allow the car to start! ***Remember*** if you jumper that switch out, the car will start IN GEAR with the clutch OUT!
9. Loose starter connections. VERY COMMON ISSUE!!! Loose wires on the starter and solenoid will cause this issue! If there loose, it will eventually cause the wire and solenoid to burn up! (get crispy) Then it will FAIL! Put the car on jack stands or a lift and check all the wires on the starter solenoid. Located on the Passenger Side Engine Compartment.
10. Starter solenoid. If the TDR isn't bad, then the solenoid is probably bad If it fails to start and trying the ignition switch a few times doesn't work and you�re stuck, whack the starter with a hammer or a wrench. Quick check to rule out the starter and solenoid is to jump the terminals on the solenoid with a screw driver or remote starter button, (preferred method).
If the starter engages it's not the starter or solenoid.
11. Starter. If the brushes inside the starter are worn or the commentator ring is corroded or burnt, the same mechanical agitation described in # 10 will also alleviate that issue (temporarily)
12. Check the Block Ground located directly above the starter Make sure you have two wires attached to that ground ,it is clean , corrosion free and tight.
Corvette Stories
The Best of Corvette for Corvette Enthusiasts

Top 10 Most Expensive Corvettes Ever Sold on Bring A Trailer
Brett Foote
10 Things Every Corvette Owner Needs (2026 Edition)
Michael S. Palmer
8 Most "Only Corvette Owners Understand" Quirks and Problems
Pouria Savadkouei
10 Reasons the C6 Z06 is Still A Performance Benchmark After 20 Years
Joe Kucinski
How Much Horsepower Every Corvette Engine "LOST" in 1972
Joe Kucinski
Top 10 DOs and DON'Ts for Protecting Your Convertible Top!
Michael S. Palmer
Top 10 Most Explosive Corvettes Ever Made: Power-to-Weight Ratio Ranked!
Joe Kucinski
150 hp to 1,250 hp: Every Corvette Generation Compared by the Specs That Matter
Joe Kucinski
8 Coolest Corvette Pace Cars (and Replicas) of All Time
Verdad Gallardo
Tech Contributor


Joined: Dec 1999
Posts: 32,910
Likes: 2,402
From: Anthony TX
CI 6,7,8,9,11 Vet
St. Jude Donor '08
Here is the CIRCUIT that you need to learn how to navigate and understand the flow path for starting a C5.
It looks complicated BUT,,,,,,, if you remember that there is a Low Voltage CONTROL side of the circuit and a Low Voltage High Current side of the circuit,, it will make a lot of sense.
The Theft Deterrent Relay is the TROUBLESHOOTING center piece.
Using a simple volt meter, its easy to troubleshoot.
The C5 Corvette has a VERY WELL KNOWN issue with the starter solenoids causing a NON CRANK ISSUE. Inside the solenoid is a contact plate. That contact plate sticks and does not make contact with the contact inside that allows the coil to energize and engage the bendix.
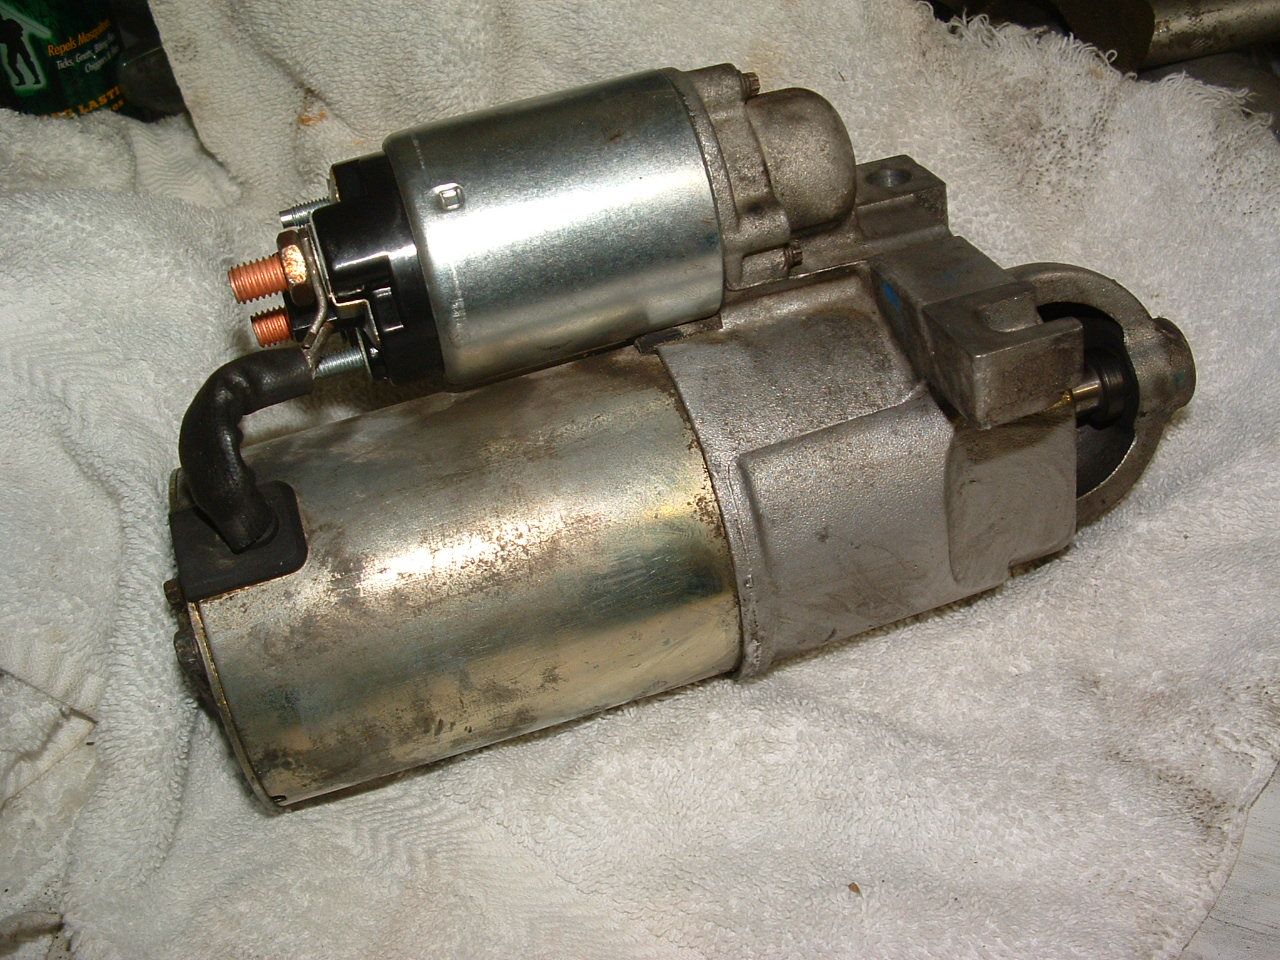
I replaced my defective solenoid and resolved my NO CRANK issues. When mine wouldn't crank, I could whack the starter and it would fire right over.
It looks complicated BUT,,,,,,, if you remember that there is a Low Voltage CONTROL side of the circuit and a Low Voltage High Current side of the circuit,, it will make a lot of sense.
The Theft Deterrent Relay is the TROUBLESHOOTING center piece.
Using a simple volt meter, its easy to troubleshoot.
The C5 Corvette has a VERY WELL KNOWN issue with the starter solenoids causing a NON CRANK ISSUE. Inside the solenoid is a contact plate. That contact plate sticks and does not make contact with the contact inside that allows the coil to energize and engage the bendix.
I replaced my defective solenoid and resolved my NO CRANK issues. When mine wouldn't crank, I could whack the starter and it would fire right over.
Tech Contributor
Joined: Dec 1999
Posts: 32,910
Likes: 2,402
From: Anthony TX
CI 6,7,8,9,11 Vet
St. Jude Donor '08


The TUMBLER has ABSOLUTY NOTHING to do with not starting the engine! You can REMOVE the entire tumbler and reinstall it into a new switch! Its JUST a mechanical lock that prevents you from turning the switch unless theres a key in the tumbler.
The ignition switch is repairable and if you dont want to repair the switch,, its easily replaced.
WHAT DTCs are you having???????????????????
Is the 'SECURITY LIGHT" flashing or on when you have the key in the ignition and when cranking the engine???????
Man,, A new switch is LESS than $100
For $550 i WILL CHANGE IT FOR YOU!!

Seriously,,,,,,,, your getting BONED!!! Find another shop!
Read and post your DTCs
READING YOUR Engine Diagnostic Trouble Codes (DTC)
This procedure should be carried out any time you experience a problem with your C5. Most inexpensive store bought aftermarket code readers will ONLY read power train DTC’s. Reading the DTC’s with the C5 built in code reader will allow you to read ALL the modules in the vehicle.
The Diagnostic Display Mode is entered with the following procedure:
1) Turn on the ignition but don't start the engine.
2) Press the RESET button to turn off any warning messages. (i.e. door open, trunk open ect)
3) Press and hold the OPTIONS button
4) While holding OPTIONS, press FUEL button four times within a 10 -second period.
Initially, the on-board diagnostics go into an Automatic Mode which will cycle through each module and shows diagnostic codes in a pre-set sequence: PCM - TCS - RTD - BCM - IPC - RADIO - HVAC - LDCM - RDCM - SCM - RFA. All codes will be displayed for each module. ( i.e. PCM = 4 codes) If none are present in a given module, you will see No More Codes on the display.
There are two types of diagnostic codes, Current and History designated with a letter suffix, “C” or “H”. A current code indicates a malfunction is present in the module displaying data. A history code indicates a problem existed sometime in the last 40 or 50 ignition cycles. When not accompanied by a current code of the same number, it's potential evidence of a previous problem, now resolved, that was not removed by clearing the codes. More likely it's an indication of an intermittent malfunction.
Intermittent codes are the most challenging of the diagnostics. An intermittent code may have happened once, may have happened more than once but is inconsistent or may be happening on a regular basis but not at the time the codes are displayed. History codes can also be caused by a current malfunction in a system that is not operating at the time codes are displayed. An example is the rear window defogger which doesn't operate until the Body Control Module detects engine rpm. For history codes set by a module that does not operate with the key on and engine off, a special diagnostic tool called a Scan Tester is necessary to properly diagnose the malfunction.
Once the system has displayed all modules, it goes into the manual mode which allows selection of each module using combinations of Driver Information Center buttons. Manual mode can also be entered during the automatic sequence by pressing any button except E/M. Once the display shows Manual Diagnostics, select a module by pressing the OPTIONS button to go forward or the TRIP button to go back. Once a module is selected, a code is displayed, and if more than one are present; press GAGES to go forward or FUEL to go back.
To exit the diagnostic mode at any time, press E/M. If you want to erase codes in a given module, press RESET To reset the codes once in manual mode, press and hold RESET until it displays NO CODES Press OPTIONS to go to the next module. Repeat the steps until you have reset the codes in all the computer modules.
NOTE!! Only reset the codes IF you want to - it is NOT necessary to do this. Clearing a code does not repair a problem. You are simply erasing the evidence of it in the module's memory. If you clear the code/s, and extinguish the Check Engine Light, your emissions status ready will NOT allow you to pass an emissions test until you have completed the required driving cycles. There are a few body module DTC’s that if set will prevent the module from operating properly. Once the DTC is cleared, the module will return to full function. This is not true for power train DTCs.
If you have never read and cleared your codes, there will probably be a lot of old history DTCs. It is recommended that you clear your codes and see if any come back during a driving cycle. Those are the ones that you need to concentrate on diagnosing.
Once you have the codes, the next question is: What to do with the information?
First, consult the factory service manual. Any serious C5 Do-It-Yourself owner should invest in the Corvette Service Manual of the appropriate model year. The Service Manual is really a requirement if you want to understand and work on your C5.
NOTE and a WARNING. You can read the DTCs while the engine is running. I pull mine up all the time while driving.
WARNING. Don’t become distracted while reading DTCs while your driving and cause an accident!!!!! Use common sense and drive safe.
These are some very good C5 Diagnostic Trouble Code (DTC) explanation web sites!!! They also explain how to read the DTCs
Here are some very good sites that explain what DTC mean:
http://www.gearchatter.com/viewtopic11755.php
http://www.obd-codes.com/trouble_cod...d-ii-codes.php
Make sure to include the H or C suffix when you post your DTCs!!
Last edited by Bill Curlee; Mar 28, 2013 at 09:07 PM.

5th Gear
Joined: Jul 2012
Posts: 5
Likes: 0
From: North Palm Beach Florida
Bill, thankyou for your in-depth review of my problem. I have now read the DTC codes using the DIC and find that when I have a problem with 'No start', I get DTC codes B2721 and P1631. The security light is on or flashing when when I turn on the ignition switch. I've found this light needs to be off for the car to start! I've trained the key fobs using the DIC and everything works as it should except ocassionally, when the security light stays on, the car will not start. I've also tried my spare key, but same problem! The ignition switch is not getting the correct signal from the key. But I don't think both key resistors can be bad...must be the ignition switch?
Tech Contributor
Joined: Dec 1999
Posts: 32,910
Likes: 2,402
From: Anthony TX
CI 6,7,8,9,11 Vet
St. Jude Donor '08
On the end of the ignition switch is a metal can. That can is the KEY PELLET READER.
Inside are two small metal contacts. Those contacts make connection with the key pellet.
If they are damaged, dirty or broken,, thats your issue. It comes apart BUT,,,,,,,,,,,,,,,,,,, I have never had the opportunity to disassemble one. If you do,,,,, PLEASE take pictures!
You can measure the key pellet resistance and then put the key into the reader and read the resistance on the wire coming off the sensor. The resistances should MATCH.
Bill