


 The module will reset after every restart. The DTCs are the key to providing you assistance and recommendations for repair.
ABS/Active handling service message
Thread Starter
Advanced

Joined: Sep 2007
Posts: 63
Likes: 0
From: Ventura Ca
Thanks in advance for any help or suggestions. 2001coupe, I got the "Acitve Handling/ABS" service warning a few weeks ago that disappeared after a restart but came on again yesterday and this time hasnt gone away. I did a search, and read about accessing "codes" but I am not able to retrieve codes. Help is appreciated.
Thanks!
PK
Thanks!
PK
Last edited by PK51st; Dec 5, 2007 at 09:52 AM.

Safety Car

Joined: Sep 2003
Posts: 3,692
Likes: 5
From: Hayward CA
Turn the key to the ON position, but don't start the engine. Clear any present messages by pressing the RESET button. Hold the OPTIONS button down, and press the FUEL button 4 times. This will get you into the CODES section of the DIC. The computer will automatically display all the codes your car has created. It will cycle through each code every 3 seconds. Any code that ends in H is a history code (something that has occured in the past) but is fine now. Once the computer has finished going through all of it's codes, press RESET to enter Manual Configuration mode. It should start with a module and show "NO CODES" or "# CODES".
To optionally reset the codes once in manual mode, press and hold RESET until it displays "NO CODES". Press OPTIONS to go to the next module. Repeat the steps in this paragraph until you have reset the codes in all the computer modules. NOTE !! Only reset the codes IF you want to - it is NOT necessary to do this.
Once the IPC has displayed all 11 modules the system goes into the manual mode. This allows selection of each module using combinations of DIC buttons. The manual mode can also be entered at any time during the automatic sequence by pressing any button except E/M.
Once the IPC displays "manual diagnostics" you may select a particular module by pressing the options button to go forward or the trip button to go back. You may find more than one code on a module. To scroll through multiple codes in a module press gages to move forward or fuel to go back within the module. If you want to erase a code press reset.
To exit the diagnostic mode at any time, press E/M.
Thread Starter
Advanced
Joined: Sep 2007
Posts: 63
Likes: 0
From: Ventura Ca
Turn the key to the ON position, but don't start the engine. Clear any present messages by pressing the RESET button. Hold the OPTIONS button down, and press the FUEL button 4 times. This will get you into the CODES section of the DIC. The computer will automatically display all the codes your car has created. It will cycle through each code every 3 seconds. Any code that ends in H is a history code (something that has occured in the past) but is fine now. Once the computer has finished going through all of it's codes, press RESET to enter Manual Configuration mode. It should start with a module and show "NO CODES" or "# CODES".
To optionally reset the codes once in manual mode, press and hold RESET until it displays "NO CODES". Press OPTIONS to go to the next module. Repeat the steps in this paragraph until you have reset the codes in all the computer modules. NOTE !! Only reset the codes IF you want to - it is NOT necessary to do this.
Once the IPC has displayed all 11 modules the system goes into the manual mode. This allows selection of each module using combinations of DIC buttons. The manual mode can also be entered at any time during the automatic sequence by pressing any button except E/M.
Once the IPC displays "manual diagnostics" you may select a particular module by pressing the options button to go forward or the trip button to go back. You may find more than one code on a module. To scroll through multiple codes in a module press gages to move forward or fuel to go back within the module. If you want to erase a code press reset.
To exit the diagnostic mode at any time, press E/M.
To optionally reset the codes once in manual mode, press and hold RESET until it displays "NO CODES". Press OPTIONS to go to the next module. Repeat the steps in this paragraph until you have reset the codes in all the computer modules. NOTE !! Only reset the codes IF you want to - it is NOT necessary to do this.
Once the IPC has displayed all 11 modules the system goes into the manual mode. This allows selection of each module using combinations of DIC buttons. The manual mode can also be entered at any time during the automatic sequence by pressing any button except E/M.
Once the IPC displays "manual diagnostics" you may select a particular module by pressing the options button to go forward or the trip button to go back. You may find more than one code on a module. To scroll through multiple codes in a module press gages to move forward or fuel to go back within the module. If you want to erase a code press reset.
To exit the diagnostic mode at any time, press E/M.
This is the 2nd time this has happened, but the prior time the lights went out after immediate restart.Mine's a 2001 coupe, why can't I get those codes?
Thanks again
PK
Race Director


Joined: May 2005
Posts: 15,960
Likes: 21
From: West Norriton PA
St. Jude Donor '08
Thanks! However, when I attempted the code thing nothing happens. I don't get the list of codes. I carefully followed instructions too... Now, the good part: The warning lights went away finally on their own! This is the 2nd time this has happened, but the prior time the lights went out after immediate restart.
Mine's a 2001 coupe, why can't I get those codes?
Thanks again
PK
This is the 2nd time this has happened, but the prior time the lights went out after immediate restart.Mine's a 2001 coupe, why can't I get those codes?
Thanks again
PK
Try This
http://www.stengel.net/diccodes.htm

Tech Contributor


Joined: Dec 1999
Posts: 32,910
Likes: 2,402
From: Anthony TX
CI 6,7,8,9,11 Vet
St. Jude Donor '08
PK
Are you using the C5 DTC code reading procedure or an afermarket code reader?
If you clear all the DIC messages off the DIC screen by pressing "RESET", then, PRESS and HOLD the options button and while pressing and holding options, press FUEL four times in rapid succsession, you "SHOULD" see the DIC enter diagnostics mode! Its kinda like "Control/ALT/DELETE on a computer
BC
Thread Starter
Advanced
Joined: Sep 2007
Posts: 63
Likes: 0
From: Ventura Ca
I got codes! I really had to hit the fuel button VERY quickly 4 times in succession. The warnings lights are back, but I'm making progress Called into dinner, but I'll write down the codes for further investigation soon. Thanks!
PK
Called into dinner, but I'll write down the codes for further investigation soon. Thanks! PK
Last edited by PK51st; Dec 5, 2007 at 09:24 PM.

Burning Brakes

Joined: Jan 2006
Posts: 1,170
Likes: 27
From: Magnolia Greens NC
The Basics
Let's cover some basic information on AH, TC, and ABS. In simple terms, these three systems combine data from wheel speed sensors, yaw rate sensors, steering wheel position sensors, along with brake and throttle inputs to determine what the driver wants to do and detects any lose of traction and take corrective action by pulling back on the throttle, activating brakes on individual wheels, or releasing brake pressure as needed to maintain traction.
What goes wrong
When there is a problem anywhere in the system, the computer does not know what's going on with the car or cannot respond correctly. Rather than risking the wrong response which could potentially wreck you car, the whole system is simply disabled for the remainder of the ignition cycle. At this time you will see the ABS and Traction Control warning indicators illuminated on the instrument cluster along with the following messages on the Driver Information Center (DIC):
- Service ABS
- Service Traction System
- Service Active Handling
At this point, you can safely continue to drive your car, just remember that your electronic driving aids are no longer functioning so you should adjust your driving habits accordingly.
Troubleshooting
As I said before, when there is a problem the system is deactivated for the remainder of the ignition cycle, so sometimes everything will go back to normal if you just turn off the car and restart it. If that corrects the problem, it was either a glitch in the system, a lose connection that's going to come back soon or an early sign of a future failure that is coming. Even though the system is now functional it is still beneficial to continue to trouble shoot. The history code should give you a good idea of what to check
The next step is to see where the fault is. If you have several different codes write them down, clear them, and see which ones come back the next time you start the car. At this point, I'm betting that the codes point to either the EBCM or the wheel speed sensors. We'll get to the wheel speed sensors later, for now, let's get to the EBCM.
Electronic Brake Control Module
The most common code for the EBCM is C1214 - Sol Valve relay Contact or coil CKT Open. This code is set when the system voltage is less than 8 volts for 0.23 seconds. Since our goal is to fix this for the lowest price possible, we'll start checking things we can fix for free
......IF YOU WANT all THE PICTURES FILE, PM me your email address....
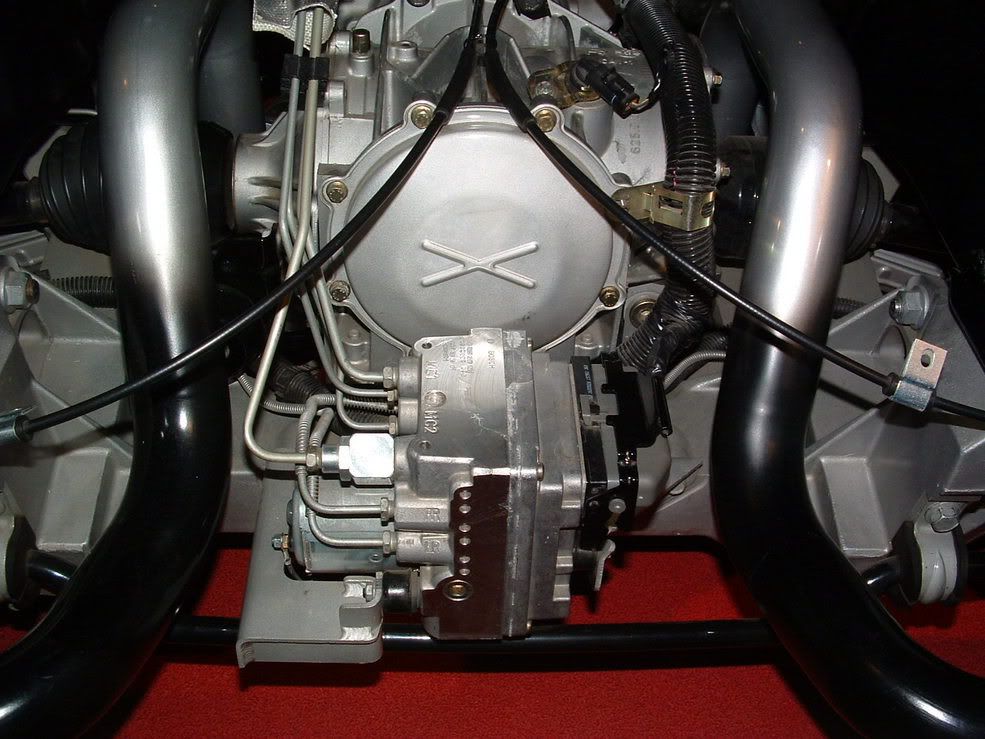
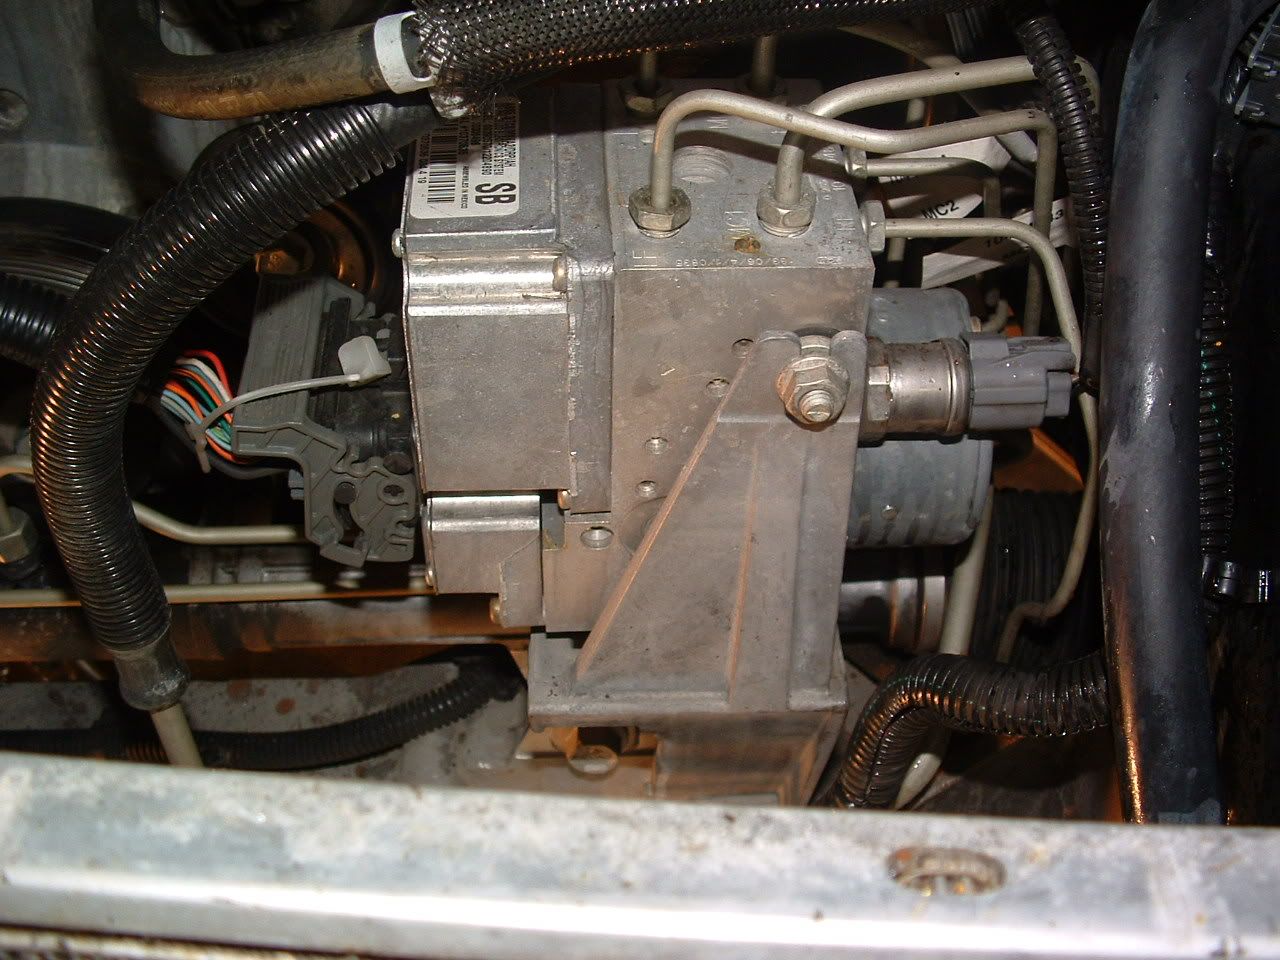
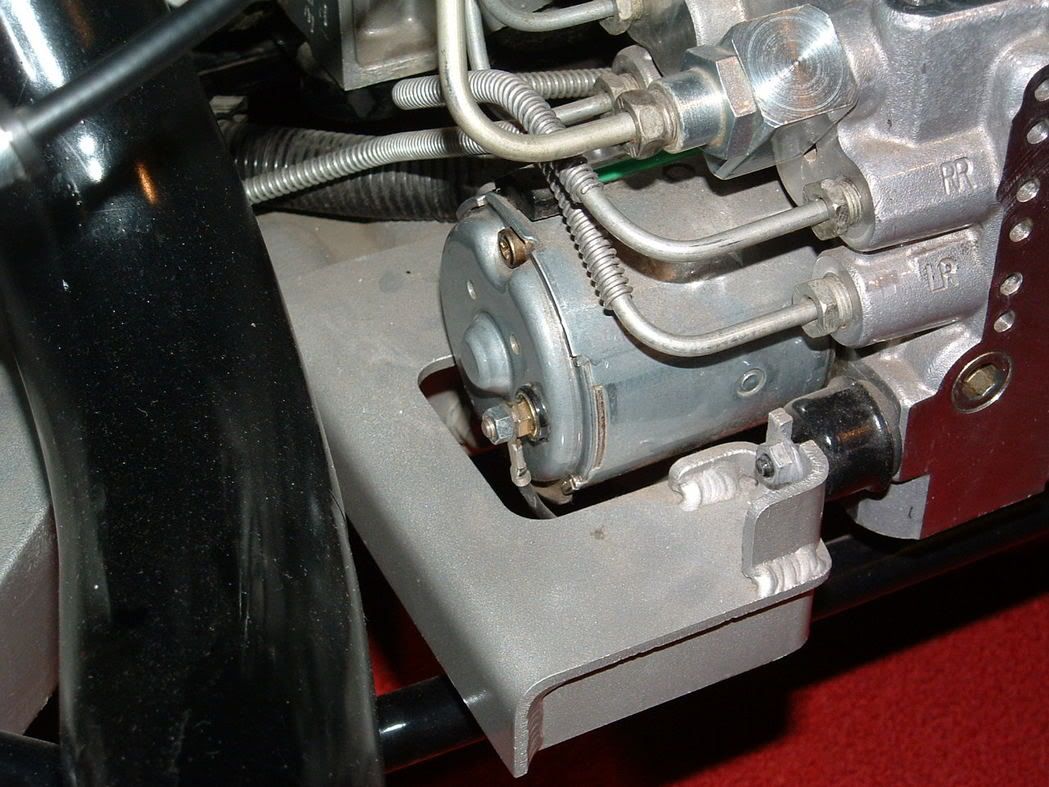
The EBCM sits between the engine and radiator. You can see it in the picture on the left below. The EBCM is on the left with the large wire harness coming into it and the sticker on top. The Brake Pressure Modulator Valve (BPMV) in on the right with the brake lines coming out. The EBCM is a dry module, meaning that you can change it out without having to worry about bleeding the ABS system. All of the brake fluid is contained within the BPMV. The coils (seen in the picture on the right below) fit over small spools that have valves inside them. The valves are operated by an electromagnetic field supplied by the coils.
Start by doing a quick visual inspection of the wires. If there are any obvious signs of damage, you've likely found the problem. One member had a problem with the wires rubbing the serpentine belt
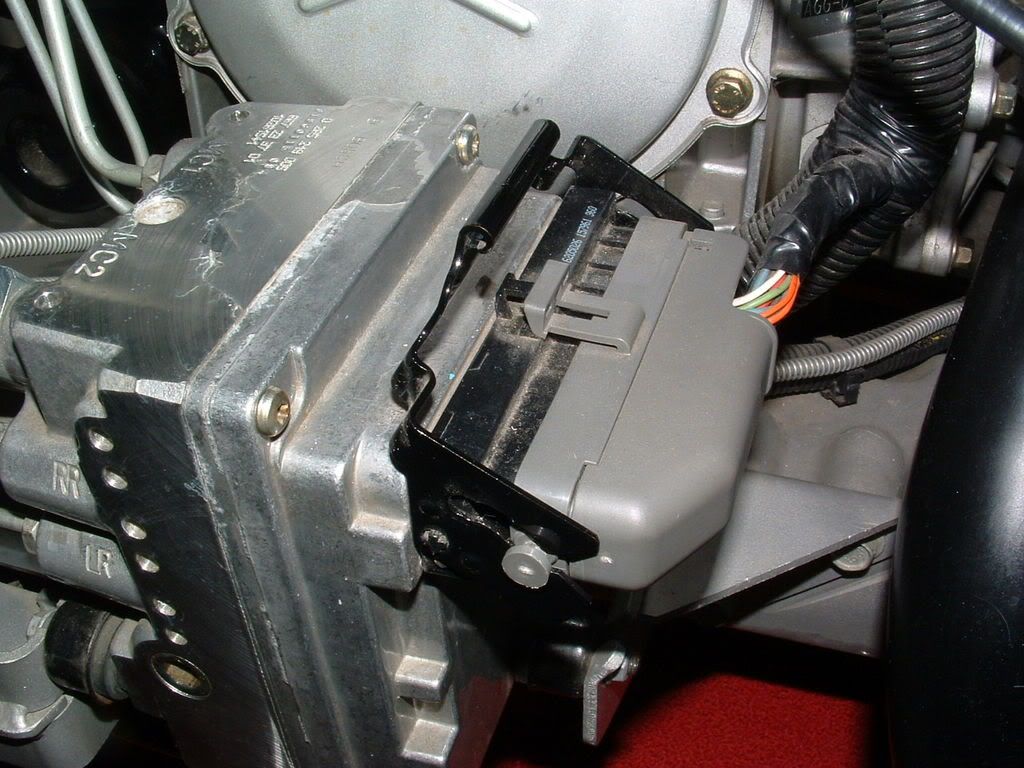
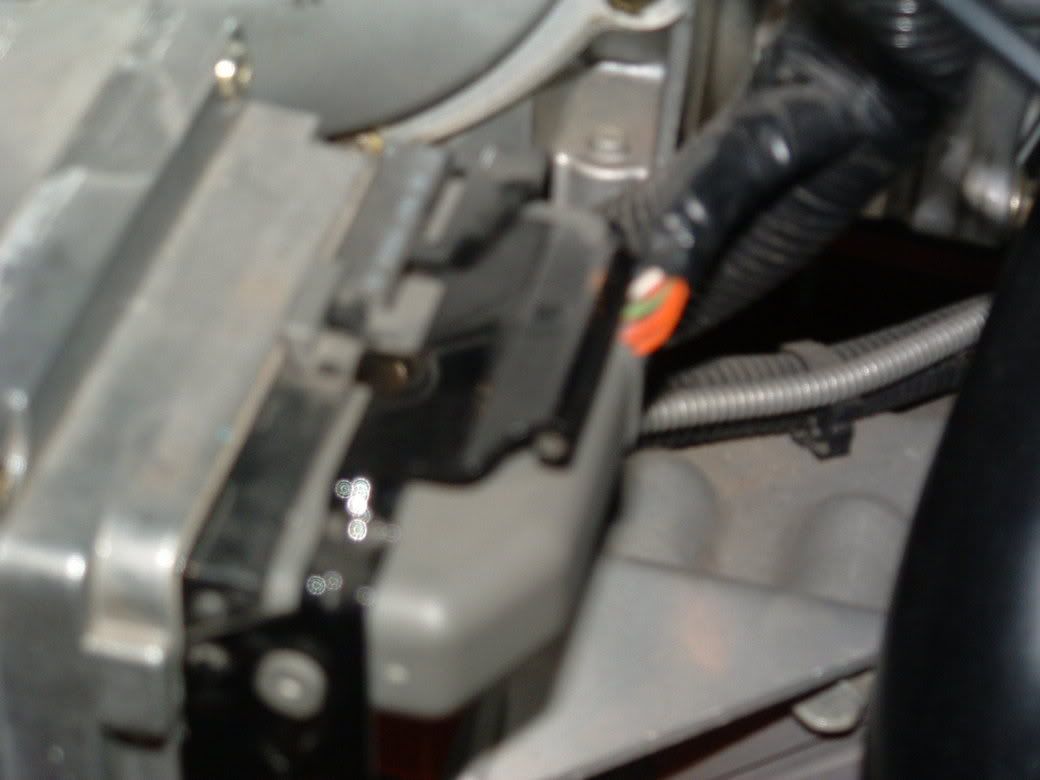
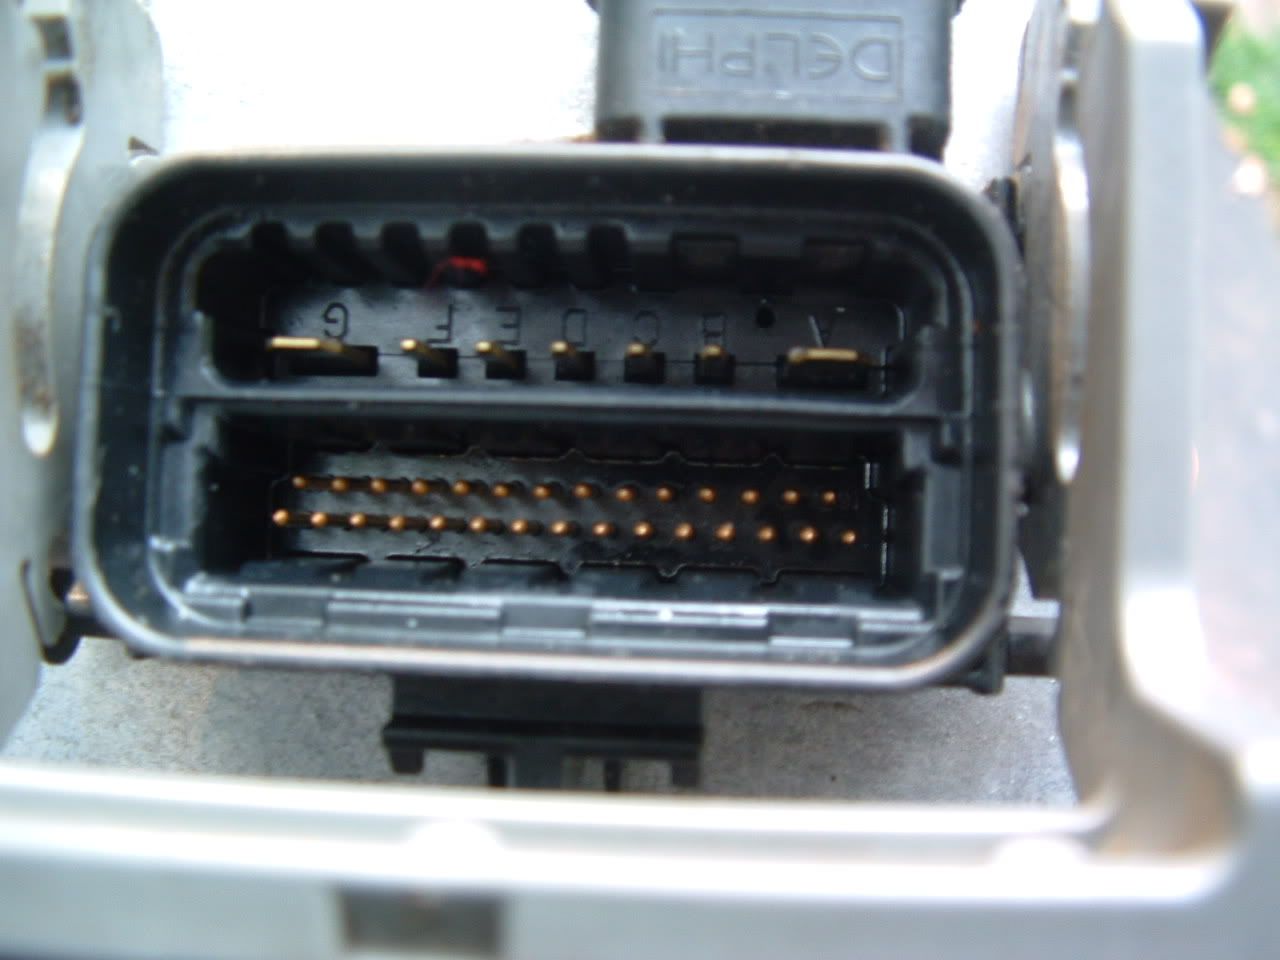
Also check to make sure the wire harness has a good connection. If the connection appears solid disconnect it (see step 3 in the replacement instructions below) check the pins to ensure that they have not been bent or damaged in any way. If there is any sign of corrosion, clean it off. Once everything looks good, reseat the harness.
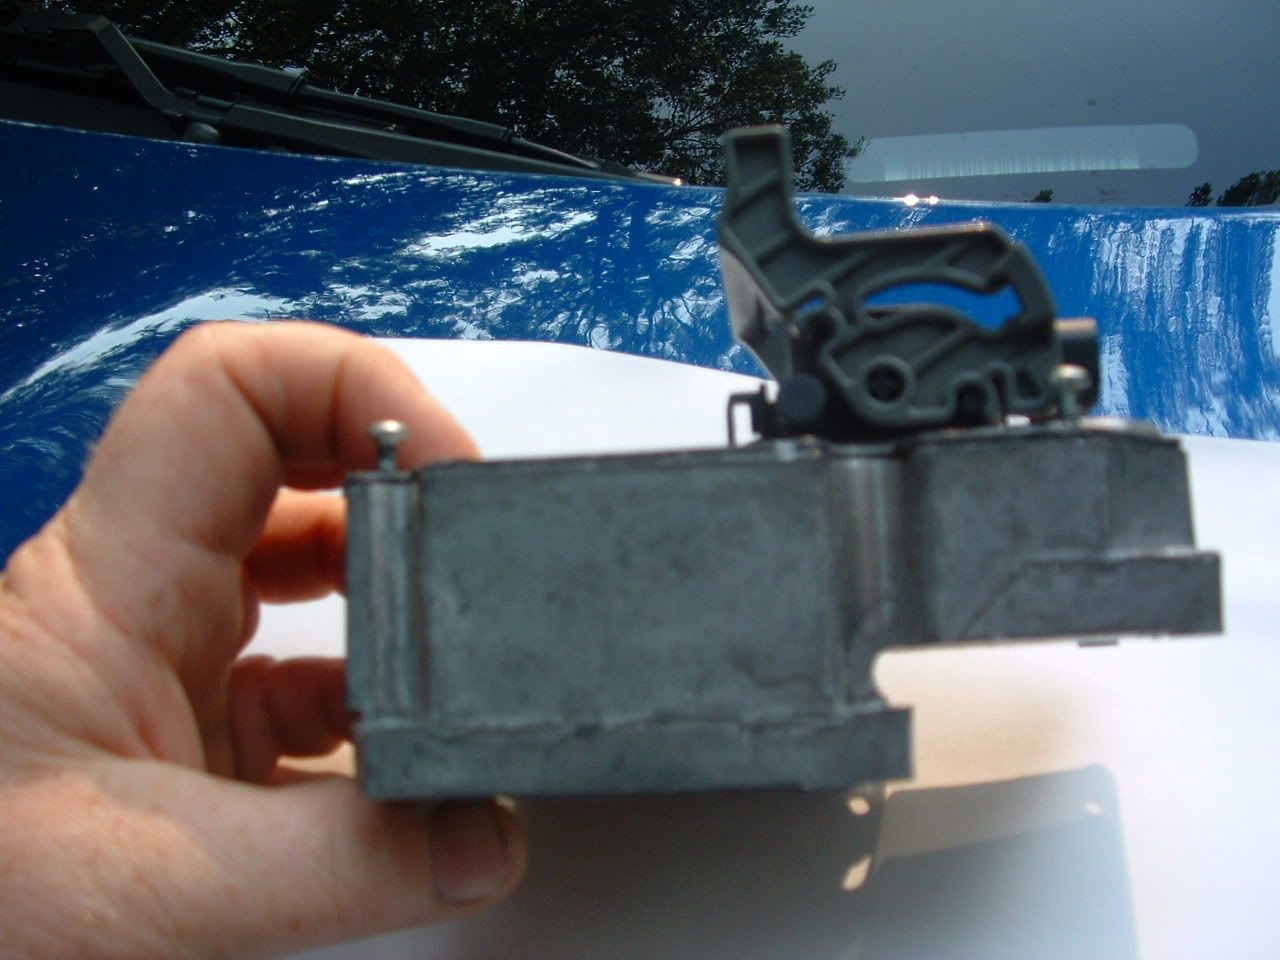
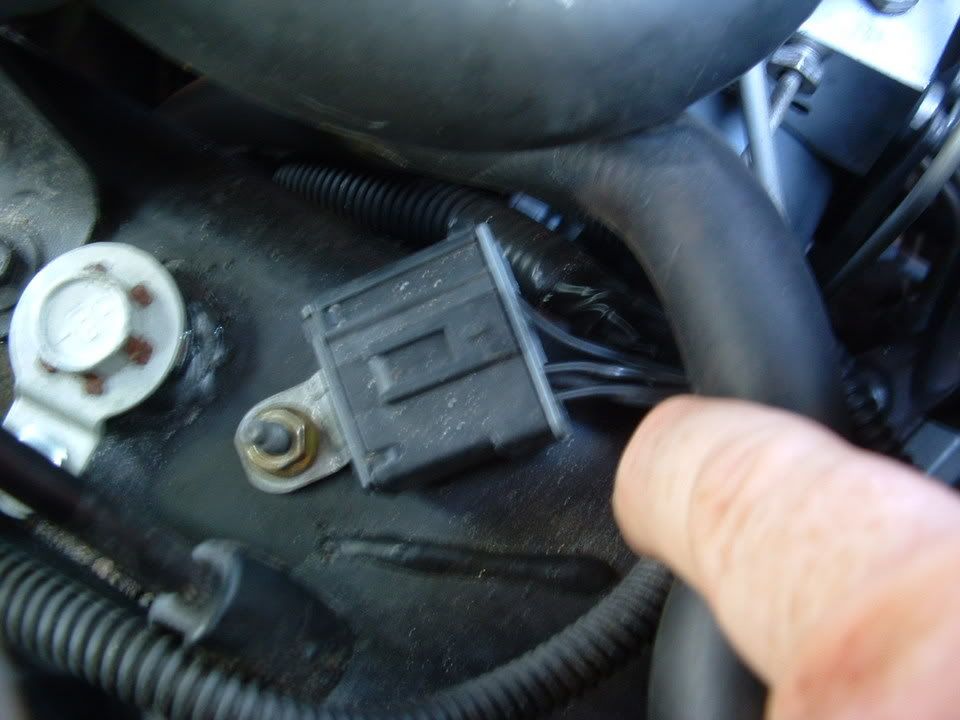
Next, let's move on to the grounds. The EBCM is grounded to the chassis on the left frame rail, just forward of the engine. It's the Black box right in the middle of the picture. As you can see, it's real easy for dirt and moisture to get in that area which isn't exactly good for electronic components. Even if you never drive your car in the rain, it'll still get wet when you wash it, and that could be enough
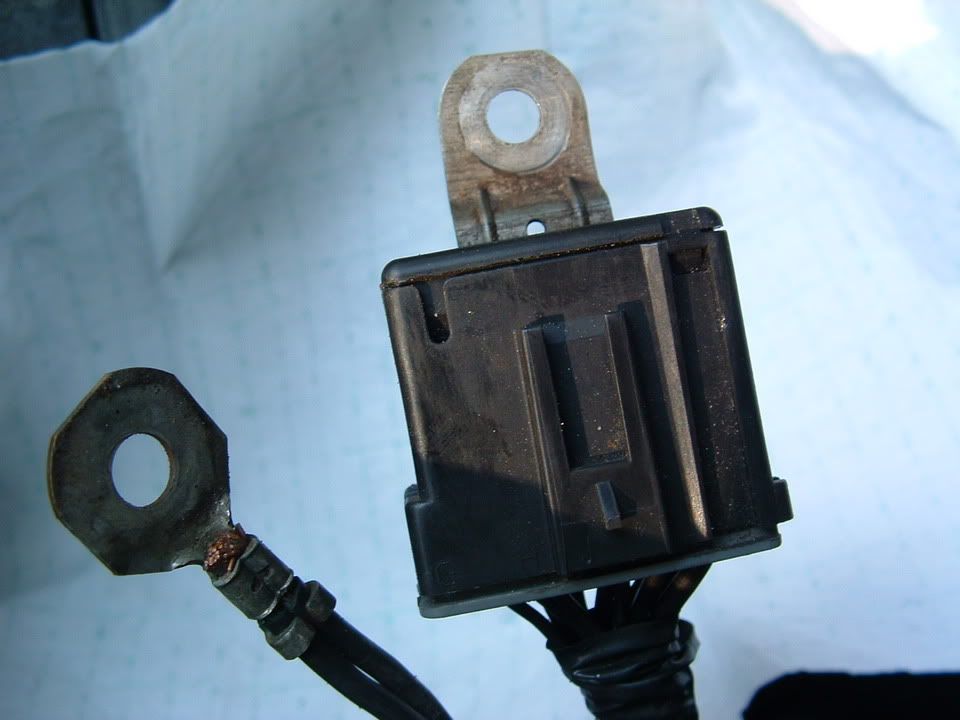
Start by unbolting the chassis ground, then take the chassis ground connector apart.
These pictures show the corrosion that can build up in the ground connector. If you chassis grounds look like this one, you've probably found the problem. Even if they don't, go ahead and clean it up with a wire brush before putting it back together. Also clean off the chassis and bolt to make sure you've got a good clean ground.
*If you are having any other electrical issues, it's a good idea to check the grounds. These pictures show where the other grounds are.
At this point, we know all of the wires are good, but for some reason enough voltage is not getting to the system. It is possible that your battery is not functioning properly. If your battery is a couple of years old, has been drained and recharged a couple of times it might be a good idea to go ahead and replace your battery. This is a long shot for EBCM issues, but I think it's worth a shot before spending several hundred dollars for a new EBCM and you're going to have to replace it eventually anyways. Old batteries can cause a variety of minor electrical issues and you likely have a bunch of history codes for minor issues if the battery is causing the problem.
Now on the EBCM itself. If the electrical contacts inside the relay are dirty or burnt, the vibration from striking the module may change the symptoms or may clear them up for a while. This is by no means a fix or a cure all, in fact it could make it worse or it may not do anything, it's just something to try. Use a small plastic hammer or something similar, lightly tap the front of the EBCM on the lower right corner of the module. The area will be on the right hand side of the lower electrical connection seen in the picture below.
At this point, You've got to additional possibilities. Replace the EBCM or replace both the EBCM and the BPMV. The service manual calls for you to measure the resistance between each pump motor control circuit and the housing of the BPMV, if that checks our okay, you replace the EBCM if not you replace them both. Since most people do not have the equipment to do this the best we can do is to replace the EBCM. If that doesn't work, you'll have to go back and replace the BPMV.
The procedure for replacing the EBCM is very simple. The only special tool you need is a T-20 torx screw driver. I have a Craftsman tool set that has a 1/4" drive screwdriver with and adapter for many different size bit. Unfortunately, the adapter was to long to fit between the EBCM and water pump, so I purchased a set of Craftsman 5 pc. torx screwdriver set that worked fine. A flathead screwdriver may also be needed to pry apart the EBCM from the BPMV
1 - make sure the car is off.
2 - you will probably need to remove the airbridge to get to the EBCM.
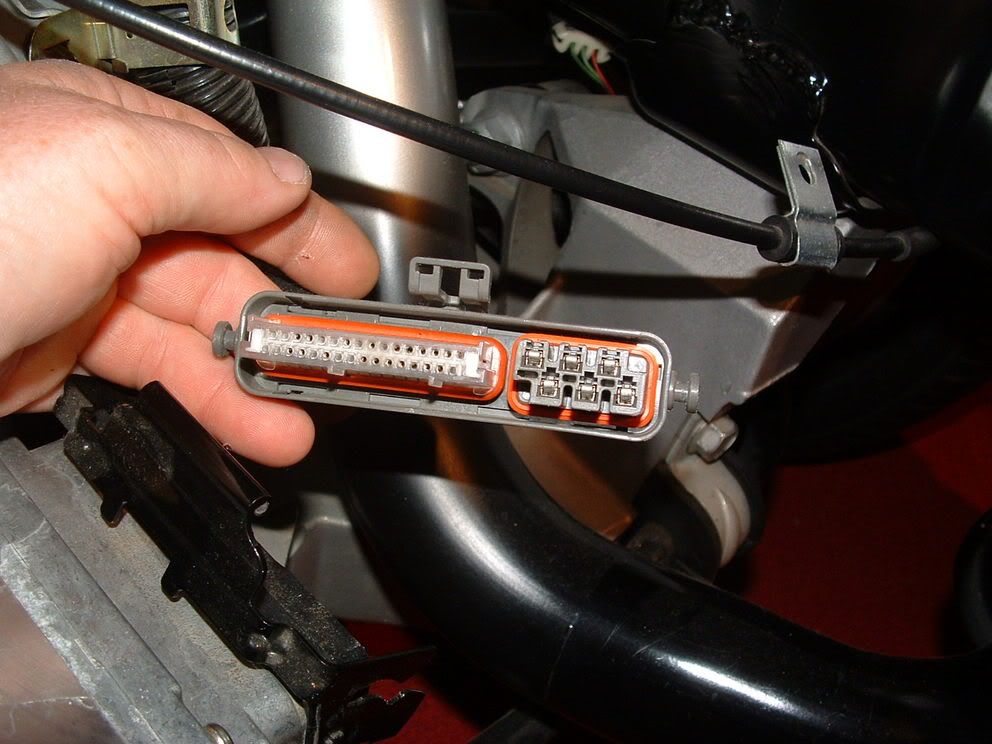
3 - remove the wire harness by first removing the white plastic clip that locks it in place (I cut it off and replaced it with a zip-tie) (picture 1), then lift gray handle and pull back on the wire harness (picture 3). At this point, you will be able to see the second wire connection that is removed by pulling down (picture 3).
4 - The service manual call for you the remove the 2 insulator nuts that hold the BPMV to the brackets and lift the EBCM/BPMV out of the bracket. I do not think this step is necessary because there is plenty of room while it is still in the bracket and you do not gain much additional clearance since the brake lines restrict the movement.
5 - Remove the 6 T-20 torx screws connecting the EBCM and BPMV - 1 on each corner and 2 on the sides (picture 2).
6 - "Separate the EBCM from the BPMV by gently pulling apart until separated" - I should start laughing here, but it's not that funny. It's been my experience that anytime the instructions call for you to do something gently, nothing gentle is going to work. In this case, I had to use a flathead screw driver to brake the seal. Once it moved a little, the rest was easy. In addition to the rubber seal, each of the 12 holes you see in picture 3 have a peg in them from the BPMV. Don't go crazy, but be prepared to force them apart.
7 - At this point, all you've got to do is put it all back together. push the new EBCM onto the BPMV.
8 - Replace the 6 T-20 torx screws
9 - reconnect the wire harness
10 - put the intake back on
At this point, the AH/TC/ABS should work normally. If not, you've also got a problem with the BPMV. Although you could replace the BPMV yourself, you have to bleed the ABS system which requires Tech II. For those of you like me that don't have access to Tech II, you've got 2 options. Replace the BPMV yourself and tow the car to a shop with Tech II to have it bled, or just take it in to have the BPMV replaced. The advantage is that you've already done all of the trouble shooting so you want have to pay the mechanic to diagnose the problem for you.
An alternative to buying a new one is to have your original rebuilt.
For EBCM repair/replace
Call Brandon
877-648-7530 at ABS FIXER
or: www.absfixer.com
$150. plus UPS....warranted as long as You own it
Let's cover some basic information on AH, TC, and ABS. In simple terms, these three systems combine data from wheel speed sensors, yaw rate sensors, steering wheel position sensors, along with brake and throttle inputs to determine what the driver wants to do and detects any lose of traction and take corrective action by pulling back on the throttle, activating brakes on individual wheels, or releasing brake pressure as needed to maintain traction.
What goes wrong
When there is a problem anywhere in the system, the computer does not know what's going on with the car or cannot respond correctly. Rather than risking the wrong response which could potentially wreck you car, the whole system is simply disabled for the remainder of the ignition cycle. At this time you will see the ABS and Traction Control warning indicators illuminated on the instrument cluster along with the following messages on the Driver Information Center (DIC):
- Service ABS
- Service Traction System
- Service Active Handling
At this point, you can safely continue to drive your car, just remember that your electronic driving aids are no longer functioning so you should adjust your driving habits accordingly.
Troubleshooting
As I said before, when there is a problem the system is deactivated for the remainder of the ignition cycle, so sometimes everything will go back to normal if you just turn off the car and restart it. If that corrects the problem, it was either a glitch in the system, a lose connection that's going to come back soon or an early sign of a future failure that is coming. Even though the system is now functional it is still beneficial to continue to trouble shoot. The history code should give you a good idea of what to check
The next step is to see where the fault is. If you have several different codes write them down, clear them, and see which ones come back the next time you start the car. At this point, I'm betting that the codes point to either the EBCM or the wheel speed sensors. We'll get to the wheel speed sensors later, for now, let's get to the EBCM.
Electronic Brake Control Module
The most common code for the EBCM is C1214 - Sol Valve relay Contact or coil CKT Open. This code is set when the system voltage is less than 8 volts for 0.23 seconds. Since our goal is to fix this for the lowest price possible, we'll start checking things we can fix for free
......IF YOU WANT all THE PICTURES FILE, PM me your email address....
The EBCM sits between the engine and radiator. You can see it in the picture on the left below. The EBCM is on the left with the large wire harness coming into it and the sticker on top. The Brake Pressure Modulator Valve (BPMV) in on the right with the brake lines coming out. The EBCM is a dry module, meaning that you can change it out without having to worry about bleeding the ABS system. All of the brake fluid is contained within the BPMV. The coils (seen in the picture on the right below) fit over small spools that have valves inside them. The valves are operated by an electromagnetic field supplied by the coils.
Start by doing a quick visual inspection of the wires. If there are any obvious signs of damage, you've likely found the problem. One member had a problem with the wires rubbing the serpentine belt
Also check to make sure the wire harness has a good connection. If the connection appears solid disconnect it (see step 3 in the replacement instructions below) check the pins to ensure that they have not been bent or damaged in any way. If there is any sign of corrosion, clean it off. Once everything looks good, reseat the harness.
Next, let's move on to the grounds. The EBCM is grounded to the chassis on the left frame rail, just forward of the engine. It's the Black box right in the middle of the picture. As you can see, it's real easy for dirt and moisture to get in that area which isn't exactly good for electronic components. Even if you never drive your car in the rain, it'll still get wet when you wash it, and that could be enough
Start by unbolting the chassis ground, then take the chassis ground connector apart.
These pictures show the corrosion that can build up in the ground connector. If you chassis grounds look like this one, you've probably found the problem. Even if they don't, go ahead and clean it up with a wire brush before putting it back together. Also clean off the chassis and bolt to make sure you've got a good clean ground.
*If you are having any other electrical issues, it's a good idea to check the grounds. These pictures show where the other grounds are.
At this point, we know all of the wires are good, but for some reason enough voltage is not getting to the system. It is possible that your battery is not functioning properly. If your battery is a couple of years old, has been drained and recharged a couple of times it might be a good idea to go ahead and replace your battery. This is a long shot for EBCM issues, but I think it's worth a shot before spending several hundred dollars for a new EBCM and you're going to have to replace it eventually anyways. Old batteries can cause a variety of minor electrical issues and you likely have a bunch of history codes for minor issues if the battery is causing the problem.
Now on the EBCM itself. If the electrical contacts inside the relay are dirty or burnt, the vibration from striking the module may change the symptoms or may clear them up for a while. This is by no means a fix or a cure all, in fact it could make it worse or it may not do anything, it's just something to try. Use a small plastic hammer or something similar, lightly tap the front of the EBCM on the lower right corner of the module. The area will be on the right hand side of the lower electrical connection seen in the picture below.
At this point, You've got to additional possibilities. Replace the EBCM or replace both the EBCM and the BPMV. The service manual calls for you to measure the resistance between each pump motor control circuit and the housing of the BPMV, if that checks our okay, you replace the EBCM if not you replace them both. Since most people do not have the equipment to do this the best we can do is to replace the EBCM. If that doesn't work, you'll have to go back and replace the BPMV.
The procedure for replacing the EBCM is very simple. The only special tool you need is a T-20 torx screw driver. I have a Craftsman tool set that has a 1/4" drive screwdriver with and adapter for many different size bit. Unfortunately, the adapter was to long to fit between the EBCM and water pump, so I purchased a set of Craftsman 5 pc. torx screwdriver set that worked fine. A flathead screwdriver may also be needed to pry apart the EBCM from the BPMV
1 - make sure the car is off.
2 - you will probably need to remove the airbridge to get to the EBCM.
3 - remove the wire harness by first removing the white plastic clip that locks it in place (I cut it off and replaced it with a zip-tie) (picture 1), then lift gray handle and pull back on the wire harness (picture 3). At this point, you will be able to see the second wire connection that is removed by pulling down (picture 3).
4 - The service manual call for you the remove the 2 insulator nuts that hold the BPMV to the brackets and lift the EBCM/BPMV out of the bracket. I do not think this step is necessary because there is plenty of room while it is still in the bracket and you do not gain much additional clearance since the brake lines restrict the movement.
5 - Remove the 6 T-20 torx screws connecting the EBCM and BPMV - 1 on each corner and 2 on the sides (picture 2).
6 - "Separate the EBCM from the BPMV by gently pulling apart until separated" - I should start laughing here, but it's not that funny. It's been my experience that anytime the instructions call for you to do something gently, nothing gentle is going to work. In this case, I had to use a flathead screw driver to brake the seal. Once it moved a little, the rest was easy. In addition to the rubber seal, each of the 12 holes you see in picture 3 have a peg in them from the BPMV. Don't go crazy, but be prepared to force them apart.
7 - At this point, all you've got to do is put it all back together. push the new EBCM onto the BPMV.
8 - Replace the 6 T-20 torx screws
9 - reconnect the wire harness
10 - put the intake back on
At this point, the AH/TC/ABS should work normally. If not, you've also got a problem with the BPMV. Although you could replace the BPMV yourself, you have to bleed the ABS system which requires Tech II. For those of you like me that don't have access to Tech II, you've got 2 options. Replace the BPMV yourself and tow the car to a shop with Tech II to have it bled, or just take it in to have the BPMV replaced. The advantage is that you've already done all of the trouble shooting so you want have to pay the mechanic to diagnose the problem for you.
An alternative to buying a new one is to have your original rebuilt.
For EBCM repair/replace
Call Brandon
877-648-7530 at ABS FIXER
or: www.absfixer.com
$150. plus UPS....warranted as long as You own it
Corvette Stories
The Best of Corvette for Corvette Enthusiasts

Every 2027 Corvette Engine Explained
Joe Kucinski
Designer Imagines A Corvette That Looks More Like a Corvette Than the Corvette
Verdad Gallardo
10 Ugly Corvettes That We Still Kinda Love
Joe Kucinski
Top 10 Most Expensive Corvettes Ever Sold on Bring A Trailer
Brett Foote
10 Things Every Corvette Owner Needs (2026 Edition)
Michael S. Palmer
8 Most "Only Corvette Owners Understand" Quirks and Problems
Pouria Savadkouei
10 Reasons the C6 Z06 is Still A Performance Benchmark After 20 Years
Joe Kucinski
How Much Horsepower Every Corvette Engine "LOST" in 1972
Joe Kucinski
Top 10 DOs and DON'Ts for Protecting Your Convertible Top!
Michael S. Palmer
Tech Contributor
Joined: Dec 1999
Posts: 32,910
Likes: 2,402
From: Anthony TX
CI 6,7,8,9,11 Vet
St. Jude Donor '08
The Basics
Let's cover some basic information on AH, TC, and ABS. In simple terms, these three systems combine data from wheel speed sensors, yaw rate sensors, steering wheel position sensors, along with brake and throttle inputs to determine what the driver wants to do and detects any lose of traction and take corrective action by pulling back on the throttle, activating brakes on individual wheels, or releasing brake pressure as needed to maintain traction.
What goes wrong
When there is a problem anywhere in the system, the computer does not know what's going on with the car or cannot respond correctly. Rather than risking the wrong response which could potentially wreck you car, the whole system is simply disabled for the remainder of the ignition cycle. At this time you will see the ABS and Traction Control warning indicators illuminated on the instrument cluster along with the following messages on the Driver Information Center (DIC):
- Service ABS
- Service Traction System
- Service Active Handling
At this point, you can safely continue to drive your car, just remember that your electronic driving aids are no longer functioning so you should adjust your driving habits accordingly.
Troubleshooting
As I said before, when there is a problem the system is deactivated for the remainder of the ignition cycle, so sometimes everything will go back to normal if you just turn off the car and restart it. If that corrects the problem, it was either a glitch in the system, a lose connection that's going to come back soon or an early sign of a future failure that is coming. Even though the system is now functional it is still beneficial to continue to trouble shoot. The history code should give you a good idea of what to check
The next step is to see where the fault is. If you have several different codes write them down, clear them, and see which ones come back the next time you start the car. At this point, I'm betting that the codes point to either the EBCM or the wheel speed sensors. We'll get to the wheel speed sensors later, for now, let's get to the EBCM.
Electronic Brake Control Module
The most common code for the EBCM is C1214 - Sol Valve relay Contact or coil CKT Open. This code is set when the system voltage is less than 8 volts for 0.23 seconds. Since our goal is to fix this for the lowest price possible, we'll start checking things we can fix for free
......IF YOU WANT all THE PICTURES FILE, PM me your email address....
The EBCM sits between the engine and radiator. You can see it in the picture on the left below. The EBCM is on the left with the large wire harness coming into it and the sticker on top. The Brake Pressure Modulator Valve (BPMV) in on the right with the brake lines coming out. The EBCM is a dry module, meaning that you can change it out without having to worry about bleeding the ABS system. All of the brake fluid is contained within the BPMV. The coils (seen in the picture on the right below) fit over small spools that have valves inside them. The valves are operated by an electromagnetic field supplied by the coils.
Start by doing a quick visual inspection of the wires. If there are any obvious signs of damage, you've likely found the problem. One member had a problem with the wires rubbing the serpentine belt
Also check to make sure the wire harness has a good connection. If the connection appears solid disconnect it (see step 3 in the replacement instructions below) check the pins to ensure that they have not been bent or damaged in any way. If there is any sign of corrosion, clean it off. Once everything looks good, reseat the harness.
Next, let's move on to the grounds. The EBCM is grounded to the chassis on the left frame rail, just forward of the engine. It's the Black box right in the middle of the picture. As you can see, it's real easy for dirt and moisture to get in that area which isn't exactly good for electronic components. Even if you never drive your car in the rain, it'll still get wet when you wash it, and that could be enough
Start by unbolting the chassis ground, then take the chassis ground connector apart.
These pictures show the corrosion that can build up in the ground connector. If you chassis grounds look like this one, you've probably found the problem. Even if they don't, go ahead and clean it up with a wire brush before putting it back together. Also clean off the chassis and bolt to make sure you've got a good clean ground.
*If you are having any other electrical issues, it's a good idea to check the grounds. These pictures show where the other grounds are.
At this point, we know all of the wires are good, but for some reason enough voltage is not getting to the system. It is possible that your battery is not functioning properly. If your battery is a couple of years old, has been drained and recharged a couple of times it might be a good idea to go ahead and replace your battery. This is a long shot for EBCM issues, but I think it's worth a shot before spending several hundred dollars for a new EBCM and you're going to have to replace it eventually anyways. Old batteries can cause a variety of minor electrical issues and you likely have a bunch of history codes for minor issues if the battery is causing the problem.
Now on the EBCM itself. If the electrical contacts inside the relay are dirty or burnt, the vibration from striking the module may change the symptoms or may clear them up for a while. This is by no means a fix or a cure all, in fact it could make it worse or it may not do anything, it's just something to try. Use a small plastic hammer or something similar, lightly tap the front of the EBCM on the lower right corner of the module. The area will be on the right hand side of the lower electrical connection seen in the picture below.
At this point, You've got to additional possibilities. Replace the EBCM or replace both the EBCM and the BPMV. The service manual calls for you to measure the resistance between each pump motor control circuit and the housing of the BPMV, if that checks our okay, you replace the EBCM if not you replace them both. Since most people do not have the equipment to do this the best we can do is to replace the EBCM. If that doesn't work, you'll have to go back and replace the BPMV.
The procedure for replacing the EBCM is very simple. The only special tool you need is a T-20 torx screw driver. I have a Craftsman tool set that has a 1/4" drive screwdriver with and adapter for many different size bit. Unfortunately, the adapter was to long to fit between the EBCM and water pump, so I purchased a set of Craftsman 5 pc. torx screwdriver set that worked fine. A flathead screwdriver may also be needed to pry apart the EBCM from the BPMV
1 - make sure the car is off.
2 - you will probably need to remove the airbridge to get to the EBCM.
3 - remove the wire harness by first removing the white plastic clip that locks it in place (I cut it off and replaced it with a zip-tie) (picture 1), then lift gray handle and pull back on the wire harness (picture 3). At this point, you will be able to see the second wire connection that is removed by pulling down (picture 3).
4 - The service manual call for you the remove the 2 insulator nuts that hold the BPMV to the brackets and lift the EBCM/BPMV out of the bracket. I do not think this step is necessary because there is plenty of room while it is still in the bracket and you do not gain much additional clearance since the brake lines restrict the movement.
5 - Remove the 6 T-20 torx screws connecting the EBCM and BPMV - 1 on each corner and 2 on the sides (picture 2).
6 - "Separate the EBCM from the BPMV by gently pulling apart until separated" - I should start laughing here, but it's not that funny. It's been my experience that anytime the instructions call for you to do something gently, nothing gentle is going to work. In this case, I had to use a flathead screw driver to brake the seal. Once it moved a little, the rest was easy. In addition to the rubber seal, each of the 12 holes you see in picture 3 have a peg in them from the BPMV. Don't go crazy, but be prepared to force them apart.
7 - At this point, all you've got to do is put it all back together. push the new EBCM onto the BPMV.
8 - Replace the 6 T-20 torx screws
9 - reconnect the wire harness
10 - put the intake back on
At this point, the AH/TC/ABS should work normally. If not, you've also got a problem with the BPMV. Although you could replace the BPMV yourself, you have to bleed the ABS system which requires Tech II. For those of you like me that don't have access to Tech II, you've got 2 options. Replace the BPMV yourself and tow the car to a shop with Tech II to have it bled, or just take it in to have the BPMV replaced. The advantage is that you've already done all of the trouble shooting so you want have to pay the mechanic to diagnose the problem for you.
An alternative to buying a new one is to have your original rebuilt.
For EBCM repair/replace
Call Brandon
877-648-7530 at ABS FIXER
or: www.absfixer.com
$150. plus UPS....warranted as long as You own it
Billy
Here are some pictures to add to this extermely informative and accurate post!! Well Done!

Early 97-98 Rear mounted EBTCM. (this module is not reparable by ABS Fixer)
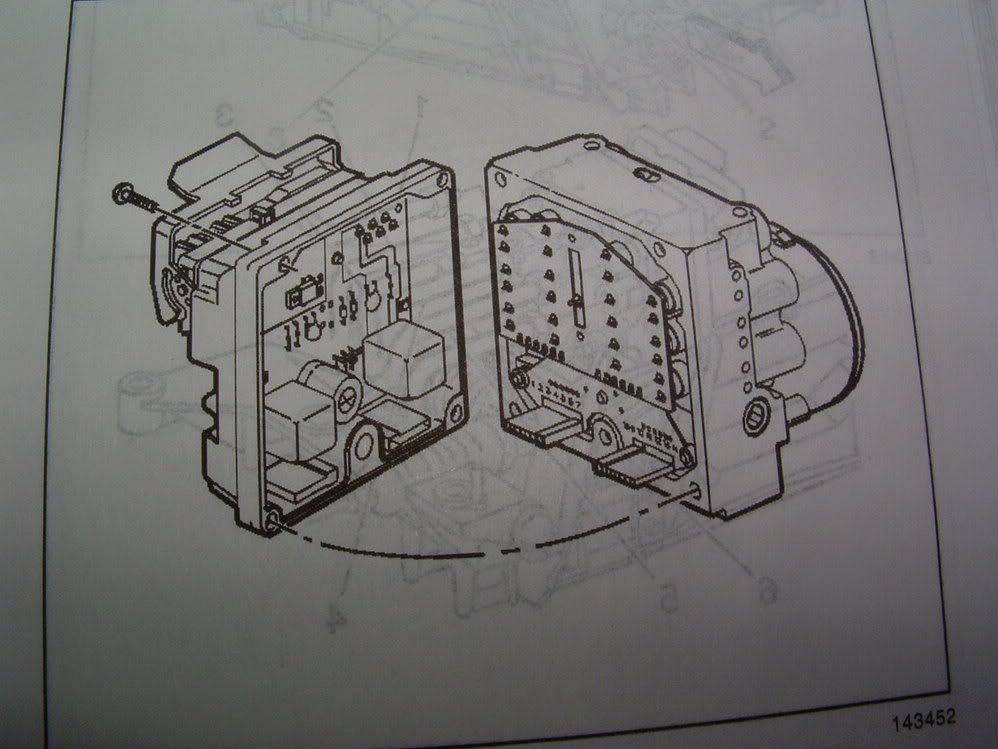
2001 and Later EBTCM and BPMV
EBTCM removed from the BPMV (six TORX screws hold it to the BPMV)

97-98 (early) Brake Pressure Modulator Valve and Motor
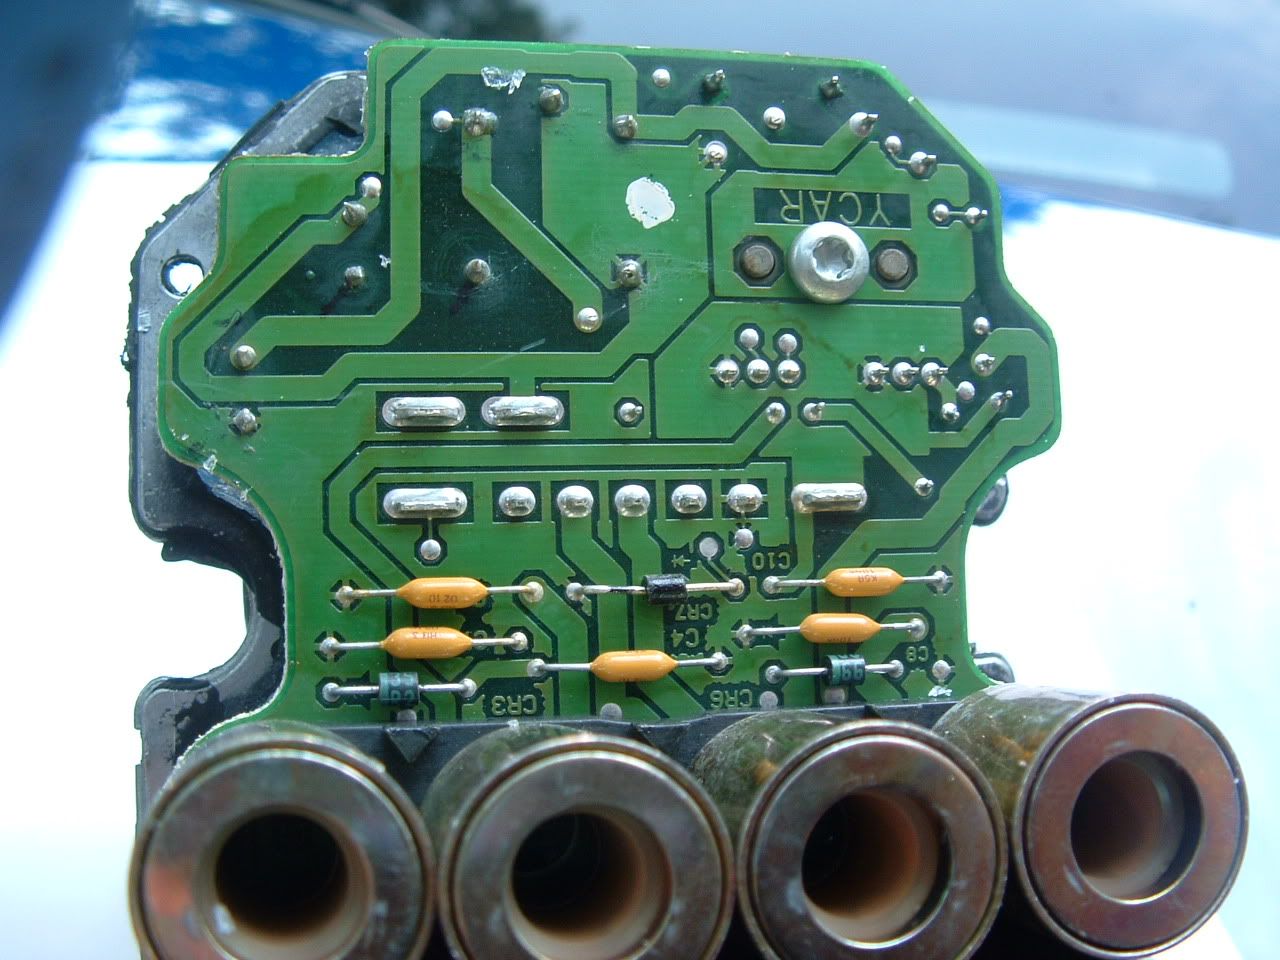
EBTCM disassembled for a close look at all the crap thats in there!


Chassis Ground G-101 and the EBTCM ground eyelet that is under the connector ground tab:
Last edited by Bill Curlee; Dec 6, 2007 at 06:28 PM.
Thread Starter
Advanced
Joined: Sep 2007
Posts: 63
Likes: 0
From: Ventura Ca
Wow! Thanks! Great reply! This job is beyond my capability but I'll show this to my mechanic. Approx how many labor hours for seasoned mechanic? I really appreciate the detailed answer.
PK
PK
Last edited by PK51st; Dec 6, 2007 at 09:44 PM.
Racer

Joined: Feb 2001
Posts: 454
Likes: 2
From: Austin TX
I ran into the same issue and decided to fix it myself; I got the module repaired by http://absfixer.com and so far so good. Info. on this forum saved me at least $300 and worst case, more than $1000.
If you need the car to drive while the module is being fixed that is an option. Ask the mechanic to remove the module, cover the adjacent module with plastic and let you drive it until the repaired EBCM returns. The steering may feel a little less power assisted while the EBCM is removed and you will see "Service Vehicle Soon" on your DIC every time you start but you can still drive. Power steering is still there but I noticed a difference with the module removed.
It took a total of 2 hours for me to remove the module and then put it back in. A professional mechanic should be able to do this in less than 2 hrs. total.
[Edit]
I should add, 2 hrs. depends on how sure you are about the EBCM being the culprit. If you are getting a C1214 code then this is a good bet. If your mechanic thinks he needs to do more analysis then he will likely quote you more time.
Last edited by WhiteKnight; Dec 6, 2007 at 10:12 PM.
Tech Contributor
Joined: Dec 1999
Posts: 32,910
Likes: 2,402
From: Anthony TX
CI 6,7,8,9,11 Vet
St. Jude Donor '08
This repair is as simple as it gets! You disconnect TWO connectors, remove SIX torx screws and separate the electronics module from the Brake Pressure Modulator Valve. There is no fluids or anything to worry about. It just pops off, you send it to ABS Fixer, get it back and reinstall it. Save your self a pocket full of cash and do it your self.
All of the pictures of the module disassembled was just to show you or anybody that was interested, what is inside the EBTCM. Once you separate the module, here is what you will see:
Thats it!
Box it up and send it off! When you get it back,,,,reverse the procedure!
BC
All of the pictures of the module disassembled was just to show you or anybody that was interested, what is inside the EBTCM. Once you separate the module, here is what you will see:
Thats it!
Box it up and send it off! When you get it back,,,,reverse the procedure!
BC
Melting Slicks

Joined: Apr 2006
Posts: 2,151
Likes: 20
With the exception of the '99 and any other year that is similar. On my '99 the ebtcm is mounted similar to the later 2001 and later cars as bill posted, but the mounts are not on the sides of the brake pressure modulator. There are two mounts behind the bpm under the brake lines and there is very little room there because of the lines and the frame rail as well as alternator is in the way. On the other side there is also a mount on the ebtcm itself. Why GM made such an elaborate mount I will never understand, but it is a huge pain to remove. They figured that out as they easily simplified the problem on the '01 and later cars. In order to get the ebtcm ('99) out you need to loosen the mounts, two on bpm, and one on ebtcm and lift it up off the bracket enough to remove the rubber mount off the ebtcm body because under that mount is a fifth torx screw that holds the ebtcm to the bpm. I've done this several times because I only found one place that rebuilds the older units and they have completely screwed me to the point that I have a dispute going on with them. Don't want to elaborate much. I have thread on this. I can't believe what crooks some companies are.