


Head Light Beam Adjustment-HELP

Thread Starter
Instructor

Joined: May 2007
Posts: 243
Likes: 0
From: Staten Island NY
I did a search and read a very detailed way how to adjust the head light beam. After 1 hour I still have no clue, is there a simple way to adjust the head light beams?
Former Vendor
Joined: Nov 2005
Posts: 8,995
Likes: 2
From: Spring Texas
St. Jude Donor '08
Technically, there's no easy way to do this. The Adjustments on C5 are often so rusty they break off if you try to adjust them. The way to prevent this is to spray WD-40 directly on the "gearbox" of the adjustments. Unfortionatly to get to these, you have to take off the headlight bucket trim, cover and headlight frame.
tools you'll need for this:
- Phillips head screwdriver
- Torx 15 (make sure it's a quality bit)
- 8mm open end wrench
- 10mm socket wrench.
- large flathead screwdriver.
If you need the instructions to take apart the headlight, let me know.
tools you'll need for this:
- Phillips head screwdriver
- Torx 15 (make sure it's a quality bit)
- 8mm open end wrench
- 10mm socket wrench.
- large flathead screwdriver.
If you need the instructions to take apart the headlight, let me know.
Tech Contributor


Joined: Dec 2003
Posts: 19,384
Likes: 87
From: Horncastle Lincolnshire, England
2023 C5 of the Year Finalist - Unmodified
Run down to the bottom of this link and it gives a good description of how to do the adjustments. Its for Euro headlights but the principle and the adjustments are the same.
http://www.c5forum.com/diy/eurolights2.php
http://www.c5forum.com/diy/eurolights2.php
Team Owner


Joined: Jul 2004
Posts: 24,652
Likes: 298
From: NJ
St. Jude Donor '05-'08
Do you want your headlight to go up further?
On the inside of the headlight cover there is a black round circle. Take that off and you will see a long brass looking arm that looks like it has little gear teeth on it. That is your adjustment for up and down. You will need an extention and figure out what socket would fit on it.
Do not force it because it will break and might be at its highest of lowest point.
For measurement it is best to use a garage door and do one side at a time. You raise one side to where you want it and then match the other side to that height. I sometimes even use tape to mark my original spot in case it is too high and I want to adjust down.
I do wish the Vette was like the Trailblazer SS that I have. It takes about 5 seconds to adjust the lights. The mechanism is roughly the same idea, but they put it in a much easier spot to get to.
Thread Starter
Instructor
Joined: May 2007
Posts: 243
Likes: 0
From: Staten Island NY
Run down to the bottom of this link and it gives a good description of how to do the adjustments. Its for Euro headlights but the principle and the adjustments are the same.
http://www.c5forum.com/diy/eurolights2.php
http://www.c5forum.com/diy/eurolights2.php
Team Owner
Joined: Jul 2004
Posts: 24,652
Likes: 298
From: NJ
St. Jude Donor '05-'08
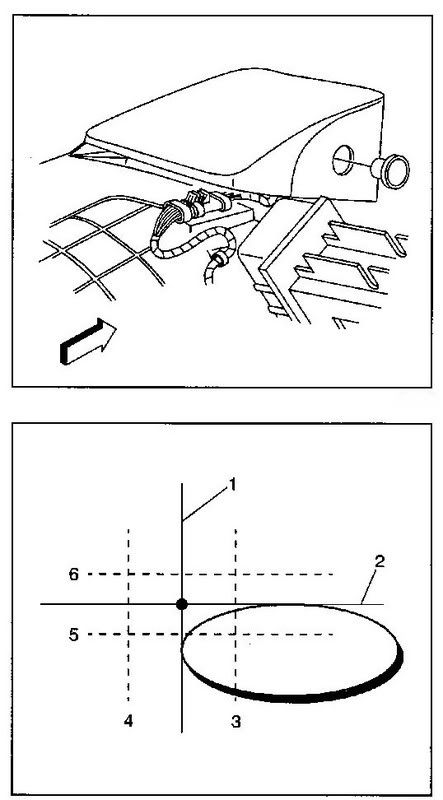
Yes that is the post that I found. I printed it out and studied it for an hour. I still have no idea. Not sure how to look at the diagram? Theres numbers 1-8 on the diagram and I get lost at 3. Am I supposed to look at the diagram straight on or from the side meaning that-- the funny shaped arc represents the light beam?
Thread Starter
Instructor
Joined: May 2007
Posts: 243
Likes: 0
From: Staten Island NY
ok are there only 2 adjustments- vertical and horizontal? If so I wd-40 them and they move freely. Now the big question-- where do I aim the lights? From what I read, if I understand -- the car's lights beam should be aimed from atleast 25 feet away from a garage door and the HEIGHT should be the same height as the headlights(measuring from the ground up to the center of the head light)- beams on the garage door? For the LEFT to RIGHT measurement -- the lights should be aimed together(centered) with about 3 inches between the beams that show up on the garage door?
Tech Contributor
Joined: Dec 2003
Posts: 19,384
Likes: 87
From: Horncastle Lincolnshire, England
2023 C5 of the Year Finalist - Unmodified
The diagram I linked to is for the Euro lights. They have a faceted beam so the kidney shape (heavy to the right) gives a more targeted beam than stock lights.
With OEM lamps and housings the beam shape will be more oval and flat. Instead of using the break point (euro) as the reference use the equivalent area of the oval beam (left of center). The instructions show the target area for the center of the beam (low and right) but the measurements still work.
With OEM lamps and housings the beam shape will be more oval and flat. Instead of using the break point (euro) as the reference use the equivalent area of the oval beam (left of center). The instructions show the target area for the center of the beam (low and right) but the measurements still work.
Corvette Stories
The Best of Corvette for Corvette Enthusiasts

Top 10 Most Expensive Corvettes Ever Sold on Bring A Trailer
Brett Foote
10 Things Every Corvette Owner Needs (2026 Edition)
Michael S. Palmer
8 Most "Only Corvette Owners Understand" Quirks and Problems
Pouria Savadkouei
10 Reasons the C6 Z06 is Still A Performance Benchmark After 20 Years
Joe Kucinski
How Much Horsepower Every Corvette Engine "LOST" in 1972
Joe Kucinski
Top 10 DOs and DON'Ts for Protecting Your Convertible Top!
Michael S. Palmer
Top 10 Most Explosive Corvettes Ever Made: Power-to-Weight Ratio Ranked!
Joe Kucinski
150 hp to 1,250 hp: Every Corvette Generation Compared by the Specs That Matter
Joe Kucinski
8 Coolest Corvette Pace Cars (and Replicas) of All Time
Verdad Gallardo
Thread Starter
Instructor
Joined: May 2007
Posts: 243
Likes: 0
From: Staten Island NY
The diagram I linked to is for the Euro lights. They have a faceted beam so the kidney shape (heavy to the right) gives a more targeted beam than stock lights.
With OEM lamps and housings the beam shape will be more oval and flat. Instead of using the break point (euro) as the reference use the equivalent area of the oval beam (left of center). The instructions show the target area for the center of the beam (low and right) but the measurements still work.
With OEM lamps and housings the beam shape will be more oval and flat. Instead of using the break point (euro) as the reference use the equivalent area of the oval beam (left of center). The instructions show the target area for the center of the beam (low and right) but the measurements still work.
Pro

Joined: Dec 2005
Posts: 619
Likes: 2
From: Destin FL
In one of the earlier posts above, someone mentioned that it is easy to break the adjustment screws/gears. I think at least one of mine is broken. Does anyone know of a DIY how-to repair this? I've had my headlamp bezel off and the painted cover itself. But I've never had the capsule completely out and I'm not sure whether the mechanisms I'm looking at are normal or broken. I don't see anything obvious. But no matter which way I turn the vertical adjustment screw, the light position doesn't change (and it's not pointed where I think it should be). Anyone with info, please advise.
Tech Contributor
Joined: Dec 2003
Posts: 19,384
Likes: 87
From: Horncastle Lincolnshire, England
2023 C5 of the Year Finalist - Unmodified
You're driving on the right and the aim is to give maximum light at the greatest distance without blinding the oncoming driver on a 2 way road. Both lights should focus in about the same position ahead of the car
Theres a precise aim point but its only critical if the safety code is tight (not even checked in NV for example). In principle, aim as far ahead of the vehicle as possible and offset to the right. Use the measurements from the guide to set the position and you can always adjust later if the lights shine too close to the car.
Last edited by DeeGee; Dec 23, 2007 at 02:08 AM.
Tech Contributor
Joined: Dec 2003
Posts: 19,384
Likes: 87
From: Horncastle Lincolnshire, England
2023 C5 of the Year Finalist - Unmodified
From the Manual:
Aiming Stock Headlights
Preparation
Chose a white wall to project the lights onto (screen, garage door or wall)
Make sure car is on level ground
Mark a vertical centreline on the screen in line with the center of the car (black tape?)
(look over the roof of the car to get the line)
Measure the height from the floor to the center of the headlight capsule
Mark a horizontal aiming line at that height on the screen
Measure the distance between the centreline of the right headlight module and the center of the left headlight module.
Position vertical tapes this distance to the right and left of the screen centreline. These give you vertical references for each headlight.
Lubricate the adjustment screws before adjusting
Adjustments
Raise the hood
Raise the headlights
Remove the headlamp adjustment screw plug
Turn on the low beam headlights and block the light from projecting onto the screen from the passenger headlight
Check the horizontal aim
Adjust the horizontal aim adjusting screw to align the left edge of the high intensity zone with the headlight vertical centreline
The left edge of the beam should lie within 4” to the left and 4” to the right
of the vertical centreline.
Check the vertical aim
Adjust the horizontal aim adjusting screw to align the top edge of the high intensity zone with the headlight horizontal centreline
The left edge of the beam should lie within 2” above and 2.5” below the lamp horizontal centreline.
Reinstall the headlamp adjustment screw plug
Repeat for the other headlight
Turn off the lights and close the hood
Le Mans Master


Joined: Oct 2004
Posts: 9,369
Likes: 4
From: Zephyrhills, Florida
St. Jude Donor '06-'07-'08-'09-'10-'11-'12-'13
I did this aiming " thing " a few years ago and thought I'd wind up in an asylum As several have said above, lubicate everything involved with aiming( I used DRY superlube spray so I didn't have a bunch of "stuff" running down all over the place ). The only thing that worked for me was to drive the car in the dark, decide what I wanted to position, back to the garage wall, adjust, and go out for a drive in the dark. Repeat, repeat, repeat
Time consuming trial and error but finally got them where I like them without affecting oncoming traffic.......
As several have said above, lubicate everything involved with aiming( I used DRY superlube spray so I didn't have a bunch of "stuff" running down all over the place ). The only thing that worked for me was to drive the car in the dark, decide what I wanted to position, back to the garage wall, adjust, and go out for a drive in the dark. Repeat, repeat, repeat Time consuming trial and error but finally got them where I like them without affecting oncoming traffic.......
Thread Starter
Instructor
Joined: May 2007
Posts: 243
Likes: 0
From: Staten Island NY
Correct
You're driving on the right and the aim is to give maximum light at the greatest distance without blinding the oncoming driver on a 2 way road. Both lights should focus in about the same position ahead of the car
Theres a precise aim point but its only critical if the safety code is tight (not even checked in NV for example). In principle, aim as far ahead of the vehicle as possible and offset to the right. Use the measurements from the guide to set the position and you can always adjust later if the lights shine too close to the car.
Tech Contributor
Joined: Dec 2003
Posts: 19,384
Likes: 87
From: Horncastle Lincolnshire, England
2023 C5 of the Year Finalist - Unmodified
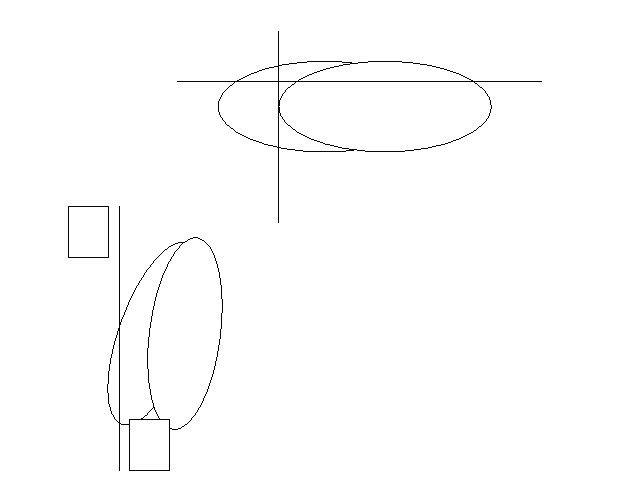
Top diagram looking from the drivers seat. Bottom diagram looking from above the car.
The beams should intersect at some point ahead of the car but offset towards the right so they dont blind oncoming drivers. The pattern's not important so long as they aim roughly in the correct area.
The beams should intersect at some point ahead of the car but offset towards the right so they dont blind oncoming drivers. The pattern's not important so long as they aim roughly in the correct area.