


Engine removal-"hard way"-From above

Thread Starter
Race Director


Joined: Oct 2004
Posts: 12,864
Likes: 4,668
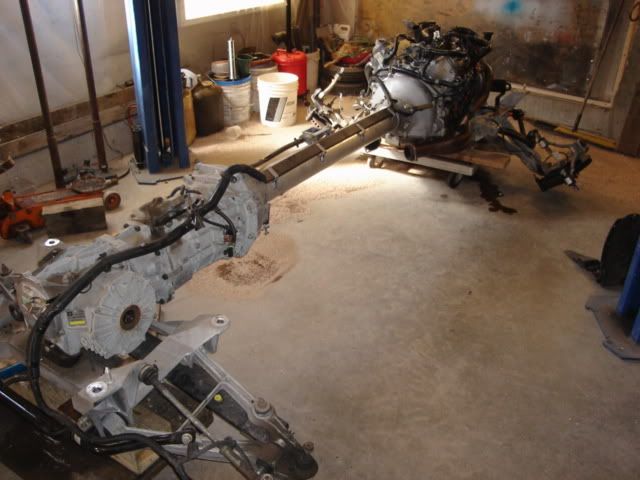
I know it's easier to drop the drivetrain out of the C5-IF you have a lift or some energetic buddies around. I have neither, so I'm going this route. I'm almost there, but...! I'm looking for help (Any pics., links, or guys who have actually done this) from any of you who may have been there-done this!! I have removed the headers, pipes, oil pan, motor mounts, heads, etc.. I have to pull the A/C compressor yet, but I believe it will then be ready. I had no choice but to pull the motor, as the cam AND cam bearings were shot. I have talked to Tony M.@AFR, and he HAS done this, but his car is an M6, I have an A4. We aren't sure how many differences there are, but we feel there are enough to justify seeking out a C5 owner with an A4 car who has done this. I'm hoping to unbolt the block from the "bell housing/torque tube" assy. Then the motor would only need to be moved forward enough to clear the dowels in the back of the block while avoiding removing the "rack". Please help if you can! Thank you very much!! 

Tech Contributor


Joined: Jan 2007
Posts: 19,472
Likes: 1,171
From: Dyer, IN
I know it's easier to drop the drivetrain out of the C5-IF you have a lift or some energetic buddies around. I have neither, so I'm going this route. I'm almost there, but...! I'm looking for help (Any pics., links, or guys who have actually done this) from any of you who may have been there-done this!! I have removed the headers, pipes, oil pan, motor mounts, heads, etc.. I have to pull the A/C compressor yet, but I believe it will then be ready. I had no choice but to pull the motor, as the cam AND cam bearings were shot. I have talked to Tony M.@AFR, and he HAS done this, but his car is an M6, I have an A4. We aren't sure how many differences there are, but we feel there are enough to justify seeking out a C5 owner with an A4 car who has done this. I'm hoping to unbolt the block from the "bell housing/torque tube" assy. Then the motor would only need to be moved forward enough to clear the dowels in the back of the block while avoiding removing the "rack". Please help if you can! Thank you very much!!
Thread Starter
Race Director
Joined: Oct 2004
Posts: 12,864
Likes: 4,668
Tech Contributor
Joined: Jan 2007
Posts: 19,472
Likes: 1,171
From: Dyer, IN
I appreciate the dilemma. I work jackstands myself. I would surmise if you use the service manual to make sure you have everything disconnected, and drop the drivetrain, then plucking the engine from the top should be relatively straight forward. Where are you running into trouble?
Racer


Joined: Jul 2006
Posts: 401
Likes: 0
From: Big Bear, CA
I just sis this on my Vette. You do in fact have to remove the steering rack AND you have to back all the K member bolts almost all the way out to lower the k member enough for engine removal. Hope this helps.
Thread Starter
Race Director
Joined: Oct 2004
Posts: 12,864
Likes: 4,668
I appreciate the dilemma. I work jackstands myself. I would surmise if you use the service manual to make sure you have everything disconnected, and drop the drivetrain, then plucking the engine from the top should be relatively straight forward. Where are you running into trouble?
Corvette Stories
The Best of Corvette for Corvette Enthusiasts

Top 10 Most Expensive Corvettes Ever Sold on Bring A Trailer
Brett Foote
10 Things Every Corvette Owner Needs (2026 Edition)
Michael S. Palmer
8 Most "Only Corvette Owners Understand" Quirks and Problems
Pouria Savadkouei
10 Reasons the C6 Z06 is Still A Performance Benchmark After 20 Years
Joe Kucinski
How Much Horsepower Every Corvette Engine "LOST" in 1972
Joe Kucinski
Top 10 DOs and DON'Ts for Protecting Your Convertible Top!
Michael S. Palmer
Top 10 Most Explosive Corvettes Ever Made: Power-to-Weight Ratio Ranked!
Joe Kucinski
150 hp to 1,250 hp: Every Corvette Generation Compared by the Specs That Matter
Joe Kucinski
8 Coolest Corvette Pace Cars (and Replicas) of All Time
Verdad Gallardo
Thread Starter
Race Director
Joined: Oct 2004
Posts: 12,864
Likes: 4,668

Tech Contributor
Joined: Jan 2007
Posts: 19,472
Likes: 1,171
From: Dyer, IN
I haven't really had problems-yet. But it IS a hell of a job for a 54 year old guy that has broken both wrists with no-zilch-nada-help. When I said "drop the drivetrain" in my post, I was referring to the ENTIRE drivetrain, including the motor. What I am trying to do is yank the motor w/o having to do anything more than disconnect the motor from the "bell housing. According to Tony, the rack may or may not have to be removed, and he didn't have to touch the rest of his drivetrain, either. But, he has a M6 tranny vs. my A4.
Take your time, and good luck.
Thread Starter
Race Director
Joined: Oct 2004
Posts: 12,864
Likes: 4,668
It's been my experience, within the confines of this forum, that dropping the drivetrain is understood to be dropping the differential/tranny/torque tube as an assembly. Hopefully you are not under any time schedule, and can just take it slow. I have to do everything myself as well, but with two good wrists.
Take your time, and good luck.
Take your time, and good luck.
Instructor
Joined: Jun 2006
Posts: 136
Likes: 0
From: Ringgold GA
I haven't done this myself but have a friend that just pulled his this way a week or two ago. He said he had to drop the front craddle about 6" so that everything would clear when moving the motor forward. He did his on jack stands and used the floor jack to hold/lower front craddle. He's done it this way once before and said hardest part was getting splines lined back up when putting it all back in.

Safety Car

Joined: Sep 2003
Posts: 3,558
Likes: 2
From: Cape Coral FL
I'm 56, have done this, and it isn't that hard doing it the way I did it. It was the first time for me. It WAS an M6, but up front I don't imagine it's any different.
Car on Jackstands.
I took the hood off.
I already had the heads off. So that meant I took the alt, water pump, and ps off, had the headers out along with the A.I.R. tubes.
Unbolted the compressor through the passenger's wheel well.
Removed the Radiator.
Removed the PS rack.
Since I had the headers off I removed the mid-section and removed the tunnel plate.
Unbolted the 8 upper control arm bolts and kept the washers on the bolts and partially threaded them in to keep them where they were.
Free'd up the brake hard lines.
Free'd up the shifter in the car by removing it from the top of the tranny. This involved removing the console and stuff.
Supported the motor and unbolted the motor mount bolts from underneath.
Dropped the cradle to the end of the bolts with the bolts about 2 threads on.
I got some twine and supported the compressor out of the way the best I could with it.
Then I found that I could work the cradle and completly drop it. This helped a lot because the oil pan 'wings' want to hang up on the cradle.
Supported the torque tube with some wood and a spare jack stand.
With the extra clearance from dropping the cradle I was able to unbolt the top 2 bell housing bolts that had some harnesses. Also was able to unbolt the bell housing bolt that had the stress strut for the big harness that runs along the torque tube in the torgue tube tunnel.
Then I removed the five bolts that hold the torque tube to the bell housing.
Once this was done I started working the motor forward while moving it around to get a good angle for the pilot bearing and input shaft to line up.
Once I got a good angle the motor almost slipped off the input shaft.
I made some marks to try and help line it up later.
Then I pushed it off the input shaft and unbolted the rest of the bolts that had wires on them and put the other bolts back into the bell housing to keep it attached to the motor.
I removed the ground wires from the block and started lifting it out very slowly, constantly looking for any other wires that were attached.
Thats about it.
Once I got the rack and heads and other assorted sundries out of the way it took about 2 hours more and that's because I didn't know what I was doing.
Here is a link to some pictures and description. Engine Removal In that thread there is a link to CajunDude's website with the same procedure, but he describes it better and his pics are better.
---
These are for an M6, but I don't see if you are doing it this way why you would need to do anything different, other than the things that need to be removed and unbolted to disconnect the engine from the bell housing with an auto.
---
One thing I can tell you tha made it manageable for me was, I took my time and spread the work out over a few days. I looked at every thing and made some drawings on stuff and kept the manuals close by. I also will say there was a little 'improvising', but nothing my small brain couldn't handle.
---
I said all that to illustrate that you don't have to take the whole drivetrain out to change the motor.
Former Vendor
Joined: Feb 2004
Posts: 10,876
Likes: 8
From: Las Vegas NV
St. Jude Donor '06 & '12
I pull the motor from the top 100% of the time. Its a piece of cake.
You DO NOT have to pull the compressor, steering rack, oil pan, etc etc etc. The ONLY thing you need to remove is the radiator and intake. Hell, you can unbolt the headers and just leave the there. They'll stay in the engine bay when you pull the motor.
Its a very easy removal process.
(6) 13mm torque tube bolts.
(8) 15mm Upper control arm bolts
(4) 13mm lower shock bolts
(4) 14mm sway bar mount bolts
(2) 18mm lower motor mount bolts
(4) 19mm engine cradle bolts
(2) 13mm wire straps at the top of the heads
- Remove the misc wires and connections to the motor. (Dont forget A/C)
- Dis-connect the 18mm high pressure line from the rack
- Remove the coolant temp sensor
- Remove the intake manifold (Only for chain clearance)
- Remove the radiator
- Disconnect headers AND O2 sensors
- Disconnect AIR system
- Do a visual around the motor for ANY connections or obstructions
- Support the engine with the hoist BEFORE you remove the lower cradle bolts.
- Put a jack under the cradle and remove the cradle bolts.
- Lift the motor about 1".
- Lower the cradle a couple of inches.
- Wiggle the motor, pulling it towards the front of the car. It will feel like its not coming, because its still on the torque tube shaft. Keep pulling until the crank pulley almost comes in contact with the rack.
- Lower the cradle even more to give the motor additional clearance. Keep doing this until the motor pulls off the shaft. Be carefull, when the motor disengages from the shaft, it will swing a few inches to the front, and lift a tad.
Safety Car
Joined: Jan 2001
Posts: 3,879
Likes: 3
From: Hobart, WI
Each time you do it you will remove less before the pull.
If you think you will EVER do it again put on a C6 oil pan. That makes it so much easier in and out without those damn wings.
I can now do it out the top without removing the rack or the radiator.
3.5 out and about 5hrs. in and believe me, I ain't no spring chicken. Just always looking for shortcuts.
A 10 and 13 and 14mm gear wrench, ~18" 3/8 drive ext and a 13mm short swivel socket (for the middle bell housing bolts) will be a lifesaver. Needless to say, air tools for faster for removal.
Something like this that I made up (bolts on top of valley cover) will hep you get your angle right.
Last edited by see5; Jan 5, 2008 at 08:42 PM.

Burning Brakes

Joined: Aug 2006
Posts: 901
Likes: 1
From: Oxford PA
http://www.cajundude.com/engineswap.htm
This really helped me out....... Its pretty much all there.... Good Luck
This really helped me out....... Its pretty much all there.... Good Luck

Instructor
Joined: Jun 2005
Posts: 110
Likes: 0
From: Cocoa Fl
Been there done that 2004 A4.
Went with cajundudes directions and had no problems.
I agree with See5 on his tool choice.....definately makes the bellhousing bolts a breeze
Went with cajundudes directions and had no problems.
I agree with See5 on his tool choice.....definately makes the bellhousing bolts a breeze
Last edited by tj37_2; Jan 5, 2008 at 10:59 PM. Reason: oops


 .....
.....