


wind noise thru passenger window
Thread Starter
Burning Brakes


Joined: Dec 2005
Posts: 831
Likes: 2
From: Silver Spring, MD
I seem to have a lot of wind noise on the passenger side. I thought I saw a thread awhile ago that addressed this. Does any recall this or can help. My temp fix is to crank the stereo.
Thx
Thx
Tech Contributor


Joined: Dec 2003
Posts: 19,384
Likes: 87
From: Horncastle Lincolnshire, England
2023 C5 of the Year Finalist - Unmodified
Try adjusting the tip in.
Window Tip-In Adjustment - Door
Tools Required
#6 Inverted TORX� Socket
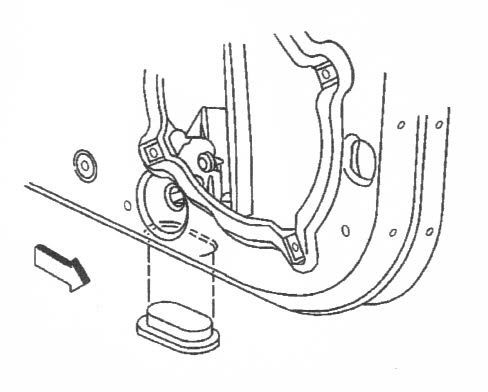
1. Position the window fully up.
2. Remove the large access plug from under the front of the door.
3. Loosen the window regulator front channel mounting nut.
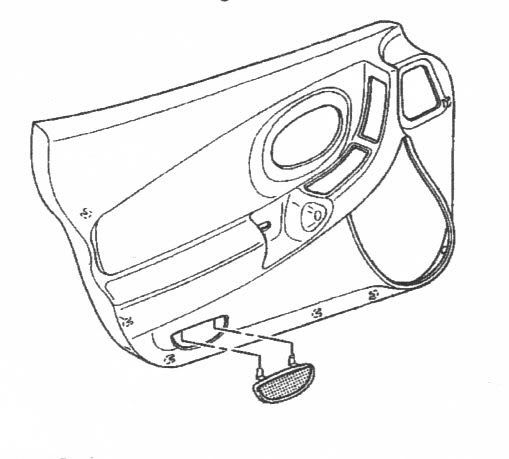
4. Remove the reflector from the trim panel
5. Loosen the jack screw jam nut.
6. Adjust tip in with the jack screw.
o Turn the jack screw clockwise to tip the window outward.
o Turn the jack screw counterclockwise to tip the window inward.
o One turn of the screw equals approximately 1 N•m (0.04 in) change at the top of the window.
7. Tighten the jack screw jam nut.
8. Lower the window.
9. Tighten the window regulator channel front mounting nut.
10. Raise the window and check the alignment.
11. Install the access plug under the front of the door.
12. Install the reflector in the door trim panel.
Window Tip-In Adjustment - Door
Tools Required
#6 Inverted TORX� Socket
1. Position the window fully up.
2. Remove the large access plug from under the front of the door.
3. Loosen the window regulator front channel mounting nut.
4. Remove the reflector from the trim panel
5. Loosen the jack screw jam nut.
6. Adjust tip in with the jack screw.
o Turn the jack screw clockwise to tip the window outward.
o Turn the jack screw counterclockwise to tip the window inward.
o One turn of the screw equals approximately 1 N•m (0.04 in) change at the top of the window.
7. Tighten the jack screw jam nut.
8. Lower the window.
9. Tighten the window regulator channel front mounting nut.
10. Raise the window and check the alignment.
11. Install the access plug under the front of the door.
12. Install the reflector in the door trim panel.
Last edited by DeeGee; Mar 9, 2008 at 07:27 AM.
Race Director


Joined: Jan 2007
Posts: 18,643
Likes: 14
From: Norman Oklahoma - The Only State in the Union with no Blue Counties!
Real simple solution, try setting HVAC on recirculate rather than fresh air. The noise in my C5 passenger side STOPS when you quit forcing in air from the outside! 
Le Mans Master


Joined: May 2006
Posts: 7,856
Likes: 242
From: Hillsboro OR
I had a similar noise in the upper rear corner of the window. Check to make sure that you did not pinch the weatherstripping the last time you put your targa top on.  Don't ask how I know.
Don't ask how I know.
Drifting


Joined: Jan 2005
Posts: 1,590
Likes: 5
From: Forsyth Illinois
Try adjusting the tip in.
You could try a search or PM me and I can send you a How To with diagrams
Document ID# 98466
1999 Chevrolet/Geo Corvette
________________________________________
Window Tip-In Adjustment - Door
Tools Required
#6 Inverted TORX� Socket
1. Position the window fully up.
2. Remove the large access plug from under the front of the door.
3. Loosen the window regulator front channel mounting nut.
4. Remove the reflector from the trim panel
5. Loosen the jack screw jam nut.
6. Adjust tip in with the jack screw.
o Turn the jack screw clockwise to tip the window outward.
o Turn the jack screw counterclockwise to tip the window inward.
o One turn of the screw equals approximately 1 N�m (0.04 in) change at the top of the window.
7. Tighten the jack screw jam nut.
8. Lower the window.
9. Tighten the window regulator channel front mounting nut.
10. Raise the window and check the alignment.
11. Install the access plug under the front of the door.
12. Install the reflector in the door trim panel.
________________________________________
Document ID# 98466
1999 Chevrolet/Geo Corvette
Race Director

Joined: Mar 2007
Posts: 18,308
Likes: 21
From: Marlton. Increasing performance one speeding ticket at a time! NJ
I have a link at home to the procedure with all the pics, I'll post it up when I get a chance. Very simple to do, only takes a few minutes.
Corvette Stories
The Best of Corvette for Corvette Enthusiasts

How Much Horsepower Every Corvette Engine "LOST" in 1972
Joe Kucinski
Top 10 DOs and DON'Ts for Protecting Your Convertible Top!
Michael S. Palmer
Top 10 Most Explosive Corvettes Ever Made: Power-to-Weight Ratio Ranked!
Joe Kucinski
150 hp to 1,250 hp: Every Corvette Generation Compared by the Specs That Matter
Joe Kucinski
8 Coolest Corvette Pace Cars (and Replicas) of All Time
Verdad Gallardo
Top 10 Corvette Engines RANKED by Peak Torque (70+ Years of Muscle!)
Joe Kucinski
Corvette ZR1X Will Be Pacing the Indy 500, And Could Probably Race, Too!
Verdad Gallardo
Top 10 Corvettes Coming to Mecum Indy 2026!
Brett Foote
Top 10 C9 Corvette MUST-HAVES to Fix These C8 Generation Flaws!
Michael S. Palmer
Thread Starter
Burning Brakes
Joined: Dec 2005
Posts: 831
Likes: 2
From: Silver Spring, MD
Try adjusting the tip in.
You could try a search or PM me and I can send you a How To with diagrams
Document ID# 98466
1999 Chevrolet/Geo Corvette
________________________________________
Window Tip-In Adjustment - Door
Tools Required
#6 Inverted TORX� Socket
1. Position the window fully up.
2. Remove the large access plug from under the front of the door.
3. Loosen the window regulator front channel mounting nut.
4. Remove the reflector from the trim panel
5. Loosen the jack screw jam nut.
6. Adjust tip in with the jack screw.
o Turn the jack screw clockwise to tip the window outward.
o Turn the jack screw counterclockwise to tip the window inward.
o One turn of the screw equals approximately 1 N•m (0.04 in) change at the top of the window.
7. Tighten the jack screw jam nut.
8. Lower the window.
9. Tighten the window regulator channel front mounting nut.
10. Raise the window and check the alignment.
11. Install the access plug under the front of the door.
12. Install the reflector in the door trim panel.
________________________________________
Document ID# 98466
1999 Chevrolet/Geo Corvette
 Checked the weatherstripping- its good. HVAC setting also had little effect but there was a difference.
 It is definately coming from the A-pillar area. Tried what nj02 suggested and road in the passenger side (that was a first) and had the same result. I know I saw something awhile go that specifically addressed this matter. I look into this weekend and report back.
A quick observation- there seems to be a lot of play or looseness in the A-pillar. More so on the passenger side than the driver's side.
Last edited by bdiddo; Feb 13, 2008 at 12:38 AM. Reason: added comment
Intermediate

Joined: Feb 2008
Posts: 36
Likes: 0
From: new bern nc
im glad that you ninj2 are working to help ssolve the problem, cause im having the same embarassing issue. I take my girl or buddies for a ride on the highway and i just haveto crank up the stereo, its bad ! noise is almost unbearable, i donr know how much longer i can take it.
I too thought about using some kind of filler for the hollow center of the weather strip, im thinking about that expandable foam from home depot.
somebody help
I too thought about using some kind of filler for the hollow center of the weather strip, im thinking about that expandable foam from home depot.
somebody help


Racer
Joined: Mar 2004
Posts: 382
Likes: 0
From: Arlington VA
Dee Gee and others thank you for the tips. I did the above procedure... it helped but still get to much wind noise Checked the weatherstripping- its good. HVAC setting also had little effect but there was a difference.
It is definately coming from the A-pillar area. Tried what nj02 suggested and road in the passenger side (that was a first) and had the same result. I know I saw something awhile go that specifically addressed this matter. I look into this weekend and report back.
A quick observation- there seems to be a lot of play or looseness in the A-pillar. More so on the passenger side than the driver's side.
Checked the weatherstripping- its good. HVAC setting also had little effect but there was a difference. It is definately coming from the A-pillar area. Tried what nj02 suggested and road in the passenger side (that was a first) and had the same result. I know I saw something awhile go that specifically addressed this matter. I look into this weekend and report back.
A quick observation- there seems to be a lot of play or looseness in the A-pillar. More so on the passenger side than the driver's side.
- Max
Intermediate
Joined: Feb 2008
Posts: 36
Likes: 0
From: new bern nc
so i found the darned culprit of the noise, it seems that the window has shifted rearward about 1/4 inch and has opened a small void near the passenger sideview mirror. its so minute that it took a while to notice the comparitive difference with the normal driver side wondow. I understand that there are about 5 adjustment points for the window, but i am extremely leary about taking my door panel off and diving into this problem. As much as i like to do things on my own, it might be time to throw in the towel and have chevy tune it up for me, unless there is someone local that wants to have a weekend of beers and window adjusts.
adam
corpus christi, tx
adam
corpus christi, tx
Burning Brakes
Joined: Feb 2007
Posts: 786
Likes: 6
From: Manassas VA/Flagler Beach FL
St. Jude Donor '13,'19
so i found the darned culprit of the noise, it seems that the window has shifted rearward about 1/4 inch and has opened a small void near the passenger sideview mirror. its so minute that it took a while to notice the comparitive difference with the normal driver side wondow. I understand that there are about 5 adjustment points for the window, but i am extremely leary about taking my door panel off and diving into this problem. As much as i like to do things on my own, it might be time to throw in the towel and have chevy tune it up for me, unless there is someone local that wants to have a weekend of beers and window adjusts.
adam
corpus christi, tx
adam
corpus christi, tx
I started a thread a while back on this. Mine is only noticable over 70 mph. I was given the "tip in" procedure w/pics. After looking at the pics and my window, I decided it was a small (tiny) gap at mirror height. I was hoping "tip in" fix would address this but haven't got around to it yet. Maybe need to "tip in" the front of the window instead of the rear as shown in the "tip in" fix. Not sure how or if this can be done. Anybody?

Racer
Joined: Apr 2005
Posts: 310
Likes: 1
From: Sterling Virginia
so i found the darned culprit of the noise, it seems that the window has shifted rearward about 1/4 inch and has opened a small void near the passenger sideview mirror. its so minute that it took a while to notice the comparitive difference with the normal driver side wondow. I understand that there are about 5 adjustment points for the window, but i am extremely leary about taking my door panel off and diving into this problem. As much as i like to do things on my own, it might be time to throw in the towel and have chevy tune it up for me, unless there is someone local that wants to have a weekend of beers and window adjusts.
adam
corpus christi, tx
adam
corpus christi, tx
The window will probably be stuck to the clamps at first - as I recall there was some rubber or some sort of padding so it wasn't metal on glass. Make sure you don't crank down on the clamps so hard you crack the glass.
Good luck!

-Rich

Burning Brakes
Joined: Dec 2003
Posts: 1,066
Likes: 9
From: Eddy Texas

Le Mans Master
Joined: May 2006
Posts: 5,987
Likes: 18
From: DuBois PA
St. Jude Donor '11-'12-'13-'14-'15
OK here's everything I could find on this problem on my maintenance DVD;
Air/Wind Noise
Wind Noise or Water Leak at Top of Door Glass - Adjustment Tips - kw adjust air convertible door fit gap glass moisture noise pillar position seal water weatherstrip whistle
Wind noise and water leak issues in this area are often the result of a mispositioned door glass. When adjusting door glass, attention should be focused on the glass fit at the rear and top edge first. Note that there is no need to remove the water deflector to perform any of the adjustments covered here.
TIP IN ADJUSTMENT reference SI document number 657148
1. Remove both access plugs from the bottom of the door (1 front bottom side, 1 rear inner side).
2. Loosen the jack screw jam nut. Turn jam nut clockwise to tip out, counter clockwise to tip in.
3. If no more adjustment is available, loosen both the forward and aft upper guide nuts, and bend the welded channel bolts downward and retighten. This will increase the inward angle of the glass. Loosen the 10mm nut at the bottom of the front channel, lower the glass and tighten the nut. This will align the front channel to the rear and prevent the glass from binding. Tip in should be added until door glass will not roll up and then backed off slightly. Maxing out both front and rear tip in would likely result in the windows not rolling up. If by some chance a door to fender fit concern was corrected by adjusting the door out (rather than bring fender in which is more involved), tip in could be maxed out in that situation. The door glass should be flush or inboard (0 mm up to -2 mm) to the w/s retainer. (This can easily be checked with a straight edge (credit card).
HEIGHT ADJUSTMENT reference SI document number 657151and 657152
Remove the front and rear butyl patches and loosen the 10 mm bolts for the glass to regulator sash blocks. Raise the blocks with a screwdriver to increase up travel but do not lift the glass itself as it will dislodge.
FORE and AFT ADJUSTMENT reference document number 657147.
Fore and aft adjustments are made at the same time as height. Door glass edge to w/s retainer should have a gap of 5 to 8 mm across the top of the glass. Rear door glass edge to B-Pillar w/s retainer should have a gap of 7 to 9 mm. Be sure that the rear edge of the door glass is far enough back to rest on the "soft" portion of the B-Pillar (or rear) weatherstrip. If the glass is adjusted too far, back the edge will rest on the "stiff" portion of the w/s.
Check for the correct blow out clip adjustment of 4 mm (2 quarters) thickness between the glass. This can be tapped with a rubber mallot to adjust. Clip could be tweaked to 3mm. Note on door switch removal - Pass side - lift front edge of switch first. Driver side - lift rear edge first. There is a tab on the edge that could be damaged if improperly removed. Door switches are interchangeable side to side. There is a special section on Waterleaks in the 2001 YB Service Manual, B3/3 pages 8-768 to 8-784 and on Air/Wind Noise pages 8-785 to 8-787. SI document number 424696 (TSB 83-15-02) also contains the information.
Please follow this diagnosis process thoroughly and complete each step. If the condition exhibited is resolved without completing every step, the remaining steps do not need to be performed. If these steps do not resolve the condition, please contact GM TAC for further diagnostic assistance.
Wind Noise from Upper B Pillar Area
The concern is likely the result of the weatherstrips end(s) lifting. Inspect the screw on the rear of the Lift Off Roof Panel that attaches/locates the side weatherstrip on the rear of the roof panel. This screw can be seen when looking at the rear of the roof panel with the panel removed from the car. The screw is located just outboard of the stud that engages the Roof Bow Panel (halo bar, role bar, targa bar) when the roof panel is installed in the car. The wind noise may be the result of the screw twisting the weatherstrip's encased metal flange upward as it tightens against the weatherstrip. The correction is to place a washer on the screw between the screw head and the weatherstrip. The washer that is used must be corrosion resistant to prevent rust from forming. When reinstalling the screw care should be used to ensure that the weatherstrip does not twist.
ADDITIONAL INFORMATION
It is also possible for the weatherstrip ends to lift on there own. This is especially common on dual top optioned vehicles (RPO C2L which consists of CC3-clear & CF7 painted). During shipping, the painted top is installed on the vehicle while the clear top is stored in the rear compartment. The painted top ends are then held in place & given time to set up while the clear top ends may lift. A weatherstrip revision was made that involved substituting 1 by 1 inch butyl patches on the ends for the pumpable urethane bead that required more time to set up. The customer should also be advised to avoid setting the lift off roof panel down on its rear edge. This can result in the deformation (wind noise) of the encased metal flange that is on each end of the weatherstrips.
Wind Noise and/or Water Leak Front Edge of Top, or Excessive Latch Effort
There could be 2 different complaints related to Top Latch Adjustment.
1. The front lift off roof panel or convertible top, latches may be too tight or too loose.
2. The front edge of the lift off roof panel or convertible top may be sitting too high in the A-Pillar joint causing wind or water leaks.
Windnoise Around B-Pillar (Add Sealer)
1999-2001 Chevrolet Corvette (Hardtop)
Condition
Some owners may comment on wind noise around the B-pillar.
Cause
The wind noise may be caused by a void in the sealer behind the B-pillar weatherstrip retainer.
Recommendation/Instructions:
1. The outside edge (closest to the door) of the latch block/header bracket (where the locating pin fits) controls latch effort. Adjusting the outer edge downward will increase latching tension. If the outside edge of the bracket is higher than the inside edge, latching effort will decrease.
2. The inside of the latch block controls the front height of the top and compression on the header weatherstrip. Adjusting the inner edge downward will increase compression on the seal and lower the front edge of the top, correcting any wind noise or water leak concerns.
Note: The convertible and the lift off roof panel models use the same windshield header weatherstrip
Air/Wind Noise Door Window At 65km/h 40mph
Possible Cause
There is a gap between the roof panel side weatherstrip and the roof panel weatherstrip retainer at the front or the rear corner of the roof. The air/wind noise sounds like it is coming from an upper corner of the door window.
Diagnosis
Road test at 65 km/h (40 mph) with an assistant using a mechanics stethoscope, Engine Ear J 39565, or equivalent, or a plastic hose to find the source of the leak.
Corrective Action
1. Remove the roof lift off panel and place the roof panel upside down on a clean dry surface.
2. Remove the screw from the end of the weatherstrip.
3. Partially remove the weatherstrip by carefully peeling the end of the weatherstrip from the top assembly.
4. Apply a bead of urethane based windshield sealant 6 mm (0.2 in) in height.
o Across the end of the weatherstrip retainer.
o From the end of the weatherstrip retainer 20 mm (0.8 in) along the upper edge of the retainer.
o From the end of the weatherstrip retainer 20 mm (0.8 in) along the roof panel at the junction where the roof frame is bonded to the roof panel.
5. Install the weatherstrip and the attaching screw.
6. Clean up any excess sealer with solvent and a clean lint free rag.
Important
When installing the roof panel make sure the front edge of the rear roof bow weatherstrip does not roll rearward and block the drain trough down the middle of the weatherstrip.
7. Install the roof lift off panel.
Air/Wind Noise Door Window Speeds over 105km/h 65mph
Possible Cause #1
There is not enough pressure between the window and the lock pillar weatherstrip (4).
Diagnosis
Road test at over 105 km/h (65 mph) with an assistant using a mechanics stethoscope, Engine Ear J 39565, or equivalent, or a plastic hose to find the source of the leak.
Corrective Action
Adjust the door window tip in so that the window is flush to 2 mm (0.08 in) inboard of the lock pillar weatherstrip retainer. Refer to Window Tip-In Adjustment - Door in Doors.
Possible Cause #2
The gap between the window and the blow out clip is to wide.
Diagnosis
Road test at over 105 km/h (65 mph) with an assistant using a mechanics stethoscope, Engine Ear J 39565, or equivalent, or a plastic hose to find the source of the leak.
Corrective Action
1. Adjust the blow out clip clearance.
2. Slam the door to insure accurate readings.
3. Measure the clearance between the blow out clip and the door window.
4. With a rubber hammer adjust the blow out clip clearance to the window to 4 mm (0.16 in) within 1 mm (0.04 in).
Tech Contributor
Joined: Dec 2003
Posts: 19,384
Likes: 87
From: Horncastle Lincolnshire, England
2023 C5 of the Year Finalist - Unmodified