


Climate control won't change vents

4th Gear

Joined: Aug 2011
Posts: 4
Likes: 0
white. the line is under the dash above the bcm. remove floor panel. open glovebox and remove 2 10 mm bolts under rubber grommets behind glovebox. i am actually in the process of this exact repair right now and have the center console removed (not necessary as it turns out) but its dirty there anyways. you should be able to reach just by the glove box. theres a hard black hose that plugs into the purple hvac line. the next part is fun, i have the front right qtr panel off as well as battery tray and everything else. all three lines and check valve cracked. going to have to replace all the underhood vac lines by time im finished. hopefully this helps, and yours isnt as bad as mine
4th Gear
Joined: Aug 2011
Posts: 4
Likes: 0
I think yes. Without knowing first hand what your car is doing, I can't say. The hvac bundle is very accessible and plainly visible with just the floor panel and glove box off. Like I said I think earlier, purple should hold vacuum fine, but black will not I would imagine. The tube goes thru firewall in about a 1 in wire bundle taped up in the middle. It appears just under battery tray when u remove it. I blew cigar smoke thru black line and found all my leaks were in engine bay. Had to run new line to map sensor, replace 2 way check valve and replace line to reservoir. The line thru firewall thankfully wasn't that bad and I had enough left to splice to not have to run new wire
Instructor

Joined: Aug 2006
Posts: 205
Likes: 1
From: Wichita KS
Thanks a bunch mrobertm31!
I will check this out tonight. I also have the quarter panel and have replaced parts under the battery, and had a cracked check valve. That is when I discoverd the line that goes into the car was also busted, sounds like it may not be to tough for me to run new line. This is the second time I have had to make repairs to the hose that runs from the check valve to the back of the manifold.....
I will check this out tonight. I also have the quarter panel and have replaced parts under the battery, and had a cracked check valve. That is when I discoverd the line that goes into the car was also busted, sounds like it may not be to tough for me to run new line. This is the second time I have had to make repairs to the hose that runs from the check valve to the back of the manifold.....
white. the line is under the dash above the bcm. remove floor panel. open glovebox and remove 2 10 mm bolts under rubber grommets behind glovebox. i am actually in the process of this exact repair right now and have the center console removed (not necessary as it turns out) but its dirty there anyways. you should be able to reach just by the glove box. theres a hard black hose that plugs into the purple hvac line. the next part is fun, i have the front right qtr panel off as well as battery tray and everything else. all three lines and check valve cracked. going to have to replace all the underhood vac lines by time im finished. hopefully this helps, and yours isnt as bad as mine
Instructor
Joined: Aug 2006
Posts: 205
Likes: 1
From: Wichita KS
Also, I have a '99 and it only has two hoses coming off the check valve can anyone confirm where the top and the bottom one go?? I am thinking from the picks in this write up the top goes into car and bottom go to back of manifold, but like I said I have two hoses not three so I want to make sure before firing it back up and all the work of finishing running the lines.
Intermediate
Joined: Oct 2013
Posts: 47
Likes: 3
White Lightening, if you are still working on this or haven't resolved the issue yet, I can clearify as I just did this myself yesterday. I also want to thank with a deep appreciation those whom contributed to this thread with such helpful, informative information to help correct my issue with no prior knowledge of C5's mechanical/electrical make-up.
The line you are asking about goes inside the car, under the passenger side dash. Remove the floor mat and then the foot board below that to access the lower section of blower motor box/vents. There is a light purple line that mates with a black line via 90 degree, clear elbow. The black line is the one that runs to the vacuum canister outside the car(top line). If you are still unsure, look at page 1 with all the pictures posted of the brightly colored vacuum lines. You will see the light purple line with the clear elbow but you will not see the black line.
My issue was both the top line that ran into cabin and the line that ran behind the intake manifold. I will attempt to post a couple pictures to help clarify from my cell phone in another post.
Intermediate
Joined: Oct 2013
Posts: 47
Likes: 3
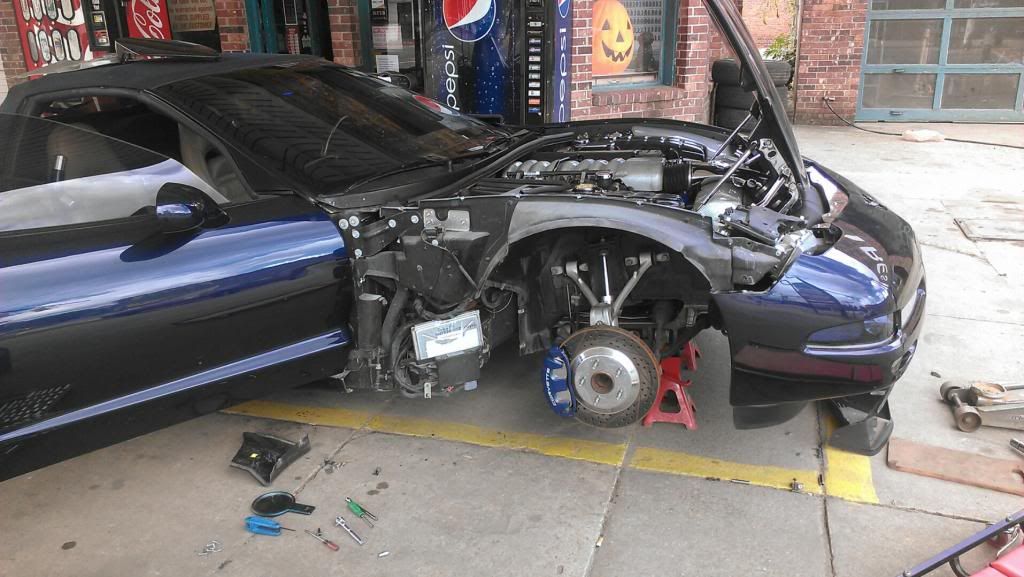
I removed the fender to allow easy access and sorting of the lines, where they go, come from, etc.

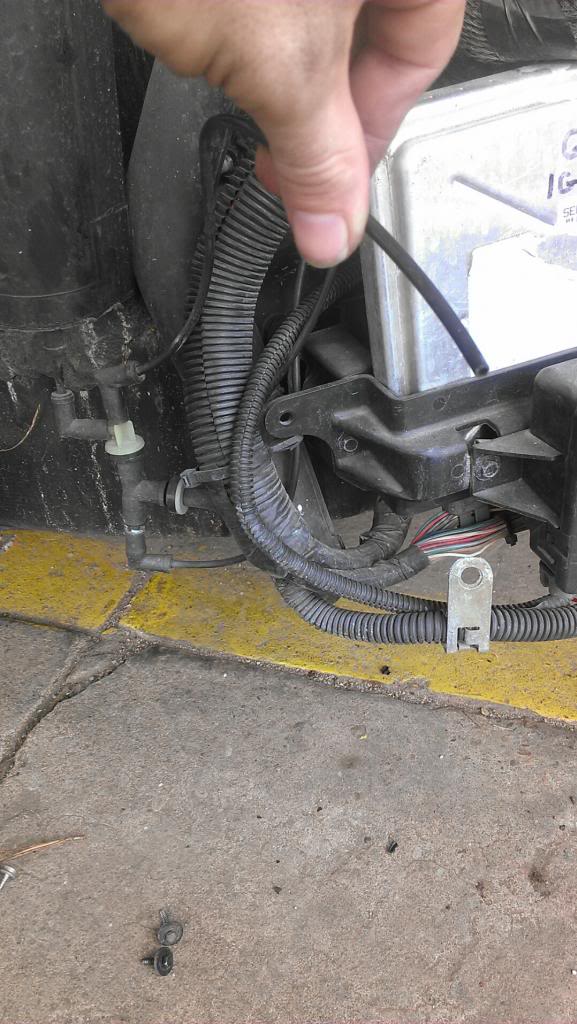
Top line broken completely. This one is the line that runs into the cabin and mates with light purple line.
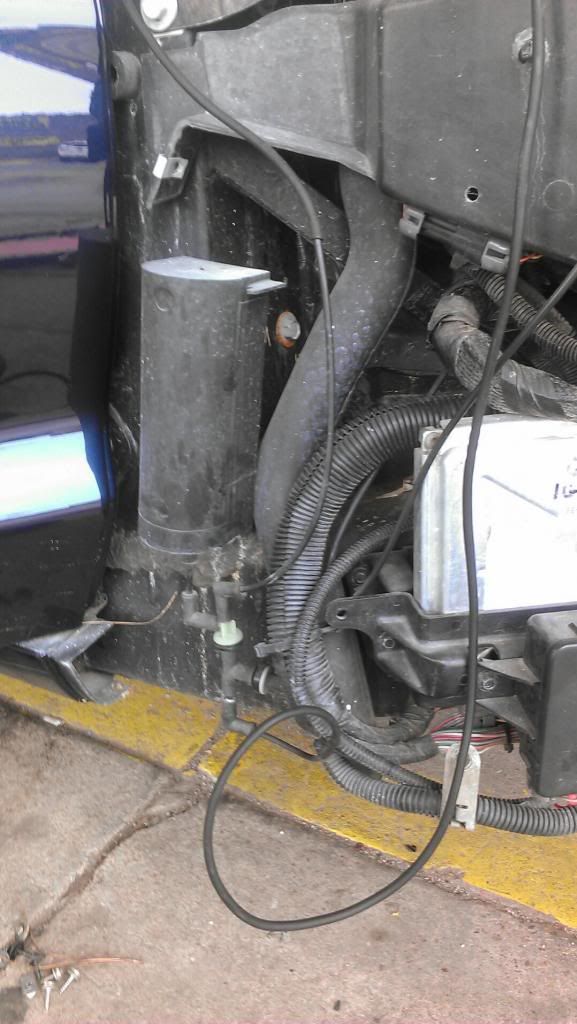
New lines run and connected to test for problem resolution before reassembly. Again, top run to inside cabin and bottom one to rear inlet of intake.

Very nervously I fired it up and turn the AC on and began changing vent direction. Got that little puff of dust of victory and I fist pumped and happy danced!
Corvette Stories
The Best of Corvette for Corvette Enthusiasts

Every 2027 Corvette Engine Explained
Joe Kucinski
Designer Imagines A Corvette That Looks More Like a Corvette Than the Corvette
Verdad Gallardo
10 Ugly Corvettes That We Still Kinda Love
Joe Kucinski
Top 10 Most Expensive Corvettes Ever Sold on Bring A Trailer
Brett Foote
10 Things Every Corvette Owner Needs (2026 Edition)
Michael S. Palmer
8 Most "Only Corvette Owners Understand" Quirks and Problems
Pouria Savadkouei
10 Reasons the C6 Z06 is Still A Performance Benchmark After 20 Years
Joe Kucinski
How Much Horsepower Every Corvette Engine "LOST" in 1972
Joe Kucinski
Top 10 DOs and DON'Ts for Protecting Your Convertible Top!
Michael S. Palmer
Advanced
Joined: Aug 2002
Posts: 71
Likes: 7
From: Cincinnati Ohio
I removed the fender to allow easy access and sorting of the lines, where they go, come from, etc.
Top line broken completely. This one is the line that runs into the cabin and mates with light purple line.

New lines run and connected to test for problem resolution before reassembly. Again, top run to inside cabin and bottom one to rear inlet of intake.
Very nervously I fired it up and turn the AC on and began changing vent direction. Got that little puff of dust of victory and I fist pumped and happy danced!
Top line broken completely. This one is the line that runs into the cabin and mates with light purple line.
New lines run and connected to test for problem resolution before reassembly. Again, top run to inside cabin and bottom one to rear inlet of intake.
Very nervously I fired it up and turn the AC on and began changing vent direction. Got that little puff of dust of victory and I fist pumped and happy danced!
Sorry to revive this old thread, but I'm facing this same issue and based on what I see here, it appears the best thing to do is bite the bullet and remove the passenger fender to see everything. Is that tough? I'm thinking not, but also looking for any catcha's that might be lucking.
Secondly, my biggest challenge right now is trying to get to the connection at the rear of the intake. I cannot even get near the connection with my hands with the battery side shield removed as well as the plastic engine cover on that side. What the hell is the trick??? Or is it better to try and find the hose end somewhere in the wire harness, maybe a foot away from the intake connection, and just use and adapter from there, down to the canister with new hose??
Some GM engineer should be smacked up side the head for putting this connection to a plastic hose, in a completely inaccessible place!
Thx for your help!
Mark

Tech Contributor


Joined: Dec 1999
Posts: 32,910
Likes: 2,402
From: Anthony TX
CI 6,7,8,9,11 Vet
St. Jude Donor '08
Sorry to revive this old thread, but I'm facing this same issue and based on what I see here, it appears the best thing to do is bite the bullet and remove the passenger fender to see everything. Is that tough? I'm thinking not, but also looking for any catcha's that might be lucking.
Secondly, my biggest challenge right now is trying to get to the connection at the rear of the intake. I cannot even get near the connection with my hands with the battery side shield removed as well as the plastic engine cover on that side. What the hell is the trick??? Or is it better to try and find the hose end somewhere in the wire harness, maybe a foot away from the intake connection, and just use and adapter from there, down to the canister with new hose??
Some GM engineer should be smacked up side the head for putting this connection to a plastic hose, in a completely inaccessible place!
Thx for your help!
Mark
LOL!! If you can remove the fender,,,, You can remove the intake manifold!!
If you check for vacuum at the vacuum line at the canister and have none, remove the intake, and repair the fitting/line and if neccessary run a new line from there to the canister.
Advanced
Joined: Aug 2002
Posts: 71
Likes: 7
From: Cincinnati Ohio
You are of course right.... I removed the intake yesterday with minor fuss. Can't see a break in the tube, but I'm running new 1/4" vacuum rubber tubing from the intake nipple to the vacuum canister nipple in the passenger fender this week. Bypass the 1/8 inch hard plastic tube in the wire harness completely. Just need to now find a 1/4 to 1/8 barded adapter and I'm all set.
Thx
Mark
Advanced
Joined: Aug 2002
Posts: 71
Likes: 7
From: Cincinnati Ohio
Argh and alas, no joy. I took off the intake manifold and did all the right stuff, replacing the entire tube from the manifold connection down to the connector end in the passenger side fender well. Before I connected at the fender, I started up the car and felt the hose for good suction power and there was. Connected everything and buttoned it up. The vents seem to be in about the same state they were....not changing much at all when the mode switch is cycled thru. I guess I still have a leak from the vacuum canister to the inside hose connection or connections, or something wrong with my HVAC controller. Glum.

Le Mans Master

Joined: Oct 1999
Posts: 6,366
Likes: 34
I got under the passenger side when I was messing with mine. If I remember right, there is a purple line under the passenger side dash. I think that was the one that pulled vacuum to that manifold. I had vacuum there, so I determined my electronic HVAC controller was broken.
I purchased a new one, installed and everything worked perfectly.
I purchased a new one, installed and everything worked perfectly.
Last edited by bill mcdonald; Sep 22, 2015 at 03:54 AM.
Advanced
Joined: Aug 2002
Posts: 71
Likes: 7
From: Cincinnati Ohio
I got under the passenger side when I was messing with mine. If I remember right, there is a purple line under the passenger side dash. I think that was the one that pulled vacuum to that manifold. I had vacuum there, so I determined my electronic HVAC controller was broken.
I purchased a new one, installed and everything worked perfectly.
I purchased a new one, installed and everything worked perfectly.
The electronics in the Vette, at least in the C5's, just seems to be a bit flaky and unpredictable a fair amount of time. I now also have the occasional "traction control/ABS/speed limited to 80mph" lights and text coming on, which goes away after 2-4 restarts. I've cleaned the two big ground connectors in the right/left engine bay, so now stumped. Anyway, I digress. Time for a new HVAC head. -Mark
Le Mans Master
Joined: Oct 1999
Posts: 6,366
Likes: 34
Thanks very much for the input Bill. i think the controller might very well be my next purchase. Its doing some weird stuff as well. The AC will go on and off at what appears to be incorrect times. I dial the temp up with the AC button off and the compressor comes on (AC button lights up) and if I try to turn it off it just blinks for a bit and stays on solid again. And then other times it works "normal".
The electronics in the Vette, at least in the C5's, just seems to be a bit flaky and unpredictable a fair amount of time. I now also have the occasional "traction control/ABS/speed limited to 80mph" lights and text coming on, which goes away after 2-4 restarts. I've cleaned the two big ground connectors in the right/left engine bay, so now stumped. Anyway, I digress. Time for a new HVAC head. -Mark
The electronics in the Vette, at least in the C5's, just seems to be a bit flaky and unpredictable a fair amount of time. I now also have the occasional "traction control/ABS/speed limited to 80mph" lights and text coming on, which goes away after 2-4 restarts. I've cleaned the two big ground connectors in the right/left engine bay, so now stumped. Anyway, I digress. Time for a new HVAC head. -Mark
it took something like 2 weeks of driving without resetting the codes to get the code for the sensor being out of range.
I shut down traction control during this driving period to prevent the system malfunctioning and applying brakes to the front left tire. Which pulls the car to the left dramatically.
Burning Brakes


Joined: Oct 2013
Posts: 1,030
Likes: 72
From: Seminole, FL
O.K., kiddies, my turn...
I have read this and as many other threads as I could find related to this subject.
'99 Coupe with the Digital Auto HVAC.
while ago lost all air flow to the foot area. Only blowing out Defroster.
After reading this thread, checked Vacuum at passenger foot area. GOOD.
And vacuum holds after engine shut off. With Vacuum Guage.
Then did the Fuses removal 'reset' as per instructions read here.
Pulled #18 and #27, left them out while I made myself a couple of sandwiches and ate them. I figure that to be longer than the instructions minimum time limit.
Reinstalled fuses and now the air flow ducts (the controllers) are working "TO A POINT"..
Getting 'Change' from Defrost to Dash., and even down to the foot area.
BUT still getting too much air flow out of the defroster vent at the windshield.
Attempted to recover 'codes' using my OTC Evo Scanner.
But, alas, I'm surprised, it is unable to read the HVAC... Silly me.
Broke out the owner's manual, and a lot of good that did.
Nothing about recovering 'codes' through the DIC...
Enlighten me, Please?
Burning Brakes
Joined: Oct 2013
Posts: 1,030
Likes: 72
From: Seminole, FL
Back again. Went into the DIC and viewed every module that's listed.
Recovered and erased a whole slew of codes unrelated to HVAC.
All 'history' codes related to Antilock Brakes and the dreaded MAGNASTEER.
There were NO "B" codes related to any of the 'Actuators'.
Only B codes were 2282 (Battery Circuit #1) and 2284 (Battery Circuit #2) and 2264 (Vertical Position Sensor Circuit), Probably because I had the battery removed for the 5 or 6 weeks she was put away. This problem actually started prior to storing her, I figured I'd get to it during storage. Nah... Pulled her out to drive, and thus, am getting to it now.
As I stated above, after the Fuse removal reset above, there is movement of the air flow, but the defrost appears to remain open at all times, the dash gets a nice amount of air flow, but the foot area still, despite an increase in air flow, seems to have insufficient air flow compared to prior to this happening.
Let's say that before this, roof off, windows down, at 54 degrees out, feet and legs stayed nice and warm. Now not.
Any suggestions?
Thanks in advance.
Advanced
Joined: Aug 2002
Posts: 71
Likes: 7
From: Cincinnati Ohio
Ok, I've started to look at this issue again with the vent flows. As you might recall, I replaced the vacuum line from the intake manifold to the passenger side under-fender canister last fall. New line run, just to be safe. Also, I have no HVAC codes.
Today I pulled the inside vacuum line connection apart under passenger side dash (purple line to the black line via a 90 degree elbow) to check vacuum. I don't have a vacuum gauge (maybe should invest) but the black line is pulling...just not sure if it's "enough". By putting my finger over it, I don't get a super strong suction, just a light feeling that it's pulling. Putting this connection back together temporarily, then apart again, doesn't seem to make any difference in the vent flows...they all pretty much stay all on. There does seem however to be a small change in flows when I hit the mode switch on the HVAC controller from floor/windshield to panel vents when the connection is together..but not much. Looking for next steps in this hunt. Thanks, Mark
Today I pulled the inside vacuum line connection apart under passenger side dash (purple line to the black line via a 90 degree elbow) to check vacuum. I don't have a vacuum gauge (maybe should invest) but the black line is pulling...just not sure if it's "enough". By putting my finger over it, I don't get a super strong suction, just a light feeling that it's pulling. Putting this connection back together temporarily, then apart again, doesn't seem to make any difference in the vent flows...they all pretty much stay all on. There does seem however to be a small change in flows when I hit the mode switch on the HVAC controller from floor/windshield to panel vents when the connection is together..but not much. Looking for next steps in this hunt. Thanks, Mark


