


Air conditioning compressor replacement write-up
Racer


Joined: Jan 2009
Posts: 285
Likes: 0
From: Austin TX
Great write up. Unfortunately after 15 hours of work my new AC wouldn't hold pressure for more than 5 minutes. Looks like I'll be taking it to the shop anyway.
Update: Turns out it was a single mis-sized o-ring at the condenser. Shop charged me $100 to complete the job, $50 of which was for the refrigerant I hadn't yet put in. So ~$50 in labor as apposed to hundreds. Next time I might just take it to the shop though. Don't let the write-up fool you, this is a ridiculous project.
Update: Turns out it was a single mis-sized o-ring at the condenser. Shop charged me $100 to complete the job, $50 of which was for the refrigerant I hadn't yet put in. So ~$50 in labor as apposed to hundreds. Next time I might just take it to the shop though. Don't let the write-up fool you, this is a ridiculous project.
Last edited by RedWuken; Jun 25, 2011 at 11:11 PM.
Drifting


Joined: May 2008
Posts: 1,621
Likes: 2
From: Petal Ms
St. Jude Donor '08-'11
Thanks for the write-up. I found this to actually be really easy as opposed to many of the other things I have done on my car ha. My ac works great now! Only problem I had was that when I connected by battery back up the actuators didnt synchronize right and my air was hot on driver side cold on passenger side ha. Quick fix though luckily, just disconnected the battery and connected it back.
Corvette Stories
The Best of Corvette for Corvette Enthusiasts

Top 10 Most Expensive Corvettes Ever Sold on Bring A Trailer
Brett Foote
10 Things Every Corvette Owner Needs (2026 Edition)
Michael S. Palmer
8 Most "Only Corvette Owners Understand" Quirks and Problems
Pouria Savadkouei
10 Reasons the C6 Z06 is Still A Performance Benchmark After 20 Years
Joe Kucinski
How Much Horsepower Every Corvette Engine "LOST" in 1972
Joe Kucinski
Top 10 DOs and DON'Ts for Protecting Your Convertible Top!
Michael S. Palmer
Top 10 Most Explosive Corvettes Ever Made: Power-to-Weight Ratio Ranked!
Joe Kucinski
150 hp to 1,250 hp: Every Corvette Generation Compared by the Specs That Matter
Joe Kucinski
8 Coolest Corvette Pace Cars (and Replicas) of All Time
Verdad Gallardo
5th Gear
Joined: Aug 2010
Posts: 5
Likes: 0
From: CT
Rocco, Thanks for the great write up! I hope I never have to become that intimate with my A/C unit, but if she ever decides to leave me all hot and sweaty, I now have the knowledge of how to get her back without being taken to the cleaners. Thanks!

4th Gear

Joined: Jun 2006
Posts: 4
Likes: 0
From: Left Coast
Rocco you da man. Thanks for taking the time and making the effort to do such a superb job of documenting your A/C work experience.
Hopefully, I will take full advantage of your efforts within the next few days.
1998 Torch Red Coupe
Hopefully, I will take full advantage of your efforts within the next few days.
1998 Torch Red Coupe

Heel & Toe


Joined: Aug 2005
Posts: 20
Likes: 5
Rocco,
Thanks for the great write-up. I printed it and followed it step by step when replacing my dead AC compressor on my �01 C5
As everybody else, I struggled when trying to remove the darn 13-mm screw holding the hoses on the back of the AC compressor.
Instead of using a socket and a bunch of 1/4-in drive extensions, or remove the RH exhaust manifold, I found it easier to use a 13-mm craftsman combo ratchet wrench from the inside of the wheel well.
Here is the wrench that I am talking about. P/N is 42424 (case someone ask, I don't work for Sears).

The way the compressor is mounted, I did not have enough space for the wrench to rotate more than one click between the engine craddle and the right rail. So what I did is to first remove the compressor from its mount by loosening the 2 screws and the stud, and shifted the compressor by about one inch toward the right frame rail. I temporary secured it in this position with a wood spacer (see pic below)
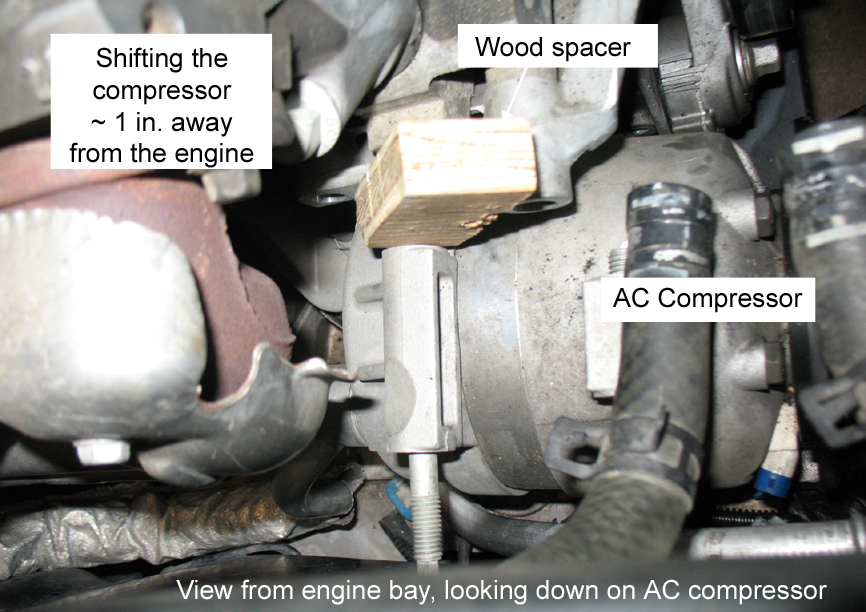
Now it gave me just enough stroke from the wrench to rotate two clicks
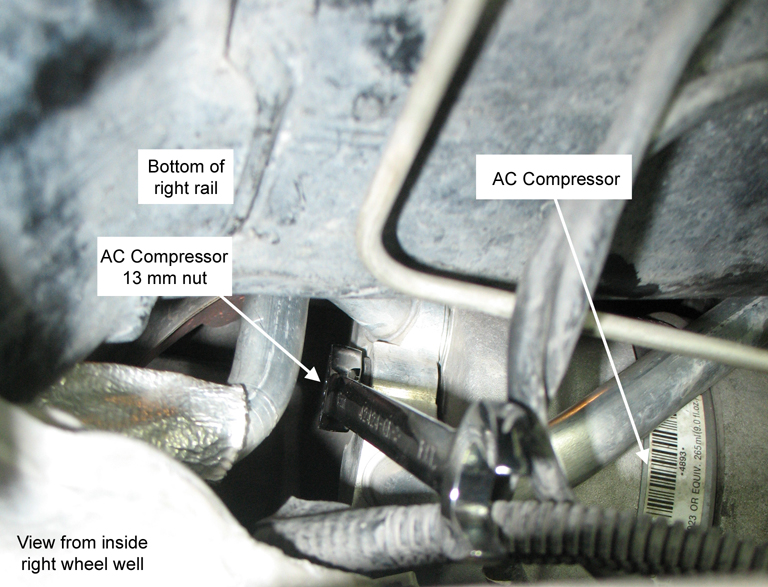
After that, taking out the 13-mm screw was a breeze, you just had to be patient as you can only ratchet it out 2 clicks at a time� But nice thing is that you are able to see what you are doing.
Did the reverse for tightening it back to the new compressor.
Hope it helps,
JM


Advanced

Joined: Jan 2014
Posts: 67
Likes: 10
Don't fight with it. Pull the bolts that hold the compressor on and pull it towards the passenger side fender. This gives you plenty of room to pull the bolt that holds the back hoses.
Of course, put it back on before you reattach the compressor to the engine block.

HTH,
Dan...
Of course, put it back on before you reattach the compressor to the engine block.
HTH,
Dan...
Rocco,
Thanks for the great write-up. I printed it and followed it step by step when replacing my dead AC compressor on my �01 C5
As everybody else, I struggled when trying to remove the darn 13-mm screw holding the hoses on the back of the AC compressor.
Instead of using a socket and a bunch of 1/4-in drive extensions, or remove the RH exhaust manifold, I found it easier to use a 13-mm craftsman combo ratchet wrench from the inside of the wheel well.
Here is the wrench that I am talking about. P/N is 42424 (case someone ask, I don't work for Sears).

The way the compressor is mounted, I did not have enough space for the wrench to rotate more than one click between the engine craddle and the right rail. So what I did is to first remove the compressor from its mount by loosening the 2 screws and the stud, and shifted the compressor by about one inch toward the right frame rail. I temporary secured it in this position with a wood spacer (see pic below)

Now it gave me just enough stroke from the wrench to rotate two clicks

After that, taking out the 13-mm screw was a breeze, you just had to be patient as you can only ratchet it out 2 clicks at a time� But nice thing is that you are able to see what you are doing.
Did the reverse for tightening it back to the new compressor.
Hope it helps,
JM
Thanks for the great write-up. I printed it and followed it step by step when replacing my dead AC compressor on my �01 C5
As everybody else, I struggled when trying to remove the darn 13-mm screw holding the hoses on the back of the AC compressor.
Instead of using a socket and a bunch of 1/4-in drive extensions, or remove the RH exhaust manifold, I found it easier to use a 13-mm craftsman combo ratchet wrench from the inside of the wheel well.
Here is the wrench that I am talking about. P/N is 42424 (case someone ask, I don't work for Sears).
The way the compressor is mounted, I did not have enough space for the wrench to rotate more than one click between the engine craddle and the right rail. So what I did is to first remove the compressor from its mount by loosening the 2 screws and the stud, and shifted the compressor by about one inch toward the right frame rail. I temporary secured it in this position with a wood spacer (see pic below)
Now it gave me just enough stroke from the wrench to rotate two clicks
After that, taking out the 13-mm screw was a breeze, you just had to be patient as you can only ratchet it out 2 clicks at a time� But nice thing is that you are able to see what you are doing.
Did the reverse for tightening it back to the new compressor.
Hope it helps,
JM


Instructor
Joined: Jul 2015
Posts: 127
Likes: 8
From: Cream Ridge NJ
EXCELLENT WRITE UP!!! My AC is making a tapping/clicking whining sound that increases as I hit the gas. AC blows ice cold, but I'm assuming not for long. Your write up, is my Chiltons manual. Haha..... Thank u for taking the guess work out of this project. Now if you could only take the sweat work out of it....... LOL.......


