When you click on links to various merchants on this site and make a purchase, this can result in this site earning a commission. Affiliate programs and affiliations include, but are not limited to, the eBay Partner Network.
I found this thread in search; used it this weekend to both remove/install the switch and rebuilt the switch. My white nylon actuator ring that opens and closes the contacts was melted like someone else who posted in this thread. I used regular JB Weld to fill in the low spots since that's what I had. After I let it harden overnight I sanded it down to the original level. One set of the contacts were pretty burned and had overheated which melted the pin into the white nylon ring. My only option was to sand the contacts. I used 400 grit then cleaned them with contact cleaner. Everything seems to be working fine. My original problem was the headlights wouldn't close or turn off. I was able to get it to close momentarily by turning the headlight **** further back which led me to believe it was the multi-function switch. I found that the switch is available from several sources including Ebay under serveral different manufacturers and part numbers. If you're looking for a new switch try these besides the OEM part number 26075870...BWD S2183, NAPA HL6226, SMP CBS1035, WELLS SW1473 and the least expensive was on Ebay as part number D1512G from Autopartstomorrow which included shipping. Anyway if I've made an error please advise.
Update: I just found one on Amazon for $121.21 under ACDelco D1512G Switch Assembly. Amazing the huge price differences that are out there. Thanks. Art
Just used the steps in this post today. Step 10 saved a lot of time on removing that stupid bolt. Used the 1/4 and had no problems. Problem of low beam not working fixed.
I found this thread in search; used it this weekend to both remove/install the switch and rebuilt the switch. My white nylon actuator ring that opens and closes the contacts was melted like someone else who posted in this thread. I used regular JB Weld to fill in the low spots since that's what I had. After I let it harden overnight I sanded it down to the original level. One set of the contacts were pretty burned and had overheated which melted the pin into the white nylon ring. My only option was to sand the contacts. I used 400 grit then cleaned them with contact cleaner. Everything seems to be working fine. My original problem was the headlights wouldn't close or turn off. I was able to get it to close momentarily by turning the headlight **** further back which led me to believe it was the multi-function switch. I found that the switch is available from several sources including Ebay under serveral different manufacturers and part numbers. If you're looking for a new switch try these besides the OEM part number 26075870...BWD S2183, NAPA HL6226, SMP CBS1035, WELLS SW1473 and the least expensive was on Ebay as part number D1512G from Autopartstomorrow which included shipping. Anyway if I've made an error please advise.
Update: I just found one on Amazon for $121.21 under ACDelco D1512G Switch Assembly. Amazing the huge price differences that are out there. Thanks. Art
Thanks for that... I can't believe amazon has this with the prime option lol.
Thanks for the awesome write up.. Just finished my switch replacement.... My symptoms were the lights would pop up , but not illuminate.. The lights would also pop up when the switch was in the parking light position...
I recognize this is probably beating a dead horse, however, I wanted to post anyway - thanks for this great write-up. I went through this today. The steps were dead on. It took a little time, but was very easy to follow and this solved my problem. Not sure why the dealer was unable to properly diagnose the problem...
Great write-up, finished the job today, had some struggle not having the 1/4 inch wrench, but after buying the right tool all went well. The switch is working fine again. This write-up did save me a lot of money because parts are very expensive in Europe, ordered the switch on Ebay received the part within 10 day's. Anyway I'll thank you very much!
[QUOTE=aleadfoot;1569743836]To the top for this excellent post all the way from Alaska[This was really helpful, replaced my switch yesterday BUT there are a couple of gotchas - Additional Torx screw behind the a/c sensor panel and that PITA rubber boot that holds the steering column pieces together from the rear. Could not have pulled it off in any kind of reasonable time without this as a starter though.]
Just finished my repair tonight. Took about 3.5 hours to remove and repair the multi function switch. Did not spend any money just a little time with my car.
My column cover is slightly different and some of the fasteners were more hex head not torx. Still a very appreciated wright up!
Last edited by DavidTheJeweler; 05-01-2015 at 11:35 AM.
This write-up will show the steps involved with removing the headlight switch / blinker arm / multi-function switch assembly, either for repair or replacement. There wasn't a good picture-rich write-up that I could find so I documented my process, and maybe it'll help somebody out.
My particular problem was that when I turn on the headlights, the taillights wouldn't work and the instrument panel would not illuminate. After removing and repairing my headlight switch, I'm fully functional once again.
I did this two days ago and am going from memory, so please point out any errors or omissions and I'll update the original post accordingly!
I also want to thank Bill Curlee and Zephyr1999 for providing some info on this whole mess in the first place, that led to me understand the problem I had and decide I could fix it.
Tools Needed:
-Beer of Choice (to be used whenever the heck you feel like it!)
-Torx driver or keys, for the following: T15, T20, and T25.
If you are going to open the headlight switch, add T8 to the list.
-The T25 should be a one-inch bit, OR an L-shaped key with a one-inch leg.
-1/4" open-end wrench
-Diagonal cutters (optional)
-Flat-bladed screwdriver or other thin prying device
10mm socket, 4mm socket, 7mm socket, socket wrench, and 6" extension (or equivalent set of nut-drivers)
The Procedure:
In order to get to the blinker switch, we'll be removing the knee panel that goes under and beside the steering wheel; the steering column covers; and we'll loosen the center console pieces. Here's how to do all this.
0. Turn the steering wheel such that the TOP of the wheel is facing LEFT. You'll see why in step 10.
1. First, I'd recommend loosening the center console and radio bezel. This just makes it easier/safer to remove the paneling around the steering wheel I think. For a good procedure on this, check out this guide at Vette Essentials:
Beginning with step 2 in that guide, it'll show you how to remove/loosen these pieces. That guide also parallels some of my writeup here, so you can refer to that guide for additional pictures/info. Once you have those panels removed or loose, come back here and continue on!
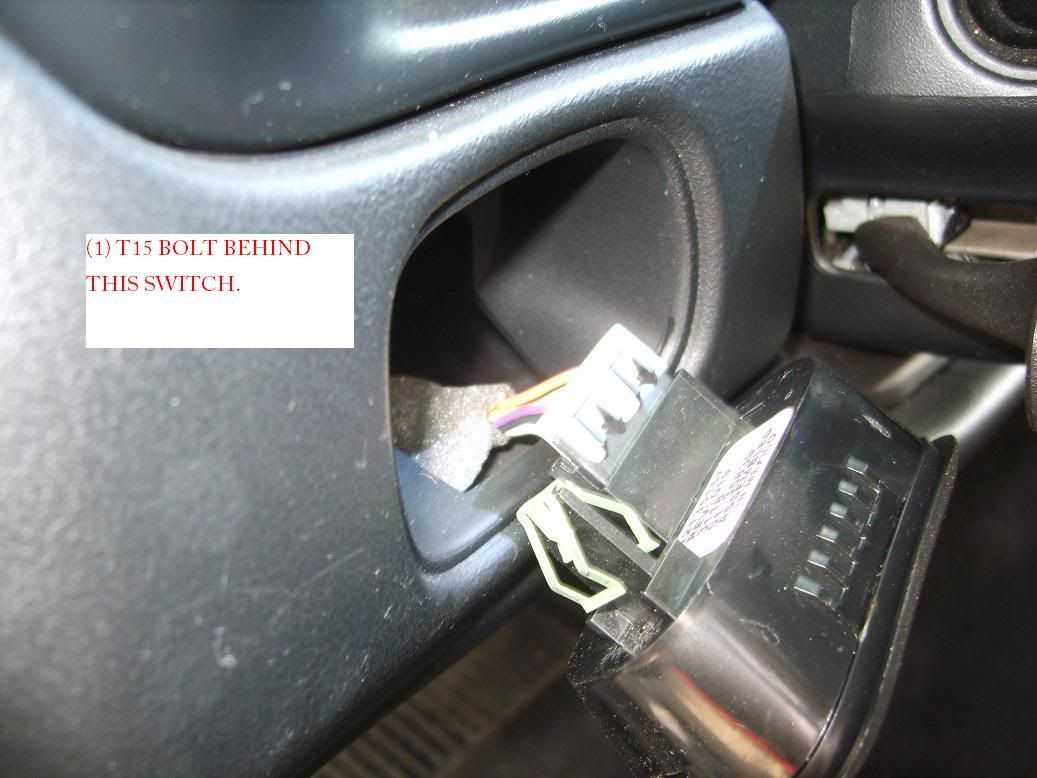
2. Remove the trunk release switch panel by using a flat screwdriver or somesuch to pop it out of the dash panel. It's connected to a wire which easily unplugs once you pull the switch foward.
Behind this switch is a T15 torx bolt; unscrew that and set aside with the trunk switch.
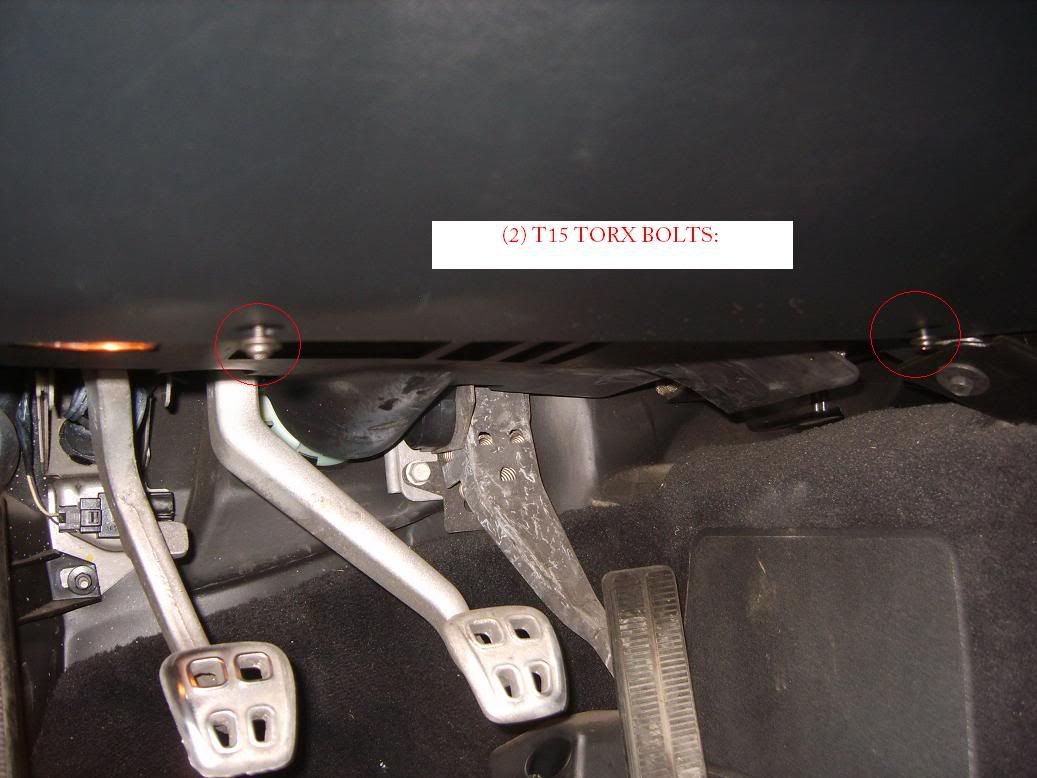
3. Next, we'll unscrew the big knee panel under the steering wheel. There are two T15 torx bolts that hold it in place... unscrew those.
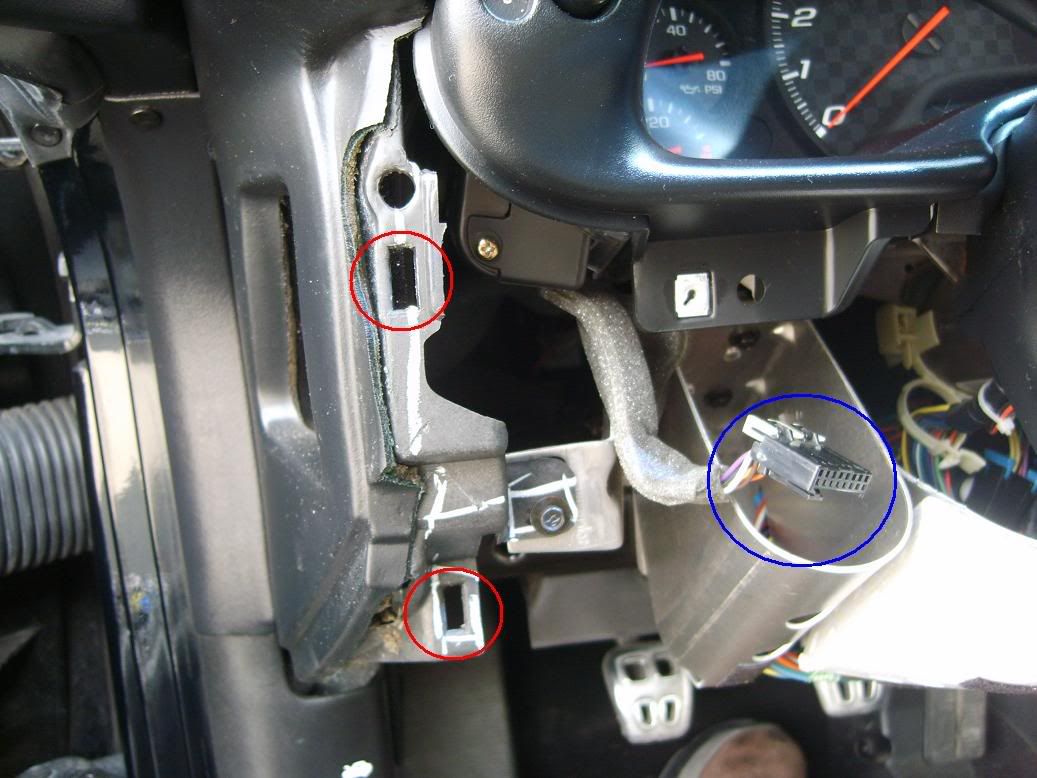
4. To remove this panel after having unscrewed those two bolts, you'll need to pull TOWARDS YOU from the LEFT SIDE of the panel. There are two tight clips that you need to unsnap: (red circles are where these fasteners attach; you'll see those once you pull the panel off). The blue circle is the wire that was attached to the trunk release button.
5. When you have the left half of the knee panel loose, carefully begin to work the right half of the panel free. The HVAC sensor is attached; so mind the connecting wire (red circle in below picture). It's easily disconnected; and at that point you should be able to remove the knee panel completely and set it aside.
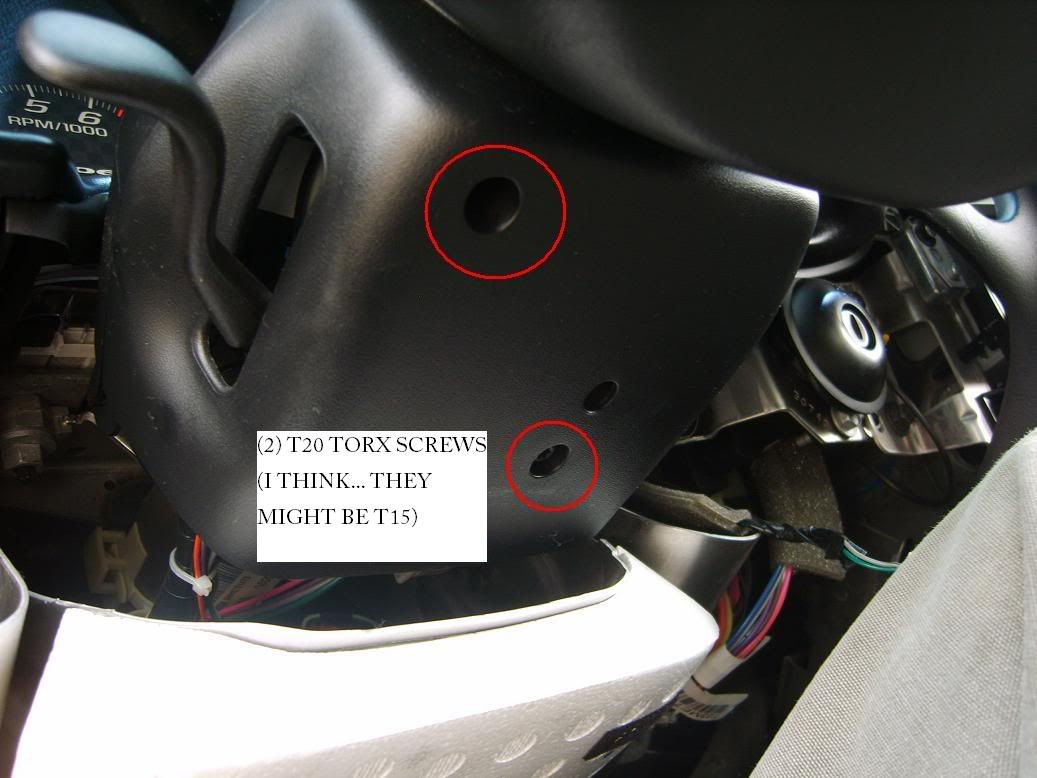
6. Next, let's remove the steering column covers. First we'll need to remove the bottom half. It's held on by two T20 screws, located as follows:
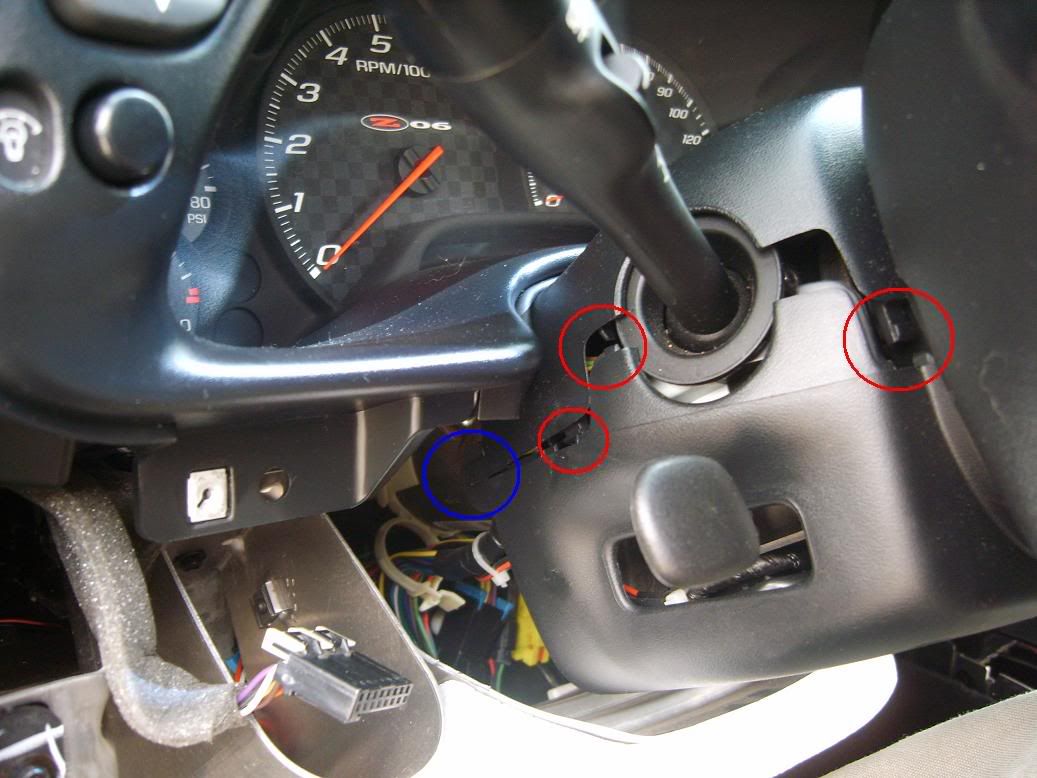
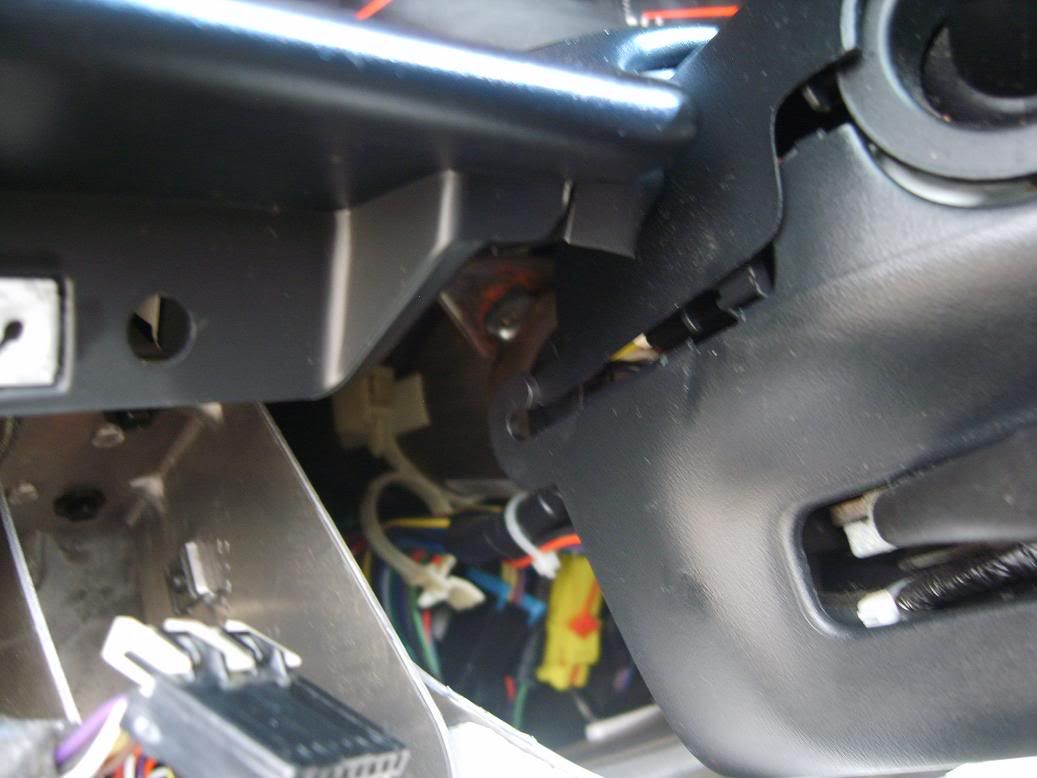
Once those screws are out, gently pull downward on the bottom half. It will separate from the top half... they are connected at this point solely by plastic latches (red circles) and hooks (blue circle), as shown below. With some maneuvering, the bottom piece will come free. The tricky part is getting it off from and around the tilt steering lever.
7. Unfortunately I didn't get pictures of this step; but I'll try to explain the removal of the top half of the steering column: It's held on by two torx bolts from underneath. However, these are not normal torx bolts. Instead of the torx pattern being recessed like most bolts; this star-pattern is RAISED. I dont know about you, but I don't have torx equipment for those bolts. I found that a 4mm socket does the trick nicely. A six-inch extension is preferred to reach the bolts with. There will be one bolt on each side of the steering wheel. You can see them if you can get your head underneath and look up. Unscrew these bolts, and the top half of the steering column cover will come right off.
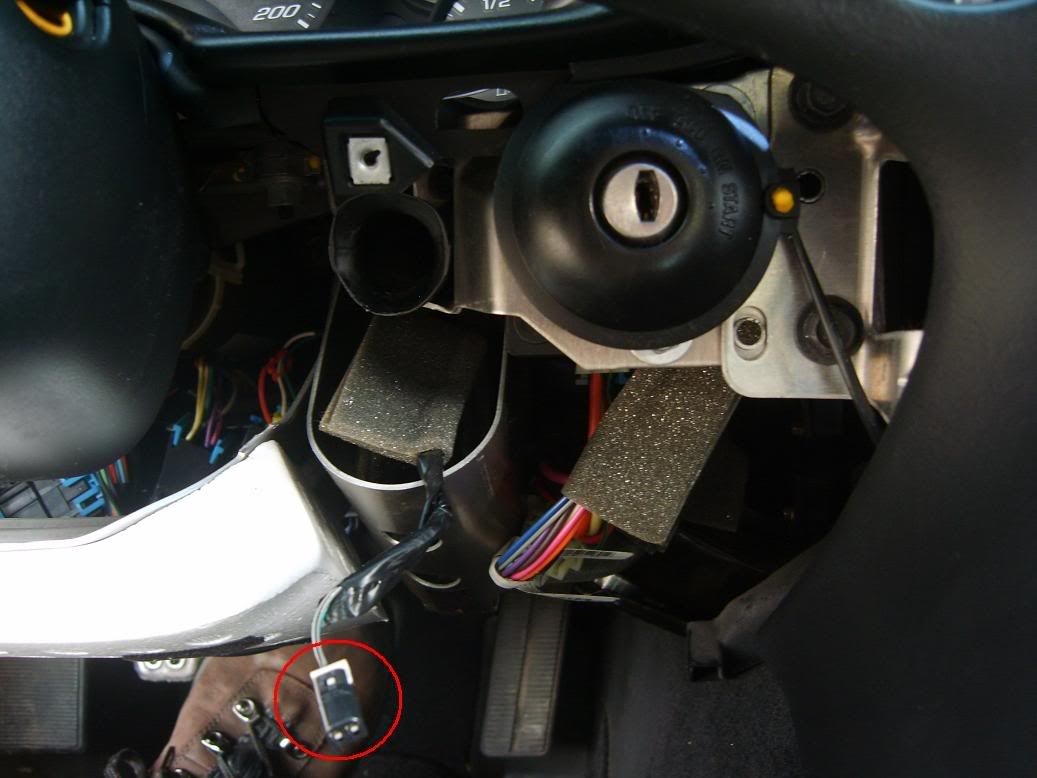
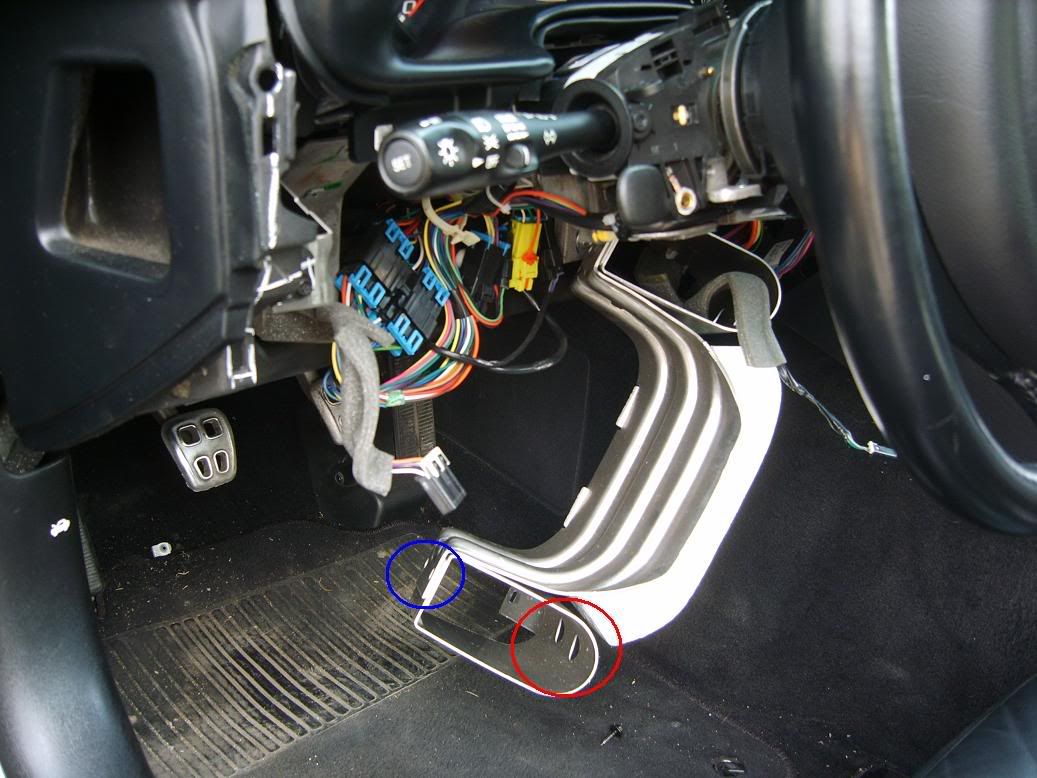
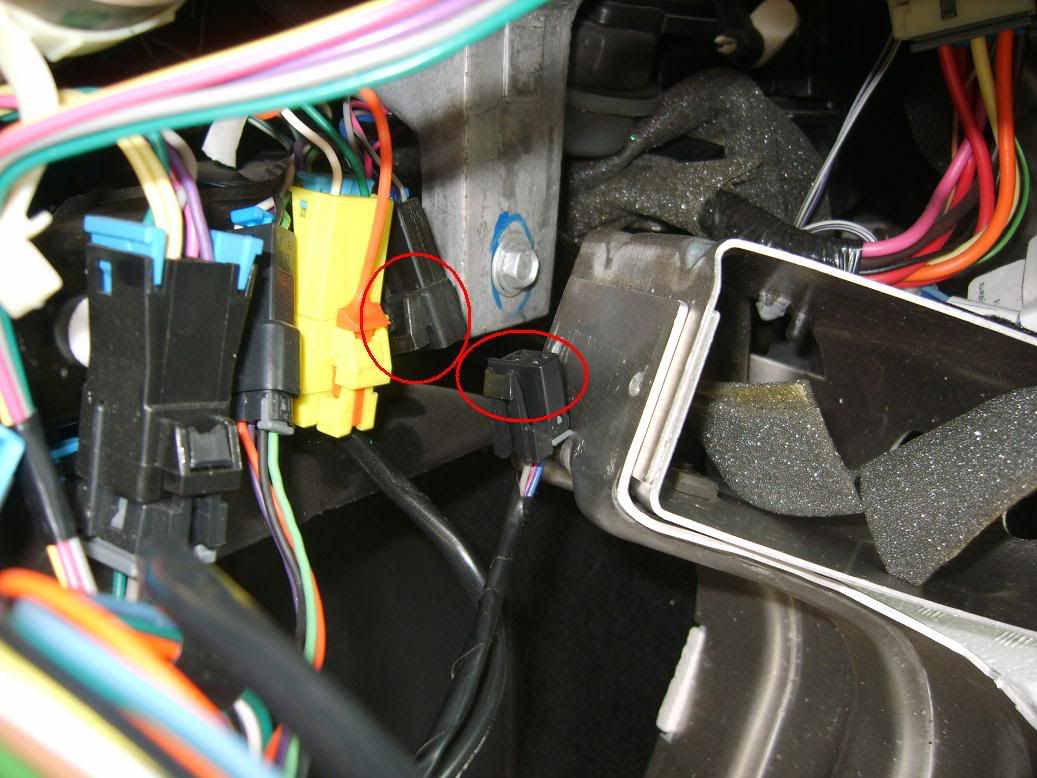
8. Now we have the headlight switch exposed, but before we remove the thing, let's tend to the wires first. To get to them easier, I would remove the metal guard that sits behind the knee panel we removed. (It's got the styrofoam on it). You'll want the 7mm socket and a 6" extension to easily do this: Insert the socket/extension through the holes (circled in red) to get at the bolts (circled in blue). Obviously, this picture is AFTER the guard has been detached but you can still see where and how to get at the bolts.
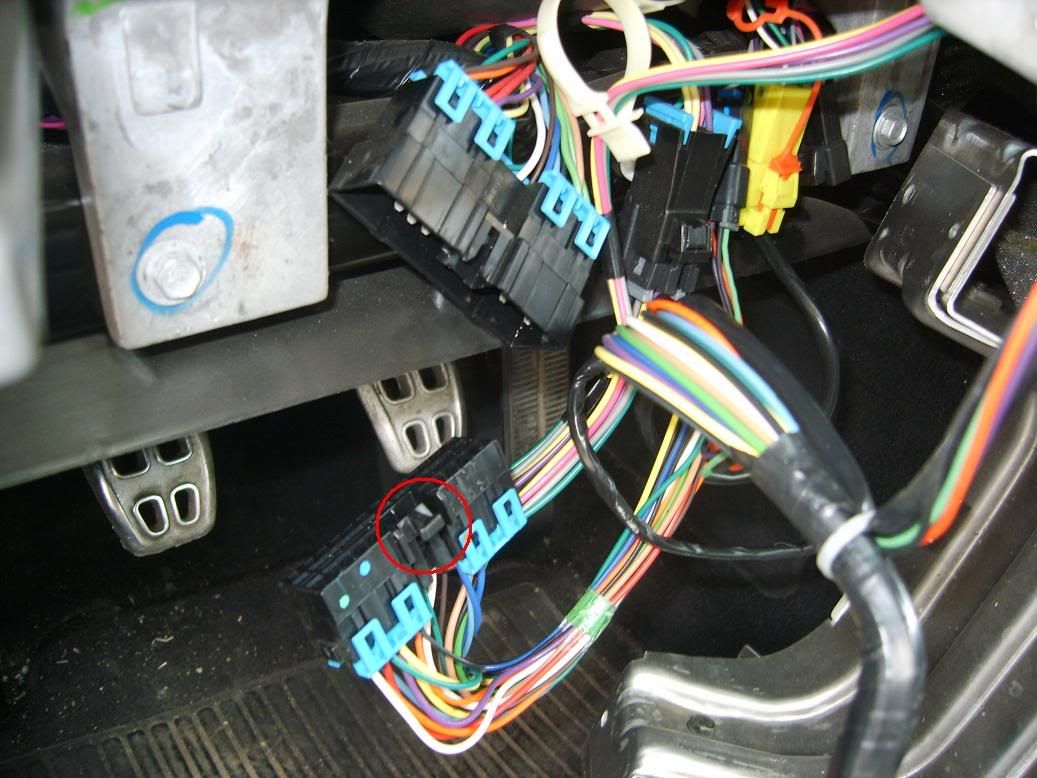
9. The wiring from the headlight switch attaches in two locations to the car: There is a large blue connector and a small black connector. You'll want to unplug both of these. They are shown below. (To detach the blue connector... push on the small tab (circled in red) and pull apart.
You may also find that the wires from the headlight switch are cable-tied together with some other wires... If this is the case, use some diagonal cutters to cut the tie away so you can fully free the wires from the headlight switch. There is another, larger clasp/cable tie that can simply be undone without cutting it through.
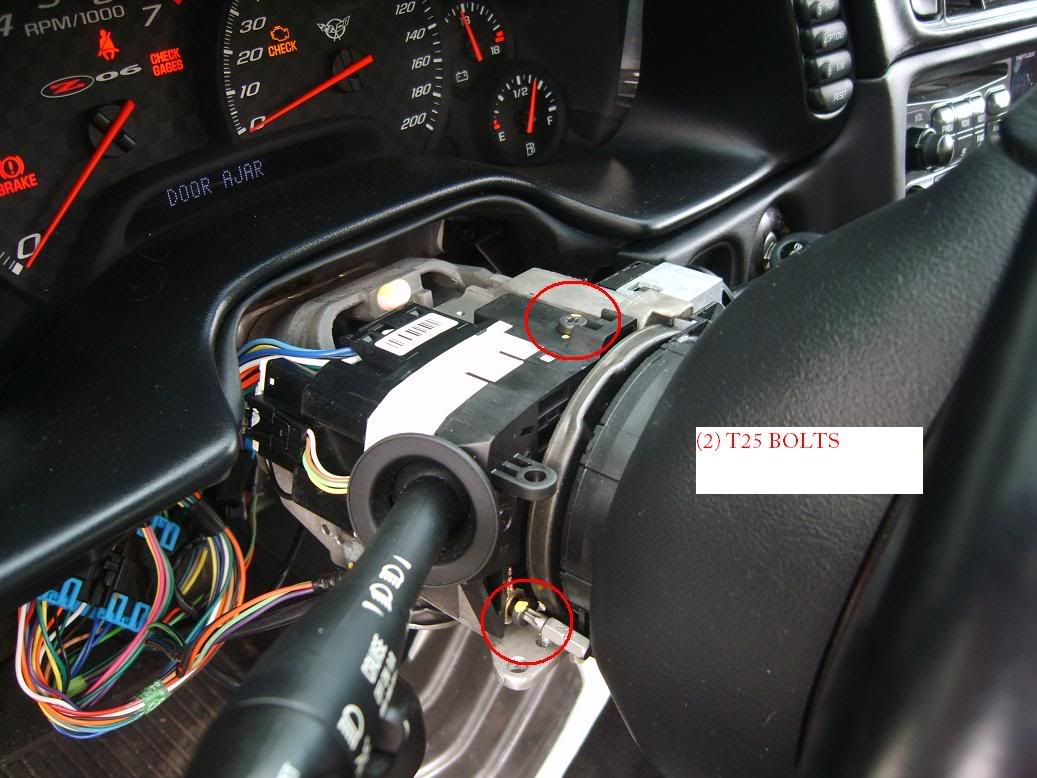
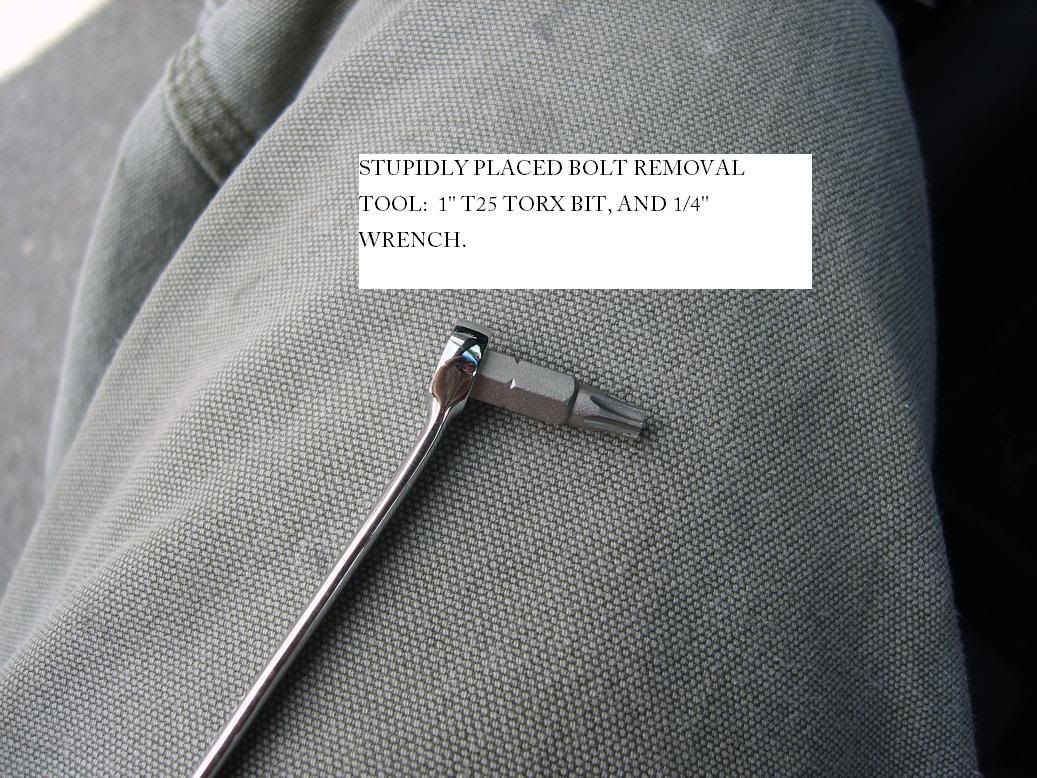
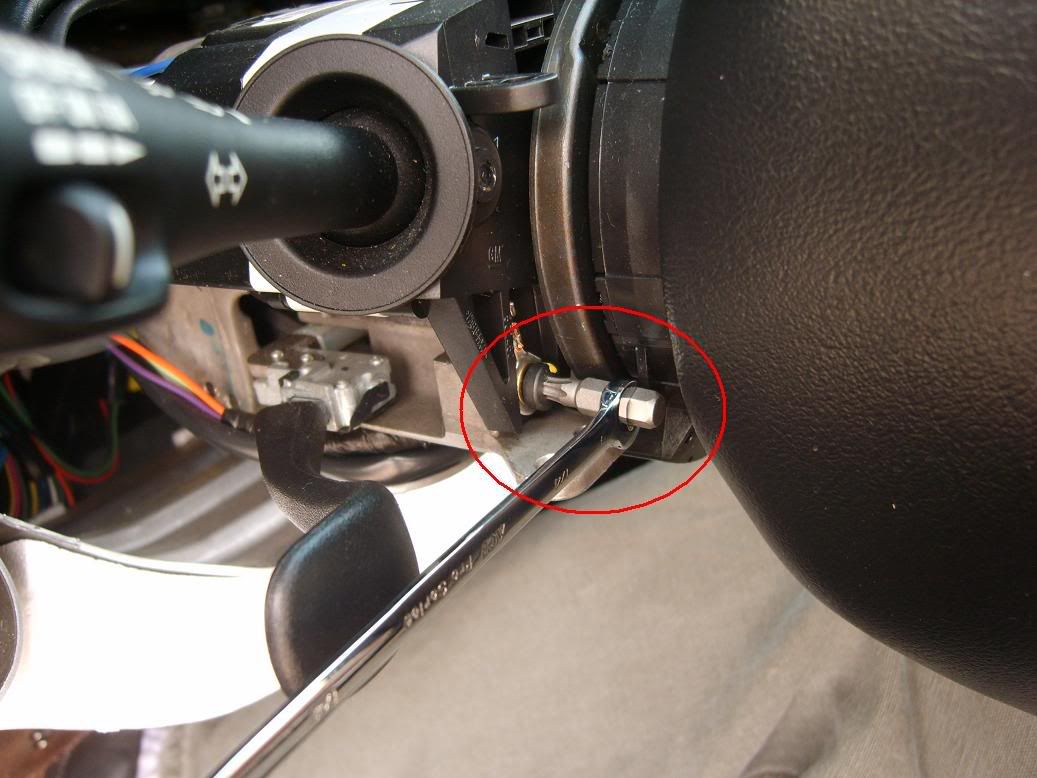
10. Now we can remove the part! For this step you'll need the T25 bit/driver and the 1/4 open-end wrench. here's the part, fully exposed: Note there are TWO bolts; both T25's. The one on top is easy to get at if you tilt the steering down as far as it will go. The one facing forward, however, sits behind the steering wheel.
To remove this, we'll simply use our 1" T25 torx bit and the 1/4 inch wrench to turn it from the side: Real easy!
Get these bolts removed, and you're home free.
One word of advice... when you remove the headlight switch, you may inadvertently beep your horn. The front of the switch has a small brass pin that sticks out, that... upon touching the steel disc at the base of the steering wheel, evidently makes the horn sound off. Remember playing that game "Operation" in preschool? It's rather like that!
At this point... your switch is free of the car and ready for repair or replacement.
If you're looking to rebuild/repair the switch like I did, take the T8 torx bit and the instructions from here:
Your write up is excellent and saved me some good money. However my '99 was slightly different in these ways.
Step#3 Mine had two 7mm hex head screws.
Step#5 Mine had a T15 hidden behind a vented cap/cover which is snapped off with a flat tool.
Step#6 Mine had no "hooks" at the back of the cover. Insted mine had an additional "band" that wrapped down from the back end of the top half of the cover, which the bottom half snapped into. And my tilt lever would snap out if pulled toward the drivers door.
#7My top half was loose after removing the bottom half.
Thank you again for an excellent write up.
Thanks for the great write up.
Never would have been able to remove the stalk without it!!
I wasn't able to fix my problems by trying to repair the existing switch, but, I'm hoping that the replacement that I ordered will fix me up!!
In any case it saved me a ton of money as opposed to taking it to the shop!!
Thanks again!!
Mine had a rubber surround in the back that connected the upper and lower together more securely. This was a big pain to get off.
My big mistake is putting it back together. I decided to screw both the upper and lower back to together, and then snap on this rubber surround. In the process of doing that, I moved the bottom piece too much and snapped the plastic where the screws were supposed to hold the bottom cover to the column. I had to take it all apart and glue some metal washers in place until I can find a suitable replacement.
Great write up, I was able to do this with ease thanks to the pictures. I came across a problem with the alarm I had installed, it looks as though they have some type of wire clamp connecting a part of the alarm to two of the lights wires. I tried to unclamp, but it doesn't seem to want to be undone without breaking. Anyone else come across this problem?
This write-up saved my A$$! I was able to relace the switch/stalk, but I should have slowed down a little when putting it all back together. I broke the tab on the console/radio bezel under the temperature sensor. I found the streering column trim pieces had been taken off before, and tabs and clips were broken previously. Those inverted torx/star nuts are weird, aren't they? I found a set at harbor freight for $9.99 (I have never seen those before, they call them "E" Sockets. Why didn't GM just use screws or torx?) Anyway, my headlights work now, so I'm greatful for this post, and learned a bunch! Many thanks to the OP!
QUOTE=Joe Munley;1590664801]Great write up, I was able to do this with ease thanks to the pictures. I came across a problem with the alarm I had installed, it looks as though they have some type of wire clamp connecting a part of the alarm to two of the lights wires. I tried to unclamp, but it doesn't seem to want to be undone without breaking. Anyone else come across this problem?[/QUOTE]
Excellent write-up!! Did this last night on my 2000 C5 and you saved me big $$$.
I can't understand the high labor charges I'm hearing about. This was my first go-around for the internal switch repair and I did it in under 3 hours. If I was only swapping the switch, it would have taken half that. An experienced interior tech could swap it in 30 min. What kind of shop charges $1000/hour?!?! ($200 parts + $500 labor) Must be the Corvette tax.
Thanks a bunch for this. Yes after all these years, this just helped fix an 04 Z06. Outstanding write up, especially that screw behind the steering wheel. Small torx with the 1/4" wrench, worked great!

 03-10-2013, 10:16 PM


 [This was really helpful, replaced my switch yesterday BUT there are a couple of gotchas - Additional Torx screw behind the a/c sensor panel and that PITA rubber boot that holds the steering column pieces together from the rear. Could not have pulled it off in any kind of reasonable time without this as a starter though.]