


HELP!!!! Lowering C5, issues!
Melting Slicks


Joined: Jan 2008
Posts: 2,620
Likes: 81
From: Florence SC
St. Jude Donor '12
To drop the control arm...start by jacking the car up, placing jack stands underneth and using your floor jack, take some of the pressure off the spring itself. Take out the 2 bolts from the lower shock mount. Then remove the bolt that is attached to the lower sway bar link. Next remove the bolt from the lower ball joint. Then you should be able to simply swing down the control arm, and access the lowering bolt very easily. Worked like a charm for me. Wish I had pictures to show. The backs are even simpler. Get a couple of stands underneath, Use a floor jack on the spring, and just remove the bolts. Please feel free to PM me if you have any other questions.
Melting Slicks
Joined: Jan 2008
Posts: 2,620
Likes: 81
From: Florence SC
St. Jude Donor '12
Also, when you are putting all this back together, I found it helpful to use the floor jack under the control arm to raise/lower the whole setup and align the holes for the sway bar end, shock mount, etc.
Racer

Joined: Sep 2008
Posts: 446
Likes: 1
From: Phillipsburg New Jersey

Thread Starter
Former Vendor
Joined: Oct 2006
Posts: 7,331
Likes: 61
From: Port Huron MI
Sounds like a plan and exactly what i did when having to wrestle the k-member back into my trans am when swapping that! Works well! I'll be doing it this weekend and will post up pics in this thread for you to see. Thanks a lot!
Racer
Joined: Jul 2007
Posts: 303
Likes: 0
From: Illinois
Thread Starter
Former Vendor
Joined: Oct 2006
Posts: 7,331
Likes: 61
From: Port Huron MI
Well i followed the write-up and have the front end totally apart. Wheels off, sway free of a-arms, shocks unbolted, nut on a-arm off.... and neither side will drop! What gives! Any suggestions how to get this damn a-arm to fall?!?!?!?!
Corvette Stories
The Best of Corvette for Corvette Enthusiasts

Top 10 Most Expensive Corvettes Ever Sold on Bring A Trailer
Brett Foote
10 Things Every Corvette Owner Needs (2026 Edition)
Michael S. Palmer
8 Most "Only Corvette Owners Understand" Quirks and Problems
Pouria Savadkouei
10 Reasons the C6 Z06 is Still A Performance Benchmark After 20 Years
Joe Kucinski
How Much Horsepower Every Corvette Engine "LOST" in 1972
Joe Kucinski
Top 10 DOs and DON'Ts for Protecting Your Convertible Top!
Michael S. Palmer
Top 10 Most Explosive Corvettes Ever Made: Power-to-Weight Ratio Ranked!
Joe Kucinski
150 hp to 1,250 hp: Every Corvette Generation Compared by the Specs That Matter
Joe Kucinski
8 Coolest Corvette Pace Cars (and Replicas) of All Time
Verdad Gallardo


Thread Starter
Former Vendor
Joined: Oct 2006
Posts: 7,331
Likes: 61
From: Port Huron MI
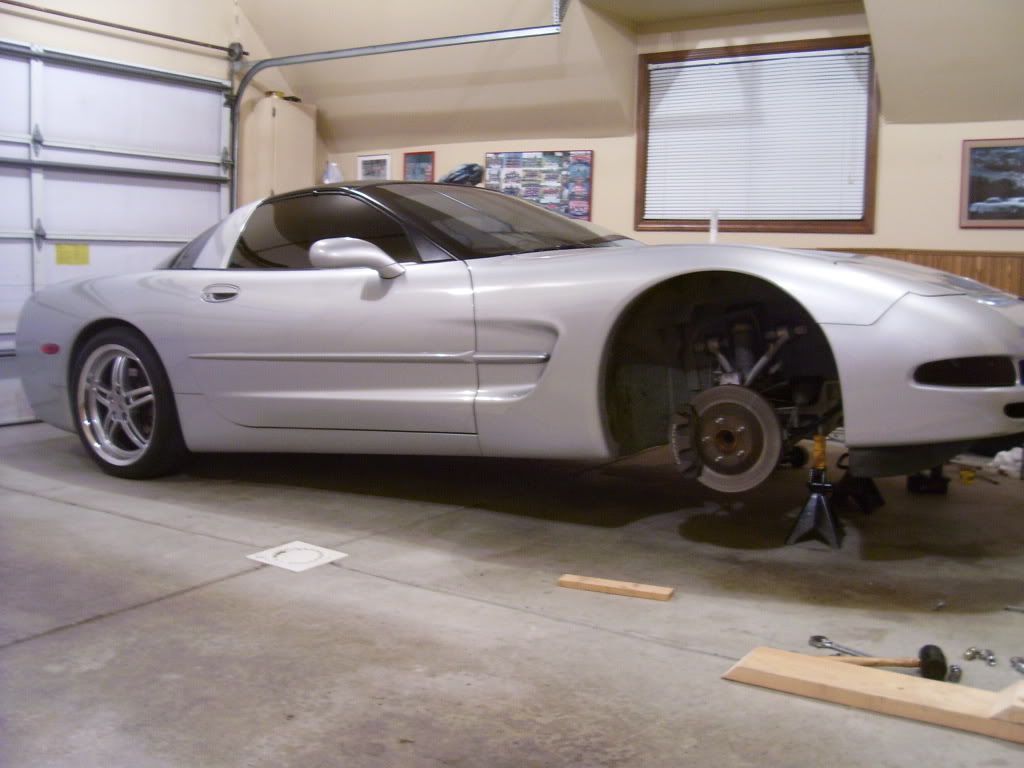
you said to remove the spring itself right? I might just resort to that now. I figured dropping the arm would be simple but she's not budging! Here is some pics.
All necessary bolts/nuts off. New bolts waiting to go in

Drivers side all free, should drop right?

Same on passy

Car up in air, rear lowered on stock bolts so far
All necessary bolts/nuts off. New bolts waiting to go in
Drivers side all free, should drop right?
Same on passy
Car up in air, rear lowered on stock bolts so far

Instructor
Joined: Oct 2008
Posts: 147
Likes: 0
From: Napa CA
I just did my '99 last week , and had the same problem . At this point , I put a floor jack under A arm , tap both sides of the A arm with a hammer , then lower jack and tap again , to get the ball joint bolt to free up .
Instructor
Joined: Oct 2008
Posts: 147
Likes: 0
From: Napa CA
yea , just give it a few whacks , while lowering jack under a arm . I was getting pi**ed off , and tried that , and they popped pretty easy . Installing Bilsteins today . Not as easy as I thought either ! Good luck ! The results are worth it !
Instructor
Joined: Oct 2008
Posts: 212
Likes: 1
From: Clearwater FL
St. Jude Donor '11
Did you need to remove the bolts? Does the lowering kit lower the car substantially more that just adjusting the bolts?
Is it not as easy as this?
Lowering your C5
Lowering the C5 is fast, easy, and best of all, free. Here's how to do it.
Tools Required
The following tools were used to make the modification.
Floor Jack
Jack Stands (2)
Wheel Blocks
Hog ring Pliers or Needle nose Pliers
Hacksaw or Serrated Knife (optional; see below)
10mm Ratcheting Wrench or 10mm Socket Wrench w/swivel extension
18mm Combination Wrench or 18mm Socket Wrench
13/16" Combination Wrench or 13/16" Deep Socket Wrench
Lowering the Rear
Make certain the car is located on a level surface.
Place blocks or boards under the front wheels to prevent the car from rolling.
Using the floor jack, raise the rear of the car, insuring that the jack is positioned in the center of the rear cross member (silver/gray in color).
Place two jack stands under the rear cross member, and SLOWLY lower the car onto them. Make sure you have raised the car high enough to allow plenty of workspace.
Locate the rear leaf spring. There is a bolt on each end (18mm bottom, 13/16" nut on top), with a rubber bushing top and bottom. At the top of the bolt, above the nut, you will see a small c-clip. This clip must be removed in order to get the nut off the top. Use hog ring pliers or needle nose pliers to remove the clip. NOTE: Only remove the bolt if you wish to lower the car more than about 1 inch in the rear. It is possible, in most cases, to lower about 1 inch without removing the bolt at all and without cutting the bushing. Cutting the bushing may make your ride a bit more harsh than before.
(SKIP IF YOU DID NOT REMOVE THE BOLT) With the c-clip removed, loosen the top nut from the bolt.
(SKIP IF YOU DID NOT REMOVE THE BOLT) Pull out the bolt and bushings from the leaf spring(the leaf spring is NOT under pressure).
(SKIP IF YOU DID NOT REMOVE THE BOLT) Cut both bushings so that the section with the extension is the only one left. Use a hacksaw or serrated knife. NOTE: If the car is too low for your personal preference, you can add back the piece or pieces you cut off.
Once the bushings are cut, reassemble the bolt, bushings, and nut through the leaf spring and A-Arm. Leave TWO threads showing on top when you re-tighten. It will seem loose, but when the car is lowered onto the ground, the weight will load the spring. Don't forget to put the c-clip back on.
Lower the car, the rear is done.
Lowering the Front
Make sure the car is in gear to prevent it from rolling.
Raise the car with the jack positioned in the center of the front cross member.
Place the two jack stands under the cross member, and slowly lower the car onto them.
Remove the front wheels. It may be necessary to slightly loosen the lug nuts before the wheels are completely off the ground.
Find the front leaf spring, and with a 10mm wrench or socket, turn the bolt as if you were loosening it (It is reverse threaded so you are actually tightening it).
Turn the bolt until there is no longer a gap between the bushing and the bolt. Measure the exposed threads to insure the other side is done the same. NOTE: On a Z51 car, the car will not drop as much as one that has the standard suspension. You can completely remove the front lowering bolt if you would like to go even lower. A spreading tool or removal of the a-arm is required to allow removal of the adjusting bolt and bushings.
Put the wheels back on and lower the car. NOTE: It may be necessary to place a board under the tires so you will be able to remove the floor jack once the car is lowered.
Thread Starter
Former Vendor
Joined: Oct 2006
Posts: 7,331
Likes: 61
From: Port Huron MI
lmao, well the bolt just does not 'turn' as the instructions say. This made me strip the bolt out and many many people have also done i have found. Therefore i am dropping the control arm to get the bolt out from the bottom and replace with the new bolts, which yes, will lower me more than factory allows  Time to go to work with my hammer now
Time to go to work with my hammer now
Instructor
Joined: Oct 2008
Posts: 212
Likes: 1
From: Clearwater FL
St. Jude Donor '11
lmao, well the bolt just does not 'turn' as the instructions say. This made me strip the bolt out and many many people have also done i have found. Therefore i am dropping the control arm to get the bolt out from the bottom and replace with the new bolts, which yes, will lower me more than factory allows Time to go to work with my hammer now
Time to go to work with my hammer now
Thread Starter
Former Vendor
Joined: Oct 2006
Posts: 7,331
Likes: 61
From: Port Huron MI
i have no welding tools.
I have wacked the a-arm is every which way and no dropping or even a sign, what a bitch! Car only has 35k miles on it too! Now i am attempting to remove the entire leaf spring!
I have wacked the a-arm is every which way and no dropping or even a sign, what a bitch! Car only has 35k miles on it too! Now i am attempting to remove the entire leaf spring!
Instructor
Joined: Oct 2008
Posts: 212
Likes: 1
From: Clearwater FL
St. Jude Donor '11
Or grind the bolt flat on each side. to put a wrench on it.