
FRC Water leak...you'll love this one!
 12-21-2008, 07:56 PM
#1
Pro

Thread Starter
Member Since: Jan 2006
Location: Alexandria Northern Virginia
Posts: 643
Likes: 0
Received 1 Like
on
1 Post

Tuesday night I bought a 2000 Arctic White FRC. I LOVE this car. 45K miles, It is going to be my "track" car. Seeing how I have an 04 A4 that just got polished (long story...somebody wiped it down with shop rags to help me clean it!) it was time to move up. I drove it home in the pouring DC rush hour. When I walked out the next morning, the windows were fogged on the inside. We all know that means water in the car. Ok, no sweat, I'll adjust the tip in on the windows in, right? Thats all it will be....WRONG! Opened the trunk to get the manuals that came with the car out, only to discover they were sopping wet. That ain't no tip in issue.
Drove it to work a day later, moved the driver seat forward to find, no kidding 2 inches of standing water. Ick. The car had been garaged but was an outdoor car before the previous owner....so I assumed plugged drains. WRONG again. Found the carpets were wet behind both seats, up the rear wall carpeting, etc. I tried the old "move up until its dry philosophy. Sure enough, headliner was wet. Ok, no problem. So I pulled EVERYTHING out of the car. I mean everything. All that was left was the dash. Now I waited for rain. I put the seats back in so I could drive it around (sounds MEAN now from the inside!) with the heat on to dry it out.
The plastic water channels on either door were literally funneling water coming in like they were never sealed. The water was coming in at the rate of a cup a minute in the heavy part of the rain. I could not beleive it. The trunk was leaking around the bolt entry on the driver side hinge. ALL weather stripping looks like new and was working fine. Thats odd. I suppose if any water had made it that far they would have held up nicely. Trunk is an easy fix....pull one bolt at a time and COVER in sealant, replace. Repeat until all bolts are sealed. Scale of 1-10 difficulty, -3. Easy.
Pulled the weather strip off of both doors yesterday only to find someone had been in there before. Plastic channel was over torqued and broken, not to mention the GM foam tape (that is their solution for water control?) was toast. Whoever had the car before me had something done, I am guessing roof reseal or paint, and these had been removed. Difficulty, around an 8 (only because you dont want to bang it up).
I am in the process of getting pics up, if you are interested in seeing where I had water you can see my pics:
http://s88.photobucket.com/albums/k169/c4b4the04/
I resealed both doors using a 3M assembly sealant (like you would use between body panels) and it held up under last nights ice/rain. I did have a quarter sized puddle in the passenger seat, I see it is dripping at the corner of the A-pillar. Got more sealant and will tackle that corner this week. I think I will fill under the top windshield seal with a good 1/4 inch bead all across there and into my new "patch job" corners. That should keep water from getting that far. You can see from the headliner mold this was a problem from a long time ago....
Bill Curlee, you are the man. Reading your posts gave me hope I can get this car 100% watertight. I really dont want a musty car and I dont need any electronics damaged from moisture (dirty grounds, etc). I already ordered the Mouser fixes for the LDCM and RDCM (dang slow shipping) and I have to wonder if the moisture issue has anything to do with dead relays.
Anyway, will try to write up eloquently another time. Just posting a possible NEW leak to add to the FRC/Z06 list.
Cassidy

 12-22-2008, 07:16 AM
#3
Pro
Thread Starter
Member Since: Jan 2006
Location: Alexandria Northern Virginia
Posts: 643
Likes: 0
Received 1 Like
on
1 Post
Posted some more pics. Glad it might help somebody else. I just cannot believe GM's answer to water leaks is foam tape! I had a 78 Trans Am that leaked less (with T-tops!).
Basically, if you take your headliner and A pillar covers out you can really get to the root of the leak visually and make sure thats where its coming from. I had a puddle dripping from the what looked like the gauge cluster. Turned out to be runoff from these seals.
To get the sun visors off, insert a screwdriver into the slot where they rotate (you'll see the opening) and turn while pulling down. They will pop out pretty easily. Once they are out, use a screwdriver in one of the three slots on the circular trim ring and tip in. That pops right out too. The FRC has regular mirrors so theres no wiring but carefully disconnect lighted mirror ones of course.
Good luck, really glad this helped somebody
Cassidy
12-22-2008, 03:28 PM
#4
Tech Contributor


Member Since: Dec 1999
Location: Anthony TX
Posts: 32,736
Received 2,180 Likes
on
1,583 Posts
CI 6,7,8,9,11 Vet
St. Jude Donor '08

If the car was a leaker for a while,,,I STRONGLY recommend removing the BCM, opening it up and examining the back of the circuit board for corrosion!! Caught mine just in time before it ate through the printed circuit wiring. Ive Seen a couple BCM circuit boards that need repair using a jumper wire and one board that was corroded and etched so bad that it had to be replaced!
Make sure you disconnect the battery before you remove the BCM and the board is ESD sensitive!! Dont zap it with static.
BC
Make sure you disconnect the battery before you remove the BCM and the board is ESD sensitive!!
Dont zap it with static.BC
Last edited by Bill Curlee; 12-23-2008 at 03:28 PM.
12-22-2008, 06:11 PM
#5
Advanced

Member Since: Apr 2008
Location: Rochester NY
Posts: 65
Likes: 0
Received 0 Likes
on
0 Posts

wow, my 2000 FRC is doing the exact same thing, puddles behind the passenger seat, trunk has water, windows fogged up in the summer, I even found a little water trickling down my left leg from the dash once......I always assumed it was the windshield leaking since it had been replaced by the previous owner and the roof looks repainted....hmmmm. Thanks for the info you provided, come spring I will tackle it all. 
12-22-2008, 07:00 PM
#6
Burning Brakes


No useful advice here, but a funny story.
My AC condensation drain clogged up unbeknownst to me.
Took a hard left with the wife in the car, and a quart of icey water poured all over her feet and legs. Sopping up the water was not too bad, but cleaning up the poopey seat was tough. (just kidding, but it did give her a start).
DG
My AC condensation drain clogged up unbeknownst to me.
Took a hard left with the wife in the car, and a quart of icey water poured all over her feet and legs. Sopping up the water was not too bad, but cleaning up the poopey seat was tough. (just kidding, but it did give her a start).
DG
12-22-2008, 07:21 PM
#7
Le Mans Master

Cassidy,
The trim piece you've removed here is prone to cracking in all of the FRC's...
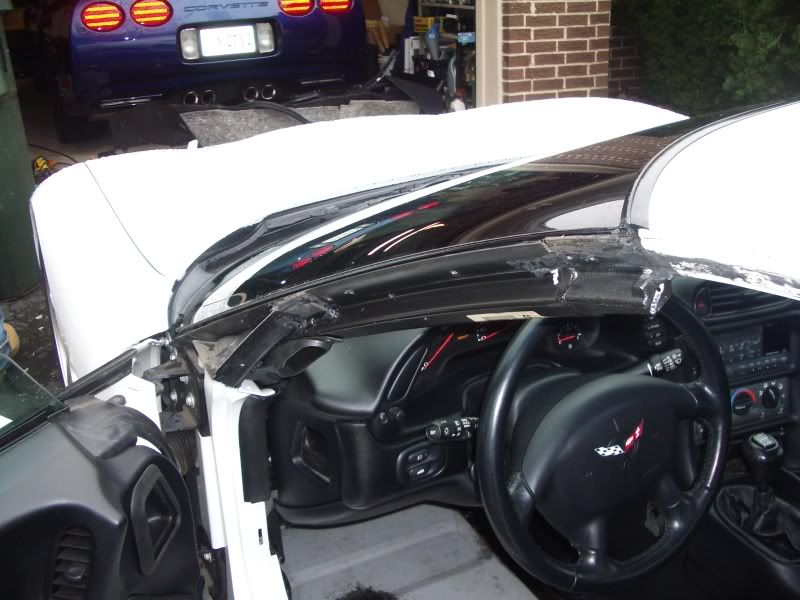
I had mine replaced on both sides and a friend had his '03 ZO-6 crack with less than 10k miles on it. They tend to crack about 2-3 inches past the joint between the windshield header and the top,
I always check this area on FRC's and you'd be surprised how many are cracked. The cracks tend to be so clean and straight you might mistake it for a joint if it were just a little further down the pillar.
Good luck... GUSTO
The trim piece you've removed here is prone to cracking in all of the FRC's...
I had mine replaced on both sides and a friend had his '03 ZO-6 crack with less than 10k miles on it. They tend to crack about 2-3 inches past the joint between the windshield header and the top,
I always check this area on FRC's and you'd be surprised how many are cracked. The cracks tend to be so clean and straight you might mistake it for a joint if it were just a little further down the pillar.
Good luck... GUSTO
12-22-2008, 07:47 PM
#8
Burning Brakes
Cassidy,
The trim piece you've removed here is prone to cracking in all of the FRC's...
I had mine replaced on both sides and a friend had his '03 ZO-6 crack with less than 10k miles on it. They tend to crack about 2-3 inches past the joint between the windshield header and the top,
I always check this area on FRC's and you'd be surprised how many are cracked. The cracks tend to be so clean and straight you might mistake it for a joint if it were just a little further down the pillar.
Good luck... GUSTO
12-22-2008, 08:34 PM
#9
Racer
Member Since: Nov 2006
Location: Chatham Ontario
Posts: 436
Likes: 0
Received 0 Likes
on
0 Posts
Sure hope this don't happen on my 03 Z06 next summer when i decide to take some road trips. I have had the car for 2yrs and its been a garage queen most of the time and only out on nice days. I've had it out on about two rainy days with no leaks so far.
Last edited by Marcs c5; 12-22-2008 at 08:36 PM.
12-23-2008, 06:12 AM
#10
Burning Brakes
Member Since: Oct 2008
Location: Minnesota City MN
Posts: 1,062
Likes: 0
Received 2 Likes
on
2 Posts
I have a 97 coupe and I also take a shower when it rains...I bring a bar of soap and I'm good to go! But really, is this the same part I need to replace on my car?
12-23-2008, 07:16 AM
#11
Pro
Thread Starter
Member Since: Jan 2006
Location: Alexandria Northern Virginia
Posts: 643
Likes: 0
Received 1 Like
on
1 Post
Seems this "feature" is similar between all the C5s but more likely on the FRC/Z06 bodies. I bought my 04 coupe new and it has never so much as looked funny at water. No leaks at all. I wonder if the stress of being a one piece design causes the cracks.
As a side note, when you take out your headliner, you can see the places the top bolts on. It looks VERY similar to a C4 top connection, in my opinion. I wonder if that all being one piece just causes junk like this to happen?
Thanks for the note, Gusto. I'll feel better when its all sealed up but that makes me feel like maybe its not a botched repair from years ago.
BC, of course, you are the man. Thanks for the BCM tip. I did look down there and (luckily) that side of things is dry. I will be doing the door module relays this week and I will pop that open too.
Cassidy
12-23-2008, 03:31 PM
#12
Tech Contributor
Member Since: Dec 1999
Location: Anthony TX
Posts: 32,736
Received 2,180 Likes
on
1,583 Posts
CI 6,7,8,9,11 Vet
St. Jude Donor '08
wow, my 2000 FRC is doing the exact same thing, puddles behind the passenger seat, trunk has water, windows fogged up in the summer, I even found a little water trickling down my left leg from the dash once......I always assumed it was the windshield leaking since it had been replaced by the previous owner and the roof looks repainted....hmmmm. Thanks for the info you provided, come spring I will tackle it all.
BC
The following users liked this post:
ArmchairArchitect (05-08-2019)
01-27-2015, 09:17 PM
#13
Instructor

Member Since: Jan 2015
Location: williamstown nj
Posts: 103
Likes: 0
Received 0 Likes
on
0 Posts
I have watercoming in behind the clutch pedal down the fire wall and from on top of and forward of my dead pedal on my 99. It has a new windshield. I cleaned the udders and reseated the rubber grommet that seemed loose around where the clutch shaft comes through the wire wall. I accessed this by taking out the left front wheel well. Also put in the accordion black boot that covers the wires from the drivers side door into the car. It was missing when I bought the car. I was told to chk the wires from the wipers where they pass through the fire wall where they go under the wiper transmission. Im told its hard to get at. Do u have any insight into this problem? Im the 4th owner of the car and there is evidence that someone else tried to find the same leak and failed. Any suggestions you can make would be greatly appreciated. THANKS Bruce
01-28-2015, 12:07 AM
#14
Tech Contributor
Member Since: Dec 1999
Location: Anthony TX
Posts: 32,736
Received 2,180 Likes
on
1,583 Posts
CI 6,7,8,9,11 Vet
St. Jude Donor '08
You will need two people to do this:
Remove the cowl cover and the wheel well close out cover. I would also remove the drivers foot well carpet and close out panel.
Start low and systematically apply water with a garden hose to different areas while the other person observes the area in the drivers foot well.
Run water in the cowl well, around the door hinges, on the windshield and windshield pillar. Look in the cowl well near the wiper motor and carefully examine the bulkhead wire grommet for the wiper motor harness.
Here�s a look at the cowl well with the fender removed:
01-30-2015, 08:37 AM
#15
Instructor
make sure to clean your gutters every 3 months leaves and other stuff remove gutters and let water pour in the top wiper vent to clean out all the trash.

05-08-2019, 11:03 AM
#16
Drifting


