
Window motor rebuild *pics*
 10-05-2011, 04:23 PM
#21
Instructor


... and I'll answer one question that was not answered in for the original poster that hopefully will save someone some trouble... if you put the motor housing back on backwards/180 degrees different, the motor will go the opposite direction you intended when you hit the switch. Pay attention to the direction of the cover when you remove it. For me the sticker on the cover was facing the outside of the door when installed.
Another tip on a shortcut that won't work; don't try to pull the motor out of the gear assembly without removing the whole regulator from the door. It can be done, but you'll never get it back without taking the whole thing apart so it's better just take it all out out to begin with. I don't know why I couldn't get it back in, just that it won't go. It's not as hard as it looks to get the regulator out anyway.
Another tip on a shortcut that won't work; don't try to pull the motor out of the gear assembly without removing the whole regulator from the door. It can be done, but you'll never get it back without taking the whole thing apart so it's better just take it all out out to begin with. I don't know why I couldn't get it back in, just that it won't go. It's not as hard as it looks to get the regulator out anyway.
 10-05-2011, 04:39 PM
#22
Intermediate
Thread Starter
Yorad, I'm glad this procedure worked for you.
The washers that Bill is talking about installing would be over the shaft with the worm gear, all the way down to the face of the commutator. It would set up against the surface seen in pic5 from post #3. I don't really know though if that surface handles the thrust load during the motor operation. If you look at pic2 in the same post, it seems like maybe the end of the worm gear is what constrains axial movement of the armature. It's been so long that I don't really remember what everything looks like in there, except what I can see in the pictures.
As far as your cable tension issue, it seems like the springs that go into the housing are there to hold a constant tension on the cables, and should be about 80% compressed. I wonder if the cables could be attached to different places on the housing to fine tune the spring tension, and maybe they don't all go together the same way. If you can barely get it together, I'd be willing to try it in another spot and see if that works. Too much tension can't be a good thing, I figure.
On another note, this fix is still working 2.5yrs later on my car, hopefully you have the same luck.
10-05-2011, 06:20 PM
#23
Tech Contributor


Member Since: Dec 1999
Location: Anthony TX
Posts: 32,736
Received 2,180 Likes
on
1,583 Posts
CI 6,7,8,9,11 Vet
St. Jude Donor '08

Jason
Hope you dont mine me adding this info to your Motor rebuild post.
This is an OUTSTANDING POST for those that have ACTUAL MOTOR ISSUES!
If you pull the motor apart and do not see ANY signs of brush or motor damage, here are some other areas that can give trouble:
For those that have an electrical issue OTHER than a motor issue,, here are some tips to resolve those issues.
I have been seeing and assisting people with several door issues in the recent past. The issues occur inside the door connectors. EVERYONE that owns a C5 needs to know about theses possible issues and should be able to inspect for the problems inside the connectors.
The door wiring harness connectors reside inside a hole inside the door frame A pillar. Remove the rubber accordion tube that goes between the door and the door frame:
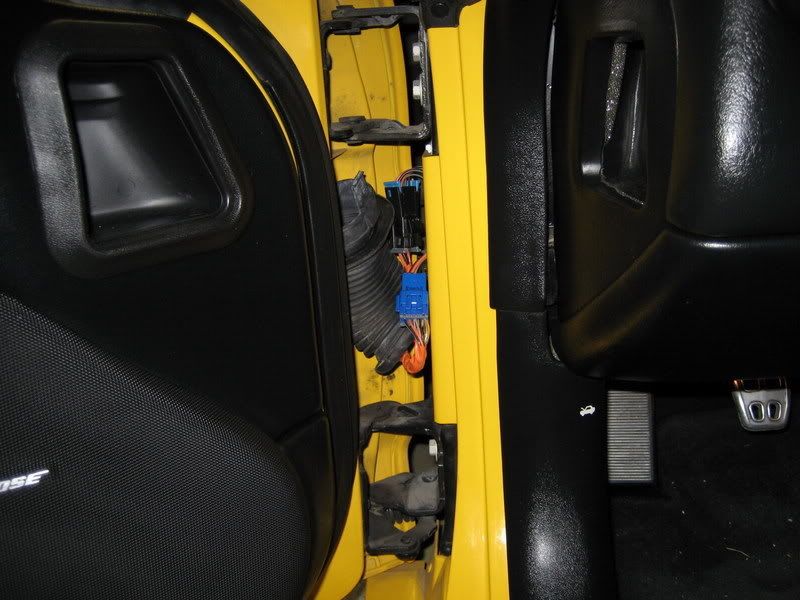
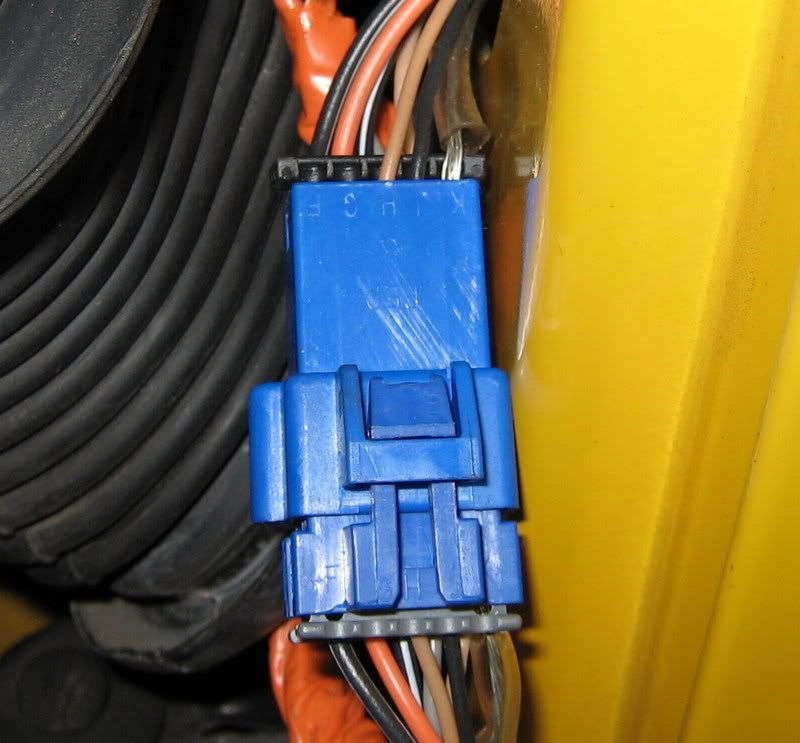
Once the rubber tube is popped out of the way, pull the two harnesses up out of the hole in the A pillar. Disconnect the two connectors. The smaller BLUE square one is the power connector which has the most issues.
Issues that Ive seen or have been reported to be an issue are:
- Bent deformed female pins
- Corroded pins
- Burnt pins
- Melted Plastic Connectors where the pins sit inside the plastic connector
If you find a deformed female pin, you can use a small metal pick and re-bend the small metal tong back in place to allow the female pin to better grip the male pin.
The optimum solution would be to replace the damaged female pin but, re-bending the deformed tong seems to resolve the issue. Just MAKE SURE that the female pin has a firm grip on the male pin.
One of the symptoms of a loose POSITIVE or NEGATIVE power wire of serial data pin is loss of door control and some very strange IPC indications. The DCM powering ON and OFF causes the SERIAL BUSS communications to crash. Numerous "NO COMMUNICATIONS" DIC Messages are another tell tail sign. NO COMMS messages can also be caused by a wetted/damp BCM. If the serial data wire gets loose the same loss of serial data can occur and cause NO COMMS issues.
DAMAGED FEMALE PIN (Spread apart):
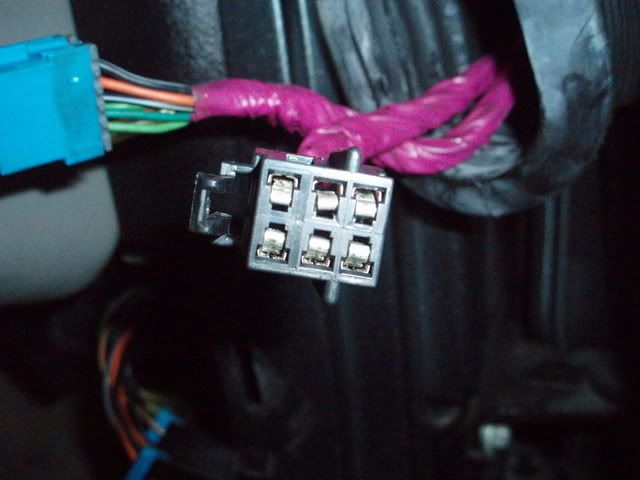
The LDCM Serial Data wire is BROWN and the RDCM Serial Data wire is TAN:
Hope this adds some additional troubleshooting information to this outstanding post.
As Jason stated, the actual motor connector can also have deformed or damaged connector pins!
Bill Curlee
Hope you dont mine me adding this info to your Motor rebuild post.
This is an OUTSTANDING POST for those that have ACTUAL MOTOR ISSUES!
If you pull the motor apart and do not see ANY signs of brush or motor damage, here are some other areas that can give trouble:
For those that have an electrical issue OTHER than a motor issue,, here are some tips to resolve those issues.
I have been seeing and assisting people with several door issues in the recent past. The issues occur inside the door connectors. EVERYONE that owns a C5 needs to know about theses possible issues and should be able to inspect for the problems inside the connectors.
The door wiring harness connectors reside inside a hole inside the door frame A pillar. Remove the rubber accordion tube that goes between the door and the door frame:
Once the rubber tube is popped out of the way, pull the two harnesses up out of the hole in the A pillar. Disconnect the two connectors. The smaller BLUE square one is the power connector which has the most issues.
Issues that Ive seen or have been reported to be an issue are:
- Bent deformed female pins
- Corroded pins
- Burnt pins
- Melted Plastic Connectors where the pins sit inside the plastic connector
If you find a deformed female pin, you can use a small metal pick and re-bend the small metal tong back in place to allow the female pin to better grip the male pin.
The optimum solution would be to replace the damaged female pin but, re-bending the deformed tong seems to resolve the issue. Just MAKE SURE that the female pin has a firm grip on the male pin.
One of the symptoms of a loose POSITIVE or NEGATIVE power wire of serial data pin is loss of door control and some very strange IPC indications. The DCM powering ON and OFF causes the SERIAL BUSS communications to crash. Numerous "NO COMMUNICATIONS" DIC Messages are another tell tail sign. NO COMMS messages can also be caused by a wetted/damp BCM. If the serial data wire gets loose the same loss of serial data can occur and cause NO COMMS issues.
DAMAGED FEMALE PIN (Spread apart):
The LDCM Serial Data wire is BROWN and the RDCM Serial Data wire is TAN:
Hope this adds some additional troubleshooting information to this outstanding post.
As Jason stated, the actual motor connector can also have deformed or damaged connector pins!
Bill Curlee
Last edited by Bill Curlee; 10-05-2011 at 06:41 PM.
02-15-2012, 06:16 PM
#24
Tech Contributor
Member Since: Dec 1999
Location: Anthony TX
Posts: 32,736
Received 2,180 Likes
on
1,583 Posts
CI 6,7,8,9,11 Vet
St. Jude Donor '08
LOTS of people are starting to have door issues again. Bump to the top for some valuable info.
Bill
Bill


 11-19-2012, 06:27 PM
#27
Instructor
Member Since: Aug 2010
Location: Las Vegas NV
Posts: 186
Likes: 0
Received 0 Likes
on
0 Posts
Did it myself today. Used vinegar and salt per the discovery channel to clean copper. Worked perfectly.
Thank you much.
Also put in some sound proofing in while I was there.
Thank you much.
Also put in some sound proofing in while I was there.
11-20-2012, 12:04 AM
#28
Administrator

Member Since: Mar 2001
Location: In a parallel universe. Currently own 2014 Stingray Coupe.
Posts: 343,032
Received 19,309 Likes
on
13,980 Posts
C7 of the Year - Modified Finalist 2021
MO Events Coordinator
St. Jude Co-Organizer
St. Jude Donor '03-'04-'05-'06-'07-'08-'09-'10-'11-'12-'13-'14-'15-'16-'17-'18-'19-
'20-'21-'22-'23-'24
NCM Sinkhole Donor
CI 5, 8 & 11 Veteran

This is an excellent post - glad it popped back up.
12-10-2016, 10:44 AM
#29


Hi Jason,
I have a Corvette C6, tried to change the motor and the cables unraveled. I am having a hard time getting the proper tension, is there any place that replaces the motor and fixes the tension? Can you do it for a fee?
I have a Corvette C6, tried to change the motor and the cables unraveled. I am having a hard time getting the proper tension, is there any place that replaces the motor and fixes the tension? Can you do it for a fee?