

Tranny leak

Thread Starter
Heel & Toe

Joined: Sep 2007
Posts: 24
Likes: 0
From: Effingham Illinois
I have a 2002 Coupe with automatic transmission. I have had a leak that is easy to see coming from between the tranny and the differential. The fluid is definitely tranny fluid and not differential. I have pulled the tranny and replaced the O ring on the differential, and the oil seals on both the tranny & differential. The leak is still present.
The bad part is that it only leaks while the engine is running, so to test the repair you have to fully re-assemble.
Anyone else experienced this type of leak? Information on a fix?
The bad part is that it only leaks while the engine is running, so to test the repair you have to fully re-assemble.
Anyone else experienced this type of leak? Information on a fix?
Tech Contributor


Joined: Dec 2003
Posts: 19,384
Likes: 87
From: Horncastle Lincolnshire, England
2023 C5 of the Year Finalist - Unmodified
Its not a common fault although theres another thread running at the minute
Long shot but out of interest, I had a service early on in the cars life and they overfilled the transmission. It vented from the vent and looked like a leak. Once they drained some oil no more problem.
If not, heres the troubleshooting procedure.
Document ID# 403256
2002 Chevrolet Corvette
Fluid Leak Diagnosis
General Method
1. Verify that the leak is transmission fluid.
2. Thoroughly clean the suspected leak area.
3. Operate the vehicle for 24 km (15 mi), or until normal operating temperatures are reached.
4. Park the vehicle over clean paper or cardboard.
5. Shut OFF the engine.
6. Look for fluid spots on the paper.
7. Make the necessary repairs.
Powder Method
1. Thoroughly clean the suspected leak area with solvent.
2. Apply an aerosol type powder, such as foot powder, to the suspected leak area.
3. Operate the vehicle for 24 km (15 mi), or until normal operating temperatures are reached.
4. Shut OFF the engine.
5. Inspect the suspected leak area.
6. Trace the leak path through the powder in order to find the source of the leak.
7. Make the necessary repairs.
Dye and Black Light Method
A fluid dye and black light kit is available from various tool manufacturers.
1. Follow the manufacturer's instructions in order to determine the amount of dye to use.
2. Detect the leak with the black light.
3. Make the necessary repairs.
Find the Cause of the Leak
Pinpoint the leak and trace the leak back to the source. You must determine the cause of the leak in order to repair the leak properly. For example, if you replace a gasket, but the sealing flange is bent, the new gasket will not repair the leak. You must also repair the bent flange. Before you attempt to repair a leak, check for the following conditions, and make repairs as necessary:
* Gaskets Fluid level/pressure is too high
* Plugged vent or drain-back holes
* Improperly tightened fasteners
* Dirty or damaged threads
* Warped flanges or sealing surface
* Scratches, burrs, or other damage to the sealing surface
* Damaged or worn gasket
* Cracking or porosity of the component
* Improper sealant used, where applicable
* Incorrect gasket
* Seals Fluid level/pressure is too high
* Plugged vent or drain-back holes
* Damaged seal bore
* Damaged or worn seal
* Improper installation
* Cracks in component
* Manual or output shaft surface is scratched, nicked, or damaged
* Loose or worn bearing causing excess seal wear
Possible Points of Fluid Leaks
* Transmission Oil Pan Incorrectly tightened oil pan bolts
* Improperly installed or damaged oil pan gasket
* Damaged oil pan or mounting face
* Incorrect oil pan gasket
* Case Leak Damaged or missing fill tube seal
* Mislocated fill tube bracket
* Damaged vehicle speed sensor seal
* Damaged manual shaft seal
* Loose or damaged oil cooler connector fittings
* Worn or damaged propeller shaft oil seal
* Loose line pressure pipe plug
* Porous casting
* Leak at the Torque Converter End Converter leak in the weld area
* Converter seal lip cut. Check the converter hub for damage
* Converter seal bushing moved forward and damaged
* Converter seal garter spring missing from the seal
* Porous casting of the transmission case or the oil pump
* Leak at the Vent Pipe or the Fluid Fill Tube Overfilled system
* Water or coolant in the fluid. The fluid will appear milky
* Transmission case porous
* Incorrect fluid level indicator
* Plugged vent
* Drain-back holes plugged
* Mispositioned oil pump to case gasket, if equipped
FIGURE Leak Inspection Points(c)
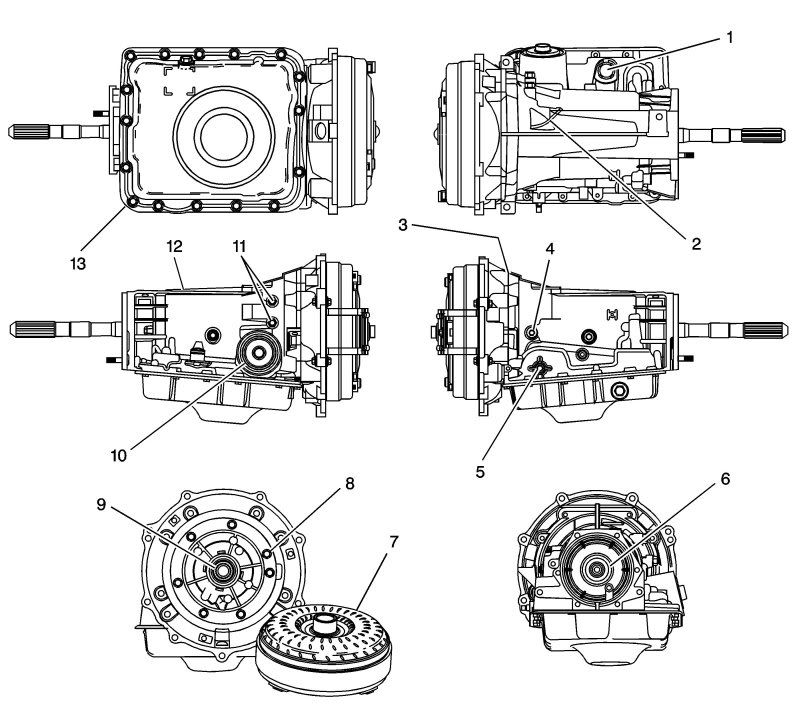
Object Number: 211350 Size: LF
Click here for detailed picture of above image.
(1) Wiring Harness Pass-through Connector O-Ring Seal
(2) Transmission Vent Assembly
(3) Converter Housing to Case Joint (Pump to Case Oil Seal)
(4) Line Pressure Plug
(5) Manual Shaft Seal
(6) Case Rear Oil Seal Assembly
(7) Torque Converter Assembly
(8) Pump to Case Oil Seal
(9) Pump Oil Seal Assembly
(10) 2-4 Servo Cover O-Ring Seal
(11) Oil Cooler Pipe Connectors
(12) Transmission Case
(13) Transmission Oil Pan Gasket
Document ID# 403256
2002 Chevrolet Corvette
Long shot but out of interest, I had a service early on in the cars life and they overfilled the transmission. It vented from the vent and looked like a leak. Once they drained some oil no more problem.
If not, heres the troubleshooting procedure.
Document ID# 403256
2002 Chevrolet Corvette
Fluid Leak Diagnosis
General Method
1. Verify that the leak is transmission fluid.
2. Thoroughly clean the suspected leak area.
3. Operate the vehicle for 24 km (15 mi), or until normal operating temperatures are reached.
4. Park the vehicle over clean paper or cardboard.
5. Shut OFF the engine.
6. Look for fluid spots on the paper.
7. Make the necessary repairs.
Powder Method
1. Thoroughly clean the suspected leak area with solvent.
2. Apply an aerosol type powder, such as foot powder, to the suspected leak area.
3. Operate the vehicle for 24 km (15 mi), or until normal operating temperatures are reached.
4. Shut OFF the engine.
5. Inspect the suspected leak area.
6. Trace the leak path through the powder in order to find the source of the leak.
7. Make the necessary repairs.
Dye and Black Light Method
A fluid dye and black light kit is available from various tool manufacturers.
1. Follow the manufacturer's instructions in order to determine the amount of dye to use.
2. Detect the leak with the black light.
3. Make the necessary repairs.
Find the Cause of the Leak
Pinpoint the leak and trace the leak back to the source. You must determine the cause of the leak in order to repair the leak properly. For example, if you replace a gasket, but the sealing flange is bent, the new gasket will not repair the leak. You must also repair the bent flange. Before you attempt to repair a leak, check for the following conditions, and make repairs as necessary:
* Gaskets Fluid level/pressure is too high
* Plugged vent or drain-back holes
* Improperly tightened fasteners
* Dirty or damaged threads
* Warped flanges or sealing surface
* Scratches, burrs, or other damage to the sealing surface
* Damaged or worn gasket
* Cracking or porosity of the component
* Improper sealant used, where applicable
* Incorrect gasket
* Seals Fluid level/pressure is too high
* Plugged vent or drain-back holes
* Damaged seal bore
* Damaged or worn seal
* Improper installation
* Cracks in component
* Manual or output shaft surface is scratched, nicked, or damaged
* Loose or worn bearing causing excess seal wear
Possible Points of Fluid Leaks
* Transmission Oil Pan Incorrectly tightened oil pan bolts
* Improperly installed or damaged oil pan gasket
* Damaged oil pan or mounting face
* Incorrect oil pan gasket
* Case Leak Damaged or missing fill tube seal
* Mislocated fill tube bracket
* Damaged vehicle speed sensor seal
* Damaged manual shaft seal
* Loose or damaged oil cooler connector fittings
* Worn or damaged propeller shaft oil seal
* Loose line pressure pipe plug
* Porous casting
* Leak at the Torque Converter End Converter leak in the weld area
* Converter seal lip cut. Check the converter hub for damage
* Converter seal bushing moved forward and damaged
* Converter seal garter spring missing from the seal
* Porous casting of the transmission case or the oil pump
* Leak at the Vent Pipe or the Fluid Fill Tube Overfilled system
* Water or coolant in the fluid. The fluid will appear milky
* Transmission case porous
* Incorrect fluid level indicator
* Plugged vent
* Drain-back holes plugged
* Mispositioned oil pump to case gasket, if equipped
FIGURE Leak Inspection Points(c)
Object Number: 211350 Size: LF
Click here for detailed picture of above image.
(1) Wiring Harness Pass-through Connector O-Ring Seal
(2) Transmission Vent Assembly
(3) Converter Housing to Case Joint (Pump to Case Oil Seal)
(4) Line Pressure Plug
(5) Manual Shaft Seal
(6) Case Rear Oil Seal Assembly
(7) Torque Converter Assembly
(8) Pump to Case Oil Seal
(9) Pump Oil Seal Assembly
(10) 2-4 Servo Cover O-Ring Seal
(11) Oil Cooler Pipe Connectors
(12) Transmission Case
(13) Transmission Oil Pan Gasket
Document ID# 403256
2002 Chevrolet Corvette
Last edited by DeeGee; Mar 18, 2009 at 02:08 AM.


