


Flip up headlights inop

Thread Starter
2nd Gear

Joined: Oct 2008
Posts: 2
Likes: 0
My headlights pop up and come on in my garage where the twilight opt takes over but if I try to do it manually no luck. Any suggestions? They work fine when they are up just have to wait for dust...
Thanks
Thanks
Tech Contributor


Joined: Dec 2003
Posts: 19,384
Likes: 87
From: Horncastle Lincolnshire, England
2023 C5 of the Year Finalist - Unmodified
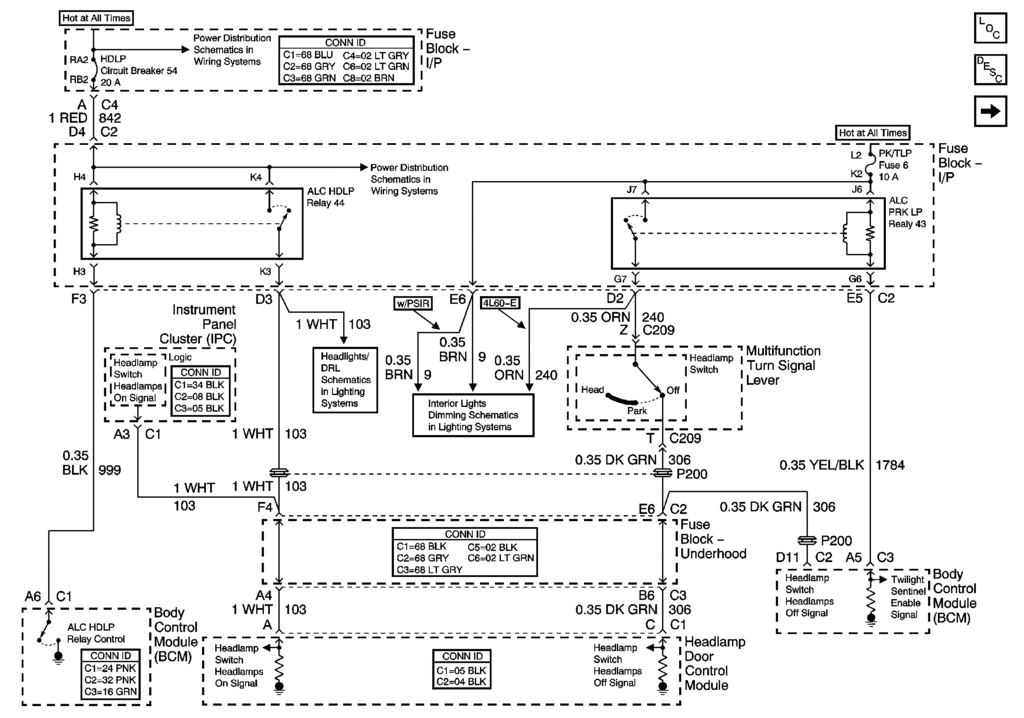
Here's the troubleshooting guide
The twilight sentinel operates on a different circuit so its not a surprise that auto works but manual doesn't.
From what you say I'd suspect the headlight switch. It fails quite often.
Document ID# 661511
2002 Chevrolet Corvette
________________________________________
Headlamp Door(s) Inoperative
Step Action Yes No
Schematic Reference: Headlight Doors Schematics
1 Did you perform the Diagnostic System Check? Go to Step 2
Go to Diagnostic System Check - Lighting Systems
2 Turn the headlamps ON and OFF.
Do the headlamp doors open and close? Go to Testing for Intermittent and Poor Connections in Wiring Systems Go to Step 3
3 Is only one headlamp door inoperative? Go to Step 9
Go to Step 4
4 Are the headlamp doors closed at all times? Go to Step 5
Go to Step 7
5 1. Remove the right hand headlamp assembly.
2. Disconnect the control module connectors C1 and C2 to the actuator for the headlamp opening door.
3. Turn the headlamps ON.
4. Connect a test lamp between the headlamps ON input circuit and a known good ground at connector C1. Refer to Circuit Testing in Wiring Systems.
Does the test lamp illuminate? Go to Step 6
Go to Step 13
6 Connect a test lamp between the headlamps ON input circuit and the ground circuit of connector C1.
Does the test lamp illuminate? Go to Step 11
Go to Step 14
7 1. Turn OFF the headlamp switch.
2. Disconnect the actuator control module to the headlamp opening door.
3. Using a test lamp, probe between the headlamp OFF input circuit and ground.
Does the test lamp illuminate? Go to Step 8
Go to Step 11
8 1. Disconnect connector C209.
2. Using a test lamp, probe between the headlamp OFF input circuit (female side) and ground.
Does the test lamp illuminate? Go to Step 12
Go to Step 15
9 Test the power and ground circuit of the headlamp door control for a poor connection or an open. Refer to Circuit Testing and Wiring Repairs in Wiring Systems.
Did you find and correct the condition? Go to Step 19
Go to Step 10
10 Inspect the harness connector for headlamp opening door assembly for a poor connection. Refer to Testing for Intermittent and Poor Connections and Connector Repairs in Wiring Systems.
Did you find and complete the repair? Go to Step 19
Go to Step 16
11 Inspect the harness connector for headlamp opening door actuator control module for a poor connection. Refer to Testing for Intermittent and Poor Connections and Connector Repairs in Wiring Systems.
Did you find and complete the repair? Go to Step 19
Go to Step 17
12 Inspect the harness connector for multifunction turn signal lever for a poor connection. Refer to Testing for Intermittent and Poor Connections and Connector Repairs in Wiring Systems.
Did you find and complete the repair? Go to Step 19
Go to Step 18
13 Repair a poor connector or an open in the headlamp ON input circuit. Refer to Circuit Testing and Wiring Repairs in Wiring Systems.
Did you complete the repair? Go to Step 19
--
14 Repair a poor connector or an open in the ground circuit. Refer to Circuit Testing and Wiring Repairs in Wiring Systems.
Did you complete the repair? Go to Step 19
--
15 Repair a short to battery positive voltage in the headlamps OFF input circuit. Refer to Circuit Testing and Wiring Repairs in Wiring Systems.
Did you complete the repair? Go to Step 19
--
16 Replace the headlamp opening door assembly. Refer to Headlamp Opening Door Replacement .
Did you complete the replacement? Go to Step 19
--
17 Replace the control module for the headlamp opening door actuator. Refer to Headlamp Control Module Replacement .
Did you complete the replacement? Go to Step 19
--
18 Replace the multifunction turn signal lever. Refer to Multifunction Turn Signal Lever Replacement - On Vehicle in Steering Wheel and Column - Tilt.
Did you complete the replacement? Go to Step 19
--
19 Operate the system in order to verify the repair.
Did you correct the condition? System OK Go to Step 2
________________________________________
Document ID# 661511
2002 Chevrolet Corvette
Instructor


Joined: Jul 2005
Posts: 158
Likes: 4
From: Arlington TX
It's much easier- for me at least.
It's a grounding issue. Just open the hood, and start wiggling the grounding block on the passenger side. The ground near the passenger headlight, on the frame rail. My grounds are so flakey, I keep a screwdriver with me to poke/move the grounding block around to get things to work.
I've taken the grounds completely apart 3 times, cleaned, dielectric greased, etc and it still has problems. I've just accepted it's never going to work correctly.
Melting Slicks


Joined: Oct 2007
Posts: 2,383
Likes: 14
From: Kinston North Carolina
If the ground was bad, it wouldn't work with the twilight opt, I don't think. Troubleshooting with the schematics and voltmeter will probably find a bad multifunction switch. That's just a guess, could be any number of things, but proper trouble shooting will find it without throwing parts at it.
Tech Contributor


Joined: Jan 2007
Posts: 19,566
Likes: 1,209
From: Dyer, IN
It's much easier- for me at least.
It's a grounding issue. Just open the hood, and start wiggling the grounding block on the passenger side. The ground near the passenger headlight, on the frame rail. My grounds are so flakey, I keep a screwdriver with me to poke/move the grounding block around to get things to work.
I've taken the grounds completely apart 3 times, cleaned, dielectric greased, etc and it still has problems. I've just accepted it's never going to work correctly.
It's a grounding issue. Just open the hood, and start wiggling the grounding block on the passenger side. The ground near the passenger headlight, on the frame rail. My grounds are so flakey, I keep a screwdriver with me to poke/move the grounding block around to get things to work.
I've taken the grounds completely apart 3 times, cleaned, dielectric greased, etc and it still has problems. I've just accepted it's never going to work correctly.

Corvette Stories
The Best of Corvette for Corvette Enthusiasts

Corvette & Porsche 911: How Two Icons Conquered the Last 25 Years
Joe Kucinski
2027 Chevrolet Silverado 1500 First Look: Everything You NEED to Know!
Michael S. Palmer
5 Best & 5 Worst Corvette Daily Drivers
Joe Kucinski
The Headlights of Every Corvette Generation Explained
Joe Kucinski
5 Best & 5 Most Overrated Corvette Track Packages of All Time!
Joe Kucinski
Every 2027 Corvette Engine Explained
Joe Kucinski
Designer Imagines A Corvette That Looks More Like a Corvette Than the Corvette
Verdad Gallardo
10 Ugly Corvettes That We Still Kinda Love
Joe Kucinski