


C5 Rocker Panel Replacement.
Melting Slicks


Joined: Oct 2007
Posts: 2,383
Likes: 13
From: Kinston North Carolina
From the Manual:
The Sheet Molded Compound (SMC) roof panel (1) is bonded and bolted to become an integral part of the vehicle structure. The top is installed using windshield urethane. Use the Urethane Adhesive Kit GM P/N 12346392, or a urethane adhesive system which meets GM Specification GM3651M, in order to maintain original installation integrity.
The Sheet Molded Compound (SMC) roof panel (1) is bonded and bolted to become an integral part of the vehicle structure. The top is installed using windshield urethane. Use the Urethane Adhesive Kit GM P/N 12346392, or a urethane adhesive system which meets GM Specification GM3651M, in order to maintain original installation integrity.
Melting Slicks
Joined: Oct 2007
Posts: 2,383
Likes: 13
From: Kinston North Carolina
Door Opening Frame Replacement - Side
Tools Required
J 42058 Frame Adapter Clamp
Removal Procedure
Notice
The frame rails and bumper impact bars must be serviced as required, and returned to three-dimensional coordinates before any SMC repairs are attempted.
Visually inspect for damage to the frame rails or wheelhouse mounting areas. Restore as much of the damage as possible to specifications using three-dimensional measuring procedures. Use J 42058 if vehicle pulling and straightening are required.
Remove all panels and components to gain access to door side frame. The door side frame can be removed if the quarter panel is loosened from it. This may include removal of the following components:
Door
Quarter panel
Quarter inner splash shield
Remove latch striker closeout cover and striker.
Remove the trim screws that attach the side door frame panel to the rail. These screws must be re-installed to secure the service panel in place until the adhesive cures.
Important
Make sure the fuel inlet is sealed before proceeding with repair procedure.
Use caution along the underside of the vehicle when applying heat not to de-bond the floor panels from the frame rail.
Apply heat and pry to break bond along area (1).
Installation Procedure
Remove all remaining adhesive, and scuff all bonding surfaces to ensure proper adhesion.
Clean and prepare all bonding surfaces prior to SMC panel installation. Refer to Plastic Panels in Plastic Panel Information and Repair.
Prime all bare metal surfaces with PPGs DP90, or an equivalent epoxy anti-corrosion primer. Do not top-coat any bonding surface.
Temporarily fit the side door opening assembly to ensure proper fit and alignment with adjacent panels.
Remove panel assembly and apply a consistent bead of adhesive (1) to the front body hinge pillar and top surface of rail (2) and to all areas originally bonded, except for bottom side of rail.
The bead should be 10 mm (13/32 in) diameter.
This area is bonded after the side door opening assembly is installed.
Install assembly using original screws in factory locations. The screws are necessary to secure the service part until the adhesive cures.
Important
Ensure that the foam seal on the front body hinge pillar portion of the side door opening panel makes contact with the front hinge pillar.
Important
Use only approved adhesives. Refer to Repair Materials - Rigid Plastic Part in Plastic Panel Information and Repair.
Apply adhesive to inner edge of rocker and clamp in place until adhesive cures. Standoffs in part must fit flush against bottom of rail.
Remove excess adhesive squeeze-out and allow to cure.
Prime bare metal areas with PPGs DP90, or an equivalent epoxy anti-corrosion primer. Do not combine paint systems. Always refer to paint manufacturer's recommendations.
Install all related panels and components.

Racer


Joined: Apr 2005
Posts: 307
Likes: 0
From: Lake Orion MI
I did both of them. not so bad, I used a air chizle. and for the most pard I used a 5" grinderwith rough floppy pad. I just ground through the panel and most of the adheasive. it was fast and worked great! LOTS of smoke and black rubber goes all over but cleans up nice. The grinder is the only way to go. dont use any of the fast setting stuff they used. just use the urathane to re glue them it holds better then the other stuff. have fun!!
Burning Brakes

Joined: Jun 2005
Posts: 782
Likes: 45
From: Toronto Ontario
I did both of them. not so bad, I used a air chizle. and for the most pard I used a 5" grinderwith rough floppy pad. I just ground through the panel and most of the adheasive. it was fast and worked great! LOTS of smoke and black rubber goes all over but cleans up nice. The grinder is the only way to go. dont use any of the fast setting stuff they used. just use the urathane to re glue them it holds better then the other stuff. have fun!!
Corvette Stories
The Best of Corvette for Corvette Enthusiasts

Top 10 Most Expensive Corvettes Ever Sold on Bring A Trailer
Brett Foote
10 Things Every Corvette Owner Needs (2026 Edition)
Michael S. Palmer
8 Most "Only Corvette Owners Understand" Quirks and Problems
Pouria Savadkouei
10 Reasons the C6 Z06 is Still A Performance Benchmark After 20 Years
Joe Kucinski
How Much Horsepower Every Corvette Engine "LOST" in 1972
Joe Kucinski
Top 10 DOs and DON'Ts for Protecting Your Convertible Top!
Michael S. Palmer
Top 10 Most Explosive Corvettes Ever Made: Power-to-Weight Ratio Ranked!
Joe Kucinski
150 hp to 1,250 hp: Every Corvette Generation Compared by the Specs That Matter
Joe Kucinski
8 Coolest Corvette Pace Cars (and Replicas) of All Time
Verdad GallardoBurning Brakes
Joined: Aug 2006
Posts: 1,217
Likes: 5
From: Stark County Ohio
I’ve been involved with working on and rebuilding Corvettes for many years. Mostly C3's.
When I first learned the fact that the C5 rocker panels are bonded directly to the frame/chassis, I couldn’t help but wonder, how years down the road, this will affect the integrity of the frame.
I can imagine moisture trapped under there causing severe rust damage.
Time will tell.
When I first learned the fact that the C5 rocker panels are bonded directly to the frame/chassis, I couldn’t help but wonder, how years down the road, this will affect the integrity of the frame.
I can imagine moisture trapped under there causing severe rust damage.
Time will tell.

Instructor
Joined: Nov 2009
Posts: 109
Likes: 12
From: St. Louis MO
Anyone have any photos of that exercise?
I've got a damage right side rocker and I'm debating making a repair versus replace. From what I've heard repair is the way to go, but I'm not sure where to draw the line between the pain of repairing cracks, gouges, versus replacing.
Thanks!
I've got a damage right side rocker and I'm debating making a repair versus replace. From what I've heard repair is the way to go, but I'm not sure where to draw the line between the pain of repairing cracks, gouges, versus replacing.
Thanks!
Burning Brakes

Joined: Dec 2005
Posts: 831
Likes: 2
From: Silver Spring, MD
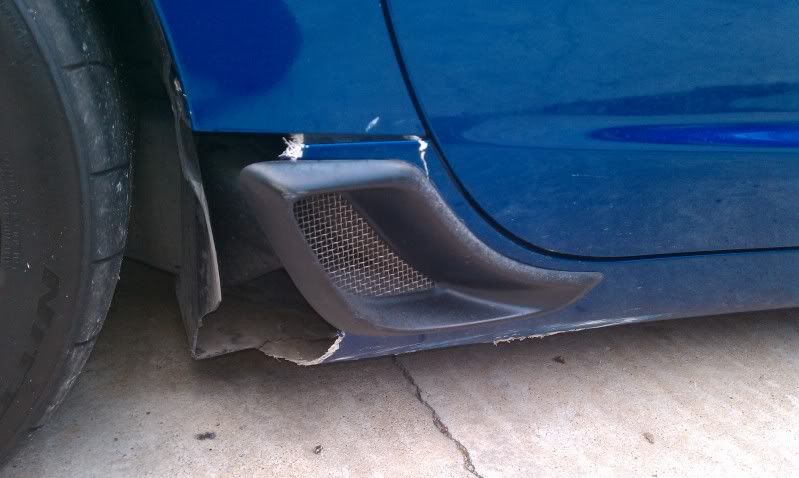
I have some damage to both of mine. Can't really see it but it is there. I went to three local shops to try to get the rear portion only replaced with ACI vented rockers. no one will toch the job. They will damage but won't replace just that section. Wish i had the skill tom do so-because the ACI rockers are killer.

Drifting


Joined: Jan 2007
Posts: 1,870
Likes: 38
From: Sacramento CA
not that difficult. Removing them will mean damaging them. New ones are around 250 from Gene. I used a bonding glue from my local automotive paint/supply store. Make sure u take your time aligning it with door before the glue sets. Its a job that can easily be done in a garage setting.
Burning Brakes
Joined: Dec 2005
Posts: 831
Likes: 2
From: Silver Spring, MD
Here is what I am looking to do-
REPAIR THIS:
Replace only that section with this

To look like this:
Perhaps you can pm me with some info> At least then i can find the right shop to do it. The damage is only in that area and the ACI rockers would take care of it but can't find anyone willing to do the job. They rather just repair the existing rocker damage. Ugh!
REPAIR THIS:
Replace only that section with this
To look like this:
Perhaps you can pm me with some info> At least then i can find the right shop to do it. The damage is only in that area and the ACI rockers would take care of it but can't find anyone willing to do the job. They rather just repair the existing rocker damage. Ugh!
Instructor
Joined: Mar 2007
Posts: 235
Likes: 0
From: USA


1st Gear
Joined: Apr 2010
Posts: 1
Likes: 0
I have removed without damage a rocker/aperature panel from an 07 vette. It takes time and patience. Heat the surround with a good heat gun - never stopping moving using oblong movements. Start at the back top and work down and toward the front. It takes a very long time for the heat to penetrate the smc and weaken the bond. Gently pulling in light jerks helps fracture the bond. The front is by far the most difficult. You have to heat from the underneath and inside at the front corner and all the way up. The corner has a extra amount of smc structure that cannot be heated from the outside. Another alternative is to cut the rocker ~1/3 the way up with a thin cutoff wheel and then piece it back together. Painting it before reassembly is important.
Use only SMC compatable glue for permanent trouble free installation.
Use only SMC compatable glue for permanent trouble free installation.


Pro

Joined: Jun 2008
Posts: 509
Likes: 0
From: The Ham AL
ouch... that's a pretty ugly wound you've got there, crazy. BUT, on the upside, if you happened to stop and pick up the missing piece, that should be easily repairable by a competent body shop. I had mine repaired, and it was worse than that... you definitely can't tell it ever happened now... best of luck to you. i searched for a replacement for well over a month and finally gave up and just had it repaired.