


how to replace "air dam" under the front
Tech Contributor


Joined: Dec 2003
Posts: 19,384
Likes: 87
From: Horncastle Lincolnshire, England
2023 C5 of the Year Finalist - Unmodified
Air Deflector Replacement - Front Bumper Fascia
Removal Procedure
1. Raise and support the vehicle. Refer to Lifting and Jacking the Vehicle in General Information.
2. Remove the center air deflector bolts.
3. Remove the air deflector from the vehicle.
Installation Procedure
1. Position the center air deflector between the side valances.
Notice
Use the correct fastener in the correct location. Replacement fasteners must be the correct part number for that application. Fasteners requiring replacement or fasteners requiring the use of thread locking compound or sealant are identified in the service procedure. Do not use paints, lubricants, or corrosion inhibitors on fasteners or fastener joint surfaces unless specified. These coatings affect fastener torque and joint clamping force and may damage the fastener. Use the correct tightening sequence and specifications when installing fasteners in order to avoid damage to parts and systems.
2. Install the center air deflector and attaching bolts.
Tighten
Tighten the air deflector bolts to 7 N�m (62 lb in).
3. Lower the vehicle.

Drifting


Joined: Sep 2009
Posts: 1,868
Likes: 0
From: Tuscaloosa Alabama
St. Jude Donor '10
Air Deflector Replacement - Front Bumper Fascia
Removal Procedure
1. Raise and support the vehicle. Refer to Lifting and Jacking the Vehicle in General Information.
2. Remove the center air deflector bolts.
3. Remove the air deflector from the vehicle.
Installation Procedure
1. Position the center air deflector between the side valances.
Notice
Use the correct fastener in the correct location. Replacement fasteners must be the correct part number for that application. Fasteners requiring replacement or fasteners requiring the use of thread locking compound or sealant are identified in the service procedure. Do not use paints, lubricants, or corrosion inhibitors on fasteners or fastener joint surfaces unless specified. These coatings affect fastener torque and joint clamping force and may damage the fastener. Use the correct tightening sequence and specifications when installing fasteners in order to avoid damage to parts and systems.
2. Install the center air deflector and attaching bolts.
Tighten
Tighten the air deflector bolts to 7 N�m (62 lb in).
3. Lower the vehicle.
Removal Procedure
1. Raise and support the vehicle. Refer to Lifting and Jacking the Vehicle in General Information.
2. Remove the center air deflector bolts.
3. Remove the air deflector from the vehicle.
Installation Procedure
1. Position the center air deflector between the side valances.
Notice
Use the correct fastener in the correct location. Replacement fasteners must be the correct part number for that application. Fasteners requiring replacement or fasteners requiring the use of thread locking compound or sealant are identified in the service procedure. Do not use paints, lubricants, or corrosion inhibitors on fasteners or fastener joint surfaces unless specified. These coatings affect fastener torque and joint clamping force and may damage the fastener. Use the correct tightening sequence and specifications when installing fasteners in order to avoid damage to parts and systems.
2. Install the center air deflector and attaching bolts.
Tighten
Tighten the air deflector bolts to 7 N�m (62 lb in).
3. Lower the vehicle.
L
Corvette Stories
The Best of Corvette for Corvette Enthusiasts

Top 10 Most Expensive Corvettes Ever Sold on Bring A Trailer
Brett Foote
10 Things Every Corvette Owner Needs (2026 Edition)
Michael S. Palmer
8 Most "Only Corvette Owners Understand" Quirks and Problems
Pouria Savadkouei
10 Reasons the C6 Z06 is Still A Performance Benchmark After 20 Years
Joe Kucinski
How Much Horsepower Every Corvette Engine "LOST" in 1972
Joe Kucinski
Top 10 DOs and DON'Ts for Protecting Your Convertible Top!
Michael S. Palmer
Top 10 Most Explosive Corvettes Ever Made: Power-to-Weight Ratio Ranked!
Joe Kucinski
150 hp to 1,250 hp: Every Corvette Generation Compared by the Specs That Matter
Joe Kucinski
8 Coolest Corvette Pace Cars (and Replicas) of All Time
Verdad GallardoTech Contributor
Joined: Dec 2003
Posts: 19,384
Likes: 87
From: Horncastle Lincolnshire, England
2023 C5 of the Year Finalist - Unmodified
A lot of people take them off without fully realizing that the car needs the air dam to breathe. Has the car been lowered? That may be why they were removed. Dont forget the end fairings. They smooth the airflow under the car and are quite important for higher speed stability.
Drifting
Joined: Sep 2009
Posts: 1,868
Likes: 0
From: Tuscaloosa Alabama
St. Jude Donor '10
A lot of people take them off without fully realizing that the car needs the air dam to breathe. Has the car been lowered? That may be why they were removed. Dont forget the end fairings. They smooth the airflow under the car and are quite important for higher speed stability.
L and J
Tech Contributor
Joined: Dec 2003
Posts: 19,384
Likes: 87
From: Horncastle Lincolnshire, England
2023 C5 of the Year Finalist - Unmodified
Happy New Year

Racer

Joined: Jun 2012
Posts: 495
Likes: 1
From: Missouri
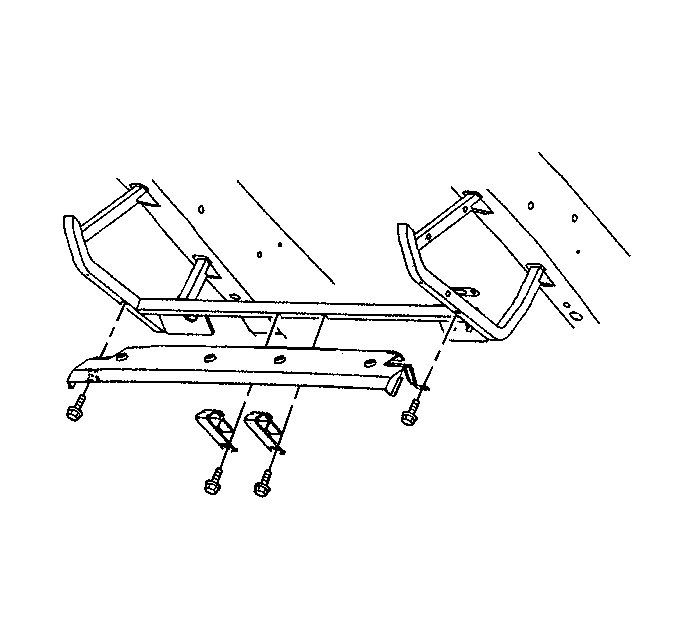
I ordered a new air dam, mine was missing. I need to order the 2 center braces (red arrow). But all 4 holes in the square tubing just have oversized holes. (green arrow). There are no threads anywhere for the bolts to screw into.
Are there supposed to be threaded inserts in these holes?
Are there supposed to be threaded inserts in these holes?
Racer
Joined: Jun 2012
Posts: 495
Likes: 1
From: Missouri
Anyone? These are what the air dam bolts are supposed to thread into.. But it just has open hex holes on all 4 locations.. Should there be some sort of thread inserts?
Last edited by adamgl; Jul 8, 2014 at 08:03 AM.

Intermediate
Joined: May 2014
Posts: 39
Likes: 16
I just went thru this replacing my crash bar...new ones come without the nutserts and need to be bought seperately. Pretty safe to say your crash bar was replaced but the air dam was blown off. GM part number is 11515638 for the nutserts and there is a total of 7 of that size and one larger one where the horn mounts. I found the procedure to "squash/secure" them into the holes fairly straightforward.
Racer
Joined: Jun 2012
Posts: 495
Likes: 1
From: Missouri
Intermediate
Joined: May 2014
Posts: 39
Likes: 16
Sorry, that is the wrong part number. I got it from a website stating "common C5 problems" which had the following info:
"Here�s a list of ALL the parts you�ll need to replace the impact bar and the side air deflectors:
Part #------Qty---Description
10188023---001---Insulator (goes to bottom of radiator)
10278679---001---Insulator (goes to bottom of radiator)
10278679---005---Nut
10400765---001---Plate (the actual impact bar, unpainted)
10419312---001---Panel (air deflector)
10419313---001---Panel (air deflector)
11515638---010---Nut-speci
11515757---010---Bolt-Metr
10281487---010---Nut
Not all of these parts need to get replaced, and there will be a few leftovers, but it will get the job done."
I got mine from the dealer and they looked them up. Part number on my invoice is 11518908, they fit snug in the hex holes, look like the second style, and are not even on the list above??
Racer
Joined: Jun 2012
Posts: 495
Likes: 1
From: Missouri
Sorry, that is the wrong part number. I got it from a website stating "common C5 problems" which had the following info:
"Here�s a list of ALL the parts you�ll need to replace the impact bar and the side air deflectors:
Part #------Qty---Description
10188023---001---Insulator (goes to bottom of radiator)
10278679---001---Insulator (goes to bottom of radiator)
10278679---005---Nut
10400765---001---Plate (the actual impact bar, unpainted)
10419312---001---Panel (air deflector)
10419313---001---Panel (air deflector)
11515638---010---Nut-speci
11515757---010---Bolt-Metr
10281487---010---Nut
Not all of these parts need to get replaced, and there will be a few leftovers, but it will get the job done."
I got mine from the dealer and they looked them up. Part number on my invoice is 11518908, they fit snug in the hex holes, look like the second style, and are not even on the list above??
"Here�s a list of ALL the parts you�ll need to replace the impact bar and the side air deflectors:
Part #------Qty---Description
10188023---001---Insulator (goes to bottom of radiator)
10278679---001---Insulator (goes to bottom of radiator)
10278679---005---Nut
10400765---001---Plate (the actual impact bar, unpainted)
10419312---001---Panel (air deflector)
10419313---001---Panel (air deflector)
11515638---010---Nut-speci
11515757---010---Bolt-Metr
10281487---010---Nut
Not all of these parts need to get replaced, and there will be a few leftovers, but it will get the job done."
I got mine from the dealer and they looked them up. Part number on my invoice is 11518908, they fit snug in the hex holes, look like the second style, and are not even on the list above??
 I'll go by the dealer and see if they have that part.
I couldn't find anything about it in the service manual either. They're not very clear on it.

Heel & Toe
Joined: Mar 2026
Posts: 15
Likes: 3