


Floor Pan Removal

Thread Starter
Instructor


Joined: Nov 2009
Posts: 109
Likes: 12
From: St. Louis MO
Has anyone sucessfully removed a floor pan from a C5?
I've got a damaged passenger side one and need to pull it out for replacement.
I've tried for a short time with a heat gun as suggested in the service manual. Basically I have the car raised up, and I put a spare jack under the passenger floor board with some light pressure on the floor. I've then tried heating the edge with what I know to be a pretty good heat gun. The trouble is that I can't see how you're supposed to keep the panel edge hot the whole way around while applying pressure such that the old panel simply "pops" out. Or at least that's about how easy it appears to be from the service manual. I've also already go the interior brackets removed, so it's simply just the panel at this point.
It's not like I need to save the old panel, so I may go the route of a reciprocating saw to cut out the non-bonded areas, then go at the smaller pieces with the heat gun and scraper, but I'd rather not resort to that unless I can't pop it out all in one piece.
Any suggestions from someone who's done this excersize before?
Thanks,
Pete
Melting Slicks


Joined: Nov 1999
Posts: 2,349
Likes: 860
From: MI
Cruise-In VI Veteran
You need to apply heat to the flange and apply upward pressure on the panel at the same time to break the bond.
Go here and download the manual.
http://www.goodwrench.com/gmgoodwren...model=Corvette
The floor panel is serviced as separate left and
right side components (Fig.�3.43). The panels are
bonded around the outer edges and across the
seat mounting braces. For repair other than full
panel replacement see SMC Repair Procedures.
— REMOVE OR DISCONNECT —
1 Remove all panels and components to gain
access to the floor panel. This will include
removing seat and carpeting.
Notice: When servicing the right front
floor panel, the bonded and bolted
electrical component mounting brackets
must be removed. Remove or reposition
electrical components and wiring harness
as necessary to avoid damage.
2 Visually inspect for damage to the frame rail
and seat mounting brace, restore as much of
the damage as possible to specifications
using three-dimensional measuring
procedures.
3 Remove the side reinforcement bonded to
the floor panel and the frame rail (Fig.�3.44).
4 Remove the side reinforcement bonded to
the floor panel and the tunnel area
(Fig.�3.45). NOTE: Use care when removing
the reinforcement, if damaged during the
removal process replacement will be
necessary.
5 Apply upward force and heat simultaneously
to the floor panel as necessary to detach
adhesive. Remove damaged floor panel.
Important: Save wiring harness clips (3 per
side), for transfer to service floor panel.
Last edited by 69; Jan 13, 2010 at 09:58 PM. Reason: Add Link
Burning Brakes


Joined: Jan 2005
Posts: 1,057
Likes: 18
From: BF Mid East TEXAS
Use a chisel to first break off any adhesive squeeze out and then use the chisel to start the separating the panel from the flange while using heat and pressure. When you can smell the glue just starting to burn its just right.. it has to be really hot...
You can straighten the flange with hammer and dolly when the panel is out. Worked for me...
You can straighten the flange with hammer and dolly when the panel is out. Worked for me...
Thread Starter
Instructor
Joined: Nov 2009
Posts: 109
Likes: 12
From: St. Louis MO
Thanks guys. 69, those are the same instructions in the service manual. Like I said, they make it sound pretty easy, but with a floor jack pushing up on the bottom and the heat gun working the edges, I really didn't get it to budge.
JVetthead, I'll give that a shot. I went at the seat cross supports with a crowbar and heat gun and managed to at least get the middle one freed up. Maybe I'll get a bit more agressive around the edges.
Is the trick to get one of the corners to pop first, then simply work your way around from there? Or is it easier to start along one of the edges?
Thanks. At least there's someone who managed to get one out!
Corvette Stories
The Best of Corvette for Corvette Enthusiasts

Every 2027 Corvette Engine Explained
Joe Kucinski
Designer Imagines A Corvette That Looks More Like a Corvette Than the Corvette
Verdad Gallardo
10 Ugly Corvettes That We Still Kinda Love
Joe Kucinski
Top 10 Most Expensive Corvettes Ever Sold on Bring A Trailer
Brett Foote
10 Things Every Corvette Owner Needs (2026 Edition)
Michael S. Palmer
8 Most "Only Corvette Owners Understand" Quirks and Problems
Pouria Savadkouei
10 Reasons the C6 Z06 is Still A Performance Benchmark After 20 Years
Joe Kucinski
How Much Horsepower Every Corvette Engine "LOST" in 1972
Joe Kucinski
Top 10 DOs and DON'Ts for Protecting Your Convertible Top!
Michael S. Palmer
Thread Starter
Instructor
Joined: Nov 2009
Posts: 109
Likes: 12
From: St. Louis MO
Bill,
Just wondering, but what exactly are those photos of? I mean, I know it's one of the floor boards cut, but those cuts look pretty clean. Were you using the floorboard for something else? Just curious.
I've already got an FRP replacement, but yes, I'll keep my eye out for the carbon variety as a future option.
I'll have to go at it with the heat gun and maybe a torch this weekend. You would think an 1100 degree gun would be enough. I'm hoping to avoid the recip saw just becuase I know the mess it's going to make. That fiberglass dust gets everywhere.
Will let you know how it goes.

Tech Contributor


Joined: Dec 1999
Posts: 32,910
Likes: 2,402
From: Anthony TX
CI 6,7,8,9,11 Vet
St. Jude Donor '08
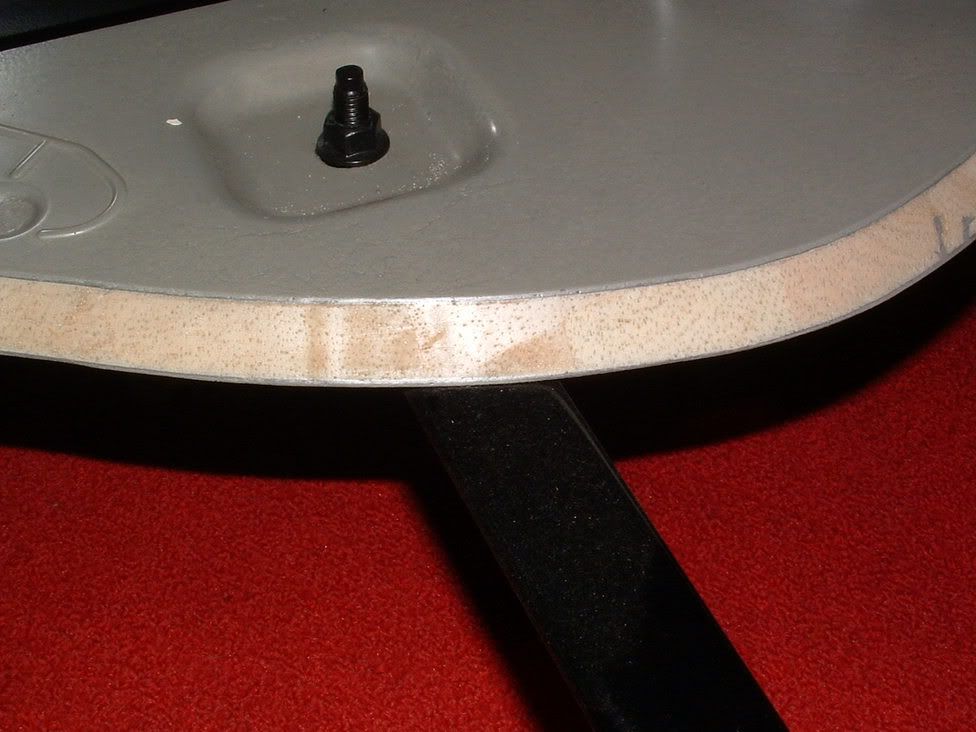
 I knew someone would ask that question. GM has several bare chassis that they take to Carslile for display and theres one at Bowling Green KY. They have cut out floor panels. Heres the entire chassis:
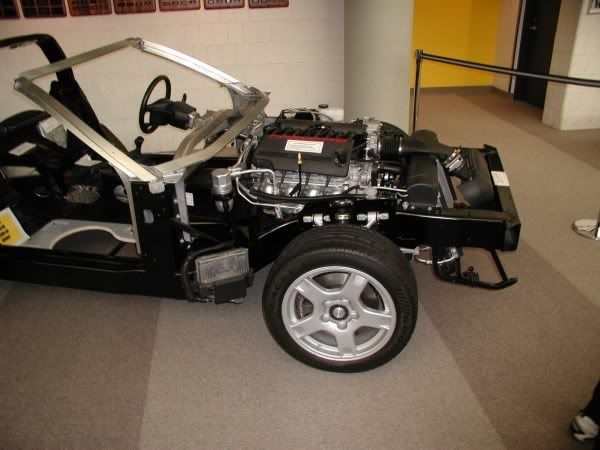
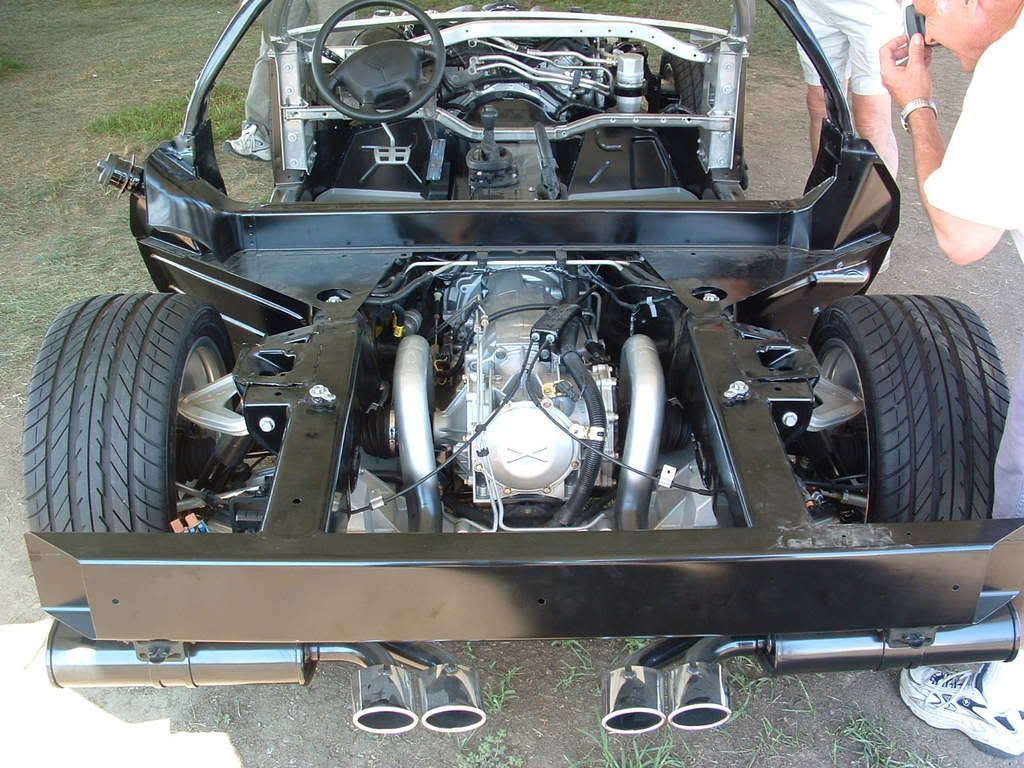

Theres even a ZO6 chassis:

Bill,
Just wondering, but what exactly are those photos of? I mean, I know it's one of the floor boards cut, but those cuts look pretty clean. Were you using the floorboard for something else? Just curious.
I've already got an FRP replacement, but yes, I'll keep my eye out for the carbon variety as a future option.
I'll have to go at it with the heat gun and maybe a torch this weekend. You would think an 1100 degree gun would be enough. I'm hoping to avoid the recip saw just becuase I know the mess it's going to make. That fiberglass dust gets everywhere.
Will let you know how it goes.
Just wondering, but what exactly are those photos of? I mean, I know it's one of the floor boards cut, but those cuts look pretty clean. Were you using the floorboard for something else? Just curious.
I've already got an FRP replacement, but yes, I'll keep my eye out for the carbon variety as a future option.
I'll have to go at it with the heat gun and maybe a torch this weekend. You would think an 1100 degree gun would be enough. I'm hoping to avoid the recip saw just becuase I know the mess it's going to make. That fiberglass dust gets everywhere.
Will let you know how it goes.
Le Mans Master


Joined: Feb 2002
Posts: 6,937
Likes: 21
From: Waldorf MD
Never knew thw C5 ZO6 used carbon fiber floorboards.
I thought all C5s used the Balsa wood honeycombed floorboards, which were pretty innovative. I bet a lot of C5 owners didn't know their car was partly constructed with wood ! Keep the termites away, LOL !
Hard to believe that even carbon fiber would be that much lighter than balsa wood ?
I thought all C5s used the Balsa wood honeycombed floorboards, which were pretty innovative. I bet a lot of C5 owners didn't know their car was partly constructed with wood ! Keep the termites away, LOL !
Hard to believe that even carbon fiber would be that much lighter than balsa wood ?
Tech Contributor
Joined: Dec 1999
Posts: 32,910
Likes: 2,402
From: Anthony TX
CI 6,7,8,9,11 Vet
St. Jude Donor '08
Never knew thw C5 ZO6 used carbon fiber floorboards.
I thought all C5s used the Balsa wood honeycombed floorboards, which were pretty innovative. I bet a lot of C5 owners didn't know their car was partly constructed with wood ! Keep the termites away, LOL !
Hard to believe that even carbon fiber would be that much lighter than balsa wood ?
I thought all C5s used the Balsa wood honeycombed floorboards, which were pretty innovative. I bet a lot of C5 owners didn't know their car was partly constructed with wood ! Keep the termites away, LOL !
Hard to believe that even carbon fiber would be that much lighter than balsa wood ?
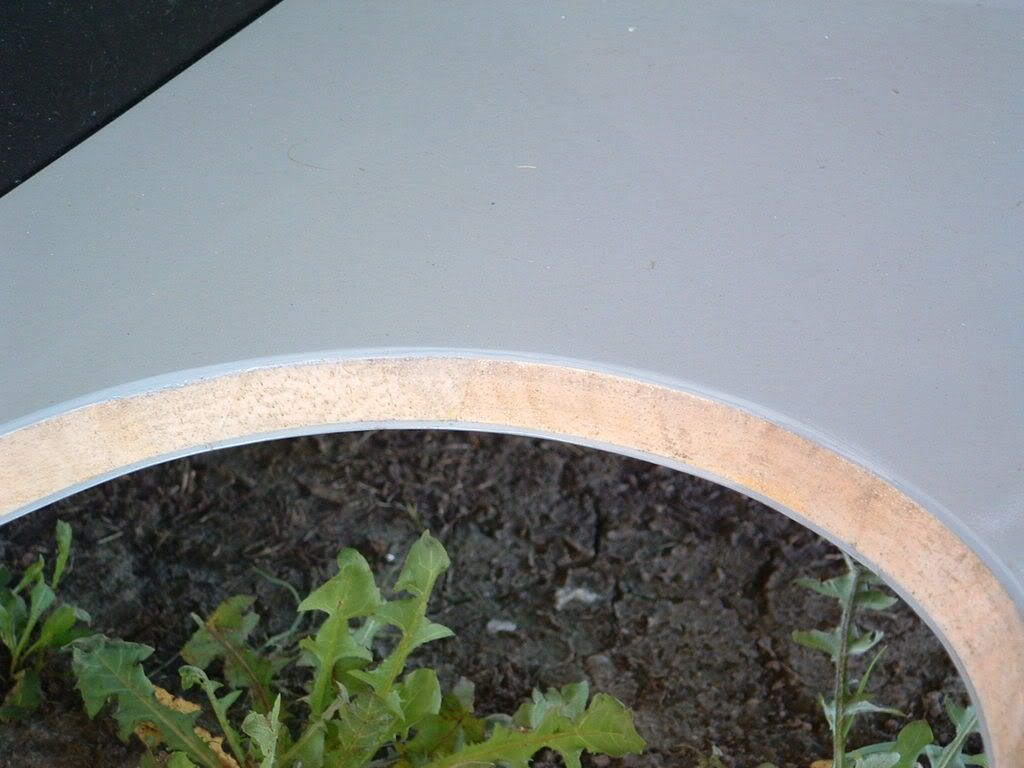
 If I had to guess, the carbon floor panel weighted 3 lbs
At the dinner auction the First Ride in a ZO6 went up for auction. My wife bid up to $3000. I got out the duct tape and secured her to the chair after that price. It went to $6,000 ish


BC
Burning Brakes
Joined: Jan 2005
Posts: 1,057
Likes: 18
From: BF Mid East TEXAS
Bill,
Just wondering, but what exactly are those photos of? I mean, I know it's one of the floor boards cut, but those cuts look pretty clean. Were you using the floorboard for something else? Just curious.
I've already got an FRP replacement, but yes, I'll keep my eye out for the carbon variety as a future option.
I'll have to go at it with the heat gun and maybe a torch this weekend. You would think an 1100 degree gun would be enough. I'm hoping to avoid the recip saw just becuase I know the mess it's going to make. That fiberglass dust gets everywhere.
Will let you know how it goes.
Just wondering, but what exactly are those photos of? I mean, I know it's one of the floor boards cut, but those cuts look pretty clean. Were you using the floorboard for something else? Just curious.
I've already got an FRP replacement, but yes, I'll keep my eye out for the carbon variety as a future option.
I'll have to go at it with the heat gun and maybe a torch this weekend. You would think an 1100 degree gun would be enough. I'm hoping to avoid the recip saw just becuase I know the mess it's going to make. That fiberglass dust gets everywhere.
Will let you know how it goes.
Thread Starter
Instructor
Joined: Nov 2009
Posts: 109
Likes: 12
From: St. Louis MO
Yeah, that has me concerned a bit too, but honestly most of the paint comes off with the adhesive, or at least it did on the brackets I had to remove from the top.
I'm guessing what I really need is some simple patience, the heat gun, and a good place to start. Once I get it moving along I would think I could just work my way around. But....I guess the trick is finding the good place to start.
I'm guessing what I really need is some simple patience, the heat gun, and a good place to start. Once I get it moving along I would think I could just work my way around. But....I guess the trick is finding the good place to start.

Burning Brakes
Joined: Jun 2005
Posts: 782
Likes: 45
From: Toronto Ontario
pmsjr: What happened to your floor that forced you to rip it out??
Thread Starter
Instructor
Joined: Nov 2009
Posts: 109
Likes: 12
From: St. Louis MO
Go Time, it was originally a "salvage" vehicle. So while it wasn't running I assume they must have used a fork lift to move it around at the auction. They managed to punch a hole the size of your fist through the passenger floor right in front of the seat. It's been a great winter project!
Pete
Pete
Thread Starter
Instructor
Joined: Nov 2009
Posts: 109
Likes: 12
From: St. Louis MO
Well, this past weekend, and a bit more patience and I managed to get the floor board out. This time I used a small bottle jack instead of a floor jack and started along the front edge instead of along the long sides or back. Once I got a small section to pop I just worked my way around from there.
....and if it comes up in the future, I used 3-200mL 3m 8115 tubes to get it put back in.
Thanks for all the help!
Pete
....and if it comes up in the future, I used 3-200mL 3m 8115 tubes to get it put back in.
Thanks for all the help!
Pete
