


Z06 Intake removal?

Thread Starter
Instructor


Joined: Jun 2002
Posts: 111
Likes: 0
From: Chesapeake Va
I have had the 1416 code for over a year now, and will replace the checkvalve. I have seen the intake removal post, but was not sure if I need a replacement gasket for intake. How does the intake seal on a 2002 Z06, is it an o-ring? Any other tricks for replacing the AIR check valve behind the block? Thank you, G
Tech Contributor
Joined: May 2008
Posts: 3,100
Likes: 17
From: Somers, CT and Clermont, FL
St. Jude Donor '09-'10-'11-'12-'13-'14-'15-'16
I replaced mine last year at about 30k miles. Although the intake o-ring seals still looked good, I opted to just replace them at the same time.
A couple of tips I learned were to lengthen the vacuum hose "straw" connection at the rear of the manifold, and to use alligator clips to hold up the two rear manifold bolts, when you slide the manifold out and back in place. The braided fuel line can stay connected, but I found it easier to disconnect it to get the fuel rail out of the way.
A couple of tips I learned were to lengthen the vacuum hose "straw" connection at the rear of the manifold, and to use alligator clips to hold up the two rear manifold bolts, when you slide the manifold out and back in place. The braided fuel line can stay connected, but I found it easier to disconnect it to get the fuel rail out of the way.

Tech Contributor


Joined: Dec 1999
Posts: 32,910
Likes: 2,402
From: Anthony TX
CI 6,7,8,9,11 Vet
St. Jude Donor '08
I agree with quick silver. I just remove the fuel rail/injectors as an assy and just FLOP them over on the fender still connected. I use close pins to hold the rear bolts up to keep the bolts from interfeering with manifold removal.
Gaskets "O" rings can be found at Advance Auto made by Felpro for 27 bucks.
Make sure that you clean all the dirt and sand from under the manifold.
Seal the knock sensor rubber plugs with RTV to help keep water out
Yep, purchase a nylon line repair kit and lengthen that dam short little vacuum line.
BC
Tech Contributor
Joined: May 2008
Posts: 3,100
Likes: 17
From: Somers, CT and Clermont, FL
St. Jude Donor '09-'10-'11-'12-'13-'14-'15-'16
One more thing is worth mentioning:
DON'T REMOVE the bolt that fastens the A.I.R. tube mounting bracket to the left side head. The bracket is slotted, and you only need to LOOSEN that bolt to slip the bracket off.
If that bolt is removed, it will be a major PITA to get it back in.
DON'T REMOVE the bolt that fastens the A.I.R. tube mounting bracket to the left side head. The bracket is slotted, and you only need to LOOSEN that bolt to slip the bracket off.
If that bolt is removed, it will be a major PITA to get it back in.
Team Owner


Joined: May 2001
Posts: 36,836
Likes: 244
From: Dear Karma, I have a list of people you missed.
St. Jude Donor '08-'09-'10-'11-'12-'13-'14-'15-'16
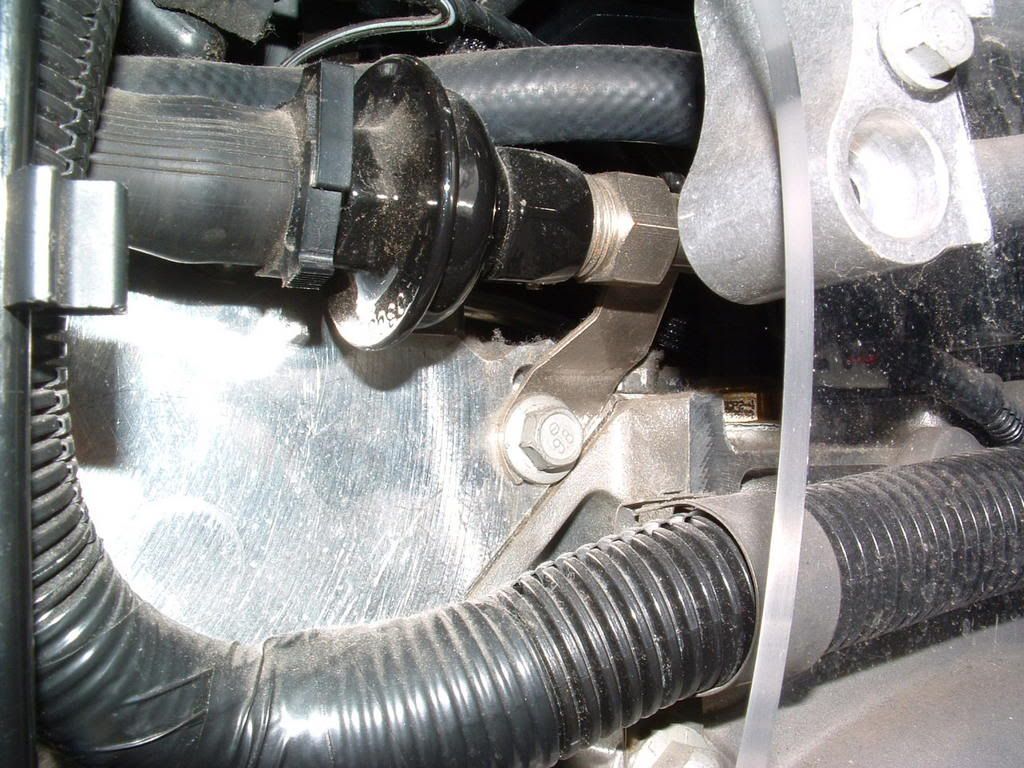
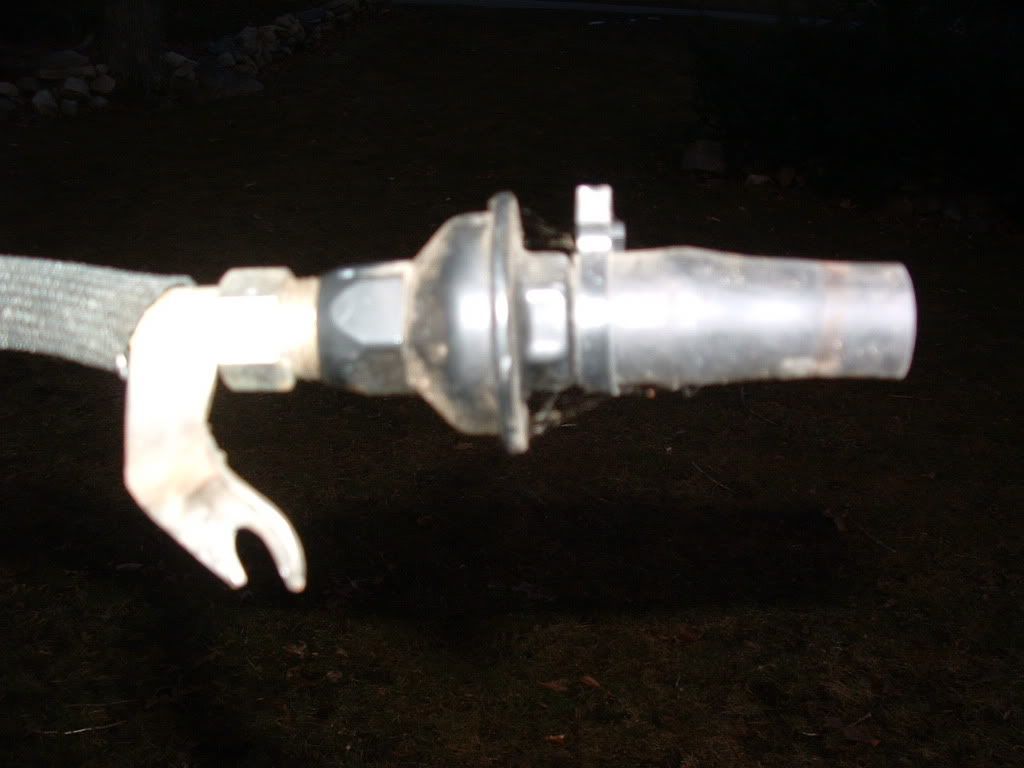
All good tips. Let me add one more: Use anti-seize compound on the threads of the new check valve. If you ever have to go back in for any reason, you'll be very glad you did. Same for the two small bolts where the tube bolts to the exhaust manifold, if you remove the whole tube assembly. Btw, there's a small gasket used at the exhaust manifold end of the pipe, as you can probably tell. It's reusable if you don't damage it. 
Let me add one more: Use anti-seize compound on the threads of the new check valve. If you ever have to go back in for any reason, you'll be very glad you did. Same for the two small bolts where the tube bolts to the exhaust manifold, if you remove the whole tube assembly. Btw, there's a small gasket used at the exhaust manifold end of the pipe, as you can probably tell. It's reusable if you don't damage it.
Racer
Joined: Jul 2008
Posts: 293
Likes: 8
From: South Bend IN
Make two 1" long pieces of rubber tubing with approximately 1/4" ID. Slit the tubes all the way up the side so that it is open. When removing the intake the rear bolts won't clear the cowl, but will conveniently drop down when you lift the intake to pull it forward/backwards during removal and installation. Use one tube on each of the two rear bolts to hold them up out of the way while you pull the manifold out and put it back in. It's easier than having someone hold them up while you get everything removed and reconnected.
Once less aggrevation while jockeying it into place while ensuring that all of your connections are in place and wires are out of the way!
Once less aggrevation while jockeying it into place while ensuring that all of your connections are in place and wires are out of the way!
Tech Contributor
Joined: May 2008
Posts: 3,100
Likes: 17
From: Somers, CT and Clermont, FL
St. Jude Donor '09-'10-'11-'12-'13-'14-'15-'16
All good tips. Let me add one more: Use anti-seize compound on the threads of the new check valve. If you ever have to go back in for any reason, you'll be very glad you did. Same for the two small bolts where the tube bolts to the exhaust manifold, if you remove the whole tube assembly. Btw, there's a small gasket used at the exhaust manifold end of the pipe, as you can probably tell. It's reusable if you don't damage it.
Let me add one more: Use anti-seize compound on the threads of the new check valve. If you ever have to go back in for any reason, you'll be very glad you did. Same for the two small bolts where the tube bolts to the exhaust manifold, if you remove the whole tube assembly. Btw, there's a small gasket used at the exhaust manifold end of the pipe, as you can probably tell. It's reusable if you don't damage it.
Corvette Stories
The Best of Corvette for Corvette Enthusiasts

Top 10 Most Expensive Corvettes Ever Sold on Bring A Trailer
Brett Foote
10 Things Every Corvette Owner Needs (2026 Edition)
Michael S. Palmer
8 Most "Only Corvette Owners Understand" Quirks and Problems
Pouria Savadkouei
10 Reasons the C6 Z06 is Still A Performance Benchmark After 20 Years
Joe Kucinski
How Much Horsepower Every Corvette Engine "LOST" in 1972
Joe Kucinski
Top 10 DOs and DON'Ts for Protecting Your Convertible Top!
Michael S. Palmer
Top 10 Most Explosive Corvettes Ever Made: Power-to-Weight Ratio Ranked!
Joe Kucinski
150 hp to 1,250 hp: Every Corvette Generation Compared by the Specs That Matter
Joe Kucinski


