


Help with damage Crank Bolt/Install: Please chime in!
Thread Starter
Pro


Joined: Jan 2006
Posts: 643
Likes: 2
From: Alexandria Northern Virginia
All,
Bought a new balancer (mine was wobbly around the bonded rubber ring). After a bear of a time (I have done three of these, this was by far the toughest to break free) I installed a new seal and began to reinstall the new balancer with a 170mm bolt I bought from McMaster Carr. It bottomed out into the crank and then I used a nut and slip washers to seat the balancer. I did it this way so I could avoid stripping the threads.
Now I can't get the bolt back out. It feels stripped, in that "I am pushing with all my strength and the bolt seems to be deflecting instead of rotating" way. I can finish seating the balancer using my technique and I have an idea....want to run it by you. Again, the bolt is NOT broken...yet.
I am thinking about cutting the end of the bolt off, removing the washers and pinning the crank. Then, get one of the washers I have back on there and use a locking nut (the metal kind, not the nylon lined ones) with about 250 ft. lbs of torque. I don't know that I can do the torque degrees given the bolt condition however I know I can get it good and tight (I hope!). If the pin is there, the balancer should not spin, right?.....This is not a race car and it won't see redline with any regularity.
Any thoughts are most appreciated. I don't know if the steel bolt gave or the crank threads but we ain't talking about an easy tap out at this point. I really appreciate the tips. Don't understand why they didn't keep this part old-school with a keyway and just a darn tight bolt...three C5's and ALL 3 have needed this job...
Cassidy
Thread Starter
Pro
Joined: Jan 2006
Posts: 643
Likes: 2
From: Alexandria Northern Virginia
I don't even think it bottomed out...it just got darned tight and that was game over. I used the longer bolt as a threaded shaft and then pulled the balancer on with a stack of washers and a nut. From the amount of pressure I was using to turn the ratchet on the bolt there was nowhere near a bottom-out condition. I suppose its possible but not very likely. It was turning easily until it wasn't, not like it got tight and I kept on it.
For some reason the bolt will NOT come back out. I have a feeling the steel threads either got chewed up or chunked up some of the crankshaft threads. Something isn't right in there. If I am pushing full body weight on it and it isn't moving (tight or loose) something is definitely wrong.
Anybody else experienced any weird crap like this? You know, I mastered the ABS module repair on this car, did the oil pressure sending unit, new lights in the radio and HVAC, rebuilt the seat air bladder, new stereo trim bezel, new seat foam, new floor mats and clips, new water pump, tensioner and idler, new e-brake shoes, new neutral switch, new battery and now new belts and a balancer all in a month and this is the thanks I get. Not to mention the cost of tagging it. Methinks I may have a coupe for sale soon...
Thanks all, any other support for my method and I will think I am on the right track too. Thanks Rob for the heads-up.
Cassidy

Racer

Joined: Sep 2004
Posts: 324
Likes: 2
From: Rogersville TN
The crank bolt is a 2.0 X ??? metric tpi. If you used a 14 tpi X ??? thread, it might have started to seize. Either way, I think you should remove the bolt. I would think that the crank is harder than your bolt and removing it won't damage the crank thread. You can grind 3 or 4 flutes in your old crank bolt to clean up the crank threads as a precaution. You have to always use a new bolt or so the book says.
Get someone to stand on the brakes with it in 3rd or 4th or what ever gear works if a 6mn, guess park if an auto. I had to use a 2 foot long power bar and my floor jack handle to tighten the bolt the last 120*s.
I'm sure something similiar to this will remove your bolt.
Good luck, Curt
Get someone to stand on the brakes with it in 3rd or 4th or what ever gear works if a 6mn, guess park if an auto. I had to use a 2 foot long power bar and my floor jack handle to tighten the bolt the last 120*s.
I'm sure something similiar to this will remove your bolt.
Good luck, Curt
Last edited by curtbriggs; Nov 11, 2010 at 10:50 PM.
Team Owner


Joined: Mar 1999
Posts: 22,025
Likes: 192
From: At the beach in little Rhody
What might have happened is the bolt turned with the nut since it wasn't bottomed and either you galled the threads or stripped them. You could try what you propose and see what happens, the worst is the balancer loosens up and you are back to your current state of affairs. Just keep an eye on it for a while to make sure it isn't moving.
Which pin method do you plan, the ATI (requires removal of the balancer again) or the end drilled pins?
Which pin method do you plan, the ATI (requires removal of the balancer again) or the end drilled pins?
Drifting


Joined: Jan 2008
Posts: 1,722
Likes: 138
From: Florida
St. Jude Donor '09
Your plan will not work, the Mcmaster Carr fastener needs to come out and the crank shaft threads need to be repaired. Leaving a galled or cross-threaded fastener in the crank to maintain the clamping force required by the harmonic balancer is not a good idea, this set-up will eventually fail, do yourself a favor and fix it correctly.
I suspect the fastener you used to seat the balancer was not the correct thread pitch. You probably do not want to hear this since you and a couple of the other internet automotive experts are convinced that you're on the right track.
I suspect the fastener you used to seat the balancer was not the correct thread pitch. You probably do not want to hear this since you and a couple of the other internet automotive experts are convinced that you're on the right track.
Corvette Stories
The Best of Corvette for Corvette Enthusiasts

Every 2027 Corvette Engine Explained
Joe Kucinski
Designer Imagines A Corvette That Looks More Like a Corvette Than the Corvette
Verdad Gallardo
10 Ugly Corvettes That We Still Kinda Love
Joe Kucinski
Top 10 Most Expensive Corvettes Ever Sold on Bring A Trailer
Brett Foote
10 Things Every Corvette Owner Needs (2026 Edition)
Michael S. Palmer
8 Most "Only Corvette Owners Understand" Quirks and Problems
Pouria Savadkouei
10 Reasons the C6 Z06 is Still A Performance Benchmark After 20 Years
Joe Kucinski
How Much Horsepower Every Corvette Engine "LOST" in 1972
Joe Kucinski
Top 10 DOs and DON'Ts for Protecting Your Convertible Top!
Michael S. Palmer
Thread Starter
Pro
Joined: Jan 2006
Posts: 643
Likes: 2
From: Alexandria Northern Virginia
I am far from convinced this is a good plan, hence my data gathering on the forums. This bolt was purchased for the purpose of pulling the dampener on and it should have worked just fine. I screwed a bolt in, it is a m16 2.0 bolt, identical in threads to the stock one and now it will not come back out. If I continue to try and turn that bolt it is going to break, period. I have worked with metal far too long to think otherwise. Right now I have the option of keeping that in there or of course the very laborious drilling it out. I have seen some posts where people threaded the unthreaded section of the crank closer to the end and used another bolt. Anybody have any positive experience with that method?
I plan to drill the pin from the end, as is the way I have done it before (with the kit that A&A supplies) so the balancer doesn't have to come back out.
Cassidy
I plan to drill the pin from the end, as is the way I have done it before (with the kit that A&A supplies) so the balancer doesn't have to come back out.
Cassidy
Thread Starter
Pro
Joined: Jan 2006
Posts: 643
Likes: 2
From: Alexandria Northern Virginia
Update,
Just called a pretty respectable machine shop in town and explained the situation. He asked if I could get a pretty good torque onto a nut down there and I said yes. It was his recommendation to do that versus drilling it out at this point. He said do the pinning so the balancer can't move and go with the loctite method. It was his thought that I bottomed out the bolt, too. I just didn't realize I had done that. Learning new things this way sucks.
At this point, I think I will try that. I know it is not right, but if it doesn't work I will have to drill it out anyway, so the only time lost is the rack R&R. Geesh, what a messy thing to happen. I feel quite sure someone will find this thread as soon as I post the car for sale...
Drifting
Joined: Jan 2008
Posts: 1,722
Likes: 138
From: Florida
St. Jude Donor '09
Update,
At this point, I think I will try that. I know it is not right, but if it doesn't work I will have to drill it out anyway, so the only time lost is the rack R&R. Geesh, what a messy thing to happen. I feel quite sure someone will find this thread as soon as I post the car for sale...
At this point, I think I will try that. I know it is not right, but if it doesn't work I will have to drill it out anyway, so the only time lost is the rack R&R. Geesh, what a messy thing to happen. I feel quite sure someone will find this thread as soon as I post the car for sale...
Race Director


Joined: Apr 2007
Posts: 11,152
Likes: 890
From: South Western Ontario
You could try an impact on it. The hammering might loosen the thing up.
I'd be concerned you have a crappy grade of bolt there and it won't hold enough torque to keep the balancer in place.
Peter
I'd be concerned you have a crappy grade of bolt there and it won't hold enough torque to keep the balancer in place.
Peter
Burning Brakes

Joined: Jun 2005
Posts: 782
Likes: 45
From: Toronto Ontario
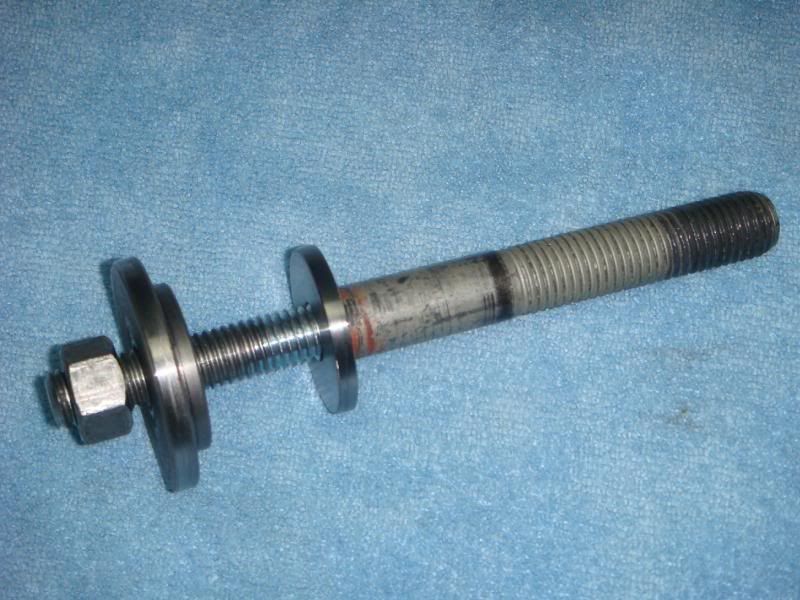
I still don't get exactly what you did. Did you take a long bolt, screw a nut and some washers onto it, then screw this thru the balancer until it bottomed, and then use the nut to push the balancer on? If that's the case, its not a bad plan, provided the bolt had enough thread for all of that. They usually don't put all that much thread on before transitioning to a smooth shank. I made this thing out of an old ballancer bolt and some threaded rod...total length is about 6.5 inches. I've never seen a bolt with that much thread cut on it.
Regardless, the bolt has to come out one way ot the other. Personally, I'd give er like a **** and see what happens. If it snaps, drill it out. Get a machine shop to make a simple drill jig, and drill it out with a tap size drill and then re-tap it. Don't leave it butchered up.
Regardless, the bolt has to come out one way ot the other. Personally, I'd give er like a **** and see what happens. If it snaps, drill it out. Get a machine shop to make a simple drill jig, and drill it out with a tap size drill and then re-tap it. Don't leave it butchered up.
Racer
Joined: Sep 2004
Posts: 324
Likes: 2
From: Rogersville TN
I made an installation bolt out of threaded rod, I threaded the Metric end on my lath and use a nut to press the balancer on. Using the Nut, you had to use a open end wrench and I can't see you putting that much torque on it even after the bolt bottomed out in the crank.
That said, I understand your concern about breaking the bolt.
The OD of the subject bolt is large enough that I don't think it will break.
A few careful direct taps on the bolt with a heavy hammer won't hurt. Many small taps are better then one that drives the crank out the back of the block.
I think the problem looks worse to you then it really is. Worse case scenario, if the bolt breaks, you have tried to do the right thing and will have to continue doing the right thing.
Just do it.

Resident moron


Joined: Jun 2003
Posts: 4,746
Likes: 20
From: Assachusetts
I'd be shocked if you broke the threaded rod trying to get it out. That'd be quite a feat - properly installed you're putting a ton of torque on it in the first place. I too am curious if you could cut down the rod a bit and put an impact on it and see what happens. The hammering might jolt it free. It's pretty hard to shear a bolt that size with an impact too.
Just makes me curious what happened in the first place. Assuming that you didn't get the wrong size threaded rod I'm at a loss as to how it could have stripped anything. M16x2.0 is pretty damn tough, and so is the crank.
Keep us updated.
Dope
Just makes me curious what happened in the first place. Assuming that you didn't get the wrong size threaded rod I'm at a loss as to how it could have stripped anything. M16x2.0 is pretty damn tough, and so is the crank.
Keep us updated.
Dope
Racer

Joined: Aug 2010
Posts: 297
Likes: 9
From: Holiday Shores IL
If it were my car I'd be trying a bag impact to try and break it free.
If that didn't work, I'd do your idea and start gathering parts to do a performance rebuild or buy big engine to drop in.
I couldn't leave it as-is and wonder every time I heard some noise if my dampener was coming loose.
If that didn't work, I'd do your idea and start gathering parts to do a performance rebuild or buy big engine to drop in.
I couldn't leave it as-is and wonder every time I heard some noise if my dampener was coming loose.
Melting Slicks


Joined: Dec 2003
Posts: 3,315
Likes: 17
From: Near Jacksonville Fl.
If memory serves me correctly the crank hole is drilled and threaded all the way through.
What I think has happened is you screwed the longer bolt in far enough to contact the the throw, this will deflect the end of the bolt since it's not flat.
This puts the thread into a bind and the only thing you need to do is back the bolt out DO NOT attempt turn it clockwise at all!!!!
And the very last thing you want to do is leave it in like that...
Thread Starter
Pro
Joined: Jan 2006
Posts: 643
Likes: 2
From: Alexandria Northern Virginia
Well, after seeing some great advice here I decided to hit it with an impact. I marked the starting position and I worked it a little in and out with my MAC gun. As it turned out, I started to see some rotation. After about a half hour of fighting, I GOT THE BOLT OUT! I will try to get a picture of it later. It DID NOT bottom out. About 7 or 8 threads from the end, one thread just got galled and stripped. It packed the threads and it was just a fight to get it out. Now, how bad is the crank? I don't know yet. Another great tip I will try later today or tomorrow is take an old bolt and cut a groove in it to make a thread chaser.
This is the exact reason I asked on the forum. I thought the bolt/nut assembly would work, I see now that it wouldn't. I thought the bolt would break, you guys were pretty confident it wouldn't and it didn't! The thread chaser, impact, etc. were all things I could do but didn't think of. Thanks to EVERYONE that chimed in, I appreciate it. I was dreading the drilling out of that bad boy, still not crazy about the idea of trying to rethread this mess but happier there is not a bolt in it.
ABSOLUTE worst case scenario now, I would tap the outer hollow section of the snout and bolt into that. Again, worst case. I am not trying to re-engineer this car, I just wanted a reliable daily driver.
Thanks everybody,
Cassidy