


DRL lights doesn't work after a car wash.
Intermediate

Joined: Mar 2011
Posts: 40
Likes: 0
You sir, have just joined the famous club called the, "You just literally exploded your DRL's to a carwash" club. Ok, I made that up but seriously, I'm posting this because not only was I a victim, I did it twice and it took me nothing short of a week to order replacement corner housings with LED's from JWM.
Check your corner housings. Wouldn't surprise me one bit if you have amber shrapnel bouncing around in there. This is common actually. The stock DRL bulbs are BRIGHT and HOT. They burn a small hole in your plastic light housing and that's where high pressure (not just rain usually) water goes. Cold water on hot bulbs... You can figure out the rest.
Buy replacements or I strongly recommend LED's. Trust me, this doesn't get better on its own. I have thin wrists so I was able to squeeze my arms down while the head lamps were up, to replace the bulbs. Hurts like hell but it's doable.
Be careful when pulling the bulbs. Seriously. They are actually shattered or have holes. So wear gloves.
I am sorry to hear you went through this. Trust me, I feel your pain.
Good luck!!!!
Burning Brakes

Joined: Nov 2007
Posts: 951
Likes: 2
From: Rochester MN
You can repair your current lamps... There will be a hole melted in the top of the
housing.. I used RTV (silicon) to plug the hole/holes.. I did both sides and then replace
the bad bulbs. It's cheaper than LEDs or new lamp housings. And not all that hard to do.
housing.. I used RTV (silicon) to plug the hole/holes.. I did both sides and then replace
the bad bulbs. It's cheaper than LEDs or new lamp housings. And not all that hard to do.
Thread Starter
Advanced
Joined: Apr 2011
Posts: 50
Likes: 0
From: Bergenfield NJ
Woah! thanks for all of your great input. I am going to try to fit my hands through that brake duct haha. Just to make sure.. May I know what type of parking lamp bulb it is and where I could get it locally? again..
Thanks.
Thanks.
Tech Contributor


Joined: Dec 2003
Posts: 19,384
Likes: 87
From: Horncastle Lincolnshire, England
2023 C5 of the Year Finalist - Unmodified
 Changing the bulbs wont fix it. The DRLs have burned the lamp housing. You need to fix the root cause.
Heres the full procedure for replacing the lamps. I'd go in through the floor for this job whereas I go in around the headlamps to change a bulb. If you get in there and find you can use sealeant all the better
Its a 4157NA bulb but a 3157NA will work.
Document ID# 655625
2002 Chevrolet Corvette
________________________________________
Park/Turn Signal/Side Marker Lamp Replacement
Removal Procedure
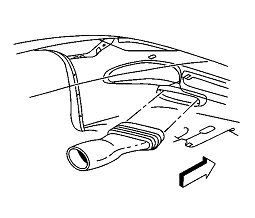
1. Raise and support the vehicle. Refer to Lifting and Jacking the Vehicle in General Information.
2. Remove the front fascia lower closeout panel.

3. Release the brake caliper cooling duct from the front fascia, and position the duct aside.
4. Remove the front turn signal lamp bracket retaining spring from the lamp bracket.
5. Remove the lamp bracket retaining spring from the front fascia.
6. Remove the front turn signal lamp bracket retaining screws.
7. Disconnect the sockets from the lamp.
8. Remove the lamp, with the bracket, from the vehicle.
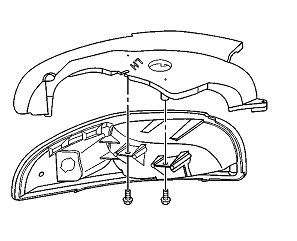
9. Remove the lamp to bracket retaining screws.
10. Remove the lamp from the bracket.
Installation Procedure
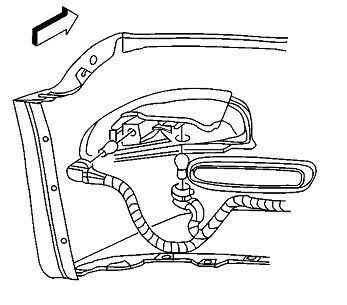
1. Install the front park/turn signal and sidemarker lamp into position on the front turn signal lamp bracket.
Notice
Use the correct fastener in the correct location. Replacement fasteners must be the correct part number for that application. Fasteners requiring replacement or fasteners requiring the use of thread locking compound or sealant are identified in the service procedure. Do not use paints, lubricants, or corrosion inhibitors on fasteners or fastener joint surfaces unless specified. These coatings affect fastener torque and joint clamping force and may damage the fastener. Use the correct tightening sequence and specifications when installing fasteners in order to avoid damage to parts and systems.
2. Install the front park/turn signal and sidemarker lamp to bracket retaining screws.
Tighten
Tighten the front park/turn signal and sidemarker lamp to bracket retaining screws to 2 N�m (18 lb in).
3. Install the sockets to the lamp.
4. Install the lamp, with the bracket, to the front fascia.
5. Align the lamp to the opening in the front fascia and hold the lamp firmly in place against the fascia, while installing the front turn signal lamp bracket retaining screws.
Tighten
Tighten the front turn signal lamp bracket retaining screws to 3 N�m (27 lb in).
6. Install the lamp bracket retaining spring to the front fascia.
7. Install the front turn signal lamp bracket retaining spring to the lamp bracket.
8. Position the brake caliper cooling duct to the front fascia and press the duct toward the fascia to secure.
9. Install the front fascia lower closeout panel. Refer to Close Out Panel - Front Bumper Fascia Lower in Bumpers.
Last edited by DeeGee; May 30, 2011 at 04:55 AM.

Racer
Joined: Oct 2010
Posts: 419
Likes: 3
From: Lexington VA
St. Jude Donor '11

Instructor

Joined: Feb 2004
Posts: 116
Likes: 0
From: Bolton Ontario
This is just a really bad design that needs to be corrected by each owner and not just keep replacing bulbs.
Go with the switchback LED's and fix the holes in the top of both corner housings. You will be shocked at the holes literally melted out of the housings. I used a small piece of aluminum sheet over the hole and then heat rated RTV sealant. Buy the LED's, hyperflash adapter and be done with this bad design by GM. They should have recalled this and I am surprised there were no fires from it. Maybe there was.....
Go with the switchback LED's and fix the holes in the top of both corner housings. You will be shocked at the holes literally melted out of the housings. I used a small piece of aluminum sheet over the hole and then heat rated RTV sealant. Buy the LED's, hyperflash adapter and be done with this bad design by GM. They should have recalled this and I am surprised there were no fires from it. Maybe there was.....
Corvette Stories
The Best of Corvette for Corvette Enthusiasts

5 Best & 5 Worst Corvette Daily Drivers
Joe Kucinski
The Headlights of Every Corvette Generation Explained
Joe Kucinski
5 Best & 5 Most Overrated Corvette Track Packages of All Time!
Joe Kucinski
Every 2027 Corvette Engine Explained
Joe Kucinski
Designer Imagines A Corvette That Looks More Like a Corvette Than the Corvette
Verdad Gallardo
10 Ugly Corvettes That We Still Kinda Love
Joe Kucinski
Top 10 Most Expensive Corvettes Ever Sold on Bring A Trailer
Brett Foote
10 Things Every Corvette Owner Needs (2026 Edition)
Michael S. Palmer
8 Most "Only Corvette Owners Understand" Quirks and Problems
Pouria Savadkouei
Thread Starter
Advanced
Joined: Apr 2011
Posts: 50
Likes: 0
From: Bergenfield NJ
SUCCESS! I have fit my hand through and changed the bulb. I found a spare light bulb in my garage it says its a 405A and it ended up working! =D so.. as of now it stays in the garage away from water till I have the time to patch up the housing.
Thank you all for great input. You have all helped me very greatly!
Thank you all for great input. You have all helped me very greatly!
Advanced

Joined: Dec 2011
Posts: 78
Likes: 56
From: Indianapolis IN
At first I just repaired the DRL damaged housing so the water from the car wash didn't leak inside the lens housing but then I figured what the heck and just ordered a set of new lenses fron Eckler's.
