


Frost King Mod
Thread Starter
Instructor


Joined: Mar 2010
Posts: 161
Likes: 14
From: Rockwall Texas
I am having my bezel re-worked to fit a double din radio. I thought while my console was out I would apply the Frost King insulation that so many people have done on here. What I cant find (and I searched) but I have to belive is on here is a step by step about taking out the carpet. I have had the seats out before and currently have the whole console off, but I would like to know how to get the carpet out. anyone know where to find that?

Tech Contributor


Joined: Dec 1999
Posts: 32,910
Likes: 2,402
From: Anthony TX
CI 6,7,8,9,11 Vet
St. Jude Donor '08
Ive the the ENTIRE inside (Front) and tunnel with frost king. Remove the seats, remove the door sill covers front and rear and the passengers section and then the drivers section will lift out on individual sections.
The frost King stuff is an easy install
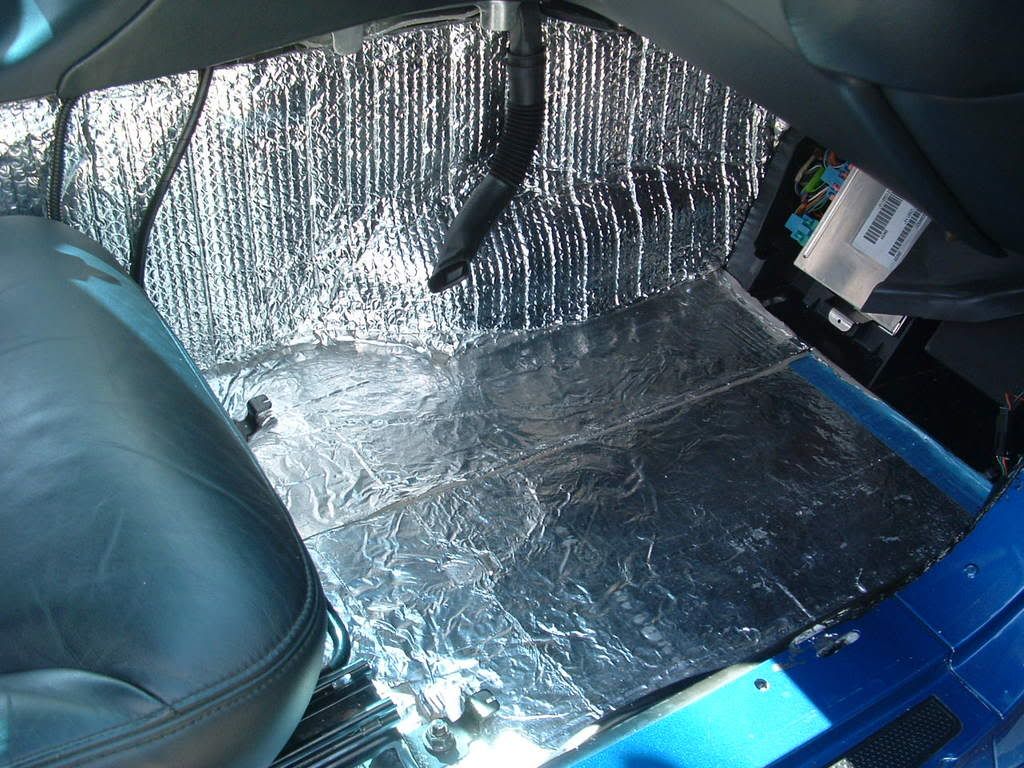
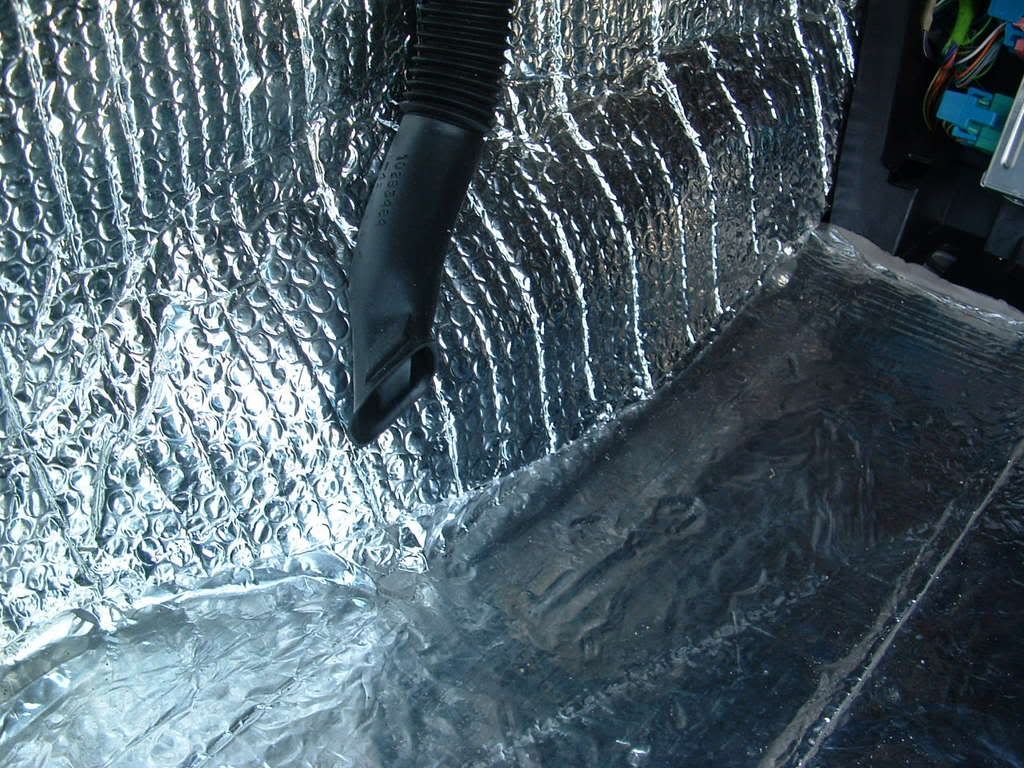
Dont to forget to add the foil covered bubbel wrap to the high heat areas and cut out all the areas where the seat buns touch the tunnel!!
In the video below,, you can see the frost king on the under side of the tunnel!
 Taken at NIGHT 21:45 in the heat of rebuilding the drive train

I also did it in my 71 Coupe!! Made a SIGNIFICANT difference!!!!
The frost King stuff is an easy install
Dont to forget to add the foil covered bubbel wrap to the high heat areas and cut out all the areas where the seat buns touch the tunnel!!
In the video below,, you can see the frost king on the under side of the tunnel!
Taken at NIGHT 21:45 in the heat of rebuilding the drive trainI also did it in my 71 Coupe!! Made a SIGNIFICANT difference!!!!
Tech Contributor
Joined: Dec 1999
Posts: 32,910
Likes: 2,402
From: Anthony TX
CI 6,7,8,9,11 Vet
St. Jude Donor '08
YES!! Its over top of the installed Frost King. I found out the HARD WAY that,, anywhere the seat bun touches the tunnel, ELIMINATE the bubble wrap in that area. Just use a raiser blade and cut it out. Move the seat fully rearward and fully forward. Anywhere the BUN touches the tunnel area, cut out the bubble wrap in that area. The remaining frost king under the bubble wrap will be fine.
Burning Brakes


Joined: Aug 2010
Posts: 930
Likes: 13
From: Aiken SC
YES!! Its over top of the installed Frost King. I found out the HARD WAY that,, anywhere the seat bun touches the tunnel, ELIMINATE the bubble wrap in that area. Just use a raiser blade and cut it out. Move the seat fully rearward and fully forward. Anywhere the BUN touches the tunnel area, cut out the bubble wrap in that area. The remaining frost king under the bubble wrap will be fine.
Mr. Curlee.....which frost king do I use? thickness, adhesive/non adhesive, etc. What is the purpose of the bubble on high areas & if you have to cut out the bubble at the seat buns, why even put it there? Also on the console, will this make the console sit higher and will the bezel fit as it should originally? I have mine out for a double din also. Just curious before I get started. Please overlook stupid questions.
Thanks,
tracer1
Safety Car


Joined: Dec 2010
Posts: 3,938
Likes: 498
From: Fords, NJ
Mr. Curlee.....which frost king do I use? thickness, adhesive/non adhesive, etc. What is the purpose of the bubble on high areas & if you have to cut out the bubble at the seat buns, why even put it there? Also on the console, will this make the console sit higher and will the bezel fit as it should originally? I have mine out for a double din also. Just curious before I get started. Please overlook stupid questions.
Thanks,
tracer1
Thanks,
tracer1
http://www.frostking.com/Lowes/FoamF...Insulation.htm
Reflectix
http://www.google.com/products/catal...ed=0CH8Q8wIwCg
Both types can be purchased at Home Depot, Lowe's, Ace Hardware
The addition of the bubble wrap stuff just adds additional insulating property's . The reason for not stopping with the bubble stuff before the seat is because you want the full benefit of of the insulation. If you have taken a long ride in your car on a hot summer day,even with the AC on that tunnel gets HOT.
The more you have covering the tunnel the better.
You should have no problem putting anything back together because both the foam and bubble insulation will compress.
I was skeptical as well until i did my interior. I'm now a firm believer in doing this to ANY Vette interior !
Last edited by SG Lou; Nov 6, 2011 at 08:28 AM.
Burning Brakes
Joined: Aug 2010
Posts: 930
Likes: 13
From: Aiken SC
Thanks SG Lou for the info. Need to do mine. The console gets hot enough to warm a can of soup on it. I already have a roll of frostking, do you know how many rolls it will take to do the job also of the bubble wrap?
Thanks,
tracer1
Thanks,
tracer1
Corvette Stories
The Best of Corvette for Corvette Enthusiasts

Every 2027 Corvette Engine Explained
Joe Kucinski
Designer Imagines A Corvette That Looks More Like a Corvette Than the Corvette
Verdad Gallardo
10 Ugly Corvettes That We Still Kinda Love
Joe Kucinski
Top 10 Most Expensive Corvettes Ever Sold on Bring A Trailer
Brett Foote
10 Things Every Corvette Owner Needs (2026 Edition)
Michael S. Palmer
8 Most "Only Corvette Owners Understand" Quirks and Problems
Pouria Savadkouei
10 Reasons the C6 Z06 is Still A Performance Benchmark After 20 Years
Joe Kucinski
How Much Horsepower Every Corvette Engine "LOST" in 1972
Joe Kucinski
Top 10 DOs and DON'Ts for Protecting Your Convertible Top!
Michael S. Palmer
Tech Contributor
Joined: Dec 1999
Posts: 32,910
Likes: 2,402
From: Anthony TX
CI 6,7,8,9,11 Vet
St. Jude Donor '08
Thanks Lou
When I put the Reflectix on the complete tunnel,, Over top the Frost King, The seat buns rubbed too hard on the carpet. To elevate that issue,, I moved the seats thru out there complete range of motion and marked it with blue painters tape. I removed ONLY the Reflectix from the areas where the seat bun touched the Reflectix.. Rubbing problem SOLVED!!!!
EVERYTHING else on the tunnel is covered with Frost king and Reflectix. The second layer of Reflectix makes a HEAT TRANSFER reduction.. NO DOUBT ABOUT IT!
The small area that you remove for the seat bun contact area shouldn't matter.
The Frost King has an adhesive backing. Its a NON PERMANENT Adhesive and the stuff can be removed after its installed if desired or necessary.
If the addition of the frost King and Reflectix didn't work and didn't make a difference, I wouldn't recommend it. Hell, my wife even complemented how it performed without me asking for input.
I AGREE!! I have zero console alignment issues and I covered everything!! You can cut out the areas where the console actually mounts. All the other pinch points will just compress the stuff down to very little thickness.
BC
When I put the Reflectix on the complete tunnel,, Over top the Frost King, The seat buns rubbed too hard on the carpet. To elevate that issue,, I moved the seats thru out there complete range of motion and marked it with blue painters tape. I removed ONLY the Reflectix from the areas where the seat bun touched the Reflectix.. Rubbing problem SOLVED!!!!
EVERYTHING else on the tunnel is covered with Frost king and Reflectix. The second layer of Reflectix makes a HEAT TRANSFER reduction.. NO DOUBT ABOUT IT!
The small area that you remove for the seat bun contact area shouldn't matter.
The Frost King has an adhesive backing. Its a NON PERMANENT Adhesive and the stuff can be removed after its installed if desired or necessary.
If the addition of the frost King and Reflectix didn't work and didn't make a difference, I wouldn't recommend it. Hell, my wife even complemented how it performed without me asking for input.
I AGREE!!
I have zero console alignment issues and I covered everything!! You can cut out the areas where the console actually mounts. All the other pinch points will just compress the stuff down to very little thickness.BC
Last edited by Bill Curlee; Nov 6, 2011 at 10:04 AM.
Safety Car
Joined: Dec 2010
Posts: 3,938
Likes: 498
From: Fords, NJ
I had an issue with every piece of rug in my car. The dealer did an excellent job at masking the scent of cigar smoke. Seems like this 60 some year old previous owner loved to smoke cigars in his car. So I pulled EVERY THING out of my car to clean it. I also had an issue with a small water leak to fix. So while the interior was gutted I covered just about everything with the Frost King.
Last edited by SG Lou; Nov 6, 2011 at 10:46 AM.
Safety Car
Joined: Dec 2010
Posts: 3,938
Likes: 498
From: Fords, NJ
Thanks Lou
When I put the Reflectix on the complete tunnel,, Over top the Frost King, The seat buns rubbed too hard on the carpet. To elevate that issue,, I moved the seats thru out there complete range of motion and marked it with blue painters tape. I removed ONLY the Reflectix from the areas where the seat bun touched the Reflectix.. Rubbing problem SOLVED!!!!
EVERYTHING else on the tunnel is covered with Frost king and Reflectix. The second layer of Reflectix makes a HEAT TRANSFER reduction.. NO DOUBT ABOUT IT!
The small area that you remove for the seat bun contact area shouldn't matter.
The Frost King has an adhesive backing. Its a NON PERMANENT Adhesive and the stuff can be removed after its installed if desired or necessary.
If the addition of the frost King and Reflectix didn't work and didn't make a difference, I wouldn't recommend it. Hell, my wife even complemented how it performed without me asking for input.
I AGREE!! I have zero console alignment issues and I covered everything!! You can cut out the areas where the console actually mounts. All the other pinch points will just compress the stuff down to very little thickness.
BC
When I put the Reflectix on the complete tunnel,, Over top the Frost King, The seat buns rubbed too hard on the carpet. To elevate that issue,, I moved the seats thru out there complete range of motion and marked it with blue painters tape. I removed ONLY the Reflectix from the areas where the seat bun touched the Reflectix.. Rubbing problem SOLVED!!!!
EVERYTHING else on the tunnel is covered with Frost king and Reflectix. The second layer of Reflectix makes a HEAT TRANSFER reduction.. NO DOUBT ABOUT IT!
The small area that you remove for the seat bun contact area shouldn't matter.
The Frost King has an adhesive backing. Its a NON PERMANENT Adhesive and the stuff can be removed after its installed if desired or necessary.
If the addition of the frost King and Reflectix didn't work and didn't make a difference, I wouldn't recommend it. Hell, my wife even complemented how it performed without me asking for input.
I AGREE!!
I have zero console alignment issues and I covered everything!! You can cut out the areas where the console actually mounts. All the other pinch points will just compress the stuff down to very little thickness.BC

Tech Contributor
Joined: Dec 1999
Posts: 32,910
Likes: 2,402
From: Anthony TX
CI 6,7,8,9,11 Vet
St. Jude Donor '08
Every bit of amplifying info on this subject helps! Your input is appreciated and welcome!
I am not the INVENTOR of the Frost King Insulation Mod but,, like YOU,, have added significantly to its validity and performance.
Bill
Safety Car
Joined: Dec 2010
Posts: 3,938
Likes: 498
From: Fords, NJ

Tech Contributor
Joined: Dec 1999
Posts: 32,910
Likes: 2,402
From: Anthony TX
CI 6,7,8,9,11 Vet
St. Jude Donor '08
Ive been to those events!

Anybody that can KEEP their C5 in the GARAGE and apply coat after coat of ZAINO each week and only break it out for a show,,,,,,,,,,,,, HAS ISSUES!
I drive the F^$@ out of mine! When it breaks or needs body work, it gets it. If I want to intall more insulation, I install it.
My engine is HIGHLY modified and I LOVE it!
Drive that Bitch like it owes you MONEY! NO GARAGE QUEENS HERE!!!
NCRS Not for me!
Bill
Anybody that can KEEP their C5 in the GARAGE and apply coat after coat of ZAINO each week and only break it out for a show,,,,,,,
,,,,,, HAS ISSUES! I drive the F^$@ out of mine! When it breaks or needs body work, it gets it. If I want to intall more insulation, I install it.
My engine is HIGHLY modified and I LOVE it!
Drive that Bitch like it owes you MONEY! NO GARAGE QUEENS HERE!!!
NCRS
Not for me!Bill
Melting Slicks

Joined: Oct 2007
Posts: 2,798
Likes: 8
From: It's true money can't buy happiness, but it is more comfortable crying in a Corvette than on a bicyc
St. Jude Donor '13
You need six rolls, five will cover most of it but you'll need to do some creative patching
Melting Slicks
Joined: Jul 2010
Posts: 3,479
Likes: 93
From: Between Tally and Gatorville ,Florida
Done this mod,Love it. A cheap one to do,but take alittle effort. I even did the rear and the rear fender liners on my 98. Even with the B&B Bullet,it was very quite. Will be doing it to my 99 project car.
I as Bill,drive the crapp out of my babies,then put them away wet.
I as Bill,drive the crapp out of my babies,then put them away wet.
Thread Starter
Instructor
Joined: Mar 2010
Posts: 161
Likes: 14
From: Rockwall Texas
On the front:
you need a 10mm deep socket to get to the two bolts holding the pedal stop under the gas pedal and the two bolts holding the dead pedal. (I didnt have a deep 10mm so I just kind of figured it out.)
you pull the little plastic cotter pins on the base of the seat mounts then one bolt on each seat corner (I think it was 3/4). Unplug the electric seat cable and pull out the seat. This is way easier if you have the targa off.
Take the fuse cover out (passenger floor board). it just clips in like the rear compartment covers.
lastly pry up the door trim with your hand and the carpets will just lift out.
In the rear of the coupe it was way easier actually. you just pull all the clip in pannels and it basicly lifts out. two wingnuts hold in the sides with the hatch lights but no tools are necessary to remove the rear.
Sound seemed dramaticly decreased. I havent gotten it up to temp yet to test the heat, but I used the reflectix heat sheilding so I imagine it will perform perfectly. This took all afternoon, but it was super easy to do.
Last edited by BigRobDsp; Nov 7, 2011 at 11:56 AM.
