


1999 C5 Heater AC Problems - Hot and Cold

Thread Starter
Intermediate


Joined: Mar 2008
Posts: 25
Likes: 1
From: bear Niagara Falls
My daughter has 1999 C5 Corvette Coupe. She was having problems with the HVAC not switching from floor to dash and defrost. I searched on this site and found the issue re battery corrosion on the vacuum line under the battery. Checked it today and found the hose was almost broken apart in one spot. Spliced a piece of hose in and there didnt seem to be much improvement. Checked the vacuum at the junction under the passenger side panel and not much vacuum there. I jumpered a vacuum hose to another car that was idling.
Got lots of vacuum that way and the HVAC controls seem to work fine now to direct the air to the right location however still have two problems.
Where is the vacuum source for the HVAC - looks like I will need to run a new line from the manifold to the surge tank and then to the controls - I read somewhere the connection is on the rear of the intakebut can't seem to see or feel anything - can it be reached from the top of the engine or from underneath ??
There is also a problem with the right actuator - AC blows cold on the driver side but real hot on the passenger like the heater is full on. Checked codes and have BO367 and BO446 - reset them but they come back right away. Puulled fuse 27 a few times to cycle the actuators but same problem.
I dont really want to take the time to pull the dash to get to the actuator now - good winter project when you live up north. I can close the passenger side vents but there is still a lot of hot air leaking out - would there be any harm putting a valve in the heater core water supply line from the engine ? That way at least the air coming out wont be quite as hot. If you think that will work and suggestions on which hose and where to put the shutoff valve ??
Drifting


Joined: May 2010
Posts: 1,482
Likes: 2
From: Pearland, TX
The big nipple is for the brake booster and the small one is for hte HVAC line. From what I hear, it's barely long enough to reach so a lot of people lengthen it if they ever have to take it off. I didn't have that problem so I guess mine was lengthened already when I got the car.
Taking the dash out really isn't that bad. I think it barely took me an hour to unbolt everything and pull it out.
Thread Starter
Intermediate
Joined: Mar 2008
Posts: 25
Likes: 1
From: bear Niagara Falls
Thanks for the picture of the manifold - makes it easier when you know what you are looking for. Just one question - in the picture it looks like the large nipple for the brake booster is pointing to the passenger side - is that correct or is the picture possibly reversed ??
Thread Starter
Intermediate
Joined: Mar 2008
Posts: 25
Likes: 1
From: bear Niagara Falls
My miistake on the manifold picture - should have realized I was seeing the cylinder ports on top.
Found my vacuum problem - the check vvalve on the bottom of the vacuum tank in the passenger wheel well area was cracked and leaking - was ab\le to epoxy over the crack for a temproary fix till I can get a replacement. Fortunately I dont have to try and replace the line to the back of the intake for now.
Found my vacuum problem - the check vvalve on the bottom of the vacuum tank in the passenger wheel well area was cracked and leaking - was ab\le to epoxy over the crack for a temproary fix till I can get a replacement. Fortunately I dont have to try and replace the line to the back of the intake for now.
Drifting
Joined: May 2010
Posts: 1,482
Likes: 2
From: Pearland, TX

Tech Contributor


Joined: Dec 1999
Posts: 32,910
Likes: 2,402
From: Anthony TX
CI 6,7,8,9,11 Vet
St. Jude Donor '08
If you look at your DTCs, you will most likely find that the actuator/s are is not working. There are lots of ways for them to break but the drive gear usually splits and fails:
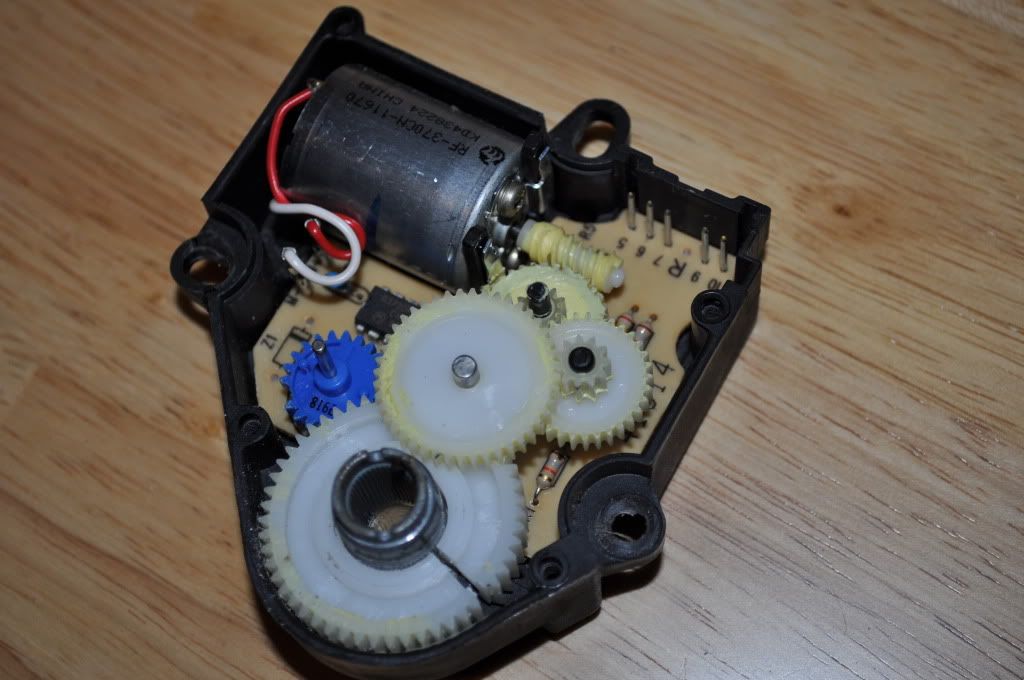
You can repair the gear if you want or just get a new actuator.
Here is how to read your DTCs from the drivers seat:
READING YOUR Engine Diagnostic Trouble Codes (DTC)
This procedure should be carried out any time you experience a problem with your C5. Most inexpensive store bought aftermarket code readers will ONLY read power train DTC�s. Reading the DTC�s with the C5 built in code reader will allow you to read ALL the modules in the vehicle.
The Diagnostic Display Mode is entered with the following procedure:
1) Turn on the ignition but don't start the engine.
2) Press the RESET button to turn off any warning messages. (i.e. door open, trunk open ect)
3) Press and hold the OPTIONS button
4) While holding OPTIONS, press FUEL button four times within a 10 -second period.
Initially, the on-board diagnostics go into an Automatic Mode which will cycle through each module and shows diagnostic codes in a pre-set sequence: PCM - TCS - RTD - BCM - IPC - RADIO - HVAC - LDCM - RDCM - SCM - RFA. All codes will be displayed for each module. ( i.e. PCM = 4 codes) If none are present in a given module, you will see No More Codes on the display.
There are two types of diagnostic codes, Current and History designated with a letter suffix, �C� or �H�. A current code indicates a malfunction is present in the module displaying data. A history code indicates a problem existed sometime in the last 40 or 50 ignition cycles. When not accompanied by a current code of the same number, it's potential evidence of a previous problem, now resolved, that was not removed by clearing the codes. More likely it's an indication of an intermittent malfunction.
Intermittent codes are the most challenging of the diagnostics. An intermittent code may have happened once, may have happened more than once but is inconsistent or may be happening on a regular basis but not at the time the codes are displayed. History codes can also be caused by a current malfunction in a system that is not operating at the time codes are displayed. An example is the rear window defogger which doesn't operate until the Body Control Module detects engine rpm. For history codes set by a module that does not operate with the key on and engine off, a special diagnostic tool called a Scan Tester is necessary to properly diagnose the malfunction.
Once the system has displayed all modules, it goes into the manual mode which allows selection of each module using combinations of Driver Information Center buttons. Manual mode can also be entered during the automatic sequence by pressing any button except E/M. Once the display shows Manual Diagnostics, select a module by pressing the OPTIONS button to go forward or the TRIP button to go back. Once a module is selected, a code is displayed, and if more than one are present; press GAGES to go forward or FUEL to go back.
To exit the diagnostic mode at any time, press E/M. If you want to erase codes in a given module, press RESET To reset the codes once in manual mode, press and hold RESET until it displays NO CODES Press OPTIONS to go to the next module. Repeat the steps until you have reset the codes in all the computer modules.
NOTE!! Only reset the codes IF you want to - it is NOT necessary to do this. Clearing a code does not repair a problem. You are simply erasing the evidence of it in the module's memory. If you clear the code/s, and extinguish the Check Engine Light, your emissions status ready will NOT allow you to pass an emissions test until you have completed the required driving cycles. There are a few body module DTC�s that if set will prevent the module from operating properly. Once the DTC is cleared, the module will return to full function. This is not true for power train DTCs.
If you have never read and cleared your codes, there will probably be a lot of old history DTCs. It is recommended that you clear your codes and see if any come back during a driving cycle. Those are the ones that you need to concentrate on diagnosing.
Once you have the codes, the next question is: What to do with the information?
First, consult the factory service manual. Any serious C5 Do-It-Yourself owner should invest in the Corvette Service Manual of the appropriate model year. The Service Manual is really a requirement if you want to understand and work on your C5.
NOTE and a WARNING. You can read the DTCs while the engine is running. I pull mine up all the time while driving.
WARNING. Don�t become distracted while reading DTCs while your driving and cause an accident!!!!! Use common sense and drive safe.
These are some very good C5 Diagnostic Trouble Code (DTC) explanation web sites!!! They also explain how to read the DTCs
Here are some very good sites that explain what DTC mean:
http://www.gearchatter.com/viewtopic11755.php
http://www.obd-codes.com/trouble_cod...d-ii-codes.php
Make sure to include the H or C suffix when you post your DTCs!!
Corvette Stories
The Best of Corvette for Corvette Enthusiasts

Every 2027 Corvette Engine Explained
Joe Kucinski
Designer Imagines A Corvette That Looks More Like a Corvette Than the Corvette
Verdad Gallardo
10 Ugly Corvettes That We Still Kinda Love
Joe Kucinski
Top 10 Most Expensive Corvettes Ever Sold on Bring A Trailer
Brett Foote
10 Things Every Corvette Owner Needs (2026 Edition)
Michael S. Palmer
8 Most "Only Corvette Owners Understand" Quirks and Problems
Pouria Savadkouei
10 Reasons the C6 Z06 is Still A Performance Benchmark After 20 Years
Joe Kucinski
How Much Horsepower Every Corvette Engine "LOST" in 1972
Joe Kucinski
Top 10 DOs and DON'Ts for Protecting Your Convertible Top!
Michael S. PalmerDrifting

Joined: Dec 2004
Posts: 1,591
Likes: 2
From: kent ct - "if i'm not in the vette, i damn well better be on the yacht."
St. Jude Donor '13
If you look at your DTCs, you will most likely find that the actuator/s are is not working. There are lots of ways for them to break but the drive gear usually splits and fails:
You can repair the gear if you want or just get a new actuator.
Here is how to read your DTCs from the drivers seat:
READING YOUR Engine Diagnostic Trouble Codes (DTC)
This procedure should be carried out any time you experience a problem with your C5. Most inexpensive store bought aftermarket code readers will ONLY read power train DTC�s. Reading the DTC�s with the C5 built in code reader will allow you to read ALL the modules in the vehicle.
The Diagnostic Display Mode is entered with the following procedure:
1) Turn on the ignition but don't start the engine.
2) Press the RESET button to turn off any warning messages. (i.e. door open, trunk open ect)
3) Press and hold the OPTIONS button
4) While holding OPTIONS, press FUEL button four times within a 10 -second period.
Initially, the on-board diagnostics go into an Automatic Mode which will cycle through each module and shows diagnostic codes in a pre-set sequence: PCM - TCS - RTD - BCM - IPC - RADIO - HVAC - LDCM - RDCM - SCM - RFA. All codes will be displayed for each module. ( i.e. PCM = 4 codes) If none are present in a given module, you will see No More Codes on the display.
There are two types of diagnostic codes, Current and History designated with a letter suffix, �C� or �H�. A current code indicates a malfunction is present in the module displaying data. A history code indicates a problem existed sometime in the last 40 or 50 ignition cycles. When not accompanied by a current code of the same number, it's potential evidence of a previous problem, now resolved, that was not removed by clearing the codes. More likely it's an indication of an intermittent malfunction.
Intermittent codes are the most challenging of the diagnostics. An intermittent code may have happened once, may have happened more than once but is inconsistent or may be happening on a regular basis but not at the time the codes are displayed. History codes can also be caused by a current malfunction in a system that is not operating at the time codes are displayed. An example is the rear window defogger which doesn't operate until the Body Control Module detects engine rpm. For history codes set by a module that does not operate with the key on and engine off, a special diagnostic tool called a Scan Tester is necessary to properly diagnose the malfunction.
Once the system has displayed all modules, it goes into the manual mode which allows selection of each module using combinations of Driver Information Center buttons. Manual mode can also be entered during the automatic sequence by pressing any button except E/M. Once the display shows Manual Diagnostics, select a module by pressing the OPTIONS button to go forward or the TRIP button to go back. Once a module is selected, a code is displayed, and if more than one are present; press GAGES to go forward or FUEL to go back.
To exit the diagnostic mode at any time, press E/M. If you want to erase codes in a given module, press RESET To reset the codes once in manual mode, press and hold RESET until it displays NO CODES Press OPTIONS to go to the next module. Repeat the steps until you have reset the codes in all the computer modules.
NOTE!! Only reset the codes IF you want to - it is NOT necessary to do this. Clearing a code does not repair a problem. You are simply erasing the evidence of it in the module's memory. If you clear the code/s, and extinguish the Check Engine Light, your emissions status ready will NOT allow you to pass an emissions test until you have completed the required driving cycles. There are a few body module DTC�s that if set will prevent the module from operating properly. Once the DTC is cleared, the module will return to full function. This is not true for power train DTCs.
If you have never read and cleared your codes, there will probably be a lot of old history DTCs. It is recommended that you clear your codes and see if any come back during a driving cycle. Those are the ones that you need to concentrate on diagnosing.
Once you have the codes, the next question is: What to do with the information?
First, consult the factory service manual. Any serious C5 Do-It-Yourself owner should invest in the Corvette Service Manual of the appropriate model year. The Service Manual is really a requirement if you want to understand and work on your C5.
NOTE and a WARNING. You can read the DTCs while the engine is running. I pull mine up all the time while driving.
WARNING. Don�t become distracted while reading DTCs while your driving and cause an accident!!!!! Use common sense and drive safe.
These are some very good C5 Diagnostic Trouble Code (DTC) explanation web sites!!! They also explain how to read the DTCs
Here are some very good sites that explain what DTC mean:
http://www.gearchatter.com/viewtopic11755.php
http://www.obd-codes.com/trouble_cod...d-ii-codes.php
Make sure to include the H or C suffix when you post your DTCs!!


Intermediate
Joined: Sep 2012
Posts: 29
Likes: 0

3rd Gear
Joined: Jul 2017
Posts: 3
Likes: 0