


Just bought an ATI
Team Owner


Joined: Sep 2001
Posts: 23,283
Likes: 906
From: Lake Elsinore, CA
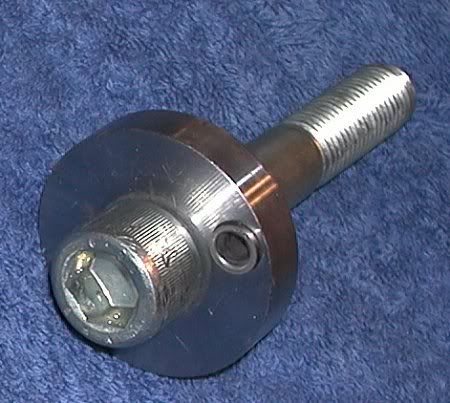
I have a pinning tool which is a metric bolt with a custom machined disc with a 1/4" drill bushing pressed in. The bushing is centered on the interface between the pulley hub ID and crank snout OD. The tool is installed, a 1/4" hole drilled and a 1/4 dowel tapped in to keep the pulley from spinning on the crank. I use two dowels 180 deg. apart to try and keep the balance as neutral as possible.

Last edited by Patches; Mar 1, 2013 at 01:48 PM.

Thread Starter
Pro

Joined: Nov 2012
Posts: 541
Likes: 0
From: Raleigh North Carolina
I forgot to ask before I bought the damn thing but should I use the steel ATI balancer or the aluminum/steel ATI balancer? I ordered the aluminum/steel one but if I have to I can just send it back for an exchange since I won't be having the car worked on until the 18th. Thanks again.
Safety Car


Joined: Jan 2012
Posts: 3,956
Likes: 520
From: Da U.P.
I have a pinning tool which is a metric bolt with a custom machined disc with a 1/4" drill bushing pressed in. The bushing is centered on the interface between the pulley hub ID and crank snout OD. The tool is installed, a 1/4" hole drilled and a 1/4 dowel tapped in to keep the pulley from spinning on the crank. I use two dowels 180 deg. apart to try and keep the balance as neutral as possible.
Team Owner
Joined: Sep 2001
Posts: 23,283
Likes: 906
From: Lake Elsinore, CA
I've seen these done on AL pullies - no difference. The drill bushing keeps you straight as along as you don't push the drill sideways. You could make an intermediate bushing inside the 1/4" bushing to create a pilot hole if you had that concern also. These types of pinning tools are usually included with supercharger kits where it's a must to pin the pulley to the crank. I believe this one is from ATI. I drew it up in AutoCAD to document it once in case I ever lost this one.
Thread Starter
Pro
Joined: Nov 2012
Posts: 541
Likes: 0
From: Raleigh North Carolina
That is friggin cool. I wonder though, how would it work on an aluminum pulley? Would the bit try to walk toward the pulley as you got farther in? I have another engine where I feel the stock keyway is inadequate and I believe now that this is the answer. Might be a good question for the OP as he's stated that he purchased the aluminum version of the ATI.
Team Owner
Joined: Sep 2001
Posts: 23,283
Likes: 906
From: Lake Elsinore, CA
I have heard of spun pullies on both FI and stock motors. Heck, the 2005 C6 had the same problem when they first released it and none of those cars were blown. C6 was a slightly different config with a friction washer between the pully hub rear face and crank shoulder.
I did it because 1) I had the tool and it's a 10 minute job and 2) better safe than sorry. I was in there anyway so what the hey. Nothing more frustrating than doing a job this involved and later regretting skipping a step that could have prevented a failure.
Most stock C5's never experience this problem but some do. Plus, I put a new pulley on there and the chances of that one slipping are probably higher than a factory-installed pulley where everything was closer to nominal and new when it was installed.
Thread Starter
Pro
Joined: Nov 2012
Posts: 541
Likes: 0
From: Raleigh North Carolina
I have heard of spun pullies on both FI and stock motors. Heck, the 2005 C6 had the same problem when they first released it and none of those cars were blown. C6 was a slightly different config with a friction washer between the pully hub rear face and crank shoulder.
I did it because 1) I had the tool and it's a 10 minute job and 2) better safe than sorry. I was in there anyway so what the hey. Nothing more frustrating than doing a job this involved and later regretting skipping a step that could have prevented a failure.
Most stock C5's never experience this problem but some do. Plus, I put a new pulley on there and the chances of that one slipping are probably higher than a factory-installed pulley where everything was closer to nominal and new when it was installed.
I did it because 1) I had the tool and it's a 10 minute job and 2) better safe than sorry. I was in there anyway so what the hey. Nothing more frustrating than doing a job this involved and later regretting skipping a step that could have prevented a failure.
Most stock C5's never experience this problem but some do. Plus, I put a new pulley on there and the chances of that one slipping are probably higher than a factory-installed pulley where everything was closer to nominal and new when it was installed.
I may take a closer look at pinning it than I did before. Any input on the aluminum/steel vs steel option?
Corvette Stories
The Best of Corvette for Corvette Enthusiasts

Top 10 Most Expensive Corvettes Ever Sold on Bring A Trailer
Brett Foote
10 Things Every Corvette Owner Needs (2026 Edition)
Michael S. Palmer
8 Most "Only Corvette Owners Understand" Quirks and Problems
Pouria Savadkouei
10 Reasons the C6 Z06 is Still A Performance Benchmark After 20 Years
Joe Kucinski
How Much Horsepower Every Corvette Engine "LOST" in 1972
Joe Kucinski
Top 10 DOs and DON'Ts for Protecting Your Convertible Top!
Michael S. Palmer
Top 10 Most Explosive Corvettes Ever Made: Power-to-Weight Ratio Ranked!
Joe Kucinski
150 hp to 1,250 hp: Every Corvette Generation Compared by the Specs That Matter
Joe Kucinski
8 Coolest Corvette Pace Cars (and Replicas) of All Time
Verdad GallardoTeam Owner
Joined: Sep 2001
Posts: 23,283
Likes: 906
From: Lake Elsinore, CA
Thread Starter
Pro
Joined: Nov 2012
Posts: 541
Likes: 0
From: Raleigh North Carolina
Safety Car


Joined: Aug 2011
Posts: 4,449
Likes: 409
From: Portland OR
I pinned mine, NA car. Just made sense to me. I used the ATI pin kit that puts a pin in the side of the crank snout instead of the end. The pin then uses the key way in the balancer.
The end method seems like it would be really hard if not impossible to re-align if you ever had to R&R the balancer.
Ron
The end method seems like it would be really hard if not impossible to re-align if you ever had to R&R the balancer.
Ron
Team Owner
Joined: Sep 2001
Posts: 23,283
Likes: 906
From: Lake Elsinore, CA
There is so little material removed, I would drill two more holes 90 deg. to the first set. The chances of me having to do this again are pretty low and a second set of holes and pins would not be a big deal - symmetry would still be maintained for balance. Curious, how would you line up a new HB with your setup? Is there a blind hole in the side of the snout?
Team Owner


Joined: May 2001
Posts: 87,356
Likes: 1,592
From: Western NY
There is so little material removed, I would drill two more holes 90 deg. to the first set. The chances of me having to do this again are pretty low and a second set of holes and pins would not be a big deal - symmetry would still be maintained for balance. Curious, how would you line up a new HB with your setup? Is there a blind hole in the side of the snout?
In essence, the keyslots they put on their dampers are primarily for aftermarket cranks that have provisions for keys. However, as most of us know, A&A supercharging and ATI both make "pinning kits" for use with stock cranks. ATI has two pinning fixtures. One simply places a pin location that's clocked anywhere on the end of the crank. The other requires removal of the timing cover and oil pump to place it, but then it locates on the key that drives the oil pump, and locates the damper pin in line with this key. The advantage is that you can remove the oil pump without having to remove the pin.
Safety Car
Joined: Aug 2011
Posts: 4,449
Likes: 409
From: Portland OR
It was interesting. The hole goes all the way through to the balancer bolt. The hole is reamed and the pin is an interference fit.

If I were to do it again, I'd use the kit that indexes off the cam gear key so the pin is aligned with that key. Then you could remove the cam gear w/o pushing the pin out.
Obviously, you can't use this method on a stock balancer.
Ron
If I were to do it again, I'd use the kit that indexes off the cam gear key so the pin is aligned with that key. Then you could remove the cam gear w/o pushing the pin out.
Obviously, you can't use this method on a stock balancer.
Ron
Team Owner
Joined: Sep 2001
Posts: 23,283
Likes: 906
From: Lake Elsinore, CA
Thanks for the explanation and pic. I would use the cam gear key indexing method as well for the next round - especially on a modded setup. This was a stock repair - I doubt I'll mess with again. (I hope!)
Team Owner
Joined: May 2001
Posts: 87,356
Likes: 1,592
From: Western NY
It was interesting. The hole goes all the way through to the balancer bolt. The hole is reamed and the pin is an interference fit.
If I were to do it again, I'd use the kit that indexes off the cam gear key so the pin is aligned with that key. Then you could remove the cam gear w/o pushing the pin out.
Obviously, you can't use this method on a stock balancer.
Ron
If I were to do it again, I'd use the kit that indexes off the cam gear key so the pin is aligned with that key. Then you could remove the cam gear w/o pushing the pin out.
Obviously, you can't use this method on a stock balancer.
Ron
My reasoning would be to put the pin where you could still get the oil pump and/or crank gear off w/o removing the pin, but being able to do the job, w/o having to pull the front of the engine apart.
Safety Car
Joined: Aug 2011
Posts: 4,449
Likes: 409
From: Portland OR
Boy, I don't know. Would be real difficult with the cover on and the oil pump on. Maybe. Butyou would have to figure out a way to precisley align the fixture with the key. I wasn't thinking when I did mine (I had everything apart) and the description for the ATI tool for use with a distributor was confusing. Didn't even dawn on me to align the two until I had the pin in and went to put the crank gear on....oops!
Fortunately, you just knock the pin on through and put it back in.
Fortunately, you just knock the pin on through and put it back in.
Last edited by RonSSNova; Mar 2, 2013 at 06:43 PM.