

Airbag sensor location

Racer


Joined: Nov 2007
Posts: 318
Likes: 3
From: kuwait
u mean the clock spring? its under the steering wheel u have to disconn the +bat term
and remove the air ban fuse pass footwell if am not mistaken its nr 16 .. then u need some spcial tool to revove the airbag and the steering wheel
and remove the air ban fuse pass footwell if am not mistaken its nr 16 .. then u need some spcial tool to revove the airbag and the steering wheel
Team Owner


Joined: May 2001
Posts: 36,836
Likes: 244
From: Dear Karma, I have a list of people you missed.
St. Jude Donor '08-'09-'10-'11-'12-'13-'14-'15-'16
The SDM, or Sensing and Diagnostic Module, (module you're looking for) is located directly behind the ashtray. Remove the console surround trim and the HVAC module, then it's easy to access.
Here's a pic of a typical module. This particular unit is for a 2000-2004. It will have a yellow connector plugged into it. All yellow connectors in the car pertain to the airbag system.

In this pic, it is located on the lower left, next to the actual air bags themselves.
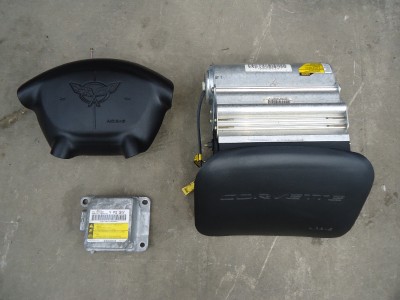
In this picture of a guy replacing a shifter, you can see it (with yellow connector) in the upper right hand portion of the picture, below the HVAC panel:

On the C5 Corvettes, there is only ONE sensor module for air bag deployment. The C6s have multiple sensors. For safety, be SURE to disconnect the battery before unplugging/plugging the yellow connector.
HTH
Here's a pic of a typical module. This particular unit is for a 2000-2004. It will have a yellow connector plugged into it. All yellow connectors in the car pertain to the airbag system.
In this pic, it is located on the lower left, next to the actual air bags themselves.
In this picture of a guy replacing a shifter, you can see it (with yellow connector) in the upper right hand portion of the picture, below the HVAC panel:
On the C5 Corvettes, there is only ONE sensor module for air bag deployment. The C6s have multiple sensors. For safety, be SURE to disconnect the battery before unplugging/plugging the yellow connector.
HTH

Thread Starter
Drifting


Joined: Jan 2010
Posts: 1,624
Likes: 48
From: Saudi Arabia
Thanks guys, the concern is. I have a friend with a '99 C5 had a small crash and the airbags went off.
Airbag indication lamp is on now. What can he do in order to bring everything back to normal regarding the airbags ?
Airbag indication lamp is on now. What can he do in order to bring everything back to normal regarding the airbags ?

Tech Contributor


Joined: Dec 1999
Posts: 32,910
Likes: 2,402
From: Anthony TX
CI 6,7,8,9,11 Vet
St. Jude Donor '08
Well,,,,,,,,,,,,, You have to replace the deployed air bags. Heres the after the accident Air Bag write up:
Document ID# 523439
1999 Chevrolet/Geo Corvette
--------------------------------------------------------------------------------
Repairs and Inspections Required After a Collision
Accident With or Without Air Bag Deployment -- Component Inspections
CAUTION
Proper operation of the Supplemental Inflatable Restraint (SIR) sensing system requires that any repairs to the vehicle structure return the vehicle structure to the original production configuration. Not properly repairing the vehicle structure could cause non-deployment of the air bag(s) in a frontal collision or deployment of the air bag(s) for conditions less severe than intended.
After any collision, inspect the following components as indicated. If you detect any damage, replace the component. If you detect any damage to the mounting points or mounting hardware, repair the component or replace the hardware as needed.
Steering column -- Perform the steering column accident damage checking procedures. Refer to Steering Column Accident Damage Inspection - Off Vehicle in Steering Wheel and Column - Tilt.
IP Knee Bolsters -- Inspect the knee bolsters for bending, twisting, buckling, or any other type of damage.
IP brackets, braces, etc. -- Inspect for bending, twisting, buckling, or any other type of damage.
Seat Belts -- Perform the seat belt operational and functional checks. Refer to Operational and Functional Checks in Seat Belts.
Accident With Air Bag Deployment -- Component Replacement and Inspections
After a collision involving air bag deployment, replace the following components. If you detect any damage to the mounting points or mounting hardware, repair or replace the mounting points and mounting hardware as needed.
Inflatable restraint IP (inflator) module
Inflatable restraint steering wheel (inflator) module
Inflatable restraint sensing and diagnostic module (SDM)
After a collision involving air bag deployment, inspect the Inflatable restraint steering wheel module coil and the coil wiring pigtail for melting, scorching, or other damage due to excessive heat. Perform this component inspection in addition to the inspections indicated above in Accident With or Without Air Bag Deployment. If you detect any damage, replace the component. If you detect any damage to the mounting points or mounting hardware, repair the component or replace the hardware as needed.
Sensor Replacement Guidelines
The SIR sensor replacement policy requires replacing sensors in the area of accident damage. The area of accident damage is defined as the portion of the vehicle which is crushed, bent, or damaged due to a collision. For example, a moderate collision where the front of the vehicle impacts a tree. If the vehicle has a SIR sensor mounted forward of the radiator, it must be replaced.
Replace the sensor whether or not the air bags have deployed.
Replace the sensor even if it appears to be undamaged.
Sensor damage which is not visible, such as slight bending of the mounting bracket or cuts in the wire insulation, can cause improper operation of the SIR sensing system. Do not try to determine whether the sensor is undamaged, replace the sensor. Also, if you follow a Diagnostic Trouble Code (DTC) table and a malfunctioning sensor is indicated, replace the sensor.
--------------------------------------------------------------------------------
Document ID# 523439
1999 Chevrolet/Geo Corvette
Document ID# 231782
1999 Chevrolet/Geo Corvette
--------------------------------------------------------------------------------
SIR System Operation
Restraint Devices
The Supplemental Inflatable Restraint (SIR) system supplements the protection offered by the driver and front passenger seat belts (2). The SIR system deploys an air bag (1) from the center of the steering wheel and from the right side of the instrument panel.
The knee bolsters (3) and the steering column absorb crash energy. The driver and passenger knee bolsters are below the instrument panel.
A frontal crash of sufficient force up to 30 degrees off the centerline of the vehicle will deploy the air bags.
System Description
The SIR system consists of the following components:
Inflatable Restraint Sensing and Diagnostic Module (SDM)
Inflatable Restraint Steering Wheel Module
Inflatable Restraint Steering Wheel Module Coil
Inflatable Restraint IP Module
AIR BAG warning lamp in the instrument cluster
The inflatable restraint Sensing and Diagnostic Module (SDM), inflatable restraint steering wheel module coil (SIR coil assembly), inflatable restraint steering wheel module (driver inflator module), inflatable restraint IP module (passenger inflator module), and connector wires make up the deployment loops. The function of the deployment loops is to supply current through the inflator modules, which will cause deployment of the air bags. Deployment occurs when the SDM detects vehicle velocity changes severe enough to warrant deployment.
The SDM contains a sensing device (Accelerometer) that converts vehicle velocity changes to an electrical signal. The SDM compares this electrical signal to a value stored in memory. When the generated signal exceeds the stored value, the SDM performs additional signal processing and compares the generated signals to values stored in memory. When two of the generated signals exceed the stored values, the SDM will cause current to flow through the inflator modules, deploying the air bags.
--------------------------------------------------------------------------------
Document ID# 231782
1999 Chevrolet/Geo Corvette
NEXT..... Tead and post any and ALL DTCs that you have using the DIC procedure. That will allow us to point you in the correct direction:READING YOUR Engine Diagnostic Trouble Codes (DTC)
This procedure should be carried out any time you experience a problem with your C5. Most inexpensive store bought aftermarket code readers will ONLY read power train DTC�s. Reading the DTC�s with the C5 built in code reader will allow you to read ALL the modules in the vehicle.
The Diagnostic Display Mode is entered with the following procedure:
1) Turn on the ignition but don't start the engine.
2) Press the RESET button to turn off any warning messages. (i.e. door open, trunk open ect)
3) Press and hold the OPTIONS button
4) While holding OPTIONS, press FUEL button four times within a 10 -second period.
Initially, the on-board diagnostics go into an Automatic Mode which will cycle through each module and shows diagnostic codes in a pre-set sequence: PCM - TCS - RTD - BCM - IPC - RADIO - HVAC - LDCM - RDCM - SCM - RFA. All codes will be displayed for each module. ( i.e. PCM = 4 codes) If none are present in a given module, you will see No More Codes on the display.
There are two types of diagnostic codes, Current and History designated with a letter suffix, �C� or �H�. A current code indicates a malfunction is present in the module displaying data. A history code indicates a problem existed sometime in the last 40 or 50 ignition cycles. When not accompanied by a current code of the same number, it's potential evidence of a previous problem, now resolved, that was not removed by clearing the codes. More likely it's an indication of an intermittent malfunction.
Intermittent codes are the most challenging of the diagnostics. An intermittent code may have happened once, may have happened more than once but is inconsistent or may be happening on a regular basis but not at the time the codes are displayed. History codes can also be caused by a current malfunction in a system that is not operating at the time codes are displayed. An example is the rear window defogger which doesn't operate until the Body Control Module detects engine rpm. For history codes set by a module that does not operate with the key on and engine off, a special diagnostic tool called a Scan Tester is necessary to properly diagnose the malfunction.
Once the system has displayed all modules, it goes into the manual mode which allows selection of each module using combinations of Driver Information Center buttons. Manual mode can also be entered during the automatic sequence by pressing any button except E/M. Once the display shows Manual Diagnostics, select a module by pressing the OPTIONS button to go forward or the TRIP button to go back. Once a module is selected, a code is displayed, and if more than one are present; press GAGES to go forward or FUEL to go back.
To exit the diagnostic mode at any time, press E/M. If you want to erase codes in a given module, press RESET To reset the codes once in manual mode, press and hold RESET until it displays NO CODES Press OPTIONS to go to the next module. Repeat the steps until you have reset the codes in all the computer modules.
NOTE!! Only reset the codes IF you want to - it is NOT necessary to do this. Clearing a code does not repair a problem. You are simply erasing the evidence of it in the module's memory. If you clear the code/s, and extinguish the Check Engine Light, your emissions status ready will NOT allow you to pass an emissions test until you have completed the required driving cycles. There are a few body module DTC�s that if set will prevent the module from operating properly. Once the DTC is cleared, the module will return to full function. This is not true for power train DTCs.
If you have never read and cleared your codes, there will probably be a lot of old history DTCs. It is recommended that you clear your codes and see if any come back during a driving cycle. Those are the ones that you need to concentrate on diagnosing.
Once you have the codes, the next question is: What to do with the information?
First, consult the factory service manual. Any serious C5 Do-It-Yourself owner should invest in the Corvette Service Manual of the appropriate model year. The Service Manual is really a requirement if you want to understand and work on your C5.
NOTE and a WARNING. You can read the DTCs while the engine is running. I pull mine up all the time while driving.
WARNING. Don�t become distracted while reading DTCs while your driving and cause an accident!!!!! Use common sense and drive safe.
These are some very good C5 Diagnostic Trouble Code (DTC) explanation web sites!!! They also explain how to read the DTCs
Here are some very good sites that explain what DTC mean:
http://www.gearchatter.com/viewtopic11755.php
http://www.obd-codes.com/trouble_cod...d-ii-codes.php
Make sure to include the H or C suffix when you post your DTCs!!
Document ID# 523439
1999 Chevrolet/Geo Corvette
--------------------------------------------------------------------------------
Repairs and Inspections Required After a Collision
Accident With or Without Air Bag Deployment -- Component Inspections
CAUTION
Proper operation of the Supplemental Inflatable Restraint (SIR) sensing system requires that any repairs to the vehicle structure return the vehicle structure to the original production configuration. Not properly repairing the vehicle structure could cause non-deployment of the air bag(s) in a frontal collision or deployment of the air bag(s) for conditions less severe than intended.
After any collision, inspect the following components as indicated. If you detect any damage, replace the component. If you detect any damage to the mounting points or mounting hardware, repair the component or replace the hardware as needed.
Steering column -- Perform the steering column accident damage checking procedures. Refer to Steering Column Accident Damage Inspection - Off Vehicle in Steering Wheel and Column - Tilt.
IP Knee Bolsters -- Inspect the knee bolsters for bending, twisting, buckling, or any other type of damage.
IP brackets, braces, etc. -- Inspect for bending, twisting, buckling, or any other type of damage.
Seat Belts -- Perform the seat belt operational and functional checks. Refer to Operational and Functional Checks in Seat Belts.
Accident With Air Bag Deployment -- Component Replacement and Inspections
After a collision involving air bag deployment, replace the following components. If you detect any damage to the mounting points or mounting hardware, repair or replace the mounting points and mounting hardware as needed.
Inflatable restraint IP (inflator) module
Inflatable restraint steering wheel (inflator) module
Inflatable restraint sensing and diagnostic module (SDM)
After a collision involving air bag deployment, inspect the Inflatable restraint steering wheel module coil and the coil wiring pigtail for melting, scorching, or other damage due to excessive heat. Perform this component inspection in addition to the inspections indicated above in Accident With or Without Air Bag Deployment. If you detect any damage, replace the component. If you detect any damage to the mounting points or mounting hardware, repair the component or replace the hardware as needed.
Sensor Replacement Guidelines
The SIR sensor replacement policy requires replacing sensors in the area of accident damage. The area of accident damage is defined as the portion of the vehicle which is crushed, bent, or damaged due to a collision. For example, a moderate collision where the front of the vehicle impacts a tree. If the vehicle has a SIR sensor mounted forward of the radiator, it must be replaced.
Replace the sensor whether or not the air bags have deployed.
Replace the sensor even if it appears to be undamaged.
Sensor damage which is not visible, such as slight bending of the mounting bracket or cuts in the wire insulation, can cause improper operation of the SIR sensing system. Do not try to determine whether the sensor is undamaged, replace the sensor. Also, if you follow a Diagnostic Trouble Code (DTC) table and a malfunctioning sensor is indicated, replace the sensor.
--------------------------------------------------------------------------------
Document ID# 523439
1999 Chevrolet/Geo Corvette
Document ID# 231782
1999 Chevrolet/Geo Corvette
--------------------------------------------------------------------------------
SIR System Operation
Restraint Devices
The Supplemental Inflatable Restraint (SIR) system supplements the protection offered by the driver and front passenger seat belts (2). The SIR system deploys an air bag (1) from the center of the steering wheel and from the right side of the instrument panel.
The knee bolsters (3) and the steering column absorb crash energy. The driver and passenger knee bolsters are below the instrument panel.
A frontal crash of sufficient force up to 30 degrees off the centerline of the vehicle will deploy the air bags.
System Description
The SIR system consists of the following components:
Inflatable Restraint Sensing and Diagnostic Module (SDM)
Inflatable Restraint Steering Wheel Module
Inflatable Restraint Steering Wheel Module Coil
Inflatable Restraint IP Module
AIR BAG warning lamp in the instrument cluster
The inflatable restraint Sensing and Diagnostic Module (SDM), inflatable restraint steering wheel module coil (SIR coil assembly), inflatable restraint steering wheel module (driver inflator module), inflatable restraint IP module (passenger inflator module), and connector wires make up the deployment loops. The function of the deployment loops is to supply current through the inflator modules, which will cause deployment of the air bags. Deployment occurs when the SDM detects vehicle velocity changes severe enough to warrant deployment.
The SDM contains a sensing device (Accelerometer) that converts vehicle velocity changes to an electrical signal. The SDM compares this electrical signal to a value stored in memory. When the generated signal exceeds the stored value, the SDM performs additional signal processing and compares the generated signals to values stored in memory. When two of the generated signals exceed the stored values, the SDM will cause current to flow through the inflator modules, deploying the air bags.
--------------------------------------------------------------------------------
Document ID# 231782
1999 Chevrolet/Geo Corvette
NEXT..... Tead and post any and ALL DTCs that you have using the DIC procedure. That will allow us to point you in the correct direction:READING YOUR Engine Diagnostic Trouble Codes (DTC)
This procedure should be carried out any time you experience a problem with your C5. Most inexpensive store bought aftermarket code readers will ONLY read power train DTC�s. Reading the DTC�s with the C5 built in code reader will allow you to read ALL the modules in the vehicle.
The Diagnostic Display Mode is entered with the following procedure:
1) Turn on the ignition but don't start the engine.
2) Press the RESET button to turn off any warning messages. (i.e. door open, trunk open ect)
3) Press and hold the OPTIONS button
4) While holding OPTIONS, press FUEL button four times within a 10 -second period.
Initially, the on-board diagnostics go into an Automatic Mode which will cycle through each module and shows diagnostic codes in a pre-set sequence: PCM - TCS - RTD - BCM - IPC - RADIO - HVAC - LDCM - RDCM - SCM - RFA. All codes will be displayed for each module. ( i.e. PCM = 4 codes) If none are present in a given module, you will see No More Codes on the display.
There are two types of diagnostic codes, Current and History designated with a letter suffix, �C� or �H�. A current code indicates a malfunction is present in the module displaying data. A history code indicates a problem existed sometime in the last 40 or 50 ignition cycles. When not accompanied by a current code of the same number, it's potential evidence of a previous problem, now resolved, that was not removed by clearing the codes. More likely it's an indication of an intermittent malfunction.
Intermittent codes are the most challenging of the diagnostics. An intermittent code may have happened once, may have happened more than once but is inconsistent or may be happening on a regular basis but not at the time the codes are displayed. History codes can also be caused by a current malfunction in a system that is not operating at the time codes are displayed. An example is the rear window defogger which doesn't operate until the Body Control Module detects engine rpm. For history codes set by a module that does not operate with the key on and engine off, a special diagnostic tool called a Scan Tester is necessary to properly diagnose the malfunction.
Once the system has displayed all modules, it goes into the manual mode which allows selection of each module using combinations of Driver Information Center buttons. Manual mode can also be entered during the automatic sequence by pressing any button except E/M. Once the display shows Manual Diagnostics, select a module by pressing the OPTIONS button to go forward or the TRIP button to go back. Once a module is selected, a code is displayed, and if more than one are present; press GAGES to go forward or FUEL to go back.
To exit the diagnostic mode at any time, press E/M. If you want to erase codes in a given module, press RESET To reset the codes once in manual mode, press and hold RESET until it displays NO CODES Press OPTIONS to go to the next module. Repeat the steps until you have reset the codes in all the computer modules.
NOTE!! Only reset the codes IF you want to - it is NOT necessary to do this. Clearing a code does not repair a problem. You are simply erasing the evidence of it in the module's memory. If you clear the code/s, and extinguish the Check Engine Light, your emissions status ready will NOT allow you to pass an emissions test until you have completed the required driving cycles. There are a few body module DTC�s that if set will prevent the module from operating properly. Once the DTC is cleared, the module will return to full function. This is not true for power train DTCs.
If you have never read and cleared your codes, there will probably be a lot of old history DTCs. It is recommended that you clear your codes and see if any come back during a driving cycle. Those are the ones that you need to concentrate on diagnosing.
Once you have the codes, the next question is: What to do with the information?
First, consult the factory service manual. Any serious C5 Do-It-Yourself owner should invest in the Corvette Service Manual of the appropriate model year. The Service Manual is really a requirement if you want to understand and work on your C5.
NOTE and a WARNING. You can read the DTCs while the engine is running. I pull mine up all the time while driving.
WARNING. Don�t become distracted while reading DTCs while your driving and cause an accident!!!!! Use common sense and drive safe.
These are some very good C5 Diagnostic Trouble Code (DTC) explanation web sites!!! They also explain how to read the DTCs
Here are some very good sites that explain what DTC mean:
http://www.gearchatter.com/viewtopic11755.php
http://www.obd-codes.com/trouble_cod...d-ii-codes.php
Make sure to include the H or C suffix when you post your DTCs!!


