


Fuse box issue

Thread Starter
Cruising

Joined: Sep 2012
Posts: 10
Likes: 0
The dealer says I need to replace the interior fuse box to fix my hvac problem. It's a discontinued dealer item. There are some used ones on ebay, but they gave a number of different part numbers. ...where do I find my part number to make sure it is a fit?

Acct Suspended APR 2026 by request
Joined: Dec 2010
Posts: 10,367
Likes: 1,272
2020 Corvette of the Year Finalist (performance mods)
C5 of Year Winner (performance mods) 2019
get in touch with Marc at vettenuts... I had to replace my underhood fusebox awhile back and he had exactly what I needed
Thread Starter
Cruising
Joined: Sep 2012
Posts: 10
Likes: 0
Acct Suspended APR 2026 by request
Joined: Dec 2010
Posts: 10,367
Likes: 1,272
2020 Corvette of the Year Finalist (performance mods)
C5 of Year Winner (performance mods) 2019
Corvette Stories
The Best of Corvette for Corvette Enthusiasts

5 Best & 5 Worst Corvette Daily Drivers
Joe Kucinski
The Headlights of Every Corvette Generation Explained
Joe Kucinski
5 Best & 5 Most Overrated Corvette Track Packages of All Time!
Joe Kucinski
Every 2027 Corvette Engine Explained
Joe Kucinski
Designer Imagines A Corvette That Looks More Like a Corvette Than the Corvette
Verdad Gallardo
10 Ugly Corvettes That We Still Kinda Love
Joe Kucinski
Top 10 Most Expensive Corvettes Ever Sold on Bring A Trailer
Brett Foote
10 Things Every Corvette Owner Needs (2026 Edition)
Michael S. Palmer
8 Most "Only Corvette Owners Understand" Quirks and Problems
Pouria Savadkouei
Thread Starter
Cruising
Joined: Sep 2012
Posts: 10
Likes: 0
Marc
No problem getting the fuse box in that you sent....have radio, clock, lights.......but no starter..nothing. Checked all connections etc. The climate control usually never came on until it started so still don't know if my original problem is solved. Any suggestions?
No problem getting the fuse box in that you sent....have radio, clock, lights.......but no starter..nothing. Checked all connections etc. The climate control usually never came on until it started so still don't know if my original problem is solved. Any suggestions?
Supporting Vendor


Joined: May 2010
Posts: 6,819
Likes: 235
From: Bell Buckle, TN
St. Jude Donor '11
Marc
No problem getting the fuse box in that you sent....have radio, clock, lights.......but no starter..nothing. Checked all connections etc. The climate control usually never came on until it started so still don't know if my original problem is solved. Any suggestions?
No problem getting the fuse box in that you sent....have radio, clock, lights.......but no starter..nothing. Checked all connections etc. The climate control usually never came on until it started so still don't know if my original problem is solved. Any suggestions?

Tech Contributor


Joined: Dec 1999
Posts: 32,910
Likes: 2,402
From: Anthony TX
CI 6,7,8,9,11 Vet
St. Jude Donor '08
The very first thing that you need to do is READ the Diagnostic Trouble Codes (DTCs) and list what pops up....
IF,,,,,,,,,,, There are a LOT of DTCs go ahead and CLEAR them using the reset button and then post what DTCs come back.
With that info, we can better help you fix the issue.
READING YOUR C5 Engine Diagnostic Trouble Codes (DTC)
This procedure should be carried out any time you experience a problem with your C5. Most inexpensive store bought aftermarket code readers will ONLY read power train DTC�s. Reading the DTC�s with the C5 built in code reader will allow you to read ALL the modules in the vehicle.
The Diagnostic Display Mode is entered with the following procedure:
1) Turn on the ignition but don't start the engine.
2) Press the RESET button to turn off any warning messages. (i.e. door open, trunk open ect)
3) Press and hold the OPTIONS button
4) While holding OPTIONS, press FUEL button four times within a 10 -second period.
Initially, the on-board diagnostics go into an Automatic Mode which will cycle through each module and shows diagnostic codes in a pre-set sequence: PCM - TCS - RTD - BCM - IPC - RADIO - HVAC - LDCM - RDCM - SCM - RFA. All codes will be displayed for each module. ( i.e. PCM = 4 codes) If none are present in a given module, you will see No More Codes on the display.
There are two types of diagnostic codes, Current and History designated with a letter suffix, �C� or �H�. A current code indicates a malfunction is present in the module displaying data. A history code indicates a problem existed sometime in the last 40 or 50 ignition cycles. When not accompanied by a current code of the same number, it's potential evidence of a previous problem, now resolved, that was not removed by clearing the codes. More likely it's an indication of an intermittent malfunction.
Intermittent codes are the most challenging of the diagnostics. An intermittent code may have happened once, may have happened more than once but is inconsistent or may be happening on a regular basis but not at the time the codes are displayed. History codes can also be caused by a current malfunction in a system that is not operating at the time codes are displayed. An example is the rear window defogger which doesn't operate until the Body Control Module detects engine rpm. For history codes set by a module that does not operate with the key on and engine off, a special diagnostic tool called a Scan Tester is necessary to properly diagnose the malfunction.
Once the system has displayed all modules, it goes into the manual mode which allows selection of each module using combinations of Driver Information Center buttons. Manual mode can also be entered during the automatic sequence by pressing any button except E/M. Once the display shows Manual Diagnostics, select a module by pressing the OPTIONS button to go forward or the TRIP button to go back. Once a module is selected, a code is displayed, and if more than one are present; press GAGES to go forward or FUEL to go back.
To exit the diagnostic mode at any time, press E/M. If you want to erase codes in a given module, press RESET To reset the codes once in manual mode, press and hold RESET until it displays NO CODES Press OPTIONS to go to the next module. Repeat the steps until you have reset the codes in all the computer modules.
NOTE!! Only reset the codes IF you want to - it is NOT necessary to do this. Clearing a code does not repair a problem. You are simply erasing the evidence of it in the module's memory. If you clear the code/s, and extinguish the Check Engine Light, your emissions status ready will NOT allow you to pass an emissions test until you have completed the required driving cycles. There are a few body module DTC�s that if set will prevent the module from operating properly. Once the DTC is cleared, the module will return to full function. This is not true for power train DTCs.
If you have never read and cleared your codes, there will probably be a lot of old history DTCs. It is recommended that you clear your codes and see if any come back during a driving cycle. Those are the ones that you need to concentrate on diagnosing.
Once you have the codes, the next question is: What to do with the information?
First, consult the factory service manual. Any serious C5 Do-It-Yourself owner should invest in the Corvette Service Manual of the appropriate model year. The Service Manual is really a requirement if you want to understand and work on your C5.
NOTE and a WARNING. You can read the DTCs while the engine is running. I pull mine up all the time while driving.
WARNING. Don�t become distracted while reading DTCs while your driving and cause an accident!!!!! Use common sense and drive safe.
These are some very good C5 Diagnostic Trouble Code (DTC) explanation web sites!!! They also explain how to read the DTCs
Here are some very good sites that explain what DTC mean:
http://www.gearchatter.com/viewtopic11755.php
http://www.obd-codes.com/trouble_cod...d-ii-codes.php
Make sure to include the H or C suffix when you post your DTCs!!
NOTE!!! Start the car and let it idle. Then take it for a drive and cause the problem to occur. When you return home pull the codes BEFORE you shut off the engine.
Do NOT discount the codes with the H following them. They can provide an audit trail for issues going on with the car. They ARE important in diagnosing problems.
Post ALL the codes that you pull with the engine running..........
Some codes go away WITHOUT setting an H code when you shut the engine off. I suspect you will have several codes that will show C or HC that do NOT show when the engine is turned off.
Thread Starter
Cruising
Joined: Sep 2012
Posts: 10
Likes: 0
I reset all codes yesterday after installing fuse box, only code ....QC114111 appeared. Went back to procedure and then diagnostics came up and no codes for any of them except HVAC NO COM. and. A6-SCM NO COM
Tech Contributor
Joined: Dec 1999
Posts: 32,910
Likes: 2,402
From: Anthony TX
CI 6,7,8,9,11 Vet
St. Jude Donor '08
LETS TRY SOMETHING:
In the passengers foot well under the toe board. Is the FUSE BOX and the BCM. On the fire wall above the BCM are one or two relays. Find the relay with FOUR WIRES. Yellow, Yellow/black stripe, RED and PURPLE.
Remove that relay.
Put the car in PARK or N with the wheels CHOCKED and E brake ON!
WARNING! If the car is not out of gear it could drive off on its OWN if you follow the procedure below! MAKE SURE THE TRANSMISSION is out of gear!
Turn the ignition key to ON/RUN! Obtain a small jumper wire and jumper the relay socket terminals that contain the PURPLE & RED wires. The starter should CRANK the engine and the engine should start and RUN. Remove the jumper wire when the engine is running!
See if that works. If it does, we will have a few thing for you to check. If it doesn't, we will have a few thing for you to check! :
: 

BC
In the passengers foot well under the toe board. Is the FUSE BOX and the BCM. On the fire wall above the BCM are one or two relays. Find the relay with FOUR WIRES. Yellow, Yellow/black stripe, RED and PURPLE.
Remove that relay.
Put the car in PARK or N with the wheels CHOCKED and E brake ON!
WARNING! If the car is not out of gear it could drive off on its OWN if you follow the procedure below! MAKE SURE THE TRANSMISSION is out of gear!
Turn the ignition key to ON/RUN! Obtain a small jumper wire and jumper the relay socket terminals that contain the PURPLE & RED wires. The starter should CRANK the engine and the engine should start and RUN. Remove the jumper wire when the engine is running!
See if that works. If it does, we will have a few thing for you to check. If it doesn't, we will have a few thing for you to check!
: BC
Last edited by Bill Curlee; Sep 8, 2016 at 12:39 PM.
Tech Contributor
Joined: Dec 1999
Posts: 32,910
Likes: 2,402
From: Anthony TX
CI 6,7,8,9,11 Vet
St. Jude Donor '08
Read the RED wire with a DC Volt Meter to chassis ground. It is Hot at all times and fused with a 60 AMP Fuse.
You MUST see FULL BATTERY voltage on the red wire all the time.
If you have proper power there, you most likely have a starter /solenoid problem.
Reinstall the relay.. Have an assistant HOLD the ignition switch to CRANK/START and try to start the engine.
Find a long pole and THUMP the starter a couple of times and see if it causes it to crank.
Bill
Thread Starter
Cruising
Joined: Sep 2012
Posts: 10
Likes: 0
Have no power from red connection. Checked battery connection...disconnected it for a few. After reconnecting my security light was on & blinking...which it had not been doing......so reconnected relay and tried to crank it. Now it acts like a short. When turn to start, hood light and dome go off. Hmmm?
Tech Contributor
Joined: Dec 1999
Posts: 32,910
Likes: 2,402
From: Anthony TX
CI 6,7,8,9,11 Vet
St. Jude Donor '08
Here is the schematic that you neeed to get troubleshooting.
Check fuse 52 in the I/P foot well fuse box!
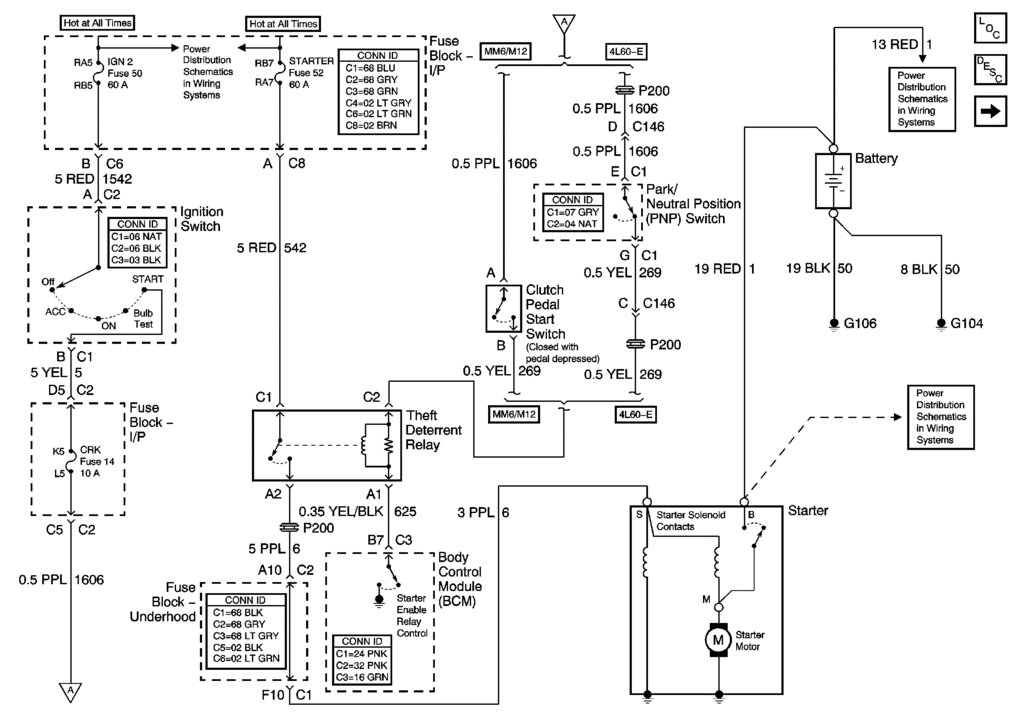
All those lights go OFF when you CRANK the engine! NORMAL
BC
Check fuse 52 in the I/P foot well fuse box!
All those lights go OFF when you CRANK the engine! NORMAL
BC

Melting Slicks


Joined: Jun 2002
Posts: 2,246
Likes: 66
From: Middletown CT
You have also verified that when the fuse box was installed that everything went back together the way it should. No loose connections, bent pins etc. Is that correct?
I'm sure Bill will get to the bottom of this, but speaking from experience, some of the toughest problems I've had to troubleshoot wound up being caused by my own missteps and failure to go back and recheck my work.
Thread Starter
Cruising
Joined: Sep 2012
Posts: 10
Likes: 0
Hi Greg,
The fuse box is the same and all plugs etc. went fine. I have tried to check and double check connections as I too realize I could have over looked something. The project got ugly quick, but hope Bill can walk me through this.
The fuse box is the same and all plugs etc. went fine. I have tried to check and double check connections as I too realize I could have over looked something. The project got ugly quick, but hope Bill can walk me through this.
You have verified that the fuse box that you received is identical to the one you removed. Is that correct?
You have also verified that when the fuse box was installed that everything went back together the way it should. No loose connections, bent pins etc. Is that correct?
I'm sure Bill will get to the bottom of this, but speaking from experience, some of the toughest problems I've had to troubleshoot wound up being caused by my own missteps and failure to go back and recheck my work.