When you click on links to various merchants on this site and make a purchase, this can result in this site earning a commission. Affiliate programs and affiliations include, but are not limited to, the eBay Partner Network.
(EDIT) I added replies to this post to document what I did to fix the headlight adjusters.
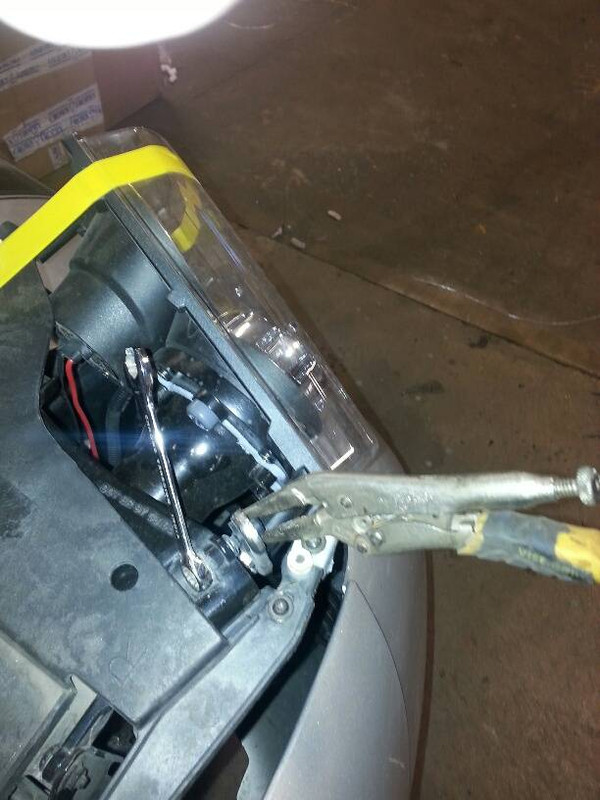
This is the LH vertical headlight adjuster bracket, which looks totally home brewed non-stock if I compare it to the few close up detailed pics out there of headlight assemblies. The rest of the bracket is good, I'm just looking for the screws for the top & bottom along with the various nuts/bushings that should be on there.
The part number stamped on the bracket is16523661.
2002 base model.
Attached is a pic I found of the RH assy, so would imagine this is what I need (but for the LHS)
Thanks. my LH vertical adjustment bracket What I think it should look like
Last edited by pewtercoupe2002; Dec 25, 2021 at 01:31 PM.
I'll split the repairs into separate replies for reference in the event this helps others. This is for the vertical aligner, which became a bit more time consuming and $$ than I thought.
Vertical Headlight Aligner
On the vertical headlight aligner, there are a few components of note. Here are the parts along with the prices I paid.
Headlight Alignment Bar Square Insert ($20 for 4) Two per headlight.
Headlight Alignment Bar Round Insert ($10 for 2) One per headlight.
Headlight Vertical Adjustment Screw **** (approx $40 each). Need one per headlight.
Vertical alignment adjuster bar. I think these go for around $10 each. Need one per headlight.
Screw which has a special round head which goes into a round insert which goes into the adjuster bar (I don't know the official name, cost or part # for this)
The first 3 for me were all broken / missing / seized. You can find them from some of the forum vendors or searching for those names.
Assembling the screw heads & inserts into the adjuster bar
Getting the inserts and screw heads into the adjuster bar were a pain. It's not an easy push fit. What I ended doing is this:
Starting with a "naked" adjuster bar, push the inserts into their respective square or round holes. It needs a fair bit of finger pressure, but goes in with a satisfying click. Make sure you push them in from the correct side!! If you do it wrong, you can get them out (gently) with some pliers and a small flat blade screwdriver and patience.
Dab a bit of grease / lube onto the ball of the screw head. (see green area on pic of screw)
Put the adjuster bar onto a solid surface, open ends of the inserts pointing up. (the closed ends of the inserts will be flat on the surface)
Borrow a hair dryer (make sure you put it back though guys!) and point it to the open side of the insert for 10-15 secs to get it nice and warm.
Position the single screw over the round insert that is now warmed up, and with a small hammer, give the other end of the screw a firm but precise hit. The round head should pop nicely into the insert with 1 or 2 hits. I tried doing this without the heat, and it just would not go in. You don't need a huge hammer for this, just a light one is fine.
For the screw in the adjustment rod assembly (the long gold colored adjuster, which is a separate part), make sure that assembly is screwed into the headlight assembly first (ask me how I know this!). You have to figure out how to hold the assembly in such a way that the adjuster screw is vertical so you can give the end of the screw a firm but direct whack, else the whole thing may slide and you end up cursing. If you have a 2nd set of hands, even better. Like in the previous step, 1 or 2 firm hits will pop the ball head into the square insert.
It's important to line up the screw to get as close as you can to a 90 degree angle of screw to the flat solid surface.
round and square inserts. The vertical adjuster bar needs one of each. dab a small bit of lube on the head of the screw
Last edited by pewtercoupe2002; Dec 25, 2021 at 01:38 PM.
The adjuster screw was seized. PB blaster did not help at all.
The mechanism was slightly wobbly, which could translate into headlight wobble. There is another thread (link) which explains the "tie wrap fix" to better secure it. Since my mechanism was toast, I went for the new part option.
This one was a bit more straightforward - I just replaced the entire assembly!
Left (or Right) Headlight Horizontal Adjustment Assy. Approx $40. Browse CF vendors or search online. The left and right are different.
The assembly that I bought had its own round insert and adjustment bar pre-installed, so did not need to fiddle with those like I did for the vertical adjuster.
It's pretty easy to replace. 3 Phillips head screws hold it on.
Lube up the screw thread and make sure you can adjust it before putting it all together.
Important note - checking the operation of the adjusters
If you hold the assembly in your hand and hand turn the adjuster star nut (1/4 inch socket works), and you see the screw turning, it's not actually doing anything but spinning in the assembly. This is not how it will work when installed into the headlight assembly. When adjusting a headlight, you should not see the screw spinning. It stays in place, only moving into, or out of the adjuster assembly. The threads of the screw go into in a fixed threaded plastic nut inside the assembly. When you turn the adjuster star nut, the gears inside the assembly rotate this plastic nut. Because the screw is not spinning but the plastic nut is, it has the effect of pushing or pulling the screw in or out. Hard to describe in words, trust me, that's how it is supposed to work.
Lube up the thread of the screw near the plastic assembly.
With pliers, gently grip the threads of the screw (either end works, whichever is most convenient).
With a 1/4 socket, gently turn the star nut either way 1/2 turn at a time, working back and forth as you go. Start with 1/2 turn then make your way up to multiple turns to minimize any chance of breaking this delicate mechanism. Dab a spot of lube on the threads as you go.
This will make adjustment a breeze when installed in the car.
Last edited by pewtercoupe2002; Dec 25, 2021 at 01:34 PM.
Here's a couple more pics of the vertical adjuster parts. It seems obvious when I look at them now, but it wasn't when I first started!
The first 2 are of the bracket where the Headlight Vertical Adjustment Screw goes. 2 Phillips head screws hold it in.
Unscrew both Phillips screws.
Gently but firmly push it out of the back of the bracket. There are some small shoulder ridges which keep it in place, so it may not simply fall out. Mine did - wear and tear / aging / front end damage.
Pop the new one back in its place. There isn't a left / right side version. It's side agnostic.
Put the 2 Phillips screws back in.
Make sure to test its operation before putting into the headlight assembly. Read the earlier comment.
The 3rd picture is of the vertical adjuster bar on the driver's side with the inserts already in place. The passenger side version is a mirror image of it. Although you can't see it from the pic, the words "TOP" are imprinted into the bar next to the round hole. Of course, when I first put the inserts in, I put them in back to front because I had no references. Also, I think I used a paint stirring stick upon which to rest the bar because the insert area is slightly higher than the middle part. Put this under the closed part of the insert before knocking the screw in. I also used a rubber grippy thing (used to clamp bits of wood together when framing for example) to keep it in place.
new adjuster screw assembled into the bracket. Do this before pushing the screw head into the adjuster insert. Vertical adjuster bar with the 2 new inserts correctly oriented.
" It seems obvious when I look at them now, but it wasn't when I first started!"
That holds true for me as well. It's the "Eureka" moment that I'm always looking for but doesn't occur as frequently as I think it should.
You can save a lot of time and hassle if you pop apart the bottom adjuster that has the ball end that goes into the plastic grommet with a large screwdriver then later pop it back together with some vice grips.
Works like a charm.