
Borla Sport Muffler Install DIY - No 56k
 06-01-2009, 09:39 AM
#41
Instructor

Member Since: Aug 2004
Location: Basingstoke England
Posts: 213
Likes: 0
Received 0 Likes
on
0 Posts

 I've got the full system with X-pipe and it only drones between 1400-1700rpm. I've got an A6 but always use paddles so it's fairly easy (but not as easy as with a manual) staying out of the drone zone. Even then it's only when on the gas - if you back off to a cruise the drone goes away.
 02-21-2010, 07:38 PM
#42


If any of you are considering doing this yourself, here is what is involved.
Some tips before we get started.
* Things will definitely move along faster if you have a helper. That said, I did this one by myself.
* I have read people recommending removing the swaybar bushing mounts and rotating the swaybar down.
I purposely DID NOT do that to find out if that's really necessary. Well, it isn't but I'll tell you right now - its a TIGHT fit getting the OEM mufflers out of there. If you don't have enough clearance (as in the car isn't up high enough) chances are you can't do it this way and you may indeed have to rotate the swaybar. For me having the swaybar in place actually helped in the install process...more on that later.
* Also, some have suggested that removal of the midpipe may not be necessary if all you are doing is the rear muffler. I don't see how that is possible - but I'll admit my install wasn't typical...read on.
First thing - get it up in the air.
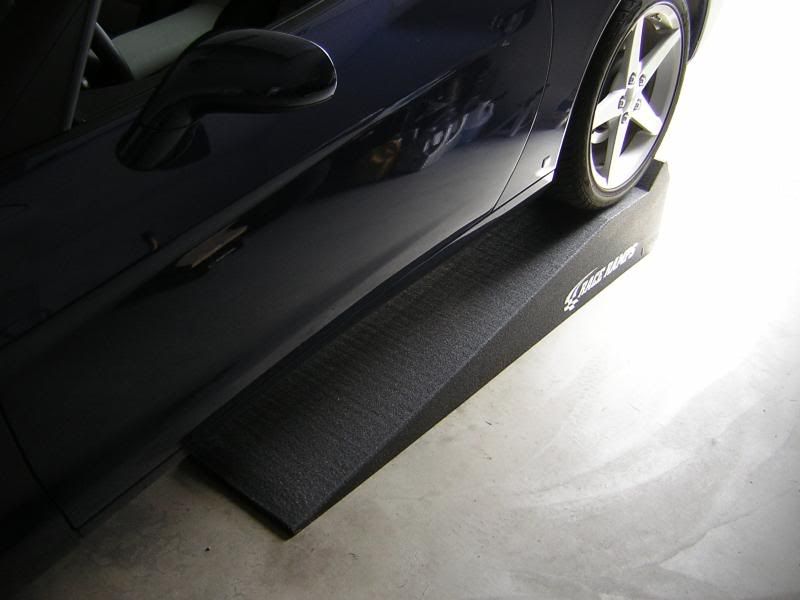
The rear was easy - a set of Race Ramps XTs get's it lifted 10".
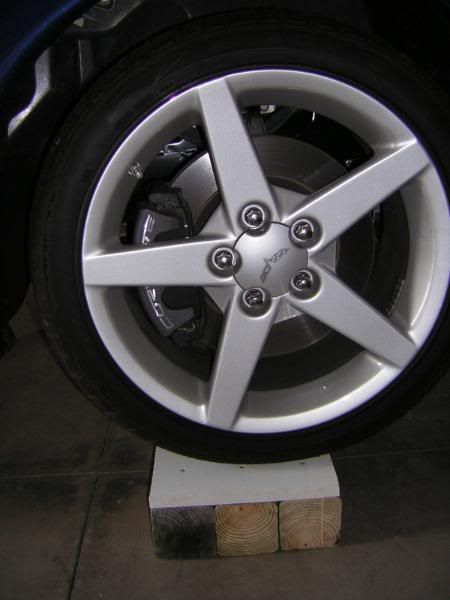
For the front I made 2 bases out of some 4x4's and a board - total height was about 4".
No, I did not drive the car up there
Once the rear was on the ramps I jacked the front up and slid the bases under the tires.
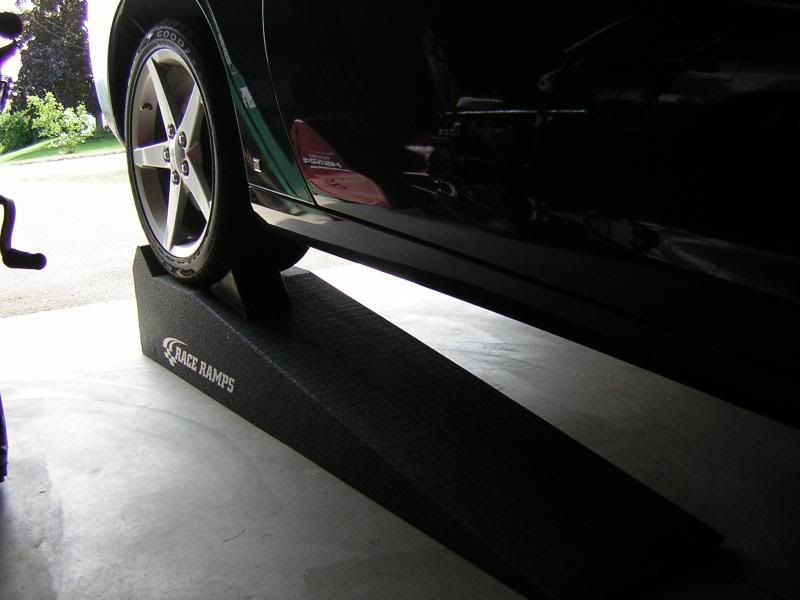
This combination worked out great - I could easily roll under most of the car with the creeper. Note the wheel chocks on the rear wheel.
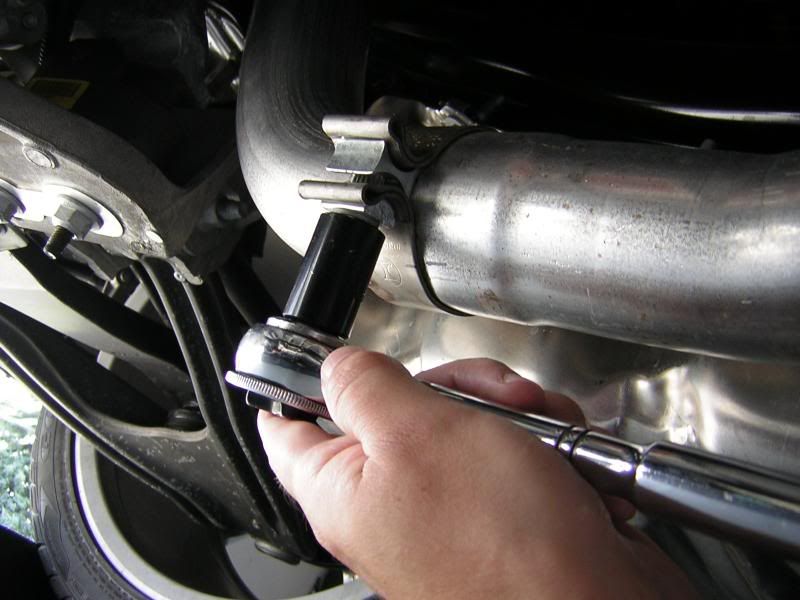
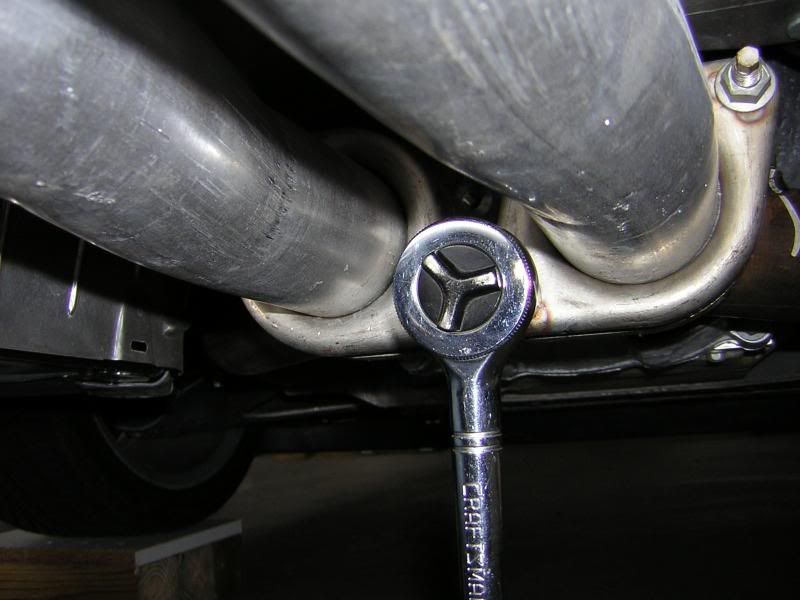
Remove the mid-pipe. Do this by loosening the rear clamps that hold the mid-pipe to the over-the-axle pipes. The clamps are welded on so there's no chance of loosing them.
Next, remove the nuts from the springs that hold the mid-pipe. Pop the studs out of the bracket so they don't hang it up later.
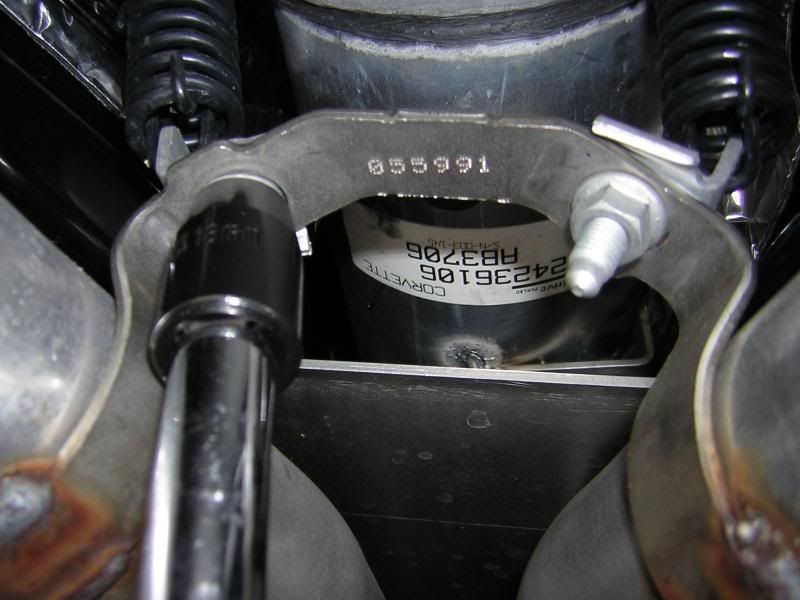
And finally, remove the nuts that hold the mid-pipe to the converter up front. Once removed, simply slide the collars back to clear the studs.
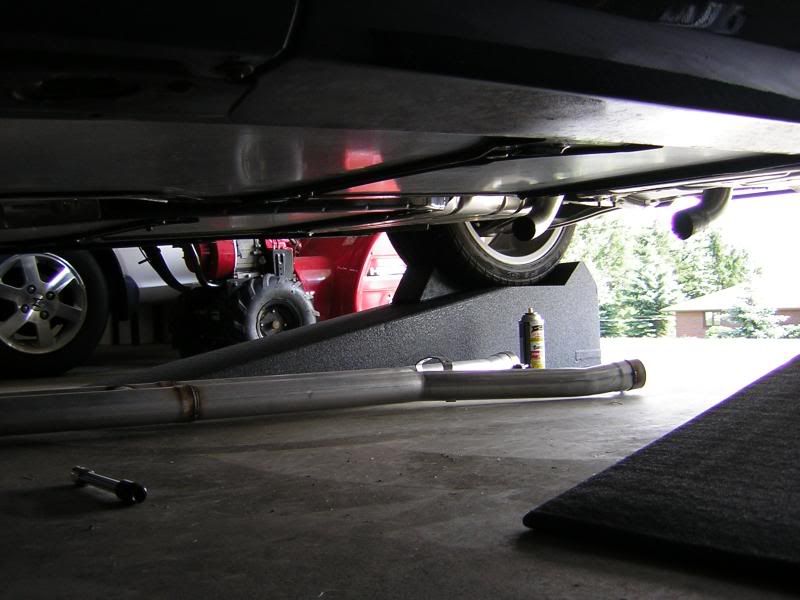
Pull back on the mid-pipe and clear the exhaust doughnuts up front and it should just drop down. Separating it from the over-the-axle pipes should only require you to slightly rock the pipe up and down / side to side while pulling forward and it should separate.
For me the passengers side pipe came out easily, the driver's side had a different idea. After much persuasion + a liberal spray of PB Blaster it reluctantly gave up it's ground very slowly.
It's out of there!
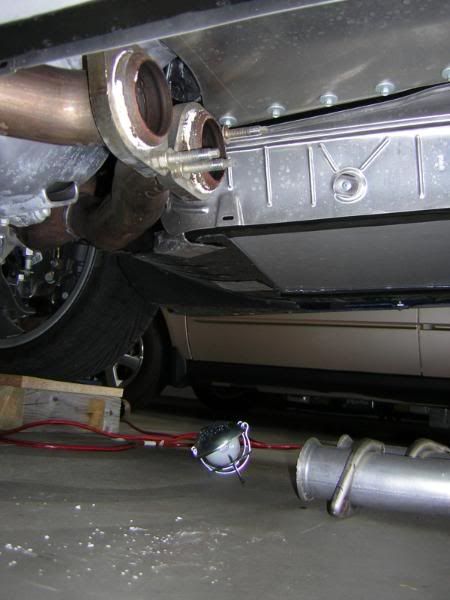
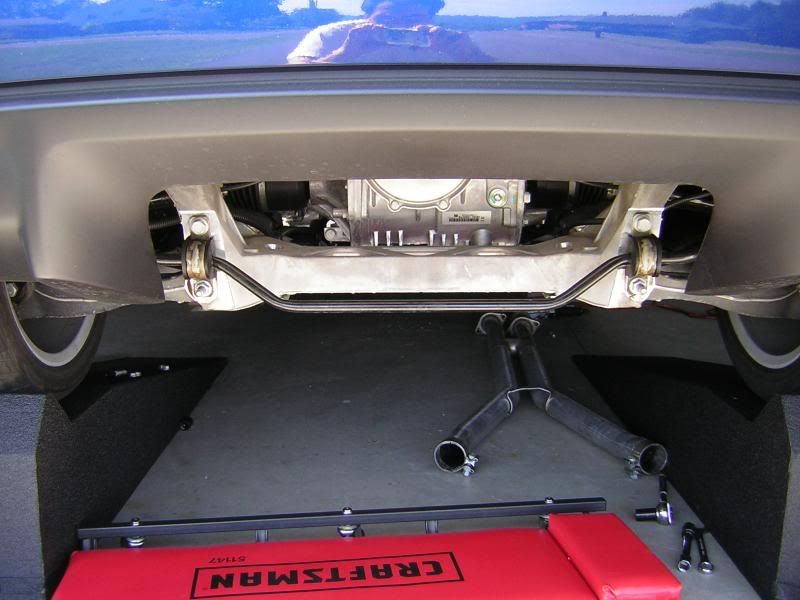
Mufflers awaiting extraction.
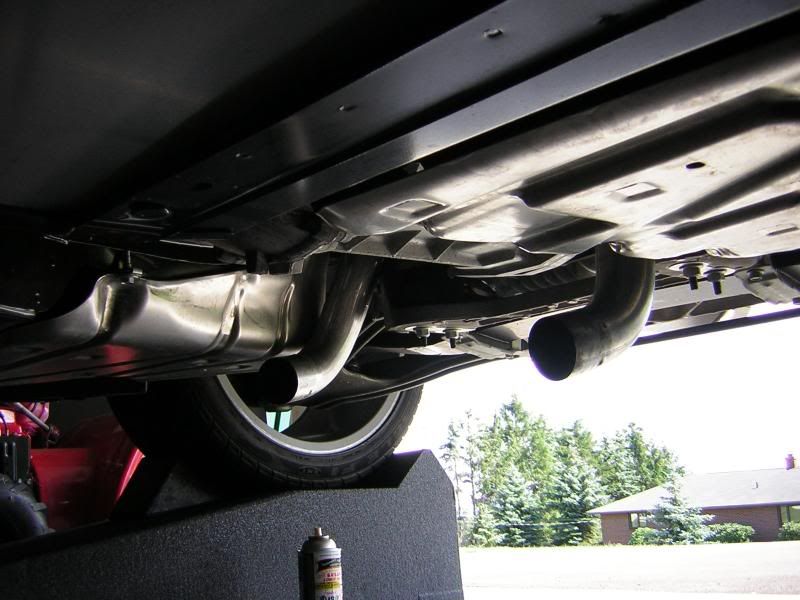
The only thing holding the mufflers in place now are the 'fingers' that engage in the rubber isolators in the back. To make things easier spray some lubricant on the nubs before trying to push them out. Once that's done just slide the fingers out, tilt the muffler down and pull it out.
One down....
Two Down. Looks better back there without the mufflers!
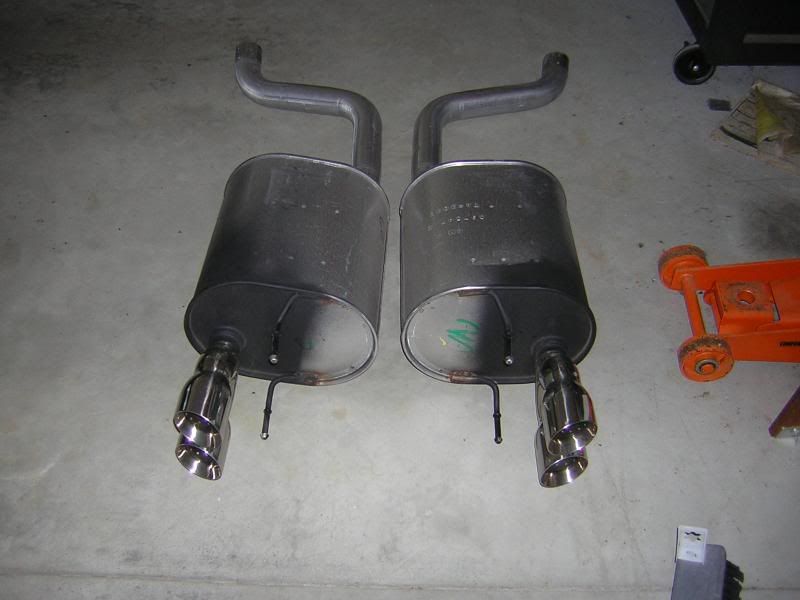
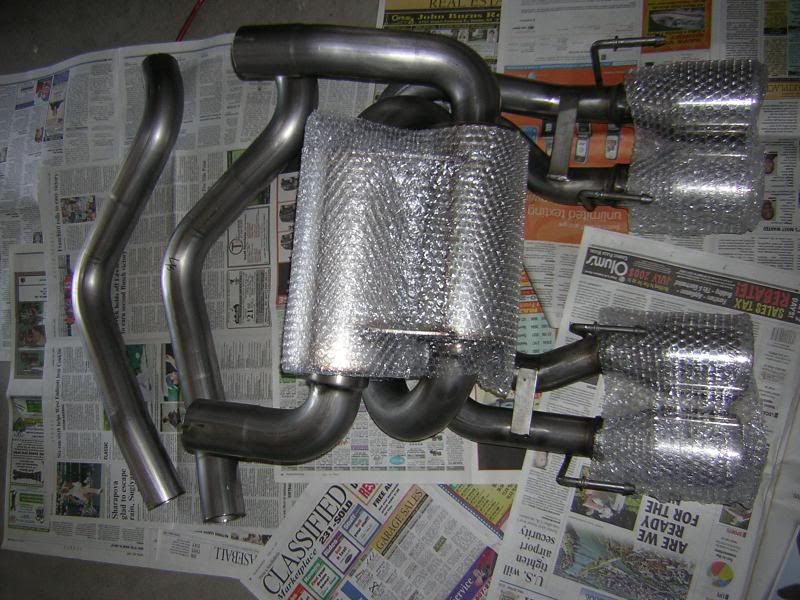
The new guy reporting for duty.
Remember when we lubed the rubber isolators to get the mufflers out? Well we are going to do the same to greatly aide getting this unit in.
I didn't want to get lube all over the place so I just sprayed some on a Q-Tip and used it to lube the isolators.
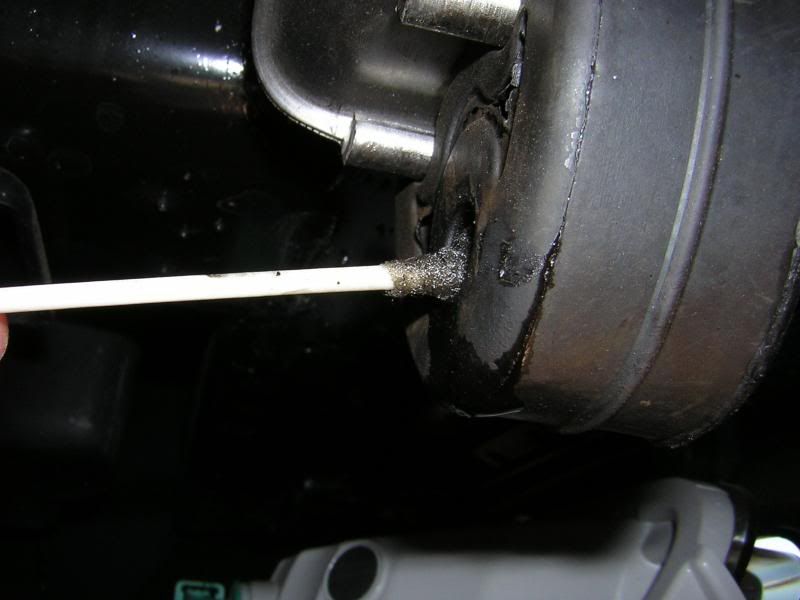
Don't forget to lube the nubs too.
Slide a clamp onto each inlet and then lift the muffler up and pop the nubs into each isolator.
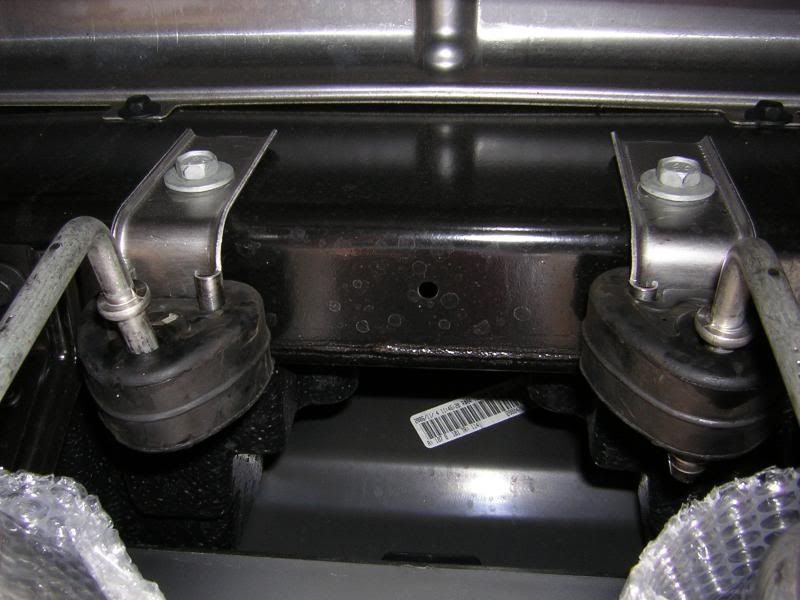
In the beginning of this write-up I said that having the swaybar in place proved helpful for me - here's why.
The rear base of the muffler is now being supported by the swaybar (see picture). If the swaybar wasn't there I'm not sure what would hold it in place. I believe Borla's instructions state to install the over-the-axle pipes before mounting the muffler in place, maybe they would hold it but I didn't want to do that since it seemed I would also have to wrestle threading those pipes into place while mounting the muffler.
So far so good.
Slide the over-the-axle pipes onto the muffler (note they are marked LH / RH). When done it should look something like this.
Here's where things took a bit of a twist for me. When I tried to reinstall the mid-pipe it simply would not slide onto the drivers side over-the-axle pipe. I measured both with a caliper and it seemed that the Borla pipe was a bit oval in 1 axis the mid-pipe was a bit oval in the opposite axis.
I had to use a pipe expander to reshape the mid-pipe, after which the 2 pipes hesitantly fit together. I don't ever remember anyone mentioning this - so that's why I say this was not a typical install. Perhaps people that do this a lot take this sort of stuff for granted.
Once you have the over-the-axle and mid-pipe together loosely connect the mid-pipe up front - do not tighten anything at this time.
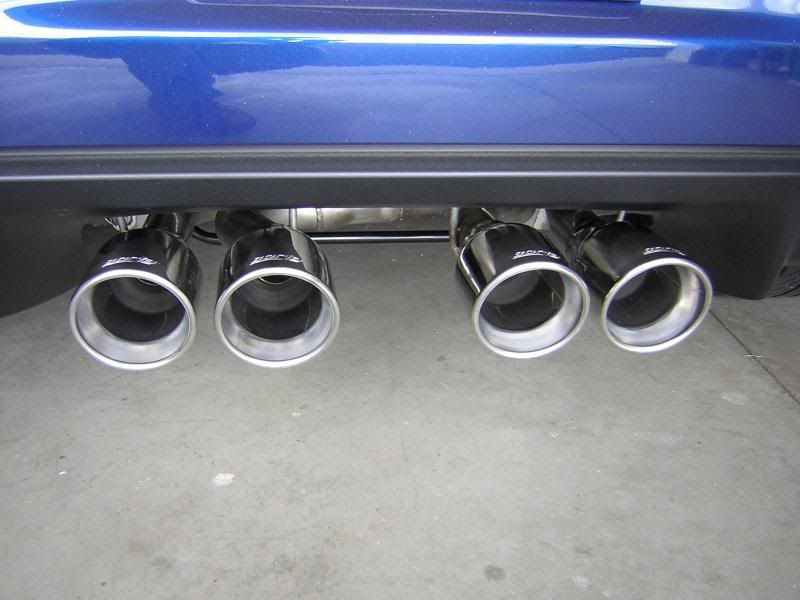
Look at how the exhaust tips align out back, also look at how the over-the-axle pipes are routed. Make sure everything is aligned and that nothing is touching the body/frame/axle/wires or anything else. While the pipes are loose make any adjustments that are necessary.
I found that as I was fitting the mid-pipe up front things out back shifted left to the point where 1 pipe was actually touching a heat shield. It took a while to get the alignment and clearance right.
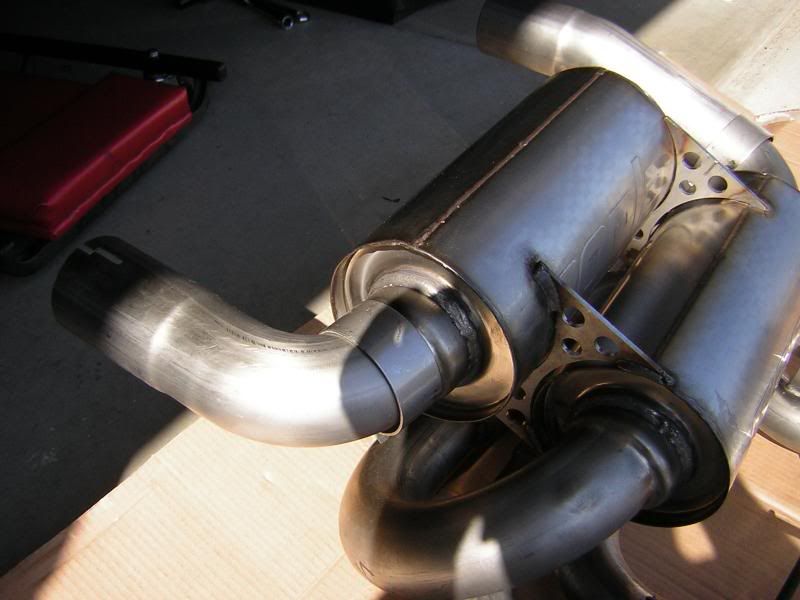
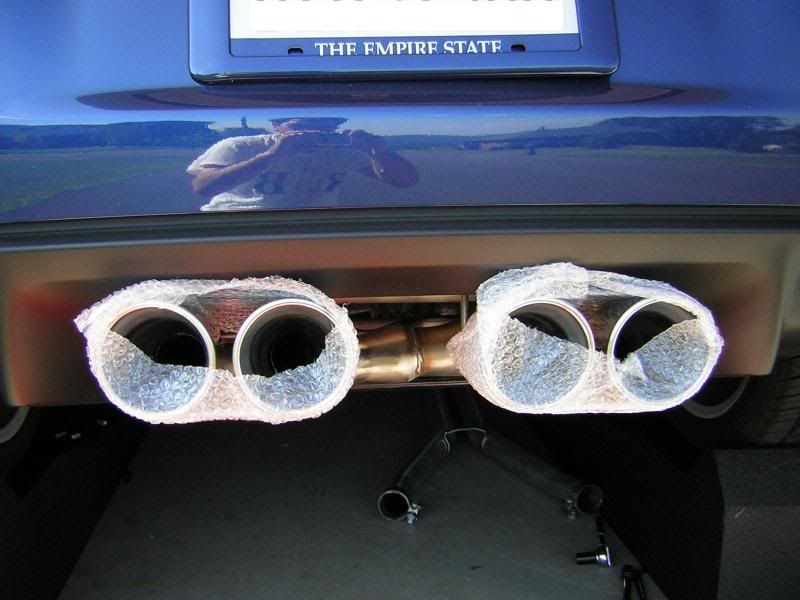
When you are done here's what you end up with.
As for the sound....
If you want your Corvette to sound like a muscle car, this is it. At idle there's just a hint that this car has something different about it. Under 1,500 RPMs the difference is subtle but as you start climbing from there things get interesting, and your grin gets bigger. Let off the gas and it pops and gurgles but nothing obnoxious. Being a 6sp manual I found that I can keep it very quiet if I want to...but I'd rather make it roar!
That's it - now go forth and make some noise.
Some tips before we get started.
* Things will definitely move along faster if you have a helper. That said, I did this one by myself.
* I have read people recommending removing the swaybar bushing mounts and rotating the swaybar down.
I purposely DID NOT do that to find out if that's really necessary. Well, it isn't but I'll tell you right now - its a TIGHT fit getting the OEM mufflers out of there. If you don't have enough clearance (as in the car isn't up high enough) chances are you can't do it this way and you may indeed have to rotate the swaybar. For me having the swaybar in place actually helped in the install process...more on that later.
* Also, some have suggested that removal of the midpipe may not be necessary if all you are doing is the rear muffler. I don't see how that is possible - but I'll admit my install wasn't typical...read on.
First thing - get it up in the air.
The rear was easy - a set of Race Ramps XTs get's it lifted 10".
For the front I made 2 bases out of some 4x4's and a board - total height was about 4".
No, I did not drive the car up there
Once the rear was on the ramps I jacked the front up and slid the bases under the tires.
This combination worked out great - I could easily roll under most of the car with the creeper. Note the wheel chocks on the rear wheel.
Remove the mid-pipe. Do this by loosening the rear clamps that hold the mid-pipe to the over-the-axle pipes. The clamps are welded on so there's no chance of loosing them.
Next, remove the nuts from the springs that hold the mid-pipe. Pop the studs out of the bracket so they don't hang it up later.
And finally, remove the nuts that hold the mid-pipe to the converter up front. Once removed, simply slide the collars back to clear the studs.
Pull back on the mid-pipe and clear the exhaust doughnuts up front and it should just drop down. Separating it from the over-the-axle pipes should only require you to slightly rock the pipe up and down / side to side while pulling forward and it should separate.
For me the passengers side pipe came out easily, the driver's side had a different idea. After much persuasion + a liberal spray of PB Blaster it reluctantly gave up it's ground very slowly.
It's out of there!
Mufflers awaiting extraction.
The only thing holding the mufflers in place now are the 'fingers' that engage in the rubber isolators in the back. To make things easier spray some lubricant on the nubs before trying to push them out. Once that's done just slide the fingers out, tilt the muffler down and pull it out.
One down....
Two Down. Looks better back there without the mufflers!
The new guy reporting for duty.
Remember when we lubed the rubber isolators to get the mufflers out? Well we are going to do the same to greatly aide getting this unit in.
I didn't want to get lube all over the place so I just sprayed some on a Q-Tip and used it to lube the isolators.
Don't forget to lube the nubs too.
Slide a clamp onto each inlet and then lift the muffler up and pop the nubs into each isolator.
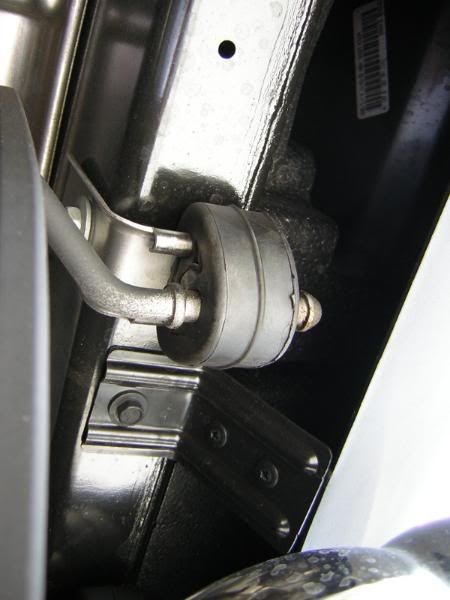
In the beginning of this write-up I said that having the swaybar in place proved helpful for me - here's why.
The rear base of the muffler is now being supported by the swaybar (see picture). If the swaybar wasn't there I'm not sure what would hold it in place. I believe Borla's instructions state to install the over-the-axle pipes before mounting the muffler in place, maybe they would hold it but I didn't want to do that since it seemed I would also have to wrestle threading those pipes into place while mounting the muffler.
So far so good.
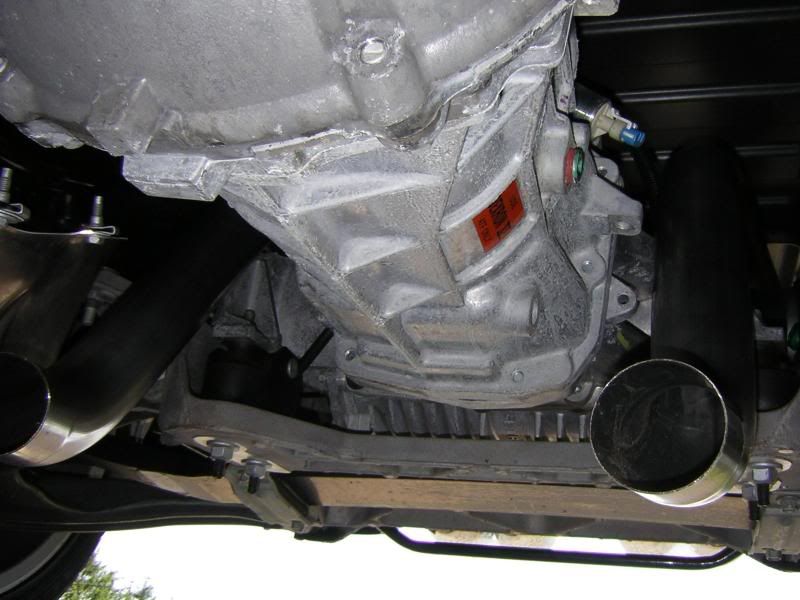
Slide the over-the-axle pipes onto the muffler (note they are marked LH / RH). When done it should look something like this.
Here's where things took a bit of a twist for me. When I tried to reinstall the mid-pipe it simply would not slide onto the drivers side over-the-axle pipe. I measured both with a caliper and it seemed that the Borla pipe was a bit oval in 1 axis the mid-pipe was a bit oval in the opposite axis.
I had to use a pipe expander to reshape the mid-pipe, after which the 2 pipes hesitantly fit together. I don't ever remember anyone mentioning this - so that's why I say this was not a typical install. Perhaps people that do this a lot take this sort of stuff for granted.
Once you have the over-the-axle and mid-pipe together loosely connect the mid-pipe up front - do not tighten anything at this time.
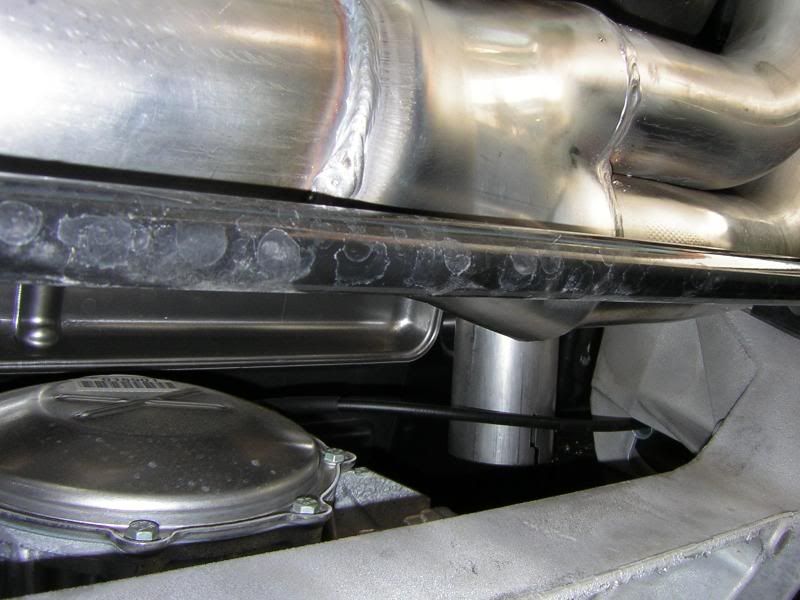
Look at how the exhaust tips align out back, also look at how the over-the-axle pipes are routed. Make sure everything is aligned and that nothing is touching the body/frame/axle/wires or anything else. While the pipes are loose make any adjustments that are necessary.
I found that as I was fitting the mid-pipe up front things out back shifted left to the point where 1 pipe was actually touching a heat shield. It took a while to get the alignment and clearance right.
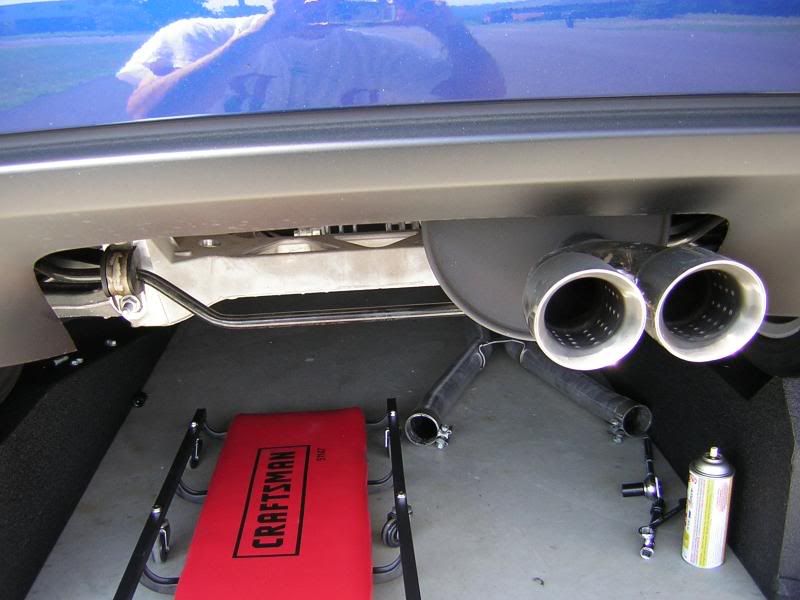
When you are done here's what you end up with.
As for the sound....
If you want your Corvette to sound like a muscle car, this is it. At idle there's just a hint that this car has something different about it. Under 1,500 RPMs the difference is subtle but as you start climbing from there things get interesting, and your grin gets bigger. Let off the gas and it pops and gurgles but nothing obnoxious. Being a 6sp manual I found that I can keep it very quiet if I want to...but I'd rather make it roar!
That's it - now go forth and make some noise.
pipe to fit the mid pipes? or you still need to get an expander? you shouldn't have this additional issue since their exhausts are expensive. i guess test fot should be done first?
02-21-2010, 07:47 PM
#43
Melting Slicks

Thread Starter
Based on how tight the pipes were when I was taking stuff apart, and how the stock mufflers are made, I am going to say you need to take the midpipe out. It's no big deal - 4 nuts up front and 2 in the back.
As for pipe size issues - I think something was slightly wrong with either my midpipe or the over-the-axle pipe. A lot of people here have done this install and not had an issue.
As for pipe size issues - I think something was slightly wrong with either my midpipe or the over-the-axle pipe. A lot of people here have done this install and not had an issue.


