



Paint Chips

Thread Starter
Race Director


Joined: May 2008
Posts: 11,986
Likes: 14
 Paint Chips
I got my first paint chip the other day and wanted to know about repairing the chip. It is very small about the size of a pinhead. I have seen all sorts of paint scratch repair kits but wanted to know which is the best. I have seen this site before http://www.paintscratch.com/. I am hoping to get a clear bra put on in the very near future; I just need to save up a little more money. Any advice would be helpful.

Instructor

Joined: Apr 2008
Posts: 153
Likes: 0
From: Athens Georgia

Team Owner


Joined: Nov 2007
Posts: 45,267
Likes: 8,542
From: Rochester, NY

Melting Slicks


Joined: Feb 2004
Posts: 3,307
Likes: 111
From: Tucson AZ
You might also try: http://www.langka.com/
Very nice kit. You will need to also purchase some touch-up paint.
Very nice kit. You will need to also purchase some touch-up paint.

Team Owner

Joined: Aug 2008
Posts: 25,582
Likes: 33
From: Chandler, AZ It's a Dry Heat.
OK, but has anyone tried one of these kits lately? My experience is, I repair the chip and I have a spot that looks like I repaired a chip. I gave up on this years ago. Are things better now, or am I just "craftsmanship challenged"?

Racer

Joined: Nov 2008
Posts: 317
Likes: 0
From: New York

Race Director
Joined: Apr 2008
Posts: 17,373
Likes: 6
From: Chatsworth California
Corvette Stories
The Best of Corvette for Corvette Enthusiasts

10 Reasons the C6 Z06 is Still A Performance Benchmark After 20 Years
Joe Kucinski
How Much Horsepower Every Corvette Engine "LOST" in 1972
Joe Kucinski
Top 10 DOs and DON'Ts for Protecting Your Convertible Top!
Michael S. Palmer
Top 10 Most Explosive Corvettes Ever Made: Power-to-Weight Ratio Ranked!
Joe Kucinski
150 hp to 1,250 hp: Every Corvette Generation Compared by the Specs That Matter
Joe Kucinski
8 Coolest Corvette Pace Cars (and Replicas) of All Time
Verdad Gallardo
Top 10 Corvette Engines RANKED by Peak Torque (70+ Years of Muscle!)
Joe Kucinski
Corvette ZR1X Will Be Pacing the Indy 500, And Could Probably Race, Too!
Verdad Gallardo
Top 10 Corvettes Coming to Mecum Indy 2026!
Brett Foote


Life Time NCM #2196

Joined: Sep 2004
Posts: 82,586
Likes: 1,698
From: Converse TX
You might also try: http://www.langka.com/
Very nice kit. You will need to also purchase some touch-up paint.
Very nice kit. You will need to also purchase some touch-up paint.


Race Director
Joined: Jun 2002
Posts: 12,198
Likes: 15
From: Columbia MD
Size of a pinhead? I'd leave it alone since it may turn out much more noticeable if you try to repair it. But, if you must, try using a toothpick (the kind with the pointed ends) instead of the brush supplied with the bottle of touchup. You'll get a much finer amount of paint to apply to the nick. JMHO.

Drifting

Joined: May 2008
Posts: 1,358
Likes: 0
From: LA Area CA
I have like 20 paintchips in my bumper hahaha. Gives it a lil character and lets people know you actually drive the thing. Once I get a Ferrari I will worry about paint chips. But yeah I would get a clear bra if you are worried about it that much.

Burning Brakes

Joined: Apr 2007
Posts: 1,042
Likes: 6
From: Bedford, TX
However, the chip I repaired is bigger than the Langka kit is intended for. And it went all the way down to the SMC.
 It took many many applications of touch up paint to get it level. The end result is still noticeable up close. It would take a body shop to do better IMO.
Instructor
Joined: Apr 2008
Posts: 153
Likes: 0
From: Athens Georgia
Dr Colorhip
Gentlemen,
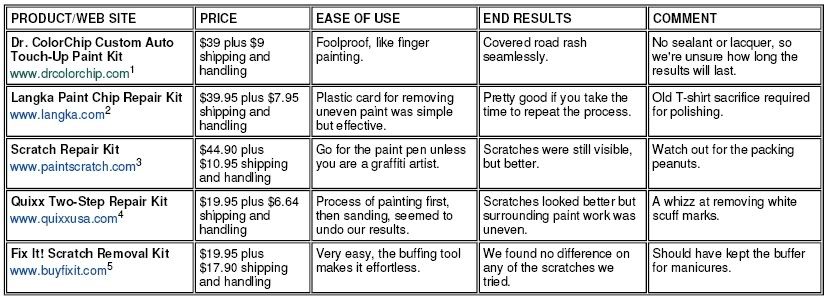
Yes I have 1st hand knowledge of this product and how it works. I actually used to own a franchise territory in Chicago and my Company serviced many dealerships. Let me tell you that there is nothing better for "road rash" and stone chips.
Wall Street Journal did a right up on them against langka and about 4 other Companies and Dr. Colorchip was the best.
Yes I have 1st hand knowledge of this product and how it works. I actually used to own a franchise territory in Chicago and my Company serviced many dealerships. Let me tell you that there is nothing better for "road rash" and stone chips.
Wall Street Journal did a right up on them against langka and about 4 other Companies and Dr. Colorchip was the best.
Team Owner
Joined: Aug 2008
Posts: 25,582
Likes: 33
From: Chandler, AZ It's a Dry Heat.
Gentlemen,
Yes I have 1st hand knowledge of this product and how it works. I actually used to own a franchise territory in Chicago and my Company serviced many dealerships. Let me tell you that there is nothing better for "road rash" and stone chips.
Wall Street Journal did a right up on them against langka and about 4 other Companies and Dr. Colorchip was the best.
Yes I have 1st hand knowledge of this product and how it works. I actually used to own a franchise territory in Chicago and my Company serviced many dealerships. Let me tell you that there is nothing better for "road rash" and stone chips.
Wall Street Journal did a right up on them against langka and about 4 other Companies and Dr. Colorchip was the best.
Thread Starter
Race Director
Joined: May 2008
Posts: 11,986
Likes: 14
Size of a pinhead? I'd leave it alone since it may turn out much more noticeable if you try to repair it. But, if you must, try using a toothpick (the kind with the pointed ends) instead of the brush supplied with the bottle of touchup. You'll get a much finer amount of paint to apply to the nick. JMHO.

Melting Slicks


Joined: May 2004
Posts: 3,017
Likes: 2
Most dealerships have a mobile touch up service that comes around to the lots and does rock chip repair. I had a guy do my pickup for $75. He repaired 8 chips for that. Used a color match program on a laptop, did some sanding, painting with small airbrush, then cleared over it. You really had to get the right angle to see where the work was done.

Drifting
Joined: Sep 2004
Posts: 1,737
Likes: 349
From: Layton Utah
There is also good advice on the Car Care section of the forum. Do a search on either "rock chips" or other sim. title. I had to repair a couple of chips on my C5 Mill Yellow and found that the paint is pretty hard to match. The older the car the more difficult it seems to be to match the paint. What worked for me was the following:
Take some terpintine and a soft cotton cloth. Apply just a dab of terp. to the cloth and rub the chip to make sure any wax, etc if removed.
Dab in some touch up paint and let set for about 10 minutes. You'll notice that the paint will gradually sink into the chip leaving a small crater.
Take the cloth and terp. again and rub across the paint fill trying not to take paint out of the chip but only to level it.
Keep repeating the process until your satisfied.
I've found that the GM touch up paint was about as close as I could get to the color I wanted. The terpintine will not hurt the existing paint.
I would post a picture but it really doesn't show up with a camera. You have to be within about a foot to see where the chip was. Good luck
Take some terpintine and a soft cotton cloth. Apply just a dab of terp. to the cloth and rub the chip to make sure any wax, etc if removed.
Dab in some touch up paint and let set for about 10 minutes. You'll notice that the paint will gradually sink into the chip leaving a small crater.
Take the cloth and terp. again and rub across the paint fill trying not to take paint out of the chip but only to level it.
Keep repeating the process until your satisfied.
I've found that the GM touch up paint was about as close as I could get to the color I wanted. The terpintine will not hurt the existing paint.
I would post a picture but it really doesn't show up with a camera. You have to be within about a foot to see where the chip was. Good luck