


Headlight assembly adjustment?
Supporting Vendor


Joined: Sep 2007
Posts: 11,216
Likes: 178
From: Pensacola Florida GO GATORS!!! www.rlsebring.com www.c6c7vette.com
St. Jude Donor '17
I get a lot of headlight assemblies in and they all have matching washers. Some thin as in 1/16" and some with as thick as 1/8" but never mixed or more than one per mounting stud. I doubt the factory line takes the time to switch out washers to fit the gap hence the bigger opening in the fender/bumper and the black gasket to take up some of the space. The hole will never be sealed completely regardless.
I am almost positve they have a jig where they set the light in place and bolt down. The fenders and bumper cover come later. I'll have to watch the factory show on TLC and see where specifically in the line that the parts meet. As with the other parts of the car the robot put the parts where they need to be and then fastened.
I am almost positve they have a jig where they set the light in place and bolt down. The fenders and bumper cover come later. I'll have to watch the factory show on TLC and see where specifically in the line that the parts meet. As with the other parts of the car the robot put the parts where they need to be and then fastened.
Melting Slicks


Joined: Mar 2007
Posts: 3,327
Likes: 166
From: Summerton SC
Tech Contributor
If you want an accurate reply (we'd all like to give you one), then make the effort to post a pic, otherwise no one knows the answer. Sounds like a fender/bumper clip failure, but we can only guess ... here you are ...
 and a waste of all our time ...
and a waste of all our time ...
Drifting


Joined: Feb 2012
Posts: 1,257
Likes: 66
From: San Luis Obispo, California
Hi Guys, I've searched & searched & still need some help.
My driver's side headlight's front (leading) edge, sticks up about 3/8" higher than it should, & for the life of me I can't figure out why. I've removed the inner fender liner & lightbulb access flap, so that I could fully slide/adjust the light housing around on it's plastic shelf, but I just can't get that front edge to fit lower(correctly). The entire assembly fits very well in the cutout, proper gaps & fitment all the way around, etc...it's just that front leading edge.
I don't think the front fender/fascia is misaligned or anything, & I can't feel the driver's side fender/fascia moving up/down any more than the passenger side, but now I'm wondering if there's some headlight guide or clip that positions the headlight assembly in the fender's light assembly coutout?
Here's the wrinkle; The passenger side headlight is perfect, perfect gap, fits nice & flush, etc., but I just noticed the driver's side headlight looked pushed up the other day, right after I'd tried to drive the car up on ramps. They both skidded forward & the front fascia got hung up(pushed upwards hard) when all its' weight was stuck on the highest part of the ramp. Which makes me think I tweaked something in how the fascia mounts on the front, or how the headlight sits on that shelf.
I really, really don't want to remove the headlight or the front fascia, as everything else fits/feels perfect, so I'm hoping someone with the same issue has some advice. Many thanks for any input or advice you can offer.
Last edited by Bedouin; Jul 12, 2012 at 03:03 PM.
Melting Slicks


Joined: Oct 2004
Posts: 2,340
Likes: 176
From: Kernersville NC
If you're using a bra with the tabs that slide into that area, that's probably what pushed those seals out of line in the first place. I had an upholstery shop cut those off and seam the bra around that area. Works great now.
Instructor

Joined: Aug 2008
Posts: 141
Likes: 0
From: Fort Myers FL
I have taken many headlights out and reinstalled and have to mess around a little for proper positioning in the fenders but really not that much. I am not sure why you would have a 3/8" difference. I have had an instance where one of the headlight assembly wires were pinched under the pod and the mounting platform .. you might verify that it is all clear under pod.
Pro


Joined: Jan 2010
Posts: 629
Likes: 65
From: Freedom PA
So the light can pivot around this post but can not be moved forward, or side to side up near the fender opening.
Ed
Drifting
Joined: Feb 2012
Posts: 1,257
Likes: 66
From: San Luis Obispo, California
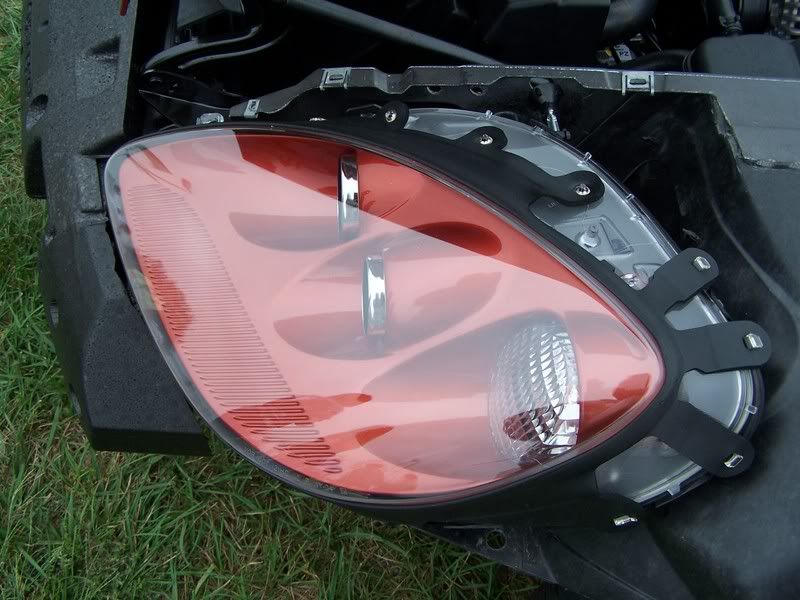
Hi Ed, Many Thanks for that insight & it makes total sense as to why the front fender seems lower, BUT I haven't seen that little tab on any of the C6 headlight pics I've seen. Where abouts is this tab located on the lens, is that it on the right inner edge (@ 12 oclock) in the below pic?
Ps; I spent a few more hours adjusting the headlight in it's tray/bucket last night & made some progress, but it's still not as perfectly placed/aligned as the passenger side is. At least it's not sticking up a full 3/8" high in front...
Ps; I spent a few more hours adjusting the headlight in it's tray/bucket last night & made some progress, but it's still not as perfectly placed/aligned as the passenger side is. At least it's not sticking up a full 3/8" high in front...
Last edited by Bedouin; Jul 13, 2012 at 04:10 PM.
Pro
Joined: Jan 2010
Posts: 629
Likes: 65
From: Freedom PA
Hi Ed, Many Thanks for that insight & it makes total sense as to why the front fender seems lower, BUT I haven't seen that little tab on any of the C6 headlight pics I've seen. Where abouts is this tab located on the lens, is that it on the right inner edge (@ 12 oclock) in the below pic?
Ps; I spent a few more hours adjusting the headlight in it's tray/bucket last night & made some progress, but it's still not as perfectly placed/aligned as the passenger side is. At least it's not sticking up a full 3/8" high in front...
Ps; I spent a few more hours adjusting the headlight in it's tray/bucket last night & made some progress, but it's still not as perfectly placed/aligned as the passenger side is. At least it's not sticking up a full 3/8" high in front...
There is a bump on the underside of the fender with a hole in it that this tapered stud goes into. This serves as a fixed position for the headlight in relation to the fender. The headlight can rotate around the stud, but this only allows for side to side positioning at the front of the headlight, but no forward, or aft movement.
As for the previous post regarding washers on the underside of the light housing to adjust the height of the headlight, you don't have to remove the light and change washers to adjust the height. The nuts on those studs can be loosened up and the entire stud can be turned with a small box end wrench (I forget the size, but I used a small ignition wrench to do the job,) in a counter clockwise direction to raise the headlight at any of the three studs positions. There is a Torx shape on the end of these studs that can be gripped with the small wrench. Then tighten the nut to lock in place. The washers on these studs are fixed to the stud and so will move with the stud and will push the headlight upward from the inner fenders headlight mounting shelf. You can probably turn the mounting studs with vise grips, but that will surely mess up the torx shape on the end of the studs
Of course if the mounting studs are fully tightened in the headlight, (as they should be from the factory,) then these three studs can only be used to raise the headlight to change the height between the light and the bumper. It cannot be done to lower the headlight, and I don't recommend this be done to adjust more than a 1/4 inch. Keep at least one of the studs fully tightened in the headlight assembly to insure there is no vibration in the light.
I used this procedure to even out the height of the headlights in relation to the bumper on a couple of c6's, including my own car. It works great with no ill effects
Ed
Last edited by Old Yellow; Jul 14, 2012 at 12:28 PM.
Corvette Stories
The Best of Corvette for Corvette Enthusiasts

Top 10 Most Expensive Corvettes Ever Sold on Bring A Trailer
Brett Foote
10 Things Every Corvette Owner Needs (2026 Edition)
Michael S. Palmer
8 Most "Only Corvette Owners Understand" Quirks and Problems
Pouria Savadkouei
10 Reasons the C6 Z06 is Still A Performance Benchmark After 20 Years
Joe Kucinski
How Much Horsepower Every Corvette Engine "LOST" in 1972
Joe Kucinski
Top 10 DOs and DON'Ts for Protecting Your Convertible Top!
Michael S. Palmer
Top 10 Most Explosive Corvettes Ever Made: Power-to-Weight Ratio Ranked!
Joe Kucinski
150 hp to 1,250 hp: Every Corvette Generation Compared by the Specs That Matter
Joe Kucinski
8 Coolest Corvette Pace Cars (and Replicas) of All Time
Verdad GallardoRacer
Joined: Jan 2010
Posts: 351
Likes: 48
From: Penn Yan NY
Yes it is the tapered protrusion on the clear part of the lens at the three o'clock position in this photo. Looking from the front towards the headlight it would be at the twelve o'clock position, at the wide space between the tabs of the black surround gasket.
There is a bump on the underside of the fender with a hole in it that this tapered stud goes into. This serves as a fixed position for the headlight in relation to the fender. The headlight can rotate around the stud, but this only allows for side to side positioning at the front of the headlight, but no forward, or aft movement.
As for the previous post regarding washers on the underside of the light housing to adjust the height of the headlight, you don't have to remove the light and change washers to adjust the height. The nuts on those studs can be loosened up and the entire stud can be turned with a small box end wrench (I forget the size, but I used a small ignition wrench to do the job,) in a counter clockwise direction to raise the headlight at any of the three studs positions. There is a Torx shape on the end of these studs that can be gripped with the small wrench. Then tighten the nut to lock in place. The washers on these studs are fixed to the stud and so will move with the stud and will push the headlight upward from the inner fenders headlight mounting shelf. You can probably turn the mounting studs with vise grips, but that will surely mess up the torx shape on the end of the studs
Of course if the mounting studs are fully tightened in the headlight, (as they should be from the factory,) then these three studs can only be used to raise the headlight to change the height between the light and the bumper. It cannot be done to lower the headlight, and I don't recommend this be done to adjust more than a 1/4 inch. Keep at least one of the studs fully tightened in the headlight assembly to insure there is no vibration in the light.
I used this procedure to even out the height of the headlights in relation to the bumper on a couple of c6's, including my own car. It works great with no ill effects
Ed
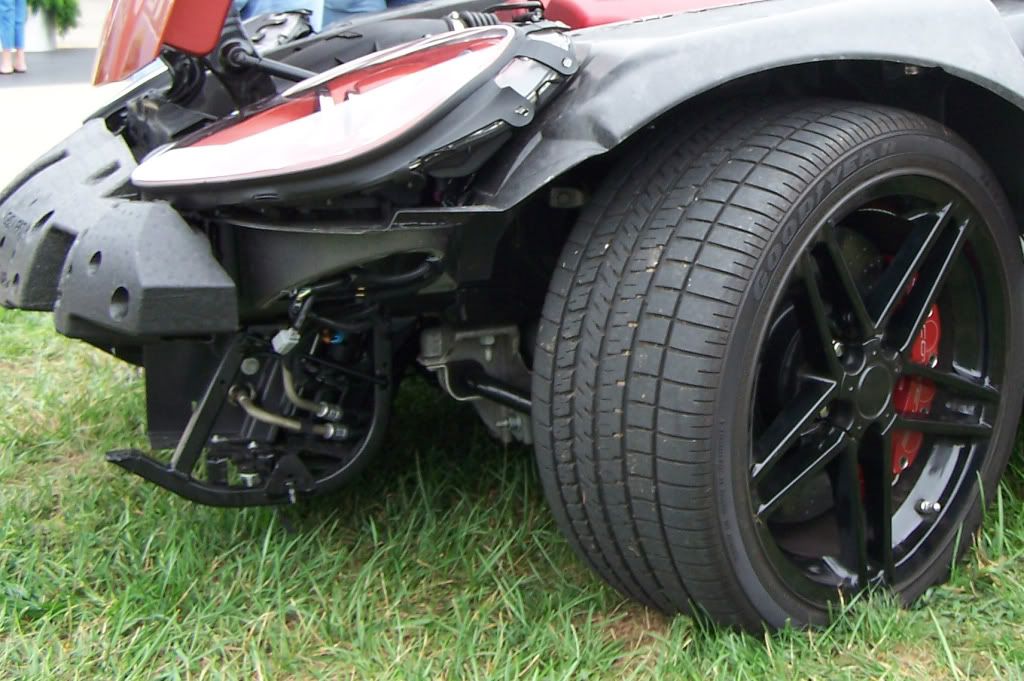
Ed, Thanks for responding to my pm. I think I have a pretty good grasp at what you're saying about how to access the adjustable mounting nuts and bolts. Since this thread is so old, I don't think anyone will mind if I post a couple of pics. Ed, based on the gap at the 7pm-10pm area, does that look like a gap that I can close using the mounting bolts, or does it appear that the bucket isn't installed correctly? Again, I appreciate your help.


