

 02-23-2015, 03:21 PM
Last edit by: IB Advertising
See related guides and technical advice from our community experts:
Browse all: Engine and Powertrain
- How to Install a Dual Mode Exhaust Switch
Step by step instructions for do-it-yourselfers.
Browse all: Engine and Powertrain

DIY Dual Mode Exhaust Switch
07-10-2011, 10:32 AM
#41
Advanced


Member Since: Apr 2007
Location: Golden Colorado
Posts: 78
Likes: 0
Received 0 Likes
on
0 Posts

 07-10-2011, 10:58 AM
#42
Burning Brakes


This suggestion was made years ago when the NPP came out. It's so easy and cheap to add a switch why spend $100? BTW...you can also get a remote control with a FOB from a hobby supply house for about $15.
Here is a pic of the "add a circuit" you can get at most auto stores.

Here is a pic of the "add a circuit" you can get at most auto stores.
07-10-2011, 03:34 PM
#43
Le Mans Master

Member Since: Jul 2007
Location: Arkansas
Posts: 5,010
Received 1,345 Likes
on
778 Posts
St. Jude Donor '09-'10-'11-'12-'13-'14-'15-'16-'17,'22-'23


 Then add a $2-3 push button lamp switch from a hardware store to the dead pedal. It's stealthy and no remote to keep up with.
07-10-2011, 03:57 PM
Then add a $2-3 push button lamp switch from a hardware store to the dead pedal. It's stealthy and no remote to keep up with.
07-10-2011, 03:57 PM
#44
Intermediate

Member Since: Jun 2011
Posts: 31
Likes: 0
Received 0 Likes
on
0 Posts
Didn't want to highjack the Official Mildy to Wildy Exhaust thread, but having a hard time understanding why my felllow Corvette brethren would shell out 90 clams for a mod you can do yourself for about $10 in parts and 10 minutes work. The dual mode exhaust function on C6 Corvettes with the NPP option is controlled by a 10amp fuse located in the fuse panel in the front of the passanger footbox. The way the system is set up the butterflies in the inside two exhaust ports open when the engine is turned off to prevent the butterflies from sticking closed during long periods of storage. That's why the Vettes with this feature sound AWESOME when they first start up, but soon after start up the butterflies close and then only open again above 3500 rpm's. Easiest way to keep the butterflies open all the time and keep that great sound is to simply pull the fuse (it's clearly marked in the fuse panel). This deactivates the sensor and keeps the butterflies fully open all the time and will not damage your car in any way. Only problem with this is it doesn't give you the option of toning the rumble down quickly and easily should the need arise (Cell phone calls [hands-free of course], slipping in or out late at night, cops, etc....) The $10 solution to this problem is to replace the 10 amp fuse with a mini add a circuit wired to a simple toggle switched installed where ever you like (I have mine in the glove box so its out of sight but can still be easily reached from behind the wheel). With the toggle switch in the off position the fuse is disabled just like its been pulled and the butterflies are fully open. flipping the toggle switch to the open position completes the circuit for the fuse and the system returns to full factory specs. Detailed instructions available for FREE if anyone is interested.
07-10-2011, 05:18 PM
#46
Stupid question: How do you make the switch work with that part? The added circuit is INDEPENDENT of the original one. And if you pull the NPP fuse, you can't close the circuit on the NPP by 'shorting' the red wire (with the switch). Am I missing something? Thx.
07-11-2011, 11:37 AM
#47
Burning Brakes
I think it works like this. Remove the seat heat fuse as you would with the remote unit sold by vendors. Plug in the "add a circuit" and plug back in the seat heat fuse into the slot that doesn't have the red wire. Remove the NPP fuse and plug it in to the "add a circuit" slot that has the red wire. Run the red wire to the switch and then from the switch back to the empty NPP fuse slot on the right hand side (going by my memory).
07-15-2011, 04:35 PM
#48


Sorry guys I haven't been watching this post too closely the last few months, but think I'm caught up on instruction requests now. If you request instruction, and don't have them yet, send me a PM, but check your email first. I've sent out several today.

 07-16-2011, 02:14 AM
#51
I think it works like this. Remove the seat heat fuse as you would with the remote unit sold by vendors. Plug in the "add a circuit" and plug back in the seat heat fuse into the slot that doesn't have the red wire. Remove the NPP fuse and plug it in to the "add a circuit" slot that has the red wire. Run the red wire to the switch and then from the switch back to the empty NPP fuse slot on the right hand side.
 . Whoever thought of that deserves a
  . Much better approach than a remote IMO, especially if you buy the stock **** modified with a switch on the side (looks factory). I only have to find (or modify) a male terminal with the same dimensions as a fuse's to prevent damage to the fuse box terminals; not a big deal. Have a good one.
The following users liked this post:
sharpseadog (04-06-2021)
07-16-2011, 09:06 AM
#52
Melting Slicks

Is there anyway this would work with the "NPP in a box".... My car never originally had the NPP option?
I am thinking if the NPP in a box is set up to start loud, and I follow these instructions I could avoid use of the remote!
Opinions?
Instructions to cdaniel525@comcast.net
I am thinking if the NPP in a box is set up to start loud, and I follow these instructions I could avoid use of the remote!
Opinions?
Instructions to cdaniel525@comcast.net
Last edited by CDaniel525; 07-16-2011 at 09:09 AM.
07-16-2011, 09:06 AM
#53

 07-16-2011, 09:27 AM
#54
Le Mans Master
I think that you'll have to send the "box" back to Ed and have it altered. I have an original NPP in a Box with the vacuum pump in the box (that has a switch for open/close at start) but i wanted to use a switch instead of the remote. I would have to have it "wired" for the switch by them. FWIW.
07-16-2011, 09:37 AM
#55
Melting Slicks
I think that you'll have to send the "box" back to Ed and have it altered. I have an original NPP in a Box with the vacuum pump in the box (that has a switch for open/close at start) but i wanted to use a switch instead of the remote. I would have to have it "wired" for the switch by them. FWIW.
07-16-2011, 09:47 AM
#56
6th Gear
Member Since: Apr 2011
Location: Philadelphia PA
Posts: 6
Likes: 0
Received 0 Likes
on
0 Posts
I thought I was the only one who remembers the hi-beam switch on the floor

My vette has a dual mode exhaust, and I'm glad I read this, because I didn't understand what it was. I thought it provided additional horsepower as well as that great exhaust note.
I know what you are all thinking right now...
Last edited by GTOKaren; 07-16-2011 at 09:50 AM.
07-18-2011, 10:53 AM
#57
Finally figured out how to post the instructions online (see below):
DIY Dual Mode Exhaust Switch for NPP
Parts, Tools & Supplies Required:
� Mini add a circuit unit
� 2 position toggle switch (recommend 20 amp rating)
� #16 gauge automotive wire or #18 heavy duty speaker wire
{normally I would not recommend using speaker wire for anything but speakers, but since you�re only running a maximum of 10 amps through the circuit the compact design of heavy duty speaker wire has some advantages in terms of a quick clean setup and can easily handle a 10 amp load.}
� Small piece of Velcro tape
� Black electrical tape
� 3 female electrical connectors
� 2 male electrical connectors
� Wire cutter, stripper, crimper tool
� General working knowledge of automotive wiring systems
Step #1 Pull back the carpeted area at the front of the passenger foot box to expose the fuse panel.
Step #2 Using the white fuse puller located at the top of the fuse panel remove the red 10AMP fuse at the lower right corner of the fuse panel as this controls the NPP exhaust.
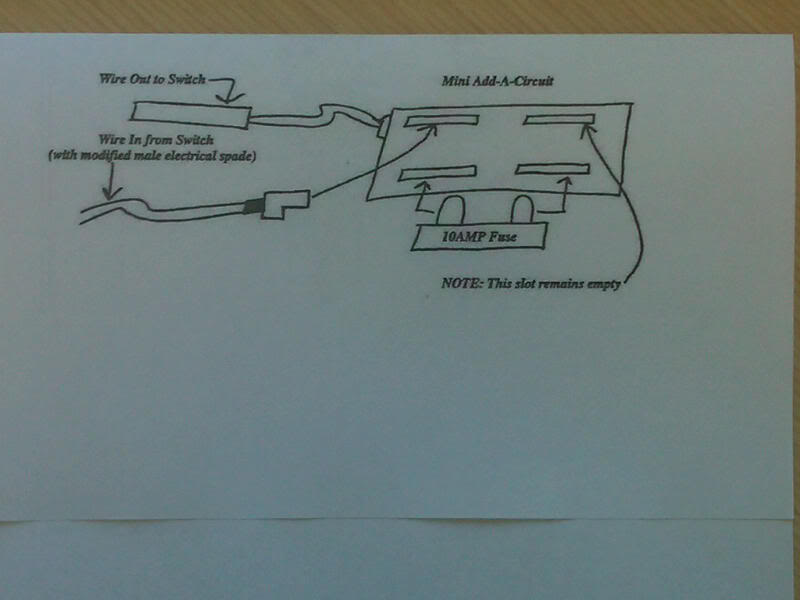
Step #3 Wire up the mini add a circuit unit and toggle switch as shown in the diagram below. It does not matter which wire goes to which post on the toggle switch. Please note, however, that in order to plug the return wire from the toggle switch back into the mini add a circuit unit you will have to cut the spade of a standard male electrical terminal in half being careful not to cut off too much.
Step #4 Plug the mini add a circuit unit into the fuse panel in the lower right corner where you removed the 10AMP fuse in Step #2 above.
Step #5 Attach the toggle switch to an appropriate spot in the glove box with the Velcro tape making sure that the switch will not interfere with the opening and closing of the glove box AND that the opening and closing of the glove box will not crimp, cut, or gouge the wires going from the toggle switch to the fuse panel. Secure any loose wiring with black electrical tape or similar material.
DIY Dual Mode Exhaust Switch for NPP
Parts, Tools & Supplies Required:
� Mini add a circuit unit
� 2 position toggle switch (recommend 20 amp rating)
� #16 gauge automotive wire or #18 heavy duty speaker wire
{normally I would not recommend using speaker wire for anything but speakers, but since you�re only running a maximum of 10 amps through the circuit the compact design of heavy duty speaker wire has some advantages in terms of a quick clean setup and can easily handle a 10 amp load.}
� Small piece of Velcro tape
� Black electrical tape
� 3 female electrical connectors
� 2 male electrical connectors
� Wire cutter, stripper, crimper tool
� General working knowledge of automotive wiring systems
Step #1 Pull back the carpeted area at the front of the passenger foot box to expose the fuse panel.
Step #2 Using the white fuse puller located at the top of the fuse panel remove the red 10AMP fuse at the lower right corner of the fuse panel as this controls the NPP exhaust.
Step #3 Wire up the mini add a circuit unit and toggle switch as shown in the diagram below. It does not matter which wire goes to which post on the toggle switch. Please note, however, that in order to plug the return wire from the toggle switch back into the mini add a circuit unit you will have to cut the spade of a standard male electrical terminal in half being careful not to cut off too much.
Step #4 Plug the mini add a circuit unit into the fuse panel in the lower right corner where you removed the 10AMP fuse in Step #2 above.
Step #5 Attach the toggle switch to an appropriate spot in the glove box with the Velcro tape making sure that the switch will not interfere with the opening and closing of the glove box AND that the opening and closing of the glove box will not crimp, cut, or gouge the wires going from the toggle switch to the fuse panel. Secure any loose wiring with black electrical tape or similar material.
The following users liked this post:
Kocmeister (04-17-2021)

 07-31-2013, 08:21 AM
#59
1st Gear

Member Since: Jul 2013
Posts: 1
Likes: 0
Received 0 Likes
on
0 Posts
Didn't want to highjack the Official Mildy to Wildy Exhaust thread, but having a hard time understanding why my felllow Corvette brethren would shell out 90 clams for a mod you can do yourself for about $10 in parts and 10 minutes work. The dual mode exhaust function on C6 Corvettes with the NPP option is controlled by a 10amp fuse located in the fuse panel in the front of the passanger footbox. The way the system is set up the butterflies in the inside two exhaust ports open when the engine is turned off to prevent the butterflies from sticking closed during long periods of storage. That's why the Vettes with this feature sound AWESOME when they first start up, but soon after start up the butterflies close and then only open again above 3500 rpm's. Easiest way to keep the butterflies open all the time and keep that great sound is to simply pull the fuse (it's clearly marked in the fuse panel). This deactivates the sensor and keeps the butterflies fully open all the time and will not damage your car in any way. Only problem with this is it doesn't give you the option of toning the rumble down quickly and easily should the need arise (Cell phone calls [hands-free of course], slipping in or out late at night, cops, etc....) The $10 solution to this problem is to replace the 10 amp fuse with a mini add a circuit wired to a simple toggle switched installed where ever you like (I have mine in the glove box so its out of sight but can still be easily reached from behind the wheel). With the toggle switch in the off position the fuse is disabled just like its been pulled and the butterflies are fully open. flipping the toggle switch to the open position completes the circuit for the fuse and the system returns to full factory specs. Detailed instructions available for FREE if anyone is interested.
Thanks
08-02-2013, 04:09 PM
#60
The Instructions are now posted directly into this thread, 2 or 3 three posts above. If you have any questions re this mod or problems with the install, please let me know. Good Luck.