


Pulley replacements on LS3
Thread Starter
Pro


Joined: Nov 2014
Posts: 537
Likes: 44
From: San Diego/Pacific Beach CA
Replaced the HB on my LS3 from a slight wobble, and there is still a squeal/chirp on cold starts.
The sound seems to basically come from the drivers side and seems like the idler pulley.
My question is (after numerous searches) is
-do you need a torque wrench when you put the idler pulley back on? How important is this?
-On the C5, after searching saw that it is 37lbs/ft. Is this the same on the LS3?
-If it isn't the idler pulley, where can I find out more torque specs for the LS3? I saw the manual is around $250-300 online, but not sure I want to purchase that at the moment.
-Do I need to order this pulley from GM or is it a bad idea to get it from autozone? If it that is okay, does it come with all the necessary pieces (dust cover, bearing bolt, etc..) ?
-Is it imperative to replace the tensioner pulley/bearing bolt if you replace the idler?
I did a ton of searches for this information, didn't get anything. Thanks, appreciative for any answers anyone can provide.

Race Director


Joined: Dec 2013
Posts: 12,505
Likes: 3,634
Idler pulley bearings are a snap to clean and re-grease it.
Pull the tensioner from the motor, vise up the pulley arm section , then use a breaker bar to remove the pulley center bolt.
With the pulley in hand, use a pick tool to pull the seal covers off the bearings (pop the seal off from the inner race side and work it around as it pops the seal off from the other side), drown the Bearings in WD-40, then hold the center race sleeves and air spin the pulley/bearings to get them clean and dry(aim the air at the bearings to spin the pulley while you hold the inner race stationary). I needed, hit the bearing a second time with WD-40 and air spin it again until the bearing is clean and spins freely.
Now repack the bearing with a bearing grease, pop the seals back on, and when you put the pulley bolt back on the tensioner arm, use Blue loctite and torque the pulley bolt to 37 ft/lb on the tensioner arm.
Now pull the other idler pulley for the AC side on the motor, and clean and re-grease it as well.
As for torque specs, 37 ft lbs on all the bolts for the belt tensioner to the motor and the AC idler bolt to the motor (do not use loctite on these bolts: only use 242 loctite on the bolt that holds the pulley to the tensioner arm itself) .
Last edited by Dano523; Mar 5, 2015 at 06:59 PM.
Le Mans Master

Joined: Feb 2014
Posts: 5,464
Likes: 1,138
From: Chino CA
Just an FYI: I had the same chirping on mine after replacing the HB and the pulleys and it turned out my alternator bearing was making the noise. An automotive stethoscope helped me pinpoint noise. Dano was a great help on that one. Probably not your problem but I thought I would throw it out there. Mine is a 2007 with 30,000 miles.
Thread Starter
Pro
Joined: Nov 2014
Posts: 537
Likes: 44
From: San Diego/Pacific Beach CA
great responses, i really appreciate it.
Dano: The breaker bar because of how hard the idler pulley is to get to? And do you mean remove the tensioner pulley? The sound is def not coming from that side of the engine.
HK770: Never got a PM.
HBSurfer: Thanks, im in the military so im grabbing my docs stethoscope later today, heh.
Really appreciate the responses.. but does anyone usually remove anything else to get to the idler pulley? Seems like a pita to get to.
Burning Brakes


Joined: Aug 2014
Posts: 1,240
Likes: 258
From: Tampa FL
Got this from a forum .... perhaps the C.F.
Says...... 2011 corvette torque specs
STEERING Upper Control Arm Mounting Bolt 110 N�m 81 lb ft
Adjuster Plug Lock Nut 68 N�m 50 lb ft Wheel Hub Mounting Bolts 130 N�m 96 lb ft
xmember Mounting Nuts 110 N�m 81 lb ft
Cyl Line End fitngs 27 N�m 20 lb ft PROP SHAFT
Cyl Line Vlv End fitngs 17 N�m 13 lb in Bearing hsng Asmbly-to-Coupling Bolts - Automatic Trans 70 N�m 52 lb ft
Inner Tie Rod 100 N�m 74 lb ft Bearing hsng Asmbly-to-Coupling Bolts - Manual Trans 90 N�m 66 lb ft
Outer Tie Rod End Stud Nut to Knuckle Clutch Actuator Cyl Mounting Bolts - Manual Trans 12 N�m 106 lb in
1st Pass 20 N�m 15 lb ft Coupling-to-Propeller Shaft Bolts - Automatic Trans 70 N�m 52 lb ft
Coupling-to-Propeller Shaft Bolts - Manual Trans 90 N�m 66 lb ft
2nd Pass 160 degrees Driveline Tunnel Closeout Panel Bolts 10 N�m 89 lb in
EBTCM LH Mounting Bracket Mounting Bolts 50 N�m 37 lb ft
Final Pass 45 N�m 33 lb ft Flexplate Spindle Nut - Automatic Trans 90 N�m 66 lb ft
Flexplate-to-Flexplate Spindle Bolts - Automatic Trans 50 N�m 37 lb ft
Pwr Steering Gear Mounting Bolt Nuts to xmember 100 N�m 74 lb ft Input Shaft Bearing posing Bolts 35 N�m 26 lb ft
Pwr Steering Hose fitngs 27 N�m 20 lb ft Input Shaft-to-Coupling Bolts - Automatic Trans 70 N�m 52 lb ft
Pwr Steering Pump Mounting Bolts 25 N�m 18 lb ft Input Shaft-to-Coupling Bolts - Manual Trans 90 N�m 66 lb ft
Pwr Steering Reservoir Bracket Bolts to Eng 50 N�m 37 lb ft Negative Battery Cable Bolt 15 N�m 11 lb ft
Pwr Steering Return Hose Mounting Bolts 11 N�m 97 lb in Propeller Shaft Hub Clamp Bolt - Automatic Trans 125 N�m 93 lb ft
Rear Exh Hanger Mounting Bolts 50 N�m 37 lb ft
FRONT SUSP Rear Suspension xmember Mounting Nuts 110 N�m 81 lb ft
xmember Mounting Nuts (Use New Nuts) 110 N�m 81 lb ft Shift Control Closeout Boot Reg Nuts - Manual Trans 12 N�m 106 lb in
Lower Control Arm Ball Joint Stud Nut Shift Control Mounting Bolts 30 N�m 22 lb ft
1st Pass 30 N�m 20 lb ft Transaxle Mount Bracket-to-Differential Bolts 50 N�m 37 lb ft
Transaxle Mount-to-Rear Suspension xmember Nuts 50 N�m 37 lb ft
Final Pass 180 degrees Trans Cooler Rear Front fitngs-to-Jnctn at Eng flywh hsng 27 N�m 20 lb ft
Trans Cooler Rear Pipe Rear fitngs-to-Trans fitngs 40 N�m 30 lb ft
Pwr Steering Gear Mounting Bolts 100 N�m 74 lb ft Trans Cooler Rear Pipe Reg Clamp Bolts 12 N�m 106 lb in
Shock Absorber Lower Mounting Nuts 28 N�m 21 lb ft Trans Shift Control Cable Bracket Reg Nuts 20 N�m 15 lb ft
Shock Absorber Upper Mounting Nut 26 N�m 19 lb ft Trans Shift Rod Clamp Bolt 30 N�m 22 lb ft
Stabilizer Shaft Insulator Clamp Bolts 58 N�m 43 lb ft Trans-to-Driveline sprt Asmbly Bolts/Studs 50 N�m 37 lb ft
Stabilizer Shaft Link Nuts 72 N�m 53 lb ft Trans Wiring Harness-to-LH Trans Case Reg Bolt 2.5 N�m 22 lb in
Transverse Spring Retainer Bolts (Use New Bolts) 62 N�m 46 lb ft Half Shaft Spindle Nut 160 N�m 118 lb ft
Upper Control Arm Ball Joint Stud Nut
1st Pass 30 N�m 22 lb ft DIFF
Carrier Asmbly - Differential-to-Trans Bolts and Nuts 50 N�m 37 lb ft
Final Pass 225 degrees Cooler Bolts - Some Models 10 N�m 89 lb in
Differential Case Bolts 55 N�m 41 lb ft
Upper Control Arm Mounting Bolts 65 N�m 48 lb ft Differential Cooler Adaptor Nut 18 N�m 13 lb ft
Wheel Hub/Bearing Mounting Bolts 130 N�m 96 lb ft Differential Cooler Fitting 1/2 Inch 28 N�m 21 lb ft
Differential Cooler Fitting 3/8 Inch 18 N�m 13 lb ft
REAR SUSP Differential Cooler Mounting Bolts 10 N�m 89 lb in
Lower Control Arm Ball Joint Stud Nut Differential Cooler Pump Inlet Hose Reg Bolt 10 N�m 89 lb in
1st Pass 30 N�m 22 lb ft Differential Reinforcement Bolt 30 N�m 22 lb ft
Drain Plug - Quick Connect - Some Models 35 N�m 26 lb ft
Final Pass 180 degrees Driveline sprt Asmbly-to-Eng flywh hsng Bolts 50 N�m 37 lb ft
EBTCM LH Mounting Bracket Bolts 50 N�m 37 lb ft
Lower Control Arm Cam Bolt Nut - Front 145 N�m 107 lb ft Fill Plug 35 N�m 26 lb ft
Lower Control Arm Cam Bolt Nut - Rear 95 N�m 70 lb ft Left Side Cvr Bolts 30 N�m 22 lb ft
Outer Tie Rod End Stud Nut Negative Battery Cable Bolt 15 N�m 11 lb ft
1st Pass 20 N�m 15 lb ft Pinion hsng/Cage Bolts 30 N�m 22 lb ft
Pinion Nut 500 N�m 370 lb ft
2nd Pass 160 degrees Propeller Input Shaft Bearing posing Bolts 35 N�m 26 lb ft
Propeller Shaft Hub Clamp Bolt 130 N�m 96 lb ft
Final Pass 60 N�m 45 lb ft Quick Connect - Left Cvr - Some Models 18 N�m 13 lb ft
Rear Cvr Bolts - Pump Bolts - Some Models 10 N�m 89 lb in
Rear xmember Mounting Nuts 110 N�m 81 lb ft Rear Suspension xmember Mounting Nuts 110 N�m 81 lb ft
Rear Suspension Adjustment Link to xmember Nut 60 N�m 44 lb ft Right Side Cvr Bolts 30 N�m 22 lb ft
Shock Absorber Lower Mounting Nut 145 N�m 107 lb ft Ring Gear Bolts 195 N�m 144 lb ft
Shock Absorber Upper Mounting Bolts 30 N�m 22 lb ft Shift Control Closeout Boot Reg Nuts 12 N�m 106 lb in
Stabilizer Shaft Insulator Clamp Bolt 65 N�m 49 lb ft Shift Control Mounting Bolts 30 N�m 22 lb ft
Stabilizer Shaft Insulator Clamp Nut 95 N�m 70 lb ft Transaxle Mount Bracket-to-Differential Bolts 50 N�m 37 lb ft
Stabilizer Shaft Link Nuts 72 N�m 53 lb ft Transaxle Mount-to-Bracket Nuts 59 N�m 43 lb ft
Transverse Spring Mounting Bracket Bolts 62 N�m 46 lb ft Transaxle Mount-to-Rear Suspension xmember Nuts 50 N�m 37 lb ft
Upper Control Arm Ball Joint Stud Nut Trans Cooler Rear Fitting-to-Jnctn fitngs at Eng flywh hsng 27 N�m 20 lb ft
1st Pass 30 N�m 22 lb ft Trans Shift Rod Clamp Bolt 30 N�m 22 lb ft
Trans Stud Mount Bolts 10 N�m 89 lb in
Final Pass 195 degrees Trans Stud-to-Mount 42 N�m 31 lb ft
Trans Wiring Harness-to-LH Trans Case Reg Bolt 2.5 N�m 22 lb inVehicle Speed Sensor Bolt 10 N�m 89 lb in flywh Bolts - Final Pass 100 N�m 74 lb ft
Front Cvr Bolts 25 N�m 18 lb ft
BRAKES Fuel Injection Fuel Rail Bolts 10 N�m 89 lb in
Brake Caliper Bleed Screw 12 N�m 106 lb in Ign Coil Bracket-to-Vlv Rocker Arm Cvr Stud 12 N�m 106 lb in
Brake Caliper Guide Pin Bolt 31 N�m 23 lb ft Ign Coil-to-Bracket Bolts 10 N�m 89 lb in
Brake Caliper Inlet Fitting Bolt 45 N�m 33 lb ft Intake Manifold Bolts - 1st Pass in Sequence 5 N�m 44 lb in
Front Brake Caliper Mounting Bracket Bolt 175 N�m 125 lb ft Intake Manifold Bolts - Final Pass in Sequence 10 N�m 89 lb in
Rear Brake Caliper Mounting Bracket Bolt 175 N�m 125 lb ft J 41798 M8 Bolt 25 N�m 18 lb ft
Brake Booster Mounting Nuts 27 N�m 20 lb ft J 41798 M10 Bolts 50 N�m 37 lb ft
Brake Caliper Inlet Fitting Bolt 45 N�m 33 lb ft Knock Sensor Bolts 20 N�m 15 lb ft
Brake Pedal Pivot Nut 29 N�m 21 lb ft Motor Mount Bracket Bolts 50 N�m 37 lb ft
Brake Pipe to Flexible Brake Hose Tube Nut 18 N�m 13 lb ft Oil Cooler Bolts 12 N�m 106 lb in
Brake Pipe to Master Cyl Tube Nut 24 N�m 18 lb ft Oil Filter 30 N�m 22 lb ft
Master Cyl Mounting Nuts 29 N�m 21 lb ft Oil Filter Fitting 55 N�m 40 lb ft
Tele Column Motor Mounting Bracket Screw 7 N�m 62 lb in Oil Level Indicator Tube Bolt 25 N�m 18 lb ft
Washer Solvent Container Reg Nuts 7.5 N�m 66 lb in Oil Level Sensor 20 N�m 15 lb ft
Actuator Mounting Bolts 70 N�m 52 lb ft Oil Pan Closeout Cvr Bolt - Left Side 9 N�m 80 lb in
Park Brake Lever Asmbly Mounting Bolts 28 N�m 21 lb ft Oil Pan Closeout Cvr Bolt - Right Side 9 N�m 80 lb in
Park Brake Lever Boot Nuts 10 N�m 89 lb in Oil Pan Cvr Bolts 12 N�m 106 lb in
BPMV Brake Pipe fitngs 16 N�m 12 lb ft Oil Pan Drain Plug 25 N�m 18 lb ft
Brake Fluid pres Sensor 22 N�m 16 lb ft Oil Pan M6 Bolts - pan-rear seal 12 N�m 106 lb in
EBCM/BPMV Bracket Bolts 27 N�m 20 lb ft Oil Pan M8 Bolts - pan-block & pan-cover 25 N�m 18 lb ft
EBCM/BPMV Insulator Nuts 12 N�m 106 lb in Oil pres Sensor 35 N�m 26 lb ft
EBCM/ BPMV Insulator Bolt 14 N�m 10 lb ft Oil Pump Cvr Bolts 12 N�m 106 lb in
EBCM to BPMV Bolts in Sequence 1st Pass 3 N�m 1st Pass 27 lb in Oil Pump Relief Vlv Plug 12 N�m 106 lb in
2nd Pass 6 N�m 2nd Pass 53 lb in Oil Pump Screen Nuts 25 N�m 18 lb ft
Oil Pump Screen-to-Oil Pump Bolt 12 N�m 106 lb in
Lateral Accelerometer Nuts 3 N�m 24 lb in Oil Pump-to-Eng Block Bolts 25 N�m 18 lb ft
Steering Gear Nut 100 N�m 74 lb ft Spark Plugs 15 N�m 11 lb ft
Yaw Rate Sensor Nuts 7 N�m 62 lb in Throttle Body Bolts 10 N�m 89 lb in
Timing Chain Dampener Bolts 25 N�m 18 lb ft
ENGINE Valley Cvr Bolts 25 N�m 18 lb ft
Cam pos (CMP) Sensor Bolt 12 N�m 106 lb in Vlv Lifter Guide Bolts 10 N�m 89 lb in
CMP Sensor Wire Harness Bolt 12 N�m 106 lb in Vlv Rocker Arm Bolts 30 N�m 22 lb ft
Cam Retainer Bolts - Hex Head Bolts 25 N�m 18 lb ft Vlv Rocker Arm Cvr Bolts 12 N�m 106 lb in
Cam Retainer Bolts - TORX� Head Bolts 15 N�m 11 lb ft Water Inlet hsng Bolts 15 N�m 11 lb ft
Cam Sprocket Bolts 25 N�m 18 lb ft Water Pump Bolts - 1st Pass 15 N�m 11 lb ft
Clutch pres Plate Bolts 70 N�m 52 lb ft Water Pump Bolts - Final Pass 30 N�m 22 lb ft
Conn Rod Bolts - 1st Pass 20 N�m 15 lb ft
Conn Rod Bolts - Final Pass 75 degrees AUTO TRANS
Coolant Air Bleed Pipe and Cvr Bolts 12 N�m 106 lb in Accumulator Cvr to Case Bolt 8.0-14.0 N�m 6-10 lb ft
Coolant Temperature Sensor 20 N�m 15 lb ft Case Extension to Case Bolt 42.0-48.0 N�m 31-35 lb ft
Crank Bal Bolt - Instal Pass-OLD bolt 330 N�m 240 lb ft Case Extension to Case Bolt (4WD Shipping) 11.2-22.6 N�m 8.3-16.7 lb ft
Crank Bal Bolt - 1st Pass -NEW Bolt for 1st&final pass 50 N�m 37 lb ft Converter Cvr Bolt 10 N�m 89 lb in
Crank Bal Bolt - Final Pass 140 degrees Converter hsng to Case Screw 65.0-75.0 N�m 48-55 lb ft
Crank Bearing Cap M10 Bolts - 1st Pass in Sequence 20 N�m 15 lb ft Cooler Pipe Connector 35.0-41.0 N�m 26-30 lb ft
Crank Bearing Cap M10 Bolts - Final Pass in Sequence 80 degrees Detent Spring to Vlv Body Bolt 20.0-27.0 N�m 15-20 lb ft
Crank Bearing Cap M10 Studs - 1st Pass in Sequence 20 N�m 15 lb ft Differential to Trans Bolts and Nuts 50 N�m 37 lb ft
Crank Bearing Cap M10 Studs - Final Pass in Sequence 51 degrees Driveline sprt Asmbly to Eng flywh hsng Bolts 50 N�m 37 lb ft
Crank Bearing Cap M8 Bolts 25 N�m 18 lb ft Driveline sprt Asmbly Front Plug Bolts 50 N�m 37 lb ft
Crank Oil Deflector Nuts 25 N�m 18 lb ft Floorshift Control Bolt 10 N�m 89 lb in
Crank pos (CKP) Sensor Bolt 25 N�m 18 lb ft flywh to Torque Converter Bolt 63 N�m 46 lb ft
Crank Rear Oil Seal hsng Bolts 25 N�m 18 lb ft Forward Accumulator Cvr to Vlv Body Bolt 8.0-14.0 N�m 6-10 lb ft
Cyl Head M11 Bolts - 1st Pass in Sequence 30 N�m 22 lb ft Heat Shield to Trans Bolt 17 N�m 13 lb ft
Cyl Head M11 Bolts - 2nd Pass in Sequence 90 degrees Line pres Plug 8.0-14.0 N�m 6-10 lb ft
Cyl Head M11 Bolts - Final Pass in Sequence 70 degrees Manual Shaft to Inside Detent Lever Nut 27.0-34.0 N�m 20-25 lb ft
Cyl Head M8 Bolts - in Sequence 30 N�m 22 lb ft Negative Battery Cable Bolt 15 N�m 11 lb ft
Cyl Head Coolant Plug 20 N�m 15 lb ft Oil Level Indicator Bolt 47 N�m 35 lb ft
Eng Block Coolant Drain Hole Plug 60 N�m 44 lb ft Oil Pan to Trans Case Bolt 11 N�m 97 lb in
Eng Block Coolant Heater 40 N�m 30 lb ft Oil Passage Cvr to Case Bolt 8-14.0 N�m 6-10 lb ft
Eng Block Oil Gallery Plug 60 N�m 44 lb ft Park Brake Bracket to Case Bolt 27.0-34.0 N�m 20-25 lb ft
Evap Emis (EVAP) Canister Purge Solenoid Vlv Bolt 50 N�m 37 lb ft Park/Neutral pos Switch Mounting Bolts 27 N�m 20 lb ft
Exh Manifold Bolts - 1st Pass 15 N�m 11 lb ft Park/Neutral pos Switch Screw 3 N�m 27 lb in
Exh Manifold Bolts - Final Pass 20 N�m 15 lb ft Plate to Case Bolt (Shipping) 27.0-34.0 N�m 20-25 lb ft
Exh Manifold Heat Shield Bolts 9 N�m 80 lb in Plate to Converter Bolt (Shipping) 27.0-34.0 N�m 20-25 lb ft
Exh Manifold Studs 20 N�m 15 lb ft Plug Asmbly, Automatic Trans Oil Pan (C/K-truck) 30-40 N�m 22.1-29.5 lb ft
flywh Bolts - 1st Pass 20 N�m 15 lb ft Plug Asmbly, Automatic Trans Oil Pan (Y-car) 28-32 N�m 20.7-23.6 lb ft
flywh Bolts - 2nd Pass 50 N�m 37 lb ft pres Control Solenoid Bracket to Vlv Body Bolt 8.0-14.0 N�m 6-10 lb ftPropeller Input Shaft Front Bearing posing Bolts 35 N�m 26 lb ft
Propeller Shaft Hub Clamp Bolt 130 N�m 96 lb ft
Pump Asmbly to Case Bolt 26.0-32.0 N�m 19-24 lb ft
Pump Cvr to Pump Body Bolt 20.0-27.0 N�m 15-20 lb ft
Rear Shock Absorber Lower Mounting Bolt 220 N�m 162 lb ft
Shift Cable Grommet Screw 1.7 N�m 15 lb in
Shift Control Cable Attachment 20 N�m 15 lb ft
Spacer Plate sprt Reg Bolts 11 N�m 97 lb in
Speed Sensor Retainer Bolt 10.5-13.5 N�m 7.7-10 lb ft
Stud, Automatic Trans Case Extension (Y-car) 18.0-22.0 N�m 13-16 lb ft
TCC Solenoid Asmbly to Case Bolt 8.0-14.0 N�m 6-10 lb ft
Transaxle Mount Bracket to Differential Bolts 50 N�m 37 lb ft
Trans to Driveline sprt Asmbly Bolts/Studs 50 N�m 37 lb ft
Trans to Eng Bolt 47 N�m 35 lb ft
Trans Fluid Check/Fill Plug 30 N�m 22 lb ft
Trans Fluid pres Manual Vlv pos Switch to Vlv Body Bolt 8.0-14.0 N�m 6-10 lb ft
Trans Mount to Trans Bolt 50 N�m 37 lb ft
Trans Mount Reg Nut 40 N�m 30 lb ft
Trans Cooler Pipe Fitting 35.0-41.0 N�m 26-30 lb ft
Trans Cooler Rear Pipes to Jnctn fitngs at Eng flywh hsng 27 N�m 20 lb ft
Trans Oil Pan to Case Bolt 9.5-13.8 N�m 7-10 lb ft
Trans Range Selector Lever Nut 20 N�m 15 lb ft
Trans Shift Cable Bracket Reg Nuts 20 N�m 15 lb ft
Trans Wiring Harness to LH Side of Trans Case Reg Bolt 2.5 N�m 22 lb in
Vlv Body to Case B
Race Director
Joined: Dec 2013
Posts: 12,505
Likes: 3,634
!E9s2fD)VbBRJPFeGql!~~60_12.JPG)

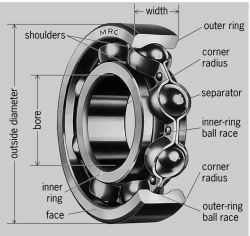
Once you have the pulley bolt off and the pulley in hand, then the rubber side plate seals are easy to remove with a pick tool so you can clean and re-grease the bearings.

Go to 1:20,and no, your bearing will not have the inner seal, just the outer rubber seal.
Once you have the side seals off the bearing, drown the bearing with Wd-40, spin it a few times to get more of the debris out, hit it again with WD-40 and this time use compressed air to high speed spin the bearing/pulley while holding onto the inner race section. Between high speed spinning with air, and maybe another shot of WD-40 needed, this will remove all the debris in the bearings so they will spin freely. Once the bearings are clean, dry, and spinning freely, then re-grease the bearings with bearing grease, then snap the side seals back on the bearings. And no, there is no such thing as over packing the bearings with grease, since the excess grease will just work it's way out of the seal at the inner race side as the bearing is being used (read bearings where not greased enough when new, and why they when dry so quickly instead).
To add, anyone with around 50K on the their motor, and looking for a winter project, pulling the pulley's and cleaning and repacking the bearings, and you will not have a problem with them for 100K miles or more. Better yet, the smoother that the bearings move from being cleaned and greased, the less problems you will have with the tensioner. When the bearing/pulley is not rolling smoothly, this causes the arm to start to jump back and forth from bind on the bearing, which wears out the spring much faster, and even causes the arm to back plate spacing to increase from all the extra movement of the arm as well.
Last edited by Dano523; Mar 6, 2015 at 08:33 PM.
Melting Slicks


Joined: Jul 2010
Posts: 3,006
Likes: 245
From: Surprise, Az
I'll caution you to not air spin the bearing after cleaning it with WD-40, you can overspin the bearing and it could fly apart. It doesn't happen often but you'll have to replace it if it does.
Corvette Stories
The Best of Corvette for Corvette Enthusiasts

5 Best & 5 Worst Corvette Daily Drivers
Joe Kucinski
The Headlights of Every Corvette Generation Explained
Joe Kucinski
5 Best & 5 Most Overrated Corvette Track Packages of All Time!
Joe Kucinski
Every 2027 Corvette Engine Explained
Joe Kucinski
Designer Imagines A Corvette That Looks More Like a Corvette Than the Corvette
Verdad Gallardo
10 Ugly Corvettes That We Still Kinda Love
Joe Kucinski
Top 10 Most Expensive Corvettes Ever Sold on Bring A Trailer
Brett Foote
10 Things Every Corvette Owner Needs (2026 Edition)
Michael S. Palmer
8 Most "Only Corvette Owners Understand" Quirks and Problems
Pouria Savadkouei
Race Director
Joined: Dec 2013
Posts: 12,505
Likes: 3,634
So WD-40 flush, and air spin away to get the bearing clean to begin with.
Race Director
Joined: Dec 2013
Posts: 12,505
Likes: 3,634
Your kidding right????
Pop the MAF wire connector off the MAF, clean side PVC hose if you have a early C6 off from the coupler section, loosing up the air coupler clamp right in front of the TB, and remove the the entire air filter system from TB forward off the car (just opened up a ton of room to work). If the coupler does not want to just slip off the TB throat flange, then use a small pick tool to work around the inside of coupler to the TB flange so it will slip off. GM uses a lube like "ASK" to install the air filter rubber hose parts, and once it dries, dam near turns into glue instead.
Note here, when you put it back on, very light coat of dielectric grease on the TB flange where the coupling slips over does wonders when you go to remove it again.
Now put a box end wrench on the belt tensioner pulley center bolt, force the spring loaded arm towards the center of the motor, and remove the serpentine bolt from the pulley.
Now remove the belt tensioner assembly, and the idler pulley.
Once this out out of the way, jack the front end and put it on jack stands so you can work from under the car, use a wrench on the AC belt tension (moves downward/cockwise to loose the tension on the belt) to remove the AC belt just like you did the serpentine belt, then switch over to the left bolt to remove the AC tensioner assembly from the motor (it also bolts back on at 37 ft lbs). On its pulley, again, vice up just the arm to remove the center bolt on the pulley, and when you go to re-install the bolt that holds the pulley onto the arm, 242 loctite on that bolt (bolt that holds the assembly to the motor does not get loctite).
Last edited by Dano523; Mar 10, 2015 at 06:51 AM.
Race Director
Joined: Dec 2013
Posts: 12,505
Likes: 3,634
But the question really comes back to how easily the bearing are going to press out and install back into FRP pulley wheels (maybe even see a heat gun involved here to relax the FRP).