
Msd leaking around injector
 03-27-2018, 12:41 PM
#21
Melting Slicks

I can see what you mean now from the pictures. I am not sure what I would do. I liked the dual O ring idea like above. That seemed smart. RTV may work as well. I have just never tried it in that application.
 03-27-2018, 01:14 PM
#22
Le Mans Master


as I posted in the past - waiting for MSD LS7 intake 'take 2', glad I sold mine. sorry for your headache


 03-27-2018, 02:23 PM
#25
Melting Slicks
From the independent data I've seen. Absolutely. Most people do not experience issues with the intake. I switched from FAST knowing I may have a few little things to deal with. None of it is a big deal.
 03-27-2018, 03:36 PM
#27

I like mine so far. Main thing I liked was I could keep the factory LS7 fuel rails. With my BTR stage 3 cam I gained 25hp switching from the stock LS7 intake to the MSD.
Last edited by EviLS7; 03-27-2018 at 03:37 PM.
03-27-2018, 04:36 PM
#28
Instructor

On my MSD the top shell was not flat extremely poor manufacturing quality control and with me being in Canada its a pain to re export it and get a new one so I fixed mine. Get a flat surface to check the top shell on mine was bowed 1/8" in the middle and made up a large sanding block and sanded until it was flat on all mating surfaces. Now it doesnt leak. Also really crappy ultra sonic welding of the internal stacks to the lower half took lots of filling and sanding with JB weld and medium viscosity CA glue to fix it. If it didnt work as well as it does I would have scrapped the hole mess. On mine I also used Hylomar gasket sealer which was invented by Rolls Royce for aircraft engines and is a non hardening sealer, I put the gaskets into there respective grooves dry and use a thin layer of Hylomar on top after. Had 20" vacuum with stock intake had 15" the first time I installed the manifold dry no Hylomar so took it off and fixed all the issues and put it back together with the Hylomar and got my 20" of vacuum back at idle. Also when I re installed mine I have the Hylomar on the intake itself and used a thin film of high temp silicone brake lube on the head surface so the manifold slides nicely into place onto the locating pins in the heads and there is no chance of manifold gaskets getting moved out of there sealing grooves. Must have done something right as mine makes 485hp and 475t rear wheel on a dyno that a ZR1 makes 525 myself and the dyno operator where surprised at the results as that is a huge torque increase, stock cam and JBA headers and x pipe with cats.
Last edited by G8Pumpkin; 03-27-2018 at 04:56 PM.
03-27-2018, 08:00 PM
#29
Drifting

Thread Starter

On my MSD the top shell was not flat extremely poor manufacturing quality control and with me being in Canada its a pain to re export it and get a new one so I fixed mine. Get a flat surface to check the top shell on mine was bowed 1/8" in the middle and made up a large sanding block and sanded until it was flat on all mating surfaces. Now it doesnt leak. Also really crappy ultra sonic welding of the internal stacks to the lower half took lots of filling and sanding with JB weld and medium viscosity CA glue to fix it. If it didnt work as well as it does I would have scrapped the hole mess. On mine I also used Hylomar gasket sealer which was invented by Rolls Royce for aircraft engines and is a non hardening sealer, I put the gaskets into there respective grooves dry and use a thin layer of Hylomar on top after. Had 20" vacuum with stock intake had 15" the first time I installed the manifold dry no Hylomar so took it off and fixed all the issues and put it back together with the Hylomar and got my 20" of vacuum back at idle. Also when I re installed mine I have the Hylomar on the intake itself and used a thin film of high temp silicone brake lube on the head surface so the manifold slides nicely into place onto the locating pins in the heads and there is no chance of manifold gaskets getting moved out of there sealing grooves. Must have done something right as mine makes 485hp and 475t rear wheel on a dyno that a ZR1 makes 525 myself and the dyno operator where surprised at the results as that is a huge torque increase, stock cam and JBA headers and x pipe with cats.
03-28-2018, 11:25 AM
#30
Instructor
Also some details on Locktite if you go to their web site and look at the product application sheet for blue Locktite it says it has a 10 minute working time and SETS in 24 hours and to apply to 6 threads. I find the liquid is very thin so it tends to not stay on the threads that much but they do make a gel that I find much better and you have to really hustle to get the manifold on and torqued down in 10 minutes. So what I think others that have used the liquid and then RE TORQUED the manifold after it has been on break the locking bond on the bolt so it doesnt hold properly. Also the various versions of red locktite are for different diameters of bolts because of thread clearance differences as you get to bigger bolt diameters but in the case of blue its one choice that I know of and the bolts are a loose fit for tolerance on the intake so I think the gel is a better choice, at least thats my 2 cents worth.
03-28-2018, 11:31 AM
#31
Burning Brakes


Also some details on Locktite if you go to their web site and look at the product application sheet for blue Locktite it says it has a 10 minute working time and SETS in 24 hours and to apply to 6 threads. I find the liquid is very thin so it tends to not stay on the threads that much but they do make a gel that I find much better and you have to really hustle to get the manifold on and torqued down in 10 minutes. So what I think others that have used the liquid and then RE TORQUED the manifold after it has been on break the locking bond on the bolt so it doesnt hold properly. Also the various versions of red locktite are for different diameters of bolts because of thread clearance differences as you get to bigger bolt diameters but in the case of blue its one choice that I know of and the bolts are a loose fit for tolerance on the intake so I think the gel is a better choice, at least thats my 2 cents worth.
03-28-2018, 04:08 PM
#32
Race Director

Member Since: Mar 2006
Location: Everywhere and Nowhere at all
Posts: 15,357
Received 1,679 Likes
on
1,135 Posts

I just disassembled mine today to inspect. 5 of the 8 o gaskets between upper/lower shell were torn.
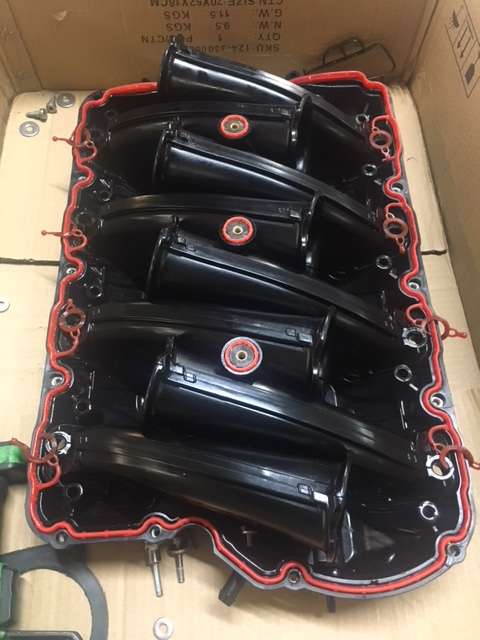
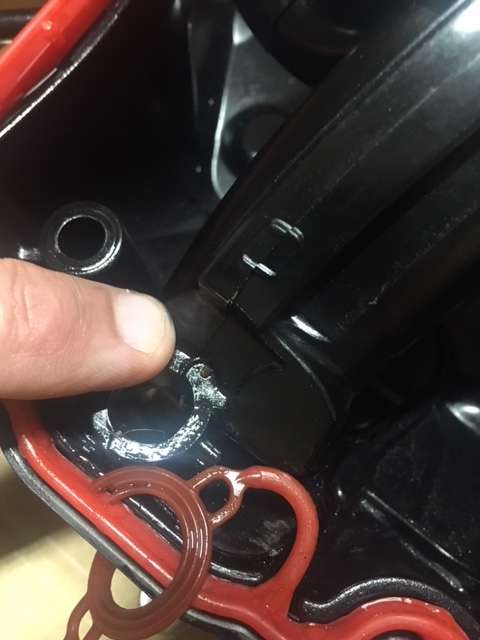
I think these little lips cause the gasket to tear.
I think these little lips cause the gasket to tear.
Last edited by TXGS507; 03-28-2018 at 04:09 PM.
03-28-2018, 04:09 PM
#33
Race Director
Member Since: Mar 2006
Location: Everywhere and Nowhere at all
Posts: 15,357
Received 1,679 Likes
on
1,135 Posts
and to think I went from a perfectly good FAST.... lol