When you click on links to various merchants on this site and make a purchase, this can result in this site earning a commission. Affiliate programs and affiliations include, but are not limited to, the eBay Partner Network.
Parked the car in a parking lot about an hour ago. Now key fob will not unlock the doors or hatch. Removed key and opened hatch. Alarm went off as it should. Opened the door and Alarm stopped. Placed fob in glovebox slot. No fob detected as I try to start it. Replaced battery. No difference. Battery is good, will not try to start and no fob detected is only message. Bad key fob? How can it fail and not be recognized by the car?
Car should start with the FOB in the glovebox slot even with no battery installed or RFI close by…have another spare FOB to try ??….these FOB testers are good to have and inexpensive…maybe a faulty RCDLR…if you have that good FOB press the start button…you should hear some clicking sounds…if only 1 clicky most likely bad RCDLR…also check fuse 11 in the underhood fusebox…make sure a test light illuminates on both fuse test points…#11 is battery power for RCDLR…if that fuse is blown the FOB won’t unlock the doors or rear hatch or let you start the car…RCDLR is “dead” !!…having a good scan tool that can communicate with all of the cars modules would be helpful…if you can’t communicate with the module you want to check its powers and grounds.
I had someone get the spare fob from my house and deliver it to us. 25 mile one way trip but the second fob did not flash the lights when trying to unlock the car remotely. The car started with no problem with fob #2 near it. Perhaps the second fob was not programed to operate the lights and it would not remotely unlock the doors either. I could unlock the door using the door button with the second fob in my hand and had no problem starting the car. I guess the original fob, the one that gets used all the time, has failed internally. I'll use the original fob #2 until I get a new one from Ebay. I should be able to program the new fob since I have one working fob.
Fob #1 would not operate anything when properly inserted into the glovebox slot. New battery or old battery, made no difference. I am gonna make sure the wires are connected on the glovebox slot because that door and some of the dash has been apart to install a new radio many years ago.
Another thing to check is that there have been a few cases where the antenna right behind the slot has fallen away, which would make the slot unable to power the fob. Does kind of sound like fob#1 has failed internally, though.
Ordering a new Ebay fob tonight. Should be able to program it via online instructions. It doesn't look too difficult. Also adding a new 2032 battery in every vehicle glovebox so we are never caught looking for one again,
The #1 and #2 fob are now working as normal now that we are home. The lights flash and they will lock and unlock the doors remotely and I can start the car. We all tried operating the #2 fob when they arrived with it while in the parking lot. and the lights didn't flash nor would the doors unlock via fob buttons. I was worried the car had another issue, but I unlocked the door via the door button and started the car with no issue. Strangest thing is the old #1 fob (with new battery) will now operate everything as normal here in the garage. Gonna look for an issue with the fob slot, as that should have worked and saved us a lot of trouble.
Walk in the park and guessing it has nothing to do with the fobs, but the last start up with the battery had low voltage isntead (glitched the modules with under voltage when you went to start the car).
Note, it take about 15 mins of driving above 2K rpms before a good low battery to fully charge back up again. If driving is just stop and go with the ACC on, may take even longer. So on that note for a while set your DIC to voltage, and keep an eye on it. It should be 14.1~14.3, and if in the 13.5V range of lower, may be time to check the alternator for possible clean up. https://www.corvetteforum.com/forums...nator-fix.html
So on that note of low voltage glitched RCDLT module, pop the hood, remove either the positive or negative battery cable from the battery (which ever is easy to pull off), touch the pulled cable off it battery terminal, to the other cable that is still on its battery terminal to fully discharge all the modules in the car, then reconnect the pulled battery cable back to its battery terminal. This will hard reset the modules in the car, and the fobs should start working again.
When you get back in the car, remember to re-index the windows,and stop by an auto parts store to have the battery load tested to see if it still good/need to be replace.
If battery is still good, then time to check the battery cables on both ends (where the ground cable bolts to the engine block, and where the postive cable bolts to the starter solenoid), and if your not driving the car for a few days, get it on a battery tender.
Note here, if car is lefts on battery tender long term without driving it, then depending on the tender, it too can voltage glitch the modules as well. So get in the habit of when you are pulling the car off the tender long term, press the unlock button on the fob to see if the lights do flash before you pull the tender off the car. If lights to not flash, the do the cable pull and cap discharge cable taps to discharge the modules as your pulling the car off the tender, and hard reset the modules on the battery cable reconnect.
As for battery cable nut, is a 10mm, so pick up a cheap 10mm socket, extension, and shorty ratchet to keep in the cubby of the car for this, as well as other tools that may come in handy for the car on the road.
If battery is still good, then time to check the battery cables on both ends (where the ground cable bolts to the engine block, and where the positive cable bolts to the starter solenoid),
Just re-read your post, and say that you did replace the battery. So check the above for problems, and do the cable touch off as well, since modules may have not fully drained down as the battery was replaced, for them to fully discharge and do a hard reset when the battery is reconnected.
Just remover to have nothing touching the disconnected battery terminal when you are touching it cable to the other connected post, or just remove both cables from the battery, and touch them together a few times away from the battery itself.
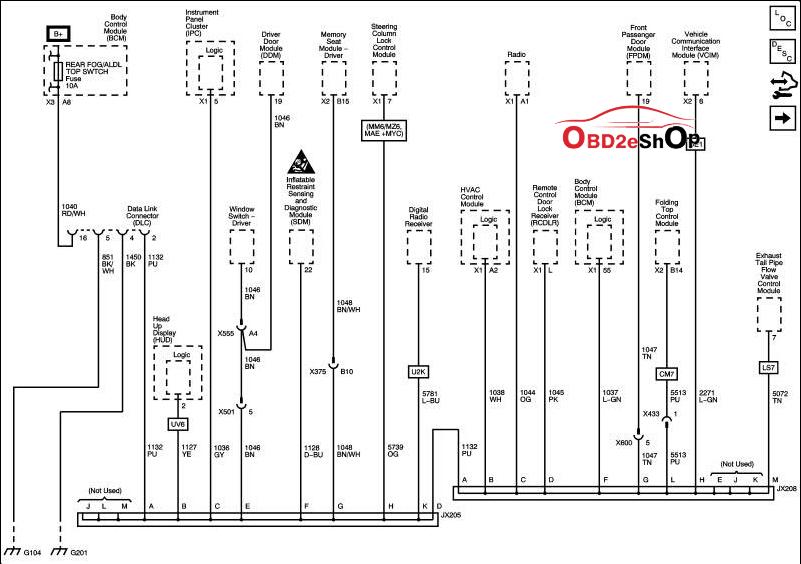
Short of that, could be that the RCDLR is working fine, but the problem is that the RCDLR signal is not making it way to the BCM on the class 2 lan bus through the Jx206 connector.
The Jx206 splice block connector is in the passeger foot well, and to the left of the Bose amp location on the second screw line down on the amp.
In the below photo, top left hand side, you will see a thing that looks like it sliglty glowing green. Its actualy silver, and it clipped to the plastic in the foot well. Unclip is, pull it up, and on the bottom of it, will see that the wires are just pushed into the splice block. So on that note, you can use the class 2 diagram to see when two wires you want to check or just push/pull each wire in the block to clean up its connecting to the slice block clips.
Short of a problem at the splice block and still on the data 1 bus, could be the BCM connectors that has a corrosion problem that you need to clean them, or could be back up in the dash above the radio, with either corrosion problem at the RCDLR connector, or cold solder joint problem of the board header pin soldering to the board itself.
You don't list your location, but if your in the Denver area, can swing by to make sure work of getting you back on the road again for free.
One other point to consider as reported recently by another owner who couldn’t get their fob to work in the slot. The fob needed to be all the way into the slot, and not at an angle. They got their car to start by making sure it was bottomed out in the slot and holding it in place. The green light lit on the Start Button, and they could then start the car.
Thanks for that information. We got the car home by using the second fob. It worked and started the car. The #1 fob case is old and had been taped together at the seams. I removed the tape when I swapped the known good battery from my wife's Nissan fob. Perhaps the fob wasn't making good contact inside. Will be ordering another case or complete fob. In the meantime I will carry the second fob in the corner toolbox with the battery removed. If there is another problem with the #1 fob, I will have the #2 fob with me and all I will need to do is install the battery.
Now all I have to do is pull the left fuel tank and look for a gas leak. Garage now smells like gas. The vette is gonna get parked in my shop today.
GM used to change them for free, but the time ran out of that.
If you are going to change the drivers side fuel pump (will come with fuel level sensor), then may as well pull the other tank to change it fuel level sensor as well. Over time, the swiper arms on the fuel level sender wear out first on that passenger side, and cheap enough to drop a new one in on that side, while you are changing out the fuel pump on the driver side.
Note, make sure you get the correct year of fuel level sensor, since they reversed the way the sensor reads in later years.
Hence drivers side has an actual pressure pump, while the passenger side has a siphon jet pump that is driving off the drivers side pressure pump. On the vet, the passenger side tank fuel is used first, then once its empty, the last half of the fuel is pulled from the driver tank. Since the passenger side tank is the first to be drained, its fuel level sending unit is the first to go out (its swiper arms wear out first).
Thanks for the info on the fuel system. Got the fuel level below 1/2 and no more fuel smell. Gonna keep it like that till cool weather even though my shop has AC. I just don't feel like messing with this type of repair at this time.
Designer Imagines A Corvette That Looks More Like a Corvette Than the Corvette
Slideshow: A Jaguar designer's personal project imagines what a modern front-engined Corvette might look like if Chevrolet revisited the golden age of the Stingray.


 That's a fair question as it will only work one way