



Painting Sequence
Thread Starter
Drifting

Joined: Jul 2006
Posts: 1,871
Likes: 6
From: Sault Ste. Marie Ontario
 Painting Sequence
Hi Guys,
I'm getting ready to spray my 73 at home and have been thinking about the moves with the gun.
Hopefully those of you who have painted one of these cars can chime in here. The car will be block down with 400, 600 & 800 before the base goes on.
I'd like to plan the moves to avoid overspray on the various panels so I thought a sequence like this would be best:
Start with the inside area around the rear window (sugar scoop), followed by the roof panels (on the car).
Then move onto the rear deck and facia. The hood and bumper would be next and then onto the side panels front to back, top to bottom.
With the base coat I'm thinking one tack coat, followed by two wet coats and a final cross coat to bring out the metallics.
With the clear, I thought I'd stop after the third coat, block the car down with 1200 and spray a final wet coat.
Hopefully any sags, orange peel, or dust will come out with the blocking and my final coat only needs compounding.
As this will be my first paint job, any help, tips or advise will be greatly appreciated.
Thanks in advance,
Ian
I'm getting ready to spray my 73 at home and have been thinking about the moves with the gun.
Hopefully those of you who have painted one of these cars can chime in here. The car will be block down with 400, 600 & 800 before the base goes on.
I'd like to plan the moves to avoid overspray on the various panels so I thought a sequence like this would be best:
Start with the inside area around the rear window (sugar scoop), followed by the roof panels (on the car).
Then move onto the rear deck and facia. The hood and bumper would be next and then onto the side panels front to back, top to bottom.
With the base coat I'm thinking one tack coat, followed by two wet coats and a final cross coat to bring out the metallics.
With the clear, I thought I'd stop after the third coat, block the car down with 1200 and spray a final wet coat.
Hopefully any sags, orange peel, or dust will come out with the blocking and my final coat only needs compounding.
As this will be my first paint job, any help, tips or advise will be greatly appreciated.
Thanks in advance,
Ian

Team Owner


Joined: Sep 2006
Posts: 31,221
Likes: 4,309
From: Westminster Maryland
Hi Ian,
I'm proud of you for painting it yourself.
I wish I could help you, but my experience is with lacquer and I'd think the sequence is different for base coat/clear coat.
I'm sure you'll get some good replies.
Regards,
Alan
PS: Lacquer is FOOL proof, and I've proved over and over that that's me!!!!
I'm proud of you for painting it yourself.
I wish I could help you, but my experience is with lacquer and I'd think the sequence is different for base coat/clear coat.
I'm sure you'll get some good replies.
Regards,
Alan
PS: Lacquer is FOOL proof, and I've proved over and over that that's me!!!!
Thread Starter
Drifting
Joined: Jul 2006
Posts: 1,871
Likes: 6
From: Sault Ste. Marie Ontario
Hi Ian,
I'm proud of you for painting it yourself.
I wish I could help you, but my experience is with lacquer and I'd think the sequence is different for base coat/clear coat.
I'm sure you'll get some good replies.
Regards,
Alan
PS: Lacquer is FOOL proof, and I've proved over and over that that's me!!!!
I'm proud of you for painting it yourself.
I wish I could help you, but my experience is with lacquer and I'd think the sequence is different for base coat/clear coat.
I'm sure you'll get some good replies.
Regards,
Alan
PS: Lacquer is FOOL proof, and I've proved over and over that that's me!!!!


Race Director


Joined: Feb 1999
Posts: 16,978
Likes: 7
From: In Dreams There Is Truth Ohio
If you are going to spray Bc/CC, do you have a self contained oxygen supply for breathing?
Moved your thread to Body and Paint section, lots of great information there...check out the posts and your Q's will be answered there....
Moved your thread to Body and Paint section, lots of great information there...check out the posts and your Q's will be answered there....
Last edited by GDaina; Jan 10, 2009 at 11:20 AM.
Team Owner
Joined: Sep 2006
Posts: 31,221
Likes: 4,309
From: Westminster Maryland
Hi Ian,
Although painting lacquer is very different from BC/CC here are some pictures of the fellow sprayng my 71. Perhaps they can be of some use to you. The really nice thing with spraying lacquer is you get such a nice high before you get the headache.
I'll be happy to answer any questions I may know anything about, but, I don't know much.
Regards,
Alan


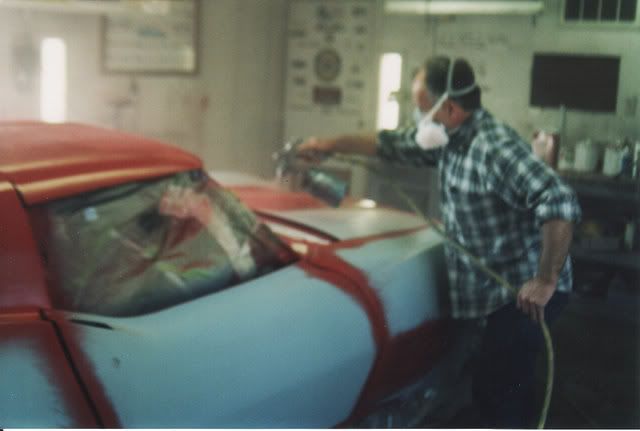
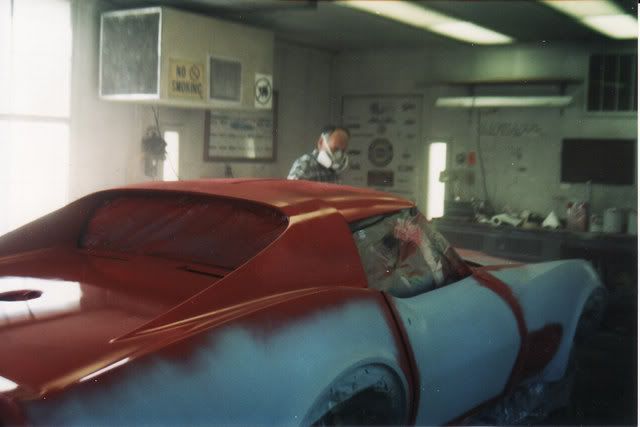


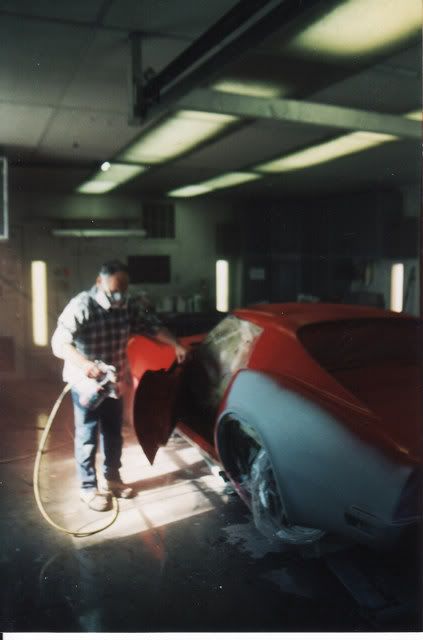

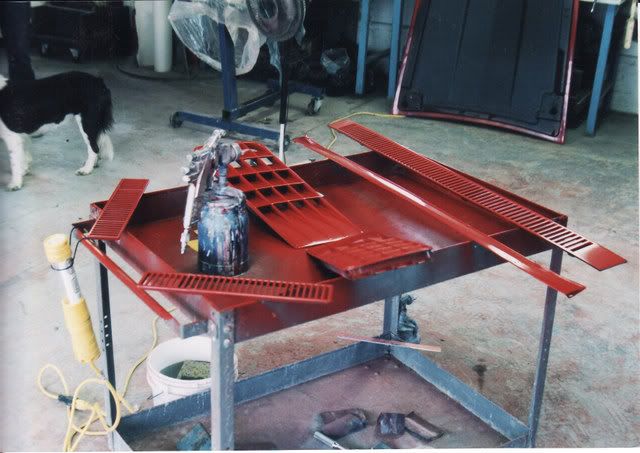
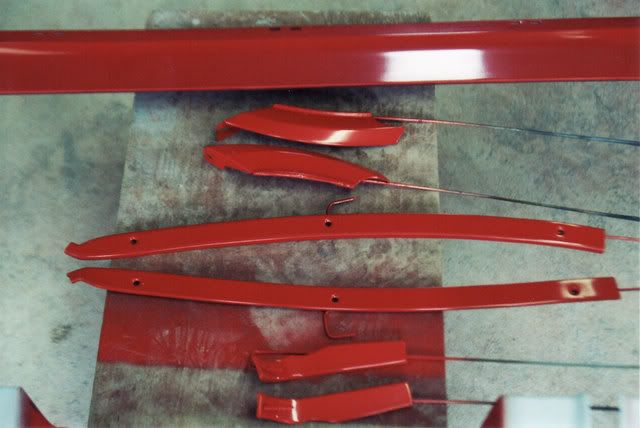
Although painting lacquer is very different from BC/CC here are some pictures of the fellow sprayng my 71. Perhaps they can be of some use to you. The really nice thing with spraying lacquer is you get such a nice high before you get the headache.
I'll be happy to answer any questions I may know anything about, but, I don't know much.
Regards,
Alan

Melting Slicks

Joined: Apr 2006
Posts: 2,084
Likes: 14
From: Airdrie Alberta
Great shots Alan!
Hey Ian!, You must be pumped now that you are at this stage!
I've done a few so i'll see if I can offer you some pointers from my experience
-Be very carefull painting in your home shop during the winter, the fumes/overspray can build up very quickly and with any spark...KaBoom
-Have a good water trap/filter or drier on your air line...with the cold weather you can get a lot of moisture created with the warm air from your compressor...bleed everything down before you start to get water/dirt out of the lines.
- Check the product sheet for the paint you are using, it will give air pressures and recoat times etc.
Clean floor and wash if you can, cover tool boxes etc
Blow car off and use tack rag one more time
Don't mask car off with plastic, the paint will dry and blow off on your next pass, newspaper contains oil, dust etc...use a high quality paper from your paint supplier
Shake paint well and use mixing containers for accuracy and paint filters when pouring paint into gun
test the spray pattern on some masking paper, set your air pressure at the gun (I use a small gauge/regulator at gun)
With BC/CC usually 2-3 coats are sufficient for coverage, its going to dry flat and dull and throw you off a bit, but will all come together when you spray the clear.
The important part is consistant pattern/distance, I try and shoot along the whole panel to avoid stopping in the middle and come back with a 50% overlap , Start at top and work down.
I will spray one side of roof, go around to other side of roof and spray, then same on hood, then down one side of car, go around do other side of car and finish up on the deck lid and rear.
Drape the airhose ofer your shoulder so it does not contact the car
Be concious of your clothes touching the car when spraying (especially when doing roof or hood)
After about 3 coats you should have even coverage but will be very flat/ dull looking....if you see any blemishes you can correct and touch them up now.
After the recommended dry time you can spray your clear...I used 3 wet coats to provide room for color sanding.
I am by no means a professional but have painted about 50 cars with the last one winning "Outstanding in class" at World of Wheels so I must have done something right Others may have more experience and do it for a living so I would go by what they say.
Good luck and send photos!!
Howard
Clean car thoroughly, blow dust off, wipe down with wax/grease remover and follow up with tach rag before spraying...aBooth is great if you can rent one in yourr area

The base coat is going to dry dull and flat looking, it will look kind of crappy, don't despair the clear will bring it to life. The important part here is to get complete coverage, make sure to check wheel well lips, around front/rear valence etc

Its Shiney!...make sure to use proper flash time between coats to allow paint to air out solvents other wise it could cause "Solvent Pop” also don’t pull masking paper off until it has cured overnight. Don’t worry too much about dust nubs or runs, you can sand/buff later

World of Wheels…

Hey Ian!, You must be pumped now that you are at this stage!
I've done a few so i'll see if I can offer you some pointers from my experience
-Be very carefull painting in your home shop during the winter, the fumes/overspray can build up very quickly and with any spark...KaBoom
-Have a good water trap/filter or drier on your air line...with the cold weather you can get a lot of moisture created with the warm air from your compressor...bleed everything down before you start to get water/dirt out of the lines.
- Check the product sheet for the paint you are using, it will give air pressures and recoat times etc.
Clean floor and wash if you can, cover tool boxes etc
Blow car off and use tack rag one more time
Don't mask car off with plastic, the paint will dry and blow off on your next pass, newspaper contains oil, dust etc...use a high quality paper from your paint supplier
Shake paint well and use mixing containers for accuracy and paint filters when pouring paint into gun
test the spray pattern on some masking paper, set your air pressure at the gun (I use a small gauge/regulator at gun)
With BC/CC usually 2-3 coats are sufficient for coverage, its going to dry flat and dull and throw you off a bit, but will all come together when you spray the clear.
The important part is consistant pattern/distance, I try and shoot along the whole panel to avoid stopping in the middle and come back with a 50% overlap , Start at top and work down.
I will spray one side of roof, go around to other side of roof and spray, then same on hood, then down one side of car, go around do other side of car and finish up on the deck lid and rear.
Drape the airhose ofer your shoulder so it does not contact the car
Be concious of your clothes touching the car when spraying (especially when doing roof or hood)
After about 3 coats you should have even coverage but will be very flat/ dull looking....if you see any blemishes you can correct and touch them up now.
After the recommended dry time you can spray your clear...I used 3 wet coats to provide room for color sanding.
I am by no means a professional but have painted about 50 cars with the last one winning "Outstanding in class" at World of Wheels so I must have done something right
Others may have more experience and do it for a living so I would go by what they say.Good luck and send photos!!
Howard
Clean car thoroughly, blow dust off, wipe down with wax/grease remover and follow up with tach rag before spraying...aBooth is great if you can rent one in yourr area
The base coat is going to dry dull and flat looking, it will look kind of crappy, don't despair the clear will bring it to life. The important part here is to get complete coverage, make sure to check wheel well lips, around front/rear valence etc
Its Shiney!...make sure to use proper flash time between coats to allow paint to air out solvents other wise it could cause "Solvent Pop” also don’t pull masking paper off until it has cured overnight. Don’t worry too much about dust nubs or runs, you can sand/buff later
World of Wheels…
Last edited by hwcoop; Jan 10, 2009 at 02:26 PM.

Melting Slicks


Joined: Oct 2000
Posts: 2,142
Likes: 195
From: Englewood FL
An excellent video is available called How to Paint your Car by
Kevin Tetz. He also has another very helpful video called
Color Sanding and Buffing. They are available from the
Eastwood Co. and direct from his web site. In the painting
video he shows the sequence of painting panels with the
objective being to paint panels by minimizing dry overspray
between or within a panel. For example he paints the hood:
starting with one fender and moving up to the center of the
hood. He then goes around to the other side of the car and
starts at the center of the hood and moves to the other
fender.
Living in a cold climate do you have a means of heating the
space and also providing for paint overspray exhaust?
I also live in a cold climate and have a heated garage with
a large exhaust fan in one wall. I cannot paint in the winter
as when using the exhaust fan, with the windows open to
provide air intake, the wall furnace will not be able to produce
enough heat.
Kevin Tetz. He also has another very helpful video called
Color Sanding and Buffing. They are available from the
Eastwood Co. and direct from his web site. In the painting
video he shows the sequence of painting panels with the
objective being to paint panels by minimizing dry overspray
between or within a panel. For example he paints the hood:
starting with one fender and moving up to the center of the
hood. He then goes around to the other side of the car and
starts at the center of the hood and moves to the other
fender.
Living in a cold climate do you have a means of heating the
space and also providing for paint overspray exhaust?
I also live in a cold climate and have a heated garage with
a large exhaust fan in one wall. I cannot paint in the winter
as when using the exhaust fan, with the windows open to
provide air intake, the wall furnace will not be able to produce
enough heat.
Last edited by mark79,80; Jan 10, 2009 at 01:18 PM.

Drifting

Joined: Jan 2006
Posts: 1,944
Likes: 22
From: Yooperville MI
Ian,
You mention sandpaper grits, always follow the tech sheet for the paint you are using. It will state the correct grit to use for each product to the next. Since you are outside the U.S., make sure to follow the proper standard "P" or "CAMI" designation. For example, the 800 you were using could be P800 or CAMI 800. The difference is; CAMI 800 is the same as P1500, quite a difference. P800 is like CAMI 400. Very important to follow in all stages of the project. Most tech sheets go by the CAMI method. All 3M paper in the U.S. is CAMI unless it's imported. Norton sells both types.
For the base coat, you should not exceed the mfr. maximum number of coats. With a quality high solids paint line there is no advantage, you'll just be increasing the paint film. Especially with the clear, more is not always better. With a lower paint line, you will likely need more color coats. If this is your first metallic paint job and you have a good spray gun, your spraying technique and amount of overlap will determine if you have streaks or not. Your technique and reducer temperature will also determine if the metallics lay correctly and the amount of orange peel you have. Consider practicing on an old body part that you can pick up from a body shop for free. You can also use it as a test panel to use during your painting instead of the garage wall.
Every painter has his own techniques, and has perfected them over time to work for him, so there are lots of ways to do the same thing. You'll develop your technique on your first paint job. As long as you have good equipment (air filters, gun, compressor), your supplies are lined up, and you have your tech sheets handy, you should be fine. If you are using the same spray gun that you used for all your primers, you should take it apart and clean it. You don't want a dirty gun especially with metallics.
I would paint the T-tops, front bumper, headlights and all trim off the car, even with your metallic paint. Are you painting with the doors on or off, this is a personal preference and I've done it both ways. If you paint with the doors on, I would do the jams first, then mask the jams with transition and foam tape. You can paint the jams during the paint process, but you may end up with some dry spray which creates extra detail work and won't turn out as nice especially the hinge area. With the t-tops and front bumper off, you'll have nice paint detail in those jams.
Is your front bumper urethane or fiberglass? Is it on or off the car?
My technique is to start on the LH side at the center of the cowl and spray the hood and surround at the same time to just over the fender edge, then do the same on the RH side of the hood and surround. You want to make one complete pass from cowl to bumper edge without stopping and back in the opposite direction with the next pass and so on. Don't stop midway. Rock from one foot to the other on long panels, don't walk with the gun and keep spraying at a continuous pace. Put the air hose over your should when working on top of panels. You always want to do one complete panel at a time. Do the edges then the panel from top to bottom with some overlap to the adjacent panel. When spraying don't release the trigger all the way at the end of a pass, just release enough to stop paint flow.
Being your first job, you might need to sand between coats if you have dry spray or excessive orange peel. If you sag a metallic, you'll need to sand it out and respray the panel. Have your base color mixed as a gallon and mix it very well initially and every time you refill the gun so that you will have consistant color match throuhout the car. Periodically shake the gun between panels to mix the metallics. Cross coats that you mention go back to the lacquer days and todays guns don't really need it. If your gun sprays good, the mix is right on for the temperature and your technique is good, you shouldn't need to sand between coats. However if you clear over a metallic base that has a lot of orange peel, the peel will show as a strange paint texture under the clear. Good Luck!
You mention sandpaper grits, always follow the tech sheet for the paint you are using. It will state the correct grit to use for each product to the next. Since you are outside the U.S., make sure to follow the proper standard "P" or "CAMI" designation. For example, the 800 you were using could be P800 or CAMI 800. The difference is; CAMI 800 is the same as P1500, quite a difference. P800 is like CAMI 400. Very important to follow in all stages of the project. Most tech sheets go by the CAMI method. All 3M paper in the U.S. is CAMI unless it's imported. Norton sells both types.
For the base coat, you should not exceed the mfr. maximum number of coats. With a quality high solids paint line there is no advantage, you'll just be increasing the paint film. Especially with the clear, more is not always better. With a lower paint line, you will likely need more color coats. If this is your first metallic paint job and you have a good spray gun, your spraying technique and amount of overlap will determine if you have streaks or not. Your technique and reducer temperature will also determine if the metallics lay correctly and the amount of orange peel you have. Consider practicing on an old body part that you can pick up from a body shop for free. You can also use it as a test panel to use during your painting instead of the garage wall.
Every painter has his own techniques, and has perfected them over time to work for him, so there are lots of ways to do the same thing. You'll develop your technique on your first paint job. As long as you have good equipment (air filters, gun, compressor), your supplies are lined up, and you have your tech sheets handy, you should be fine. If you are using the same spray gun that you used for all your primers, you should take it apart and clean it. You don't want a dirty gun especially with metallics.
I would paint the T-tops, front bumper, headlights and all trim off the car, even with your metallic paint. Are you painting with the doors on or off, this is a personal preference and I've done it both ways. If you paint with the doors on, I would do the jams first, then mask the jams with transition and foam tape. You can paint the jams during the paint process, but you may end up with some dry spray which creates extra detail work and won't turn out as nice especially the hinge area. With the t-tops and front bumper off, you'll have nice paint detail in those jams.
Is your front bumper urethane or fiberglass? Is it on or off the car?
My technique is to start on the LH side at the center of the cowl and spray the hood and surround at the same time to just over the fender edge, then do the same on the RH side of the hood and surround. You want to make one complete pass from cowl to bumper edge without stopping and back in the opposite direction with the next pass and so on. Don't stop midway. Rock from one foot to the other on long panels, don't walk with the gun and keep spraying at a continuous pace. Put the air hose over your should when working on top of panels. You always want to do one complete panel at a time. Do the edges then the panel from top to bottom with some overlap to the adjacent panel. When spraying don't release the trigger all the way at the end of a pass, just release enough to stop paint flow.
Being your first job, you might need to sand between coats if you have dry spray or excessive orange peel. If you sag a metallic, you'll need to sand it out and respray the panel. Have your base color mixed as a gallon and mix it very well initially and every time you refill the gun so that you will have consistant color match throuhout the car. Periodically shake the gun between panels to mix the metallics. Cross coats that you mention go back to the lacquer days and todays guns don't really need it. If your gun sprays good, the mix is right on for the temperature and your technique is good, you shouldn't need to sand between coats. However if you clear over a metallic base that has a lot of orange peel, the peel will show as a strange paint texture under the clear. Good Luck!
Corvette Stories
The Best of Corvette for Corvette Enthusiasts

Top 10 Most Explosive Corvettes Ever Made: Power-to-Weight Ratio Ranked!
Joe Kucinski
150 hp to 1,250 hp: Every Corvette Generation Compared by the Specs That Matter
Joe Kucinski
8 Coolest Corvette Pace Cars (and Replicas) of All Time
Verdad Gallardo
Top 10 Corvette Engines RANKED by Peak Torque (70+ Years of Muscle!)
Joe Kucinski
Corvette ZR1X Will Be Pacing the Indy 500, And Could Probably Race, Too!
Verdad Gallardo
Top 10 Corvettes Coming to Mecum Indy 2026!
Brett Foote
Top 10 C9 Corvette MUST-HAVES to Fix These C8 Generation Flaws!
Michael S. Palmer
10 Revolutionary 'Corvette Firsts' Most People Don't Know
Joe Kucinski
5 Reasons to Upgrade to an LS6-Powered Corvette; 5 Reasons to Stay LT2
Michael S. Palmer
Melting Slicks
Joined: Apr 2006
Posts: 2,084
Likes: 14
From: Airdrie Alberta
My technique is to start on the LH side at the center of the cowl and spray the hood and surround at the same time to just over the fender edge, then do the same on the RH side of the hood and surround. You want to make one complete pass from cowl to bumper edge without stopping and back in the opposite direction with the next pass and so on. Don't stop midway. Rock from one foot to the other on long panels, don't walk with the gun and keep spraying at a continuous pace. Put the air hose over your should when working on top of panels. You always want to do one complete panel at a time. Do the edges then the panel from top to bottom with some overlap to the adjacent panel. When spraying don't release the trigger all the way at the end of a pass, just release enough to stop paint flow.
Being your first job, you might need to sand between coats if you have dry spray or excessive orange peel. If you sag a metallic, you'll need to sand it out and respray the panel. Have your base color mixed as a gallon and mix it very well initially and every time you refill the gun so that you will have consistant color match throuhout the car. Periodically shake the gun between panels to mix the metallics. Cross coats that you mention go back to the lacquer days and todays guns don't really need it. If your gun sprays good, the mix is right on for the temperature and your technique is good, you shouldn't need to sand between coats. However if you clear over a metallic base that has a lot of orange peel, the peel will show as a strange paint texture under the clear. Good Luck!
Being your first job, you might need to sand between coats if you have dry spray or excessive orange peel. If you sag a metallic, you'll need to sand it out and respray the panel. Have your base color mixed as a gallon and mix it very well initially and every time you refill the gun so that you will have consistant color match throuhout the car. Periodically shake the gun between panels to mix the metallics. Cross coats that you mention go back to the lacquer days and todays guns don't really need it. If your gun sprays good, the mix is right on for the temperature and your technique is good, you shouldn't need to sand between coats. However if you clear over a metallic base that has a lot of orange peel, the peel will show as a strange paint texture under the clear. Good Luck!

Excellent advice

You will develp the feel for it , once your done you're going to want to do another....its addictive!


Thread Starter
Drifting
Joined: Jul 2006
Posts: 1,871
Likes: 6
From: Sault Ste. Marie Ontario
Thank you much guys for the tips. I'm getting more excited about the job every day I get closer. Hopefully it goes without a hitch.
Buy the time I'm ready for paint, I should have the inside of the doors, the jambs, hood surround and the t-roof flanges painted. The bumper is on the car as are the headlight assemblies.
I'll post a few shots as I get closer.
Thanks again for the input.
Ian
Buy the time I'm ready for paint, I should have the inside of the doors, the jambs, hood surround and the t-roof flanges painted. The bumper is on the car as are the headlight assemblies.
I'll post a few shots as I get closer.
Thanks again for the input.
Ian


Race Director
Joined: Feb 1999
Posts: 16,978
Likes: 7
From: In Dreams There Is Truth Ohio
I hope you wear a self contained oxygen supply...BC/CC is extremely toxic, and one you breathe that stuff...just make sure your finances are up to date and you have a good life insurance policy. A filter won't do.
It would be wise to read the poisonous content that's in the product....
It would be wise to read the poisonous content that's in the product....
Melting Slicks
Joined: Apr 2006
Posts: 2,084
Likes: 14
From: Airdrie Alberta
Hi Ian, looking great!.
You will want to remask your wheel wells and jams with paper as the paint will flake off the plastic and land right on your fresh paint
Thats going to look real nice when your done!....good thing gas is cheap now you can drive it out west to show me after and come to our cruise nights!
You will want to remask your wheel wells and jams with paper as the paint will flake off the plastic and land right on your fresh paint
Thats going to look real nice when your done!....good thing gas is cheap now you can drive it out west to show me after and come to our cruise nights!


Thread Starter
Drifting
Joined: Jul 2006
Posts: 1,871
Likes: 6
From: Sault Ste. Marie Ontario
Hi Ian, looking great!.
You will want to remask your wheel wells and jams with paper as the paint will flake off the plastic and land right on your fresh paint
Thats going to look real nice when your done!....good thing gas is cheap now you can drive it out west to show me after and come to our cruise nights!
You will want to remask your wheel wells and jams with paper as the paint will flake off the plastic and land right on your fresh paint
Thats going to look real nice when your done!....good thing gas is cheap now you can drive it out west to show me after and come to our cruise nights!
I've already experienced the paint flying of the plastic, so the final masking is going to be paper. I plan to pull the wheels and mask off the inner fenders as they have already been painted.
I got a good start on the drivers side door jamb last night then some buddies came over and out came the beer.
My fridge is empty now so hopefully I can finish today.
