


wetsand

Melting Slicks

Joined: Jun 2009
Posts: 2,709
Likes: 3
From: Savannah GA

Lacquer shrinks as it cures... sometimes for months after application if the film is either thick, or if each "step" i.e. primer/sand/primer then color/clear was not allowed to sit open for any length of time between applications to allow adequate flash time. I would both add an extra coat of clear if it's not too late, and wait at least 30 days before first wet sand/polish. The extra coat of clear is there in case the finish "dies back" or starts to show repair shadows after several months... there's possibly enough extra clearcoat to allow a second wet/buff.

Race Director


Joined: Apr 2009
Posts: 19,294
Likes: 2,754
From: Charlotte NC
Like markisd77 mentioned...is makes a diufference.
When I do a lacquer job. I use PPG's DTL 105 thinner in the clear. In doing so. About two days ( depending on the temperature of a normal day being above 70 degrees) I will wetsand the clear and thenn allow it to sit OPEN CUT for several days. Putting it in the sun and then putting it in the shade. In and out, in and out. Then after a few days...or maybe a week....depending on how it smells when it is in the sun. YES I wrote smells. The less you can smell the solvents coming out...the closer you are to having it dried enough for buffing.
Then I will do a fingernail test in a spot that will be covered up by a mirror or bumper. Depending on how much my fingernal goes into the clear...will let me know it is ready to wash down and buff out.
SO if you really "stacked" the coats of clear on this car. You may want it to dry for a while. On some old "candy" paint jobs in the past that I had done when lacquer was the only way to go. It might have to cure out for 60 days. And this was due to the excessive coats required to achieve a good candy paint job....which is much more of an extreme than a normal paint job.
The main thing is to soak your wetsandpaper for a while so it will loose some of its "crispness". A fresh sheet of wet sand paper can cut into the fresh lacquer...and make a crease.. if the paper is allowed so sand on the edge of the paper. BE PATIENT..because fresh lacquer is soft...BUT being sanded and OPEN CUT will allow it to dry/cure a bit quicker.
"DUB"
Melting Slicks
Joined: Jun 2009
Posts: 2,709
Likes: 3
From: Savannah GA
I respectfully disagree with Dub on his last point... if your paint is still soft enough to "catch an edge" on your paper, it's too soft to buff. Fully cured lacquer is almost glass hard and as brittle... if sanded while fingernail mark soft it can cure (and shrink) enough to show the sand scratches from the "soft" sanding... that's the "die back" I alluded to previously.
Thread Starter
Advanced


Joined: May 2008
Posts: 97
Likes: 3
From: Rochester N.Y.
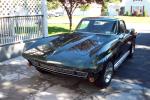
I had this car painted by a paint shop.
They used PPG Duracryl lacquer base and
Dupont 480s ready to spray clear so im assuming
they didn't use any thinner.
By the amount of orange peel I assume they
pounded it on.
I've been letting it bake in the sun the last few days
and it seems the paint is settling down and lessening
the orange peel.
They used PPG Duracryl lacquer base and
Dupont 480s ready to spray clear so im assuming
they didn't use any thinner.
By the amount of orange peel I assume they
pounded it on.
I've been letting it bake in the sun the last few days
and it seems the paint is settling down and lessening
the orange peel.

Burning Brakes

Joined: Oct 2006
Posts: 794
Likes: 2
From: Allentown Pa.
Coming from a very old retired painter I agree that if you can smell solvents, and a fingernail can mark it, " it aint ready to be buffed ". At my very old age of 72 I still miss the smell of old style laquer paint, thinner, and primer. It is a miricule I lived this long cause in the old days I sprayed a ton of the stuff. Allentown Ernie.
Race Director
Joined: Apr 2009
Posts: 19,294
Likes: 2,754
From: Charlotte NC
goodwood67,
You might want to find out how much clear they applied. Better to be safe than sorry. If they feel that you should have no problem in getting a slick surface....then I would say I would have to trust that.
Sorry, I know nothing about the clear that was used.
No problem. AND very respectfully....I agree.  FULLY cured lacquer is hard and brittle. But you also have to remember...that I do not have 6 months to wait for paint to cure and then deliver a car. SO ...processes and steps that I have used SPEED UP the process and yet still deliver a show winning paint job. Which you somewhat stated in your previous post. IT has ALL to do with giviing the lacquer enough time to flash BETWEEN coats and processes....AND the GRADE of thinner used for the temperature conditions at the time of spraying.
But even the new urethane clears that get rock hard very quickly can still get damaged if the sharp crisp edge of a NON-softened sheet of wet sand paper is allowed to run across it incorrectly. AND knowing that lacquer is about 7% solids....it makes it even more prone to a problem...fully cured or not.
I do have to admit that the longer you can wait...the better it is.
For those who may not know what "die-back" means: It is an industry term when the shine of a paint job dulls/hazes out. Usually due to solvents or vapors that are still escaping from the finish and the air flow around the car is not high enough to remove these solvents...and these solvents/vapors lay back down on the surface and cause it to dull out or become hazey. Paint settling or shrinking AFTER the paint job and showing previous repair work is just plain bad body work, prep or lack of proper priming/materials. SO a lacquer job...when cleared numerous times...has a high probability of "die-back" if it is not in an environment that has very good air movement and a way for the vapors/fumes to leave the area where the car is drying. But it does not matter anyway...because you are more than likely going to sand and buff it anyway....and that haze will now be a shine.
"DUB"
You might want to find out how much clear they applied. Better to be safe than sorry. If they feel that you should have no problem in getting a slick surface....then I would say I would have to trust that.
Sorry, I know nothing about the clear that was used.
I respectfully disagree with Dub on his last point... if your paint is still soft enough to "catch an edge" on your paper, it's too soft to buff. Fully cured lacquer is almost glass hard and as brittle... if sanded while fingernail mark soft it can cure (and shrink) enough to show the sand scratches from the "soft" sanding... that's the "die back" I alluded to previously.
FULLY cured lacquer is hard and brittle. But you also have to remember...that I do not have 6 months to wait for paint to cure and then deliver a car. SO ...processes and steps that I have used SPEED UP the process and yet still deliver a show winning paint job. Which you somewhat stated in your previous post. IT has ALL to do with giviing the lacquer enough time to flash BETWEEN coats and processes....AND the GRADE of thinner used for the temperature conditions at the time of spraying.But even the new urethane clears that get rock hard very quickly can still get damaged if the sharp crisp edge of a NON-softened sheet of wet sand paper is allowed to run across it incorrectly. AND knowing that lacquer is about 7% solids....it makes it even more prone to a problem...fully cured or not.
I do have to admit that the longer you can wait...the better it is.
For those who may not know what "die-back" means: It is an industry term when the shine of a paint job dulls/hazes out. Usually due to solvents or vapors that are still escaping from the finish and the air flow around the car is not high enough to remove these solvents...and these solvents/vapors lay back down on the surface and cause it to dull out or become hazey. Paint settling or shrinking AFTER the paint job and showing previous repair work is just plain bad body work, prep or lack of proper priming/materials. SO a lacquer job...when cleared numerous times...has a high probability of "die-back" if it is not in an environment that has very good air movement and a way for the vapors/fumes to leave the area where the car is drying. But it does not matter anyway...because you are more than likely going to sand and buff it anyway....and that haze will now be a shine.
"DUB"
Corvette Stories
The Best of Corvette for Corvette Enthusiasts

5 Best & 5 Worst Corvette Daily Drivers
Joe Kucinski
The Headlights of Every Corvette Generation Explained
Joe Kucinski
5 Best & 5 Most Overrated Corvette Track Packages of All Time!
Joe Kucinski
Every 2027 Corvette Engine Explained
Joe Kucinski
Designer Imagines A Corvette That Looks More Like a Corvette Than the Corvette
Verdad Gallardo
10 Ugly Corvettes That We Still Kinda Love
Joe Kucinski
Top 10 Most Expensive Corvettes Ever Sold on Bring A Trailer
Brett Foote
10 Things Every Corvette Owner Needs (2026 Edition)
Michael S. Palmer
8 Most "Only Corvette Owners Understand" Quirks and Problems
Pouria Savadkouei
Race Director
Joined: Apr 2009
Posts: 19,294
Likes: 2,754
From: Charlotte NC
I would have...much like markids77 mentioned....sanded down the clear to get it slick and then apply another coat of clear or two to thus reducing the amount of texture when done. ALSO using a premixed product instead of one that can be altered by adding more thinner is something I would not have done. But as long as it has worked out...you are fine.
To answer you question...it has a lot to do with really how heavy your texture is. I would start with 1000 grit and either use runnimg water that has a water filter attached to your hose spicket...or a large bucket with a small amount of liquid soap (JOY) in it to aid in keeping the paper clean and allowing teh residue ti leave the paper.
Do your sanding inside if possible, without a lot of wind blowing around to keep the possibility of trash getting betweeen the paper and your clear.
I would sand it down to about 85% sanded...with the 1000 grit. then switch to finer grits until you get it completely sanded. Leaving behind a small amount of texture makes it so you know that you are removing the previous sand scratches from the corser grade sandpaper(s). You can start with 800 grit if it seems that the 1000 grit is taking to long. BUT just makse sure that you stop before you get it totally texture free and switch to the next grit. By the time you are said and done and texture free. If you stop with 2000 grit. The clear will buff back super fast. You can go to 3000 or even 3500 grit. But with the properties of lacquer...you should not need to do so...because it buffs back fast due to being so low in solids.
It really does not matter how or what direction you sand in when sanding. BUT I always try to have my final direction of sanding...lets say from front to rear...be the same all across the body when completing a stage of sandpaper. SO if you sanded you door from top to bottom...and sanded your fender from front to rear...where your strokes went from front to rear. I would then lightly go across the door again and get the sand scratches to go from front to rear. The reason for this is when you go to buff. I cross cut with teh biffing pad and it takes out the scratches faster. IF you criss-cross all of your sanding and do not have a precise preocedure to this. When buffing, you may encounter sand scratches and what have to that are going all different directions...and thus causes for more time in sanding and buffing to get these out. You want it to look like brushed stainless steel. ALL the scratches going the same way BEFORE you buff. SO if it is easier to go side to side on your convertible deck lid...that is fine....just as long as they are going the same direction ( as much as possible) when completed. Where the top fender wraps around to your headlight area...you can change direction there also and have the scratches now go side to side across your headlight buckets if you want. JUST as long as there is a flow to your scratches and the way you sand. That is my opinion in this.
"DUB"
Melting Slicks
Joined: Jun 2009
Posts: 2,709
Likes: 3
From: Savannah GA
Be sure to use a sanding block of some sort while wetting the car. Your palm and fingers apply uneven pressure which can create ridges in the surface which might show in the final gloss. Also a neat trick to see if you're sanded enough is to use a rubber "spot putty applicator" as a squeegee to dry the surface of the paint quickly and damage free... they're available at any paint store.
Stay at least 1/4 inch away from edges and peaks while sanding if this is your first time as it is really easy to cut through the clear in these areas. You can usually adjust buffing time in these areas to get an even gloss and reduce the risk of cut throughs. If you sand or buff through the clear you will see a shadow line which looks sort of like oil sheen on water... repairing this will require re-clearing the car.
Stay at least 1/4 inch away from edges and peaks while sanding if this is your first time as it is really easy to cut through the clear in these areas. You can usually adjust buffing time in these areas to get an even gloss and reduce the risk of cut throughs. If you sand or buff through the clear you will see a shadow line which looks sort of like oil sheen on water... repairing this will require re-clearing the car.
Last edited by markids77; Jun 19, 2010 at 10:19 AM. Reason: added more info
