Bumper removal on a 91
 03-26-2012, 08:25 PM
#1
Race Director


Thread Starter


Gonna repaint my Steel Blue Metallic 91 coupe this year.. I bought a big used 220V compressor and a decent set of guns for the job and have some good advice from semi-pros along with a how-to DVD and a "how to paint in your garage" book.
I have tried the search feature here with no luck.
It looks like there are several bolts that hold the front and rear facia in place via a reinforcement strap.
Any words of wisdom on what to avoid/tricks of the trade for not screwing this up?
The existing paint is quite thin and the front and rear are badly faded. I got the paint to shine up on all the other panels with a buffing job but am down to the primer on the nose and tail. I figure I can get a better match if I just just prep and paint the entire car.
I do have one problem spot on the clamshell hood where the previous owner closed it on something (oil filler cap) that was resting on the TPI plenum. Looks like I cold sand the small, cracked bulg down but what do I use to level/fill the low spot in the smc after I have done this?
Thanks in advance!
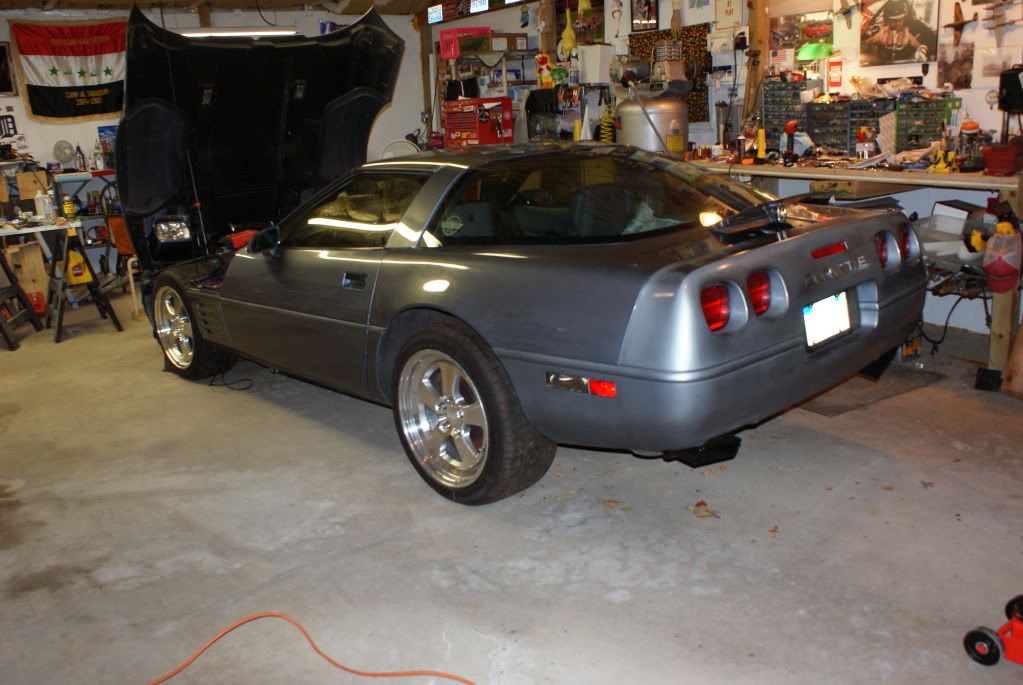
Here's my 91. Bought from the original owner who flew jets for the USAF. She spent a lot of time parked out in the sun on Western US Air Force bases.
I have tried the search feature here with no luck.
It looks like there are several bolts that hold the front and rear facia in place via a reinforcement strap.
Any words of wisdom on what to avoid/tricks of the trade for not screwing this up?
The existing paint is quite thin and the front and rear are badly faded. I got the paint to shine up on all the other panels with a buffing job but am down to the primer on the nose and tail. I figure I can get a better match if I just just prep and paint the entire car.
I do have one problem spot on the clamshell hood where the previous owner closed it on something (oil filler cap) that was resting on the TPI plenum. Looks like I cold sand the small, cracked bulg down but what do I use to level/fill the low spot in the smc after I have done this?
Thanks in advance!
Here's my 91. Bought from the original owner who flew jets for the USAF. She spent a lot of time parked out in the sun on Western US Air Force bases.
 03-26-2012, 09:09 PM
#2
Race Director
Thread Starter
I foumd this here from Dub: For what it is worth...
When you are installing the rear urethane bumpers on your Corvette. It is wise not to tighten the heck out of the bolts and nuts that hold it in place. Overtightening these fasteners can and often times causes ripples and/or buckles in the bumper cover due to uneven pressure and stress that you are applying to the cover.....by over thightening these fasteners. The bumper cover has not part of impact resistance ...it is just a panel that is styled for looks. As long as it is secure and does not move...and will not fall off...the fasteners do not need to be so tight that you chip your teeth installing them.
So...if it looked great in the garage and when it is out in the sun for a while and it warps, buckles or ripples....to the point that you can get "sea-sick"...your fasteners are to tight. This is what I have found to be the issue in the past...for what it is worth to you all.
On the 1984-1996 rear bumpers...the four nuts (2 per side) that are installed ABOVE the rear side marker lights can be tightened well....due to having ( or still should have) the metal retainer "pop" riveted to the cover to give it strength and reinforcement. The 2 bolt and nut assemblies that are located behind the reverse lights can be tighten well also.
For those years that have the antenna mounting bracket mounted to the studs that hold the bumper to the left quarter panel. Use your best judgement and get it as tight as you feel comfortable with...so that the antenna is secure and hopefully the bumper will not distort.
Any more info would be appreciated.
03-26-2012, 10:17 PM
#3
Race Director
Thread Starter
I am finding good info here so I will copy it for anyone that needs this same info. Feel free to jump in with any other info that might be helpful.
This is from Jay Axon:
--------------------------------------------------------------------------------
You decide what you want to remove, I removed the following parts:
Rear fascia (I think this is a must for a quality paint job on a C4 as it butts up against the car body with no gap. New paint will form a bridge that will crack once the car bends, like opening a painted shut window in your house) Figure 3-5 hours to remove, it is bit of a puzzle. You need to remove the license plate stuff, then you can get behind the tail lights, and then the gas lid area 1st. You will need to go thru all these areas to access the bolts holding on the bumper. The worst was the two bolts connecting the bumper to the rear quarters just behind the wheels. You need to go thru the wheel wells to get to them. You will need a deep socket 10mm (I think), I didn�t have one and had to use an open end wrench blind in the hole. Cost me an extra 1.5 hours easily.
Front fascia. (It�s really hard to paint under the car and it goes back a good 1.5 feet. No gap, but if you jack it up you�ll see repaint tell tales if you don�t pull it off . Plus you know it�s been scraped to ah hell from 20 years of hitting parking barriers and high incline driveways) 2.5 hours to remove.
Side fenders (easy to remove, depending on year really suck to sand which will be easier to do if off of car) 0.5 hours to remove.
Bottom kick board runner things under the doors. (Really hard to work on these as they are under the car, so I pulled them) WARNING there is a hidden bolt towards the rear wheel from behind, you need to get at it by removing rear wheel well bolts and reaching inside, 10mm. I broke the nut thru the fiberglass underbody on the first one I removed. Wasn�t happy but a washer should fix on re-assembly) 1hour to remove.
Headlight covers top and bottom. I guess you can paint with these on, but they don�t take much effort to remove and it�s easier to mask) 0.75 hour remove
Door mirrors � tuff call I removed them. Not as easy as it looks. You need to remove the door panels. The two Door mirror bolts are easy, but the cable sucks. Real hard to undo cable from fastener that is inside the door about a foot in towards the jam. It�s one of those fasteners that snapped shut but can be opened by skewing the top part away from the bottom, sliding the top out of the grove it snapped into. You will need this fastener intact to keep the window from hitting the power mirror wire once re-assembled. Also, to get the door panel plastic lock finger thingy off, it just snaps outward away from the door towards the interior of the car to remove. This isn�t obvious. There are some hidden screws in there. If you have a service manual, the diagrams will help to locate them. Figure 2 hours to remove mirrors.
Molding/Belt � Pretty easy to remove. Once the nuts on the edges of the doors are removed, the inside connectors just pop out of the doors.
Outside door window weather seals � There is no way you can remove these and salvage them for reuse from what I can tell. Either leave them on or figure on replacing them. If you have the mirrors off you already have access to them for removal. BE CAREFULL! They are riveted in. You will need to drill the 3 rivets out. The middle rivet is a lot closer to the door skin than the others. I accidently drilled a small hole through my door! Fortunately it wasn�t a big deal to fix when I already had the filler out for the low spots and bumper repair. My research on the forum said buy real GM replacements. I found them on E-Bay for about $100 shipped, aftermarkets from midamerica were like $65.
Weatherstripping �It�s already cracked and a mess, why paint around it when it needs replaced anyway? Now is the time to do it. Yeah it sucks to toss another $350-$400 into it. You�ll probably mess up the door weatherstrip anyway when removing the outer door seals. The forum research showed Willcox to be the best bang for the buck with proper fit, about $350 for the kit. Other kits of same price or higher from other retailers had fit issues so it�s a no brainer. Best option is original GM for $750 or more. Willcox for me. The old stuff doesn�t want to come off the forward side of the A-piller. The rear hatch was just pulled of easy. I won�t do the doors, targa, and winidshield until after the car is painted. I even removed the trim the weatherstrip mounted to on the a-pillar so I could clean up the glue with a wire wheel and we didn�t have to paint around it. Maybe Overkill. Figure 3-4 hours.
Doors � If you want to do the jams right you need to pull them. I am staying with the same color and my car is parked outside, so I decided to not paint the jams and leave the doors on. The removal of the power door mirror wire really sealed the deal on this decision. I really didn�t want to find out how many hours it was going to take to unhook the wiring and reinstall later. Plus the doors line up really nicely, I could imagine hours spent trying to get the gaps to look right again on reinstall.
Hood � I left it on as well
03-26-2012, 10:21 PM
#4
Race Director
Thread Starter
More from "Ax". Thanks buddy
This would be a good time to briefly discuss what your car is made of. The majority of it is SMC fiberglass (Hood, door skins, read quarters), the bumpers or �fascias� are made of TPU ( http://en.wikipedia.org/wiki/Thermop..._polyurethanes) , and a few parts like the gas lid and mirrors are aluminum. WARNING � body filler approved for one of these materials may not work on another. It may look like it works and develop problems later. I read a post where a professional shop used glaze putty on the SMC fiberglass door and a year or so later the paint was bubbling off. Scared the crap out of me as I didn�t question some advice given to me and used some polyester filler, originally purchased to fix a crack in my rear TPU bumper, to fill in some low spots on the SMC fiberglass. It was not specifically approved for fiberglass and I thought I was going to have to sand it all off and redo at a cost of 1-2 days work. I finally got to one of the manufacturer�s chemists and got a thumbs up; I got lucky. Make sure you use the right stuff on the right material or all your hard work might fall apart later.
This would be a good time to briefly discuss what your car is made of. The majority of it is SMC fiberglass (Hood, door skins, read quarters), the bumpers or �fascias� are made of TPU ( http://en.wikipedia.org/wiki/Thermop..._polyurethanes) , and a few parts like the gas lid and mirrors are aluminum. WARNING � body filler approved for one of these materials may not work on another. It may look like it works and develop problems later. I read a post where a professional shop used glaze putty on the SMC fiberglass door and a year or so later the paint was bubbling off. Scared the crap out of me as I didn�t question some advice given to me and used some polyester filler, originally purchased to fix a crack in my rear TPU bumper, to fill in some low spots on the SMC fiberglass. It was not specifically approved for fiberglass and I thought I was going to have to sand it all off and redo at a cost of 1-2 days work. I finally got to one of the manufacturer�s chemists and got a thumbs up; I got lucky. Make sure you use the right stuff on the right material or all your hard work might fall apart later.
03-26-2012, 10:58 PM
#5
Race Director
Thread Starter
More great info from the Ax:
--------------------------------------------------------------------------------
Quote:
Originally Posted by corvette95
This is an awesome thread. Tell me, what kind of problems did you run into aligning the hood and front bumper, that has always been the part I dreaded!
No need to take off the hood. I just removed the front bumper. You really don't need to do that either if you aren't worried about a paint blend under.
However I will say it was a bit of a pain to get back on. It took a couple of hours and I had a lift.
The first thing we did was slide the bumper (Fascia) roughly back into place. Then put in a couple of the top front bolts in. I think they are 7mm. This would keep it from falling.
Now I didn't remove the side markers when I pulled it off. They are attached to the car, not the bumper. When we slid the front fascia back on, it became clear there was no way to get the marker lights to snap back in place. Thus I had to temporarily unbolt them from the car. I didn't take them out, just got them loose.
This is a good tip; I used a small flat 1" wide putty knife like a shoe horn for both the front and rear side markers, to help guide into the cut out of the bumper. Then the fronts bolted in fine, except for the fact you can have a choice, either see or reach. So it takes a few times to get the small bolts in. Not difficult, just tedious.
The next PITA was getting the larger star bolts that connect the fascia under the car in. There are several layers, the frame you bolt into, the fascia, the metal reinforcement strip, and the cowl. It was hard to get everything lined up for the first bolt. I have a 92 and I am pretty sure not all years have the same exact cowl setup.
The top drivers side of the fascia also did not want to line up. For some reason the driver side just wanted to be 1/4 off across the board.
So I went to the "universal alignment tool kit" to force things in place. AKA a couple of different small awls and Phillips head screwdrivers.
Find the right sized "alignment tool" and work it into one of the first holes. While applying pressure to the tool to get another hole aligned, put the bolt in it. After that the rest come easy(er).
Finally the rear fascia has some things to think about. You want it to sit just a tad lower than the actual body, like 1/32 of an inch. The reason is you want any small partials or debris floating over the airstream to clear the top of the panel. It it sits higher it will take in the impact of the dust and pebbles and eventually chip.
Getting the rear aligned is a two person job. One to apply pressure to the target area and the other get the bolt tight. There is no easy way to tell you how to get to these bolts. They are a combination of nuts and bolts that literally span the parameter of the bumper. To access them is a bit of a puzzle.
When you remove the rear fascia you should start at the license plate. Then the reverse lights, then the tail lights. Then the gas lid and surrounding rubber and mounting plates. It should just be a tube with a gas cap on it sitting in a hole you can reach your hand into. You will also need to unbolt the rear inner wheel well cover and remove the side markers. Then you will need to use every hole and access point to get to all the bolts and nuts holding it on.
Putting it back together is equally true, but for the most part easier as you have a good idea on how it was put together and it is less of a puzzle. However, there is a catch 22 with the side markers. It is MUCH easier to get the bolt above the side marker in by going through the side marker hole before installing the light. But the light doesn't clear the bolt easily on re-install. Again I used the thin putty knife as a shoehorn and from under the car or through a taillight hole managed to get the side marker popped over the bolt. Trust this is easier than pre-attaching the tail light and trying to get the bumper mounting bolt installed after.
Anyway, this was my journey. Yours will be different. I'd budget 3-5 hours for each bumpers removal and re-installation. Giving 12-20 hours total, depending on how good you are with a wrench. It probably took me 14 hours in all.
Oh, get a nice set of small metric ratcheting closed end wrenches. This will cut hours off of using a regular open or closed end wrench. Most of the time you will be working off of feel with no visual or the bolt is long with a skinny thread taking forever to remove or install.
Good luck and organize your bolts well, there are hundreds of them and it can be a **** wondering what goes where. Take pics of them before you remove things as well.
03-26-2012, 11:09 PM
#6
Race Director
Thread Starter
I am retiring this summer and will tackle the repaint then. I have to have a cataract taken out of my good eye so will probably wait to do the finish work at that time.
At this time I am planning on doing a "scuff and shoot" job. I will probably drive it a year or two and move on to a C5 or C6.
One of the reasons to do this is because it is on my bucket list. I have already rebuilt and hopped up an engine on a previous Vette so that one is out of the way.
The sky diving is never gonna happen though as I still have a plate in my right ankle and don't want to risk screwing that up again.