DIY Garage Paint Booth Lighting HELP!
 11-07-2013, 07:53 PM
#1
Race Director

Thread Starter

What did you use for your DIY paint booth if you've built one?
From what I can tell it isn't necessary to get explosion proof if I vent the fumes well enough. I KNOW there are risks but geeze...I'm not spending hundreds on lighting for this.
At Home Depot they had T5 High Output lighting that was crazy bright compared to anything else(10k lumes). But at $50 for a 2 bulb fixture was pretty extreme.
Are covers for the bulbs needed? Wondering if open tubes will be affected by paint if I they don't have a cover. I'm guessing most put the lights on the outside of a plastic setup but I don't like that either
Was thinking I could get 5 of those T5HO fixtures and a box of 10 bulbs for about $250... Combined with the light I already have and it would make my garage glow like a star.
Last edited by PUNISHER VETTE; 11-07-2013 at 07:56 PM.
 11-07-2013, 08:00 PM
#2
Race Director
Thread Starter
That is the high end of the Fluorescent fixtures. without going into 4 light fixtures or covered ones.
Obviously I can get $20 T12 fixtures which would be the low end.
Are there any LED options for strip lighting that give off a lot of light for a decent price?
LED sounds awesome, probably safer, and if it was in strip lighting might be less of a chance of breaking a bulb... Not sure if you can get a strip that is bright enough that isn't $100+ per 4'.
11-08-2013, 01:44 PM
#3
Drifting

I used the fixtures that took two T8 bulbs… Think the fixtures were right around $10 each… Put 10 fixtures up… Some ceiling, some of the side and some even on the floor… I didn't have any issues with explosions or such… They worked great as temp lights...
Rogman
Rogman
11-08-2013, 06:36 PM
#4
Race Director
Thread Starter
I'll see how the old hood and maybe my motorcycle turns out before attempting the car.
I'm pretty sure I'm going to go with the T5HO lighting. Sure it's more $$$ but from what I can tell WAY brighter than even regular T8 lighting. Found an ebay guy selling them for $30...not sure how he can do that when HD is $40.
11-08-2013, 07:03 PM
#5
Race Director


Whatever you choose. Just be careful. I have shot in paint booths that were so scary...I wondered how I did not go up like a ICBM.
Once again. You can create a booth inside your garage that allows the lights to be on the outside of the clear plastic you use for walls and ceiling. It is a simple/somewhat fast way of making an enclosure that protects everything outside of your enclosure. Need to now more..let me know. I know I have posted it in the past.
DUB
11-08-2013, 07:15 PM
#6
Race Director
Thread Starter
Whatever you choose. Just be careful. I have shot in paint booths that were so scary...I wondered how I did not go up like a ICBM.
Once again. You can create a booth inside your garage that allows the lights to be on the outside of the clear plastic you use for walls and ceiling. It is a simple/somewhat fast way of making an enclosure that protects everything outside of your enclosure. Need to now more..let me know. I know I have posted it in the past.
DUB
Once again. You can create a booth inside your garage that allows the lights to be on the outside of the clear plastic you use for walls and ceiling. It is a simple/somewhat fast way of making an enclosure that protects everything outside of your enclosure. Need to now more..let me know. I know I have posted it in the past.
DUB
I'm just worried it'll require more work(having to frame in all 4 sides) and reduce lighting having them on the outside.
But I'll just have to see when I get closer. Just wasn't sure if there was a cheap LED option anyone found or if T8's are what most go for to try and stay cheap.
11-08-2013, 08:50 PM
#7
Race Director
Thread Starter
Well the Ebay guy excepted my offer of $22ea for 8 fixtures and free shipping 
eBay guarantee so we'll see if they are actually what they should be which Home Depot sells for $39.99.
Any tip on if I should go 6500k or 5000k for the bulbs? I'm pretty sure the brighter the better(6500k) but it might be overkill...
eBay guarantee so we'll see if they are actually what they should be which Home Depot sells for $39.99.
Any tip on if I should go 6500k or 5000k for the bulbs? I'm pretty sure the brighter the better(6500k) but it might be overkill...

 11-09-2013, 05:54 PM
#9
Race Director
Here it goes,
Quick plastic enclosure for inside your garage that you can use for "whatever" you choose to use it for...that is TOTALLY your decision..
NO framing needed.
Materials:
1.) A roll or two of duct tape.
2.) 4 eyelets that can screw into a wall or ceiling ( your choice)
3.) Cable ( like bicycle cable) or stout mechanics wire that can go from one end or your space to the other...times 2.
4.) If you use cable...you need something that can allow you to secure the cable onto itself ...times 4.
5.) Clear plastic thick enough to not tear easily. Mill thickness is up to you when you see what is going on with it.
Step 1.) Taking the four eyelets...finding a spot on the walls at the front and back of your garage. Screw then into any stud you can find.
Step 2.) Now taking the wire, cable or what ever you choose. Run the wire,cable, etc. from one end of one of the eyelets to the other eyelet on the other wall. Do both sides. Now these 2 wires/cables are going to be the top of your walls...and also the ceiling. SO making sure these cables/wires are tight is something you may have to work on. You can also purchase 2 turnbuckles that allows you to run the wires/ cables....and then allow the turn buckles to be tightened and get the cables tight.
Step 3.) Take your clear plastic. Making sure it will be wide enough for the area your are going to be working in. Take one edge of the plastic and tape it to your floor that has been CLEANED so the tape will stick. You want this first tape down to be UNDER one of your cables/wires. SO hopefully you spaced the two wires/cables far enough apart so you can work inside them...usually wider that your garage door is best if possible...so you have working room...so just in case you want to work on a car with the door open...FOR EXAMPLE...the width will support the total width of the car with doors open...and still give you some room to work around this...if this is an issue.
Step 4.) Now roll the plastic out over to where the other cable/wire is. This plastic is now the floor. Stop at where the other cable is located and then fold the plastic back onto itself so you then can tape it again to the floor...pulling it taught so you have minimal wrinkles in the plastic. Youa may want o make sure that this tape joint is really good.
Step 5.) Not...the tricky part. You will now unroll the plastic so you can go up with it to the cable...go over the cable...then over to the other cable and then down. This will then make the "box" or four sides complete. Having a helper would be great because you will go and lift on the plastic and tape it to the cable so the wall is taught as you like. Then...pulling the plastic over to the other cable and taping it will make the ceiling...and as taught as you like again....then the plastic from that cable down to the floor where you had begun this process taping it to the floor.
Step 6.) If you are using this enclosure so fresh air can be pulled through this "box"...that is for you to figure out because I do not know where you possibly have an exit point where a fan can be placed (back side door or window) and plastic sheeting can be used to funnel the air to the fan. The air intake can be done at the garage door (partially raised) with filters...and you constructing some square enclosures to hold them.
Step 7.) Depending on what you are planning on using this enclosure for...if dust free is the idea. Taking time to make sure that all air coming into it is filtered is important. So possible having extra plastic when you lay out the main "box" would be wise so you can use it to create the funnel you need to make sure the air intake is sealed off from any other area. You have to do some thinking on your own. And if you can not "problem solve" then do not do it.
DUB
The following users liked this post:
20mercury (05-25-2017)
11-10-2013, 12:03 PM
#11
Race Director
Thread Starter
Yeah. Thanks for that. I'll have to read up on it when it comes time to build the booth.
I was planning on just framing everything in wood but that would take lots of time and money when it probably isn't necessary.
Cable is way cheaper than 2x4's.
As far as the lighting goes any preference on what color range you prefer?
I was going to just jump into the 6500k but seems like a lot complain it's too "blue".
I want the brightest I can get but in reality the spectrum isn't about brightness...they should all be 5000lumens each so it's more of a preference I guess.
11-10-2013, 05:45 PM
#12
Race Director
Yeah. Thanks for that. I'll have to read up on it when it comes time to build the booth.
I was planning on just framing everything in wood but that would take lots of time and money when it probably isn't necessary.
Cable is way cheaper than 2x4's.
As far as the lighting goes any preference on what color range you prefer?
I was going to just jump into the 6500k but seems like a lot complain it's too "blue".
I want the brightest I can get but in reality the spectrum isn't about brightness...they should all be 5000lumens each so it's more of a preference I guess.
I was planning on just framing everything in wood but that would take lots of time and money when it probably isn't necessary.
Cable is way cheaper than 2x4's.
As far as the lighting goes any preference on what color range you prefer?
I was going to just jump into the 6500k but seems like a lot complain it's too "blue".
I want the brightest I can get but in reality the spectrum isn't about brightness...they should all be 5000lumens each so it's more of a preference I guess.
The bulb is not an issue because you are painting an all-over. If you were in your "booth" and attempting to color match a color for a spot repair...then it would become an issue.
The idea is an EVEN light with no "blotchy" areas like if you were to use spot lights.
DUB
11-14-2013, 01:48 PM
#13
Race Director
Thread Starter
So if you had 8 fixtures to put up for a booth how would you lay them out?
I'm wondering how many I should put on the walls or if I put a ton on the ceiling if they will overlap enough to not need any on the walls.
Here's my garage. 24x20x9ft I'll be using the left 2/3's of the garage to paint so was thinking I could put up the 6 fixtures, skip the right 3 for now and that leaves 2. I could put one on each wall...
I worry about putting them on the wall being easier to hit and break.
 11-14-2013, 02:28 PM
#14
Race Director
Thread Starter
Here's what I'm working with.
As you can see i'll be using the left 2/3's as my area. Although I can use the other area I'd need to wrap the frame and all sorts of extra stuff.
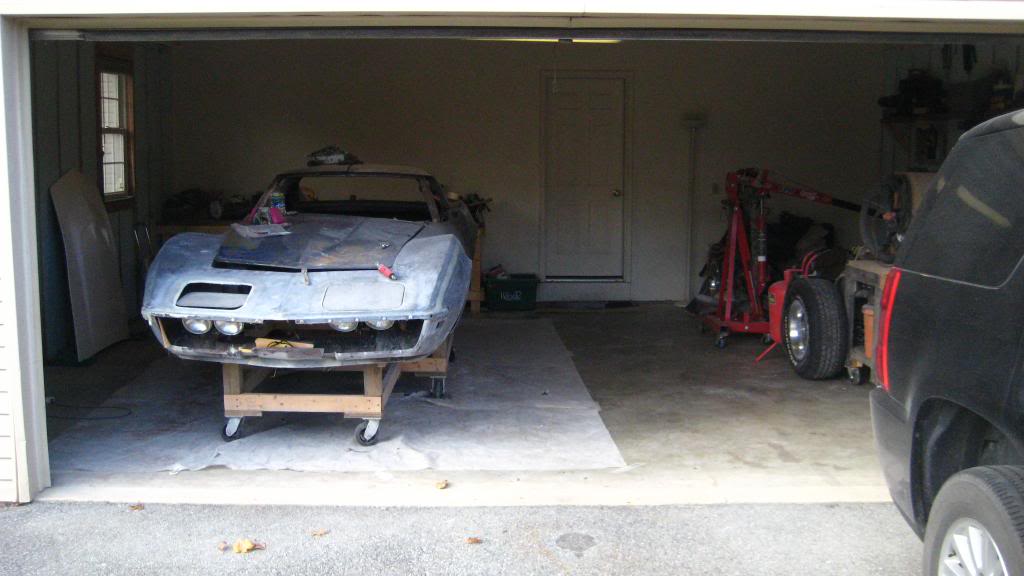
Pic of the 2/3's and the wall with the air exhaust windows I'll be using.

As you can see i'll be using the left 2/3's as my area. Although I can use the other area I'd need to wrap the frame and all sorts of extra stuff.

Pic of the 2/3's and the wall with the air exhaust windows I'll be using.
 11-14-2013, 05:43 PM
#15
Race Director
In my booth...I have four in the ceiling....and four down each side...none in the front and rear due to intake and exhaust filters. With the walls , ceiling and floor being white...it is really bright with no shadowing when I paint.
Putting them all in the ceiling will give you a wicked shadowing effect. The lower sections of the car will possibly be hard to shoot and actually see what is going on when you apply paint and clear.
One guy I knew ..what he did was to mount the light vertically on a rolling stand that he could move around. Wrapped it in plastic and turned it on and off when it was needed so the bulbs did not get to hot that it melted the plastic he wrapped it in. The light he used also had the deflector on it and he fashioned a wire grate over the bulbs so when he wrapped it...the plastic did not touch the bulbs....and he poked a few holes in it so it could allow heat to escape....but not so big that they allowed fumes to enter it. Do a test if this is something that sound good to you. It was nothing fancy...but an effective mobile fixture.
DUB
01-01-2014, 10:09 PM
#16
Intermediate


Member Since: Jan 2012
Location: Charleston West Virginia
Posts: 29
Likes: 0
Received 0 Likes
on
0 Posts
If you have a filter on the air coming out of the garage, are there still enough paint particles to worry about getting on the driveway or cars outside?
05-24-2017, 01:16 PM
#17

You will typically need to have a few filters so that air will flow and you will prevent overspray from going out all over. You could consider an exhaust chamber which is the filter wall of a paint booth. I would try for color corrected lights to so you get a true view of the product your painting compared to painting in natural sunlight.
Last edited by harmonpa; 05-24-2017 at 01:17 PM.
05-24-2017, 05:52 PM
#18
Race Director
You do know this thread is back from 2014???
FYI...using COMPLIANT exhaust filters is what is needed here..and do not be surprised that they may need to be changed out during the paint job because they are capturing so much overspray. And IF a person is using the correct HVLP paint guns..the overspray is usually not that bad...but it can still begin to fill up an exhaust filter. So much depends on how many exhaust filters a person is using.
In my booth I have twelve 20" x 20" exhaust filters and when I am clearing the car...that is when they begin to really do their job and begin to get filled up.
Most people who paint their own cars at home are not going to get into the particulars of air flow and all that. They are trying to do it on the 'cheap' so having them put more time into it is pointless to them. Some will but a majority will just dismiss it as bunch of 'hog wash'. I have mentioned to some about being able to rent an approved paint booth...and take ALL the guess work out of it...but that means they need to spend money and that is what they are trying to save by doing it themselves.
DUB
You will typically need to have a few filters so that air will flow and you will prevent overspray from going out all over. You could consider an exhaust chamber which is the filter wall of a paint booth. I would try for color corrected lights to so you get a true view of the product your painting compared to painting in natural sunlight.
In my booth I have twelve 20" x 20" exhaust filters and when I am clearing the car...that is when they begin to really do their job and begin to get filled up.
Most people who paint their own cars at home are not going to get into the particulars of air flow and all that. They are trying to do it on the 'cheap' so having them put more time into it is pointless to them. Some will but a majority will just dismiss it as bunch of 'hog wash'. I have mentioned to some about being able to rent an approved paint booth...and take ALL the guess work out of it...but that means they need to spend money and that is what they are trying to save by doing it themselves.
DUB
Last edited by DUB; 05-24-2017 at 05:54 PM.