When you click on links to various merchants on this site and make a purchase, this can result in this site earning a commission. Affiliate programs and affiliations include, but are not limited to, the eBay Partner Network.
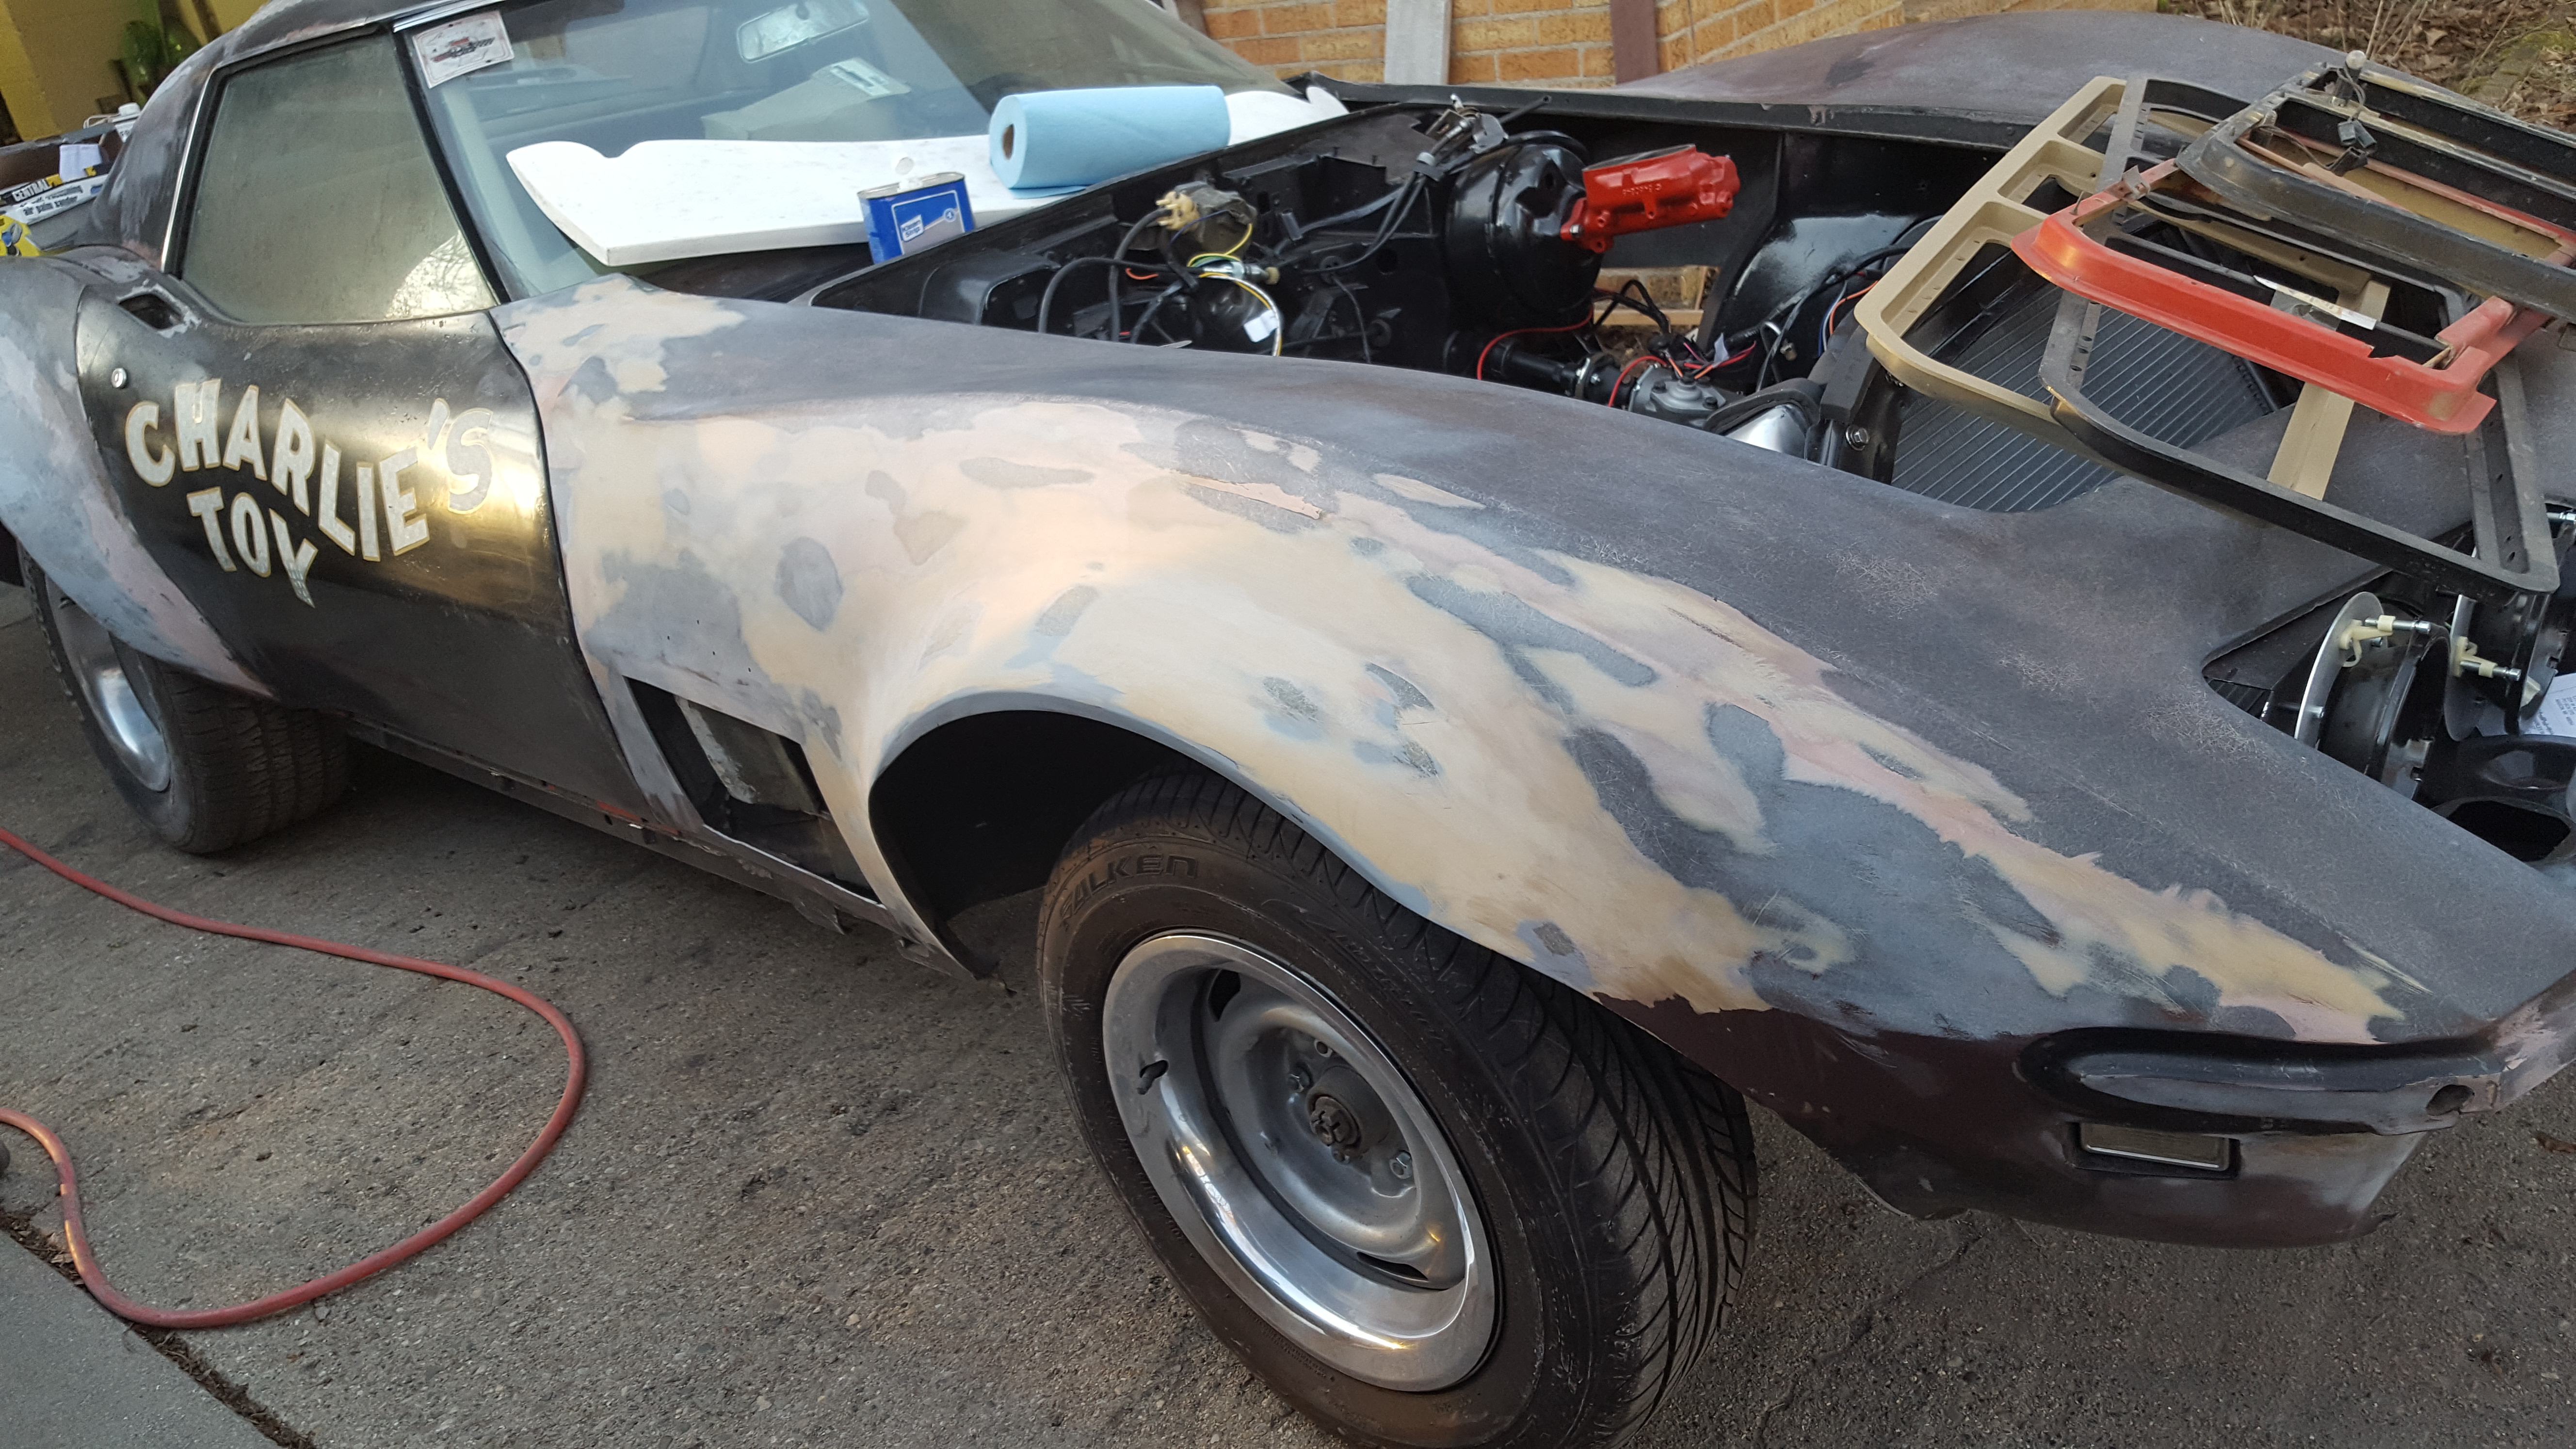
So I am to the point in my 68 rebuild that I need to get the body stripped down and repainted. I am planning on doing all of the work myself due to financial constraints. I have about 1/2 to 2/3 of the car stripped of paint so far. Being a flared out old racer there is lots of previous body work to make the car look good going down the track. The only body damage I have come across so far is a spot behind the passenger's door.
My first main question. I understand the philosophy to remove old body work/repairs, but is it absolutely necessary in every case? There is an awful lot of body shaping to make the flares look good and I'm not sure if I need to remove all of this or not. What is the best way to remove old body filler? A sander and some time?
Chuck, I am sure Dub will stop by and he does support removing all old material because covering it with new material lends itself to paint failure. Now YOU can leave it and roll the dice on the paint and if it breaks down you'll know why. I will make that my opinion and not speak for Dub. Sorry Dub didn't mean to put words in your mouth.
PLEASE keep in mind 'chazde3' that what I am writing is not begin directed at YOU. I am answering you question. And my reply may seem direct..but that is the only way I know how to comment on this question. SO...PLEASE do not take this reply personally. And if you read this you may realize that how I commented on this question has merit.
Just for fun we will act like you car is at my shop. And the paint has been removed and looks like you current photo. You stop by to take 'look-see' and I mention to you that the old body filler needs to be ground out and all the previous work checked.... and IF how the flares were installed are OK. Fill the body back in with Vette Panel Adhesive and it will cost you 'X'.
You then reply "WHOA!!!...why do you need to take out the filler when there is nothing wrong with it??? It has been on there for 'X' years and it looks fine to me" . I reply. "I don't have to grind it out. I can leave it if that is what you want me to do...BUT....IF I do...and IF a problem shows up AFTER it is painted. You do understand that I am NOT warrantying it."
Then you say: " What do you mean?" I reply: "I do not warranty or guarantee ANY work that I do not do. So this means that IF I am going over work that was done by someone else. And that work fails and it effects what I applied on top of it. I am not liable. Just like because I did not build your car...I am not liable if your body panel(s) that have been bonded on for 40+ years finally decide to let go. That is not my problem because I did not bond them on. And just because I just got done with you paint job and the car left with them bonded on like you know it went out...how can I be held liable for that? I am not liable for all the things that can happen after the car leaves my shop and it be only because I was the last guy to touch your car....and the things that are going wrong have nothing to do with what I worked on"
I would continue stating: " On the body where it is a factory panel and the paint is not on it. Obviously I will stand behind all products applied to it due to I know what I am dealing with. "
So this is often times the reason why a shop wants to strip a panel (or whatever) when it is in question...or if it has been 'touched' by someone else. And I can say I have refused to work on a car due to the person did not want to do it how I knew it needed to be done. even though they were willing to sign paperwork acknowledging that they are liable for the work.
My reputation is worth a lot to me and on some of the Corvettes that I see...there are some really BAD basket cases that have been so butchered by whoever...they what it will take to get it back right is not cost effective and I see never ending drama with that particular car. That is when I choose to bow out and let them find someone else. Reason being....I have been down that road a few times a LONG time ago and did not see 'it' coming. I pay careful attention to those things I have learned from the school of hard knocks and try not to allow them to repeat.
I know 'porchdog' has mentioned using a propane torch and heating up the old filler and it comes off with a wire brush. I have never tried that on a car but I have on some scrap panels. So all I can say is that I grind all old filer off and even the GM adhesive in the body seams so they can be filled in again.
If you are going to grind it off. You may need to realize that even though your grinder has a trigger that you can pull all the way and get it to maximum RPM"S. THAT sometimes is not what you want to do. Finding the correct pressure and RPM of your grinding disc will do two things.
1.) Extend the life of your grinding disc due to it is NOT getting hot and wearing out....because it can do that. 2.) Due to the grit on the disc staying there and with the correct pressure...you can really grind and have much better control of your tool so you do not screw up and grind something you did not want to grind because the grinder got away from you for a half second at 10.000 rpm's.
24 or 36 grit grinding discs will do just fine. No need to go out and buy 16 grit grinding discs. But if you plan on doing this..do as you wish.
So...it is entirely up to you on what you want to do because no one has a crystal ball and see into the future. I know my perspective may be quite different than other people. But unless they have done hundreds of cars ( or even a fraction of that)... and experienced as many problems like I have and like others who do this type of work...they are just commenting on what they know or have experienced ...which is fine....and may be they have been fortunate and have not yet come across a job that bites them in the backside.
Chuck, I am sure Dub will stop by and he does support removing all old material because covering it with new material lends itself to paint failure. Now YOU can leave it and roll the dice on the paint and if it breaks down you'll know why. I will make that my opinion and not speak for Dub. Sorry Dub didn't mean to put words in your mouth.
RVZIO
We are good. I was typing out my long winded views and should have waited and let you reply. It would have saved me some time.
You have first hand experience on WHY to grind it out.
PLEASE keep in mind 'chazde3' that what I am writing is not begin directed at YOU. I am answering you question. And my reply may seem direct..but that is the only way I know how to comment on this question. SO...PLEASE do not take this reply personally. And if you read this you may realize that how I commented on this question has merit.
Just for fun we will act like you car is at my shop. And the paint has been removed and looks like you current photo. You stop by to take 'look-see' and I mention to you that the old body filler needs to be ground out and all the previous work checked.... and IF how the flares were installed are OK. Fill the body back in with Vette Panel Adhesive and it will cost you 'X'.
You then reply "WHOA!!!...why do you need to take out the filler when there is nothing wrong with it??? It has been on there for 'X' years and it looks fine to me" . I reply. "I don't have to grind it out. I can leave it if that is what you want me to do...BUT....IF I do...and IF a problem shows up AFTER it is painted. You do understand that I am NOT warrantying it."
Then you say: " What do you mean?" I reply: "I do not warranty or guarantee ANY work that I do not do. So this means that IF I am going over work that was done by someone else. And that work fails and it effects what I applied on top of it. I am not liable. Just like because I did not build your car...I am not liable if your body panel(s) that have been bonded on for 40+ years finally decide to let go. That is not my problem because I did not bond them on. And just because I just got done with you paint job and the car left with them bonded on like you know it went out...how can I be held liable for that? I am not liable for all the things that can happen after the car leaves my shop and it be only because I was the last guy to touch your car....and the things that are going wrong have nothing to do with what I worked on"
I would continue stating: " On the body where it is a factory panel and the paint is not on it. Obviously I will stand behind all products applied to it due to I know what I am dealing with. "
So this is often times the reason why a shop wants to strip a panel (or whatever) when it is in question...or if it has been 'touched' by someone else. And I can say I have refused to work on a car due to the person did not want to do it how I knew it needed to be done. even though they were willing to sign paperwork acknowledging that they are liable for the work.
My reputation is worth a lot to me and on some of the Corvettes that I see...there are some really BAD basket cases that have been so butchered by whoever...they what it will take to get it back right is not cost effective and I see never ending drama with that particular car. That is when I choose to bow out and let them find someone else. Reason being....I have been down that road a few times a LONG time ago and did not see 'it' coming. I pay careful attention to those things I have learned from the school of hard knocks and try not to allow them to repeat.
I know 'porchdog' has mentioned using a propane torch and heating up the old filler and it comes off with a wire brush. I have never tried that on a car but I have on some scrap panels. So all I can say is that I grind all old filer off and even the GM adhesive in the body seams so they can be filled in again.
If you are going to grind it off. You may need to realize that even though your grinder has a trigger that you can pull all the way and get it to maximum RPM"S. THAT sometimes is not what you want to do. Finding the correct pressure and RPM of your grinding disc will do two things.
1.) Extend the life of your grinding disc due to it is NOT getting hot and wearing out....because it can do that. 2.) Due to the grit on the disc staying there and with the correct pressure...you can really grind and have much better control of your tool so you do not screw up and grind something you did not want to grind because the grinder got away from you for a half second at 10.000 rpm's.
24 or 36 grit grinding discs will do just fine. No need to go out and buy 16 grit grinding discs. But if you plan on doing this..do as you wish.
So...it is entirely up to you on what you want to do because no one has a crystal ball and see into the future. I know my perspective may be quite different than other people. But unless they have done hundreds of cars ( or even a fraction of that)... and experienced as many problems like I have and like others who do this type of work...they are just commenting on what they know or have experienced ...which is fine....and may be they have been fortunate and have not yet come across a job that bites them in the backside.
DUB
Dub, thank you for the reply. I had figured you would pop in here. You gave me the answers I was expecting to see. I will continue doing what I have been doing and remove the body filler. I have been using a DA orbital air sander with 80 and 120 grit to slowly remove the filler. I know it's slower, but I don't want to have a tool run off and gouge up the body.
But honestly I would use what I recommended for the grit. Mainly because IF you go to re-apply VPA....it would be best that the scratch in the body needs to be harsher than 120 grit for it to stick well. And 80 grit is right on the line.
FOR WHAT THIS IS WORTH:
I have trained many guys and many of them did not know anything about doing body work. And the first time I handed them the grinder...they were apprehensive.
I stood there and told them to "OWN THE TOOL"...and by that I further explained that they need to hold firmly and not hold it loosely. I also mentioned that he did not have to squeeze the tool to death with his grip...just have a hold of it so it does not get away form you like you would a hammer. If he did that and also watched what he was doing...he would not do any damage to any area of the car that was not in the area where the grinding disc was touching.
I know you are new to this but let me mention this also. I understand when people begin to do this forth first time they try to keep all of what they are doing to the smallest area. Sometimes that is wise...but generally...do not worry of you grind out past where the body filler is and make a groove in the panel. Reason being....you are going to be amazed on how far out you will need to apply the VPA so you can shape the body...that trying to keep things small can actually be counterproductive and not best for what you are doing. SO thinking that when you get done you VPA area will look just like what the panel looked like before you ground off the body filler. Think again....it will more than likely be larger...which is fine that it is.
EXAMPLE:
Experienced body men will do something that those that do not do it may not understand but what they will do is actually faster and better for the repair. Imagine that is a metal door...and it has a bad dent right in the center of it. After feeling out the dent and how bad it is and getting it out as much as possible so the body filler will not be excessively thick. Often times the body man will strip the paint off the door from end to end and apply the body filer from edge to edge. This is due door damage can cause the entire outer skin to sink in and hard to feel but WILL be seen when completed. Then he will block it out. Doing it that way may cause him to block off much of the body filler he applied. But what it does is make sure that he has all of the filler he needs to get the panel flat.
If he just applied the body filler in a small patch and blocked it...it is highly likely that when he feels the panel...he will need to re-apply the body filler and do it again. AND when he feels it again he might need to do that again. So he is basically chasing the dent to the edges of the panel. THAT is why sometimes coating the entire panel is BEST. And it does not matter if it is s fiberglass panel. The same issue can occur. I know fiberglass panels do not dent like steel...but that can flex and be put under stress and sink in or weakened.
PLEASE keep in mind 'chazde3' that what I am writing is not begin directed at YOU. I am answering you question. And my reply may seem direct..but that is the only way I know how to comment on this question. SO...PLEASE do not take this reply personally. And if you read this you may realize that how I commented on this question has merit.
Just for fun we will act like you car is at my shop. And the paint has been removed and looks like you current photo. You stop by to take 'look-see' and I mention to you that the old body filler needs to be ground out and all the previous work checked.... and IF how the flares were installed are OK. Fill the body back in with Vette Panel Adhesive and it will cost you 'X'.
You then reply "WHOA!!!...why do you need to take out the filler when there is nothing wrong with it??? It has been on there for 'X' years and it looks fine to me" . I reply. "I don't have to grind it out. I can leave it if that is what you want me to do...BUT....IF I do...and IF a problem shows up AFTER it is painted. You do understand that I am NOT warrantying it."
Then you say: " What do you mean?" I reply: "I do not warranty or guarantee ANY work that I do not do. So this means that IF I am going over work that was done by someone else. And that work fails and it effects what I applied on top of it. I am not liable. Just like because I did not build your car...I am not liable if your body panel(s) that have been bonded on for 40+ years finally decide to let go. That is not my problem because I did not bond them on. And just because I just got done with you paint job and the car left with them bonded on like you know it went out...how can I be held liable for that? I am not liable for all the things that can happen after the car leaves my shop and it be only because I was the last guy to touch your car....and the things that are going wrong have nothing to do with what I worked on"
I would continue stating: " On the body where it is a factory panel and the paint is not on it. Obviously I will stand behind all products applied to it due to I know what I am dealing with. "
So this is often times the reason why a shop wants to strip a panel (or whatever) when it is in question...or if it has been 'touched' by someone else. And I can say I have refused to work on a car due to the person did not want to do it how I knew it needed to be done. even though they were willing to sign paperwork acknowledging that they are liable for the work.
My reputation is worth a lot to me and on some of the Corvettes that I see...there are some really BAD basket cases that have been so butchered by whoever...they what it will take to get it back right is not cost effective and I see never ending drama with that particular car. That is when I choose to bow out and let them find someone else. Reason being....I have been down that road a few times a LONG time ago and did not see 'it' coming. I pay careful attention to those things I have learned from the school of hard knocks and try not to allow them to repeat.
I know 'porchdog' has mentioned using a propane torch and heating up the old filler and it comes off with a wire brush. I have never tried that on a car but I have on some scrap panels. So all I can say is that I grind all old filer off and even the GM adhesive in the body seams so they can be filled in again.
If you are going to grind it off. You may need to realize that even though your grinder has a trigger that you can pull all the way and get it to maximum RPM"S. THAT sometimes is not what you want to do. Finding the correct pressure and RPM of your grinding disc will do two things.
1.) Extend the life of your grinding disc due to it is NOT getting hot and wearing out....because it can do that. 2.) Due to the grit on the disc staying there and with the correct pressure...you can really grind and have much better control of your tool so you do not screw up and grind something you did not want to grind because the grinder got away from you for a half second at 10.000 rpm's.
24 or 36 grit grinding discs will do just fine. No need to go out and buy 16 grit grinding discs. But if you plan on doing this..do as you wish.
So...it is entirely up to you on what you want to do because no one has a crystal ball and see into the future. I know my perspective may be quite different than other people. But unless they have done hundreds of cars ( or even a fraction of that)... and experienced as many problems like I have and like others who do this type of work...they are just commenting on what they know or have experienced ...which is fine....and may be they have been fortunate and have not yet come across a job that bites them in the backside.
But honestly I would use what I recommended for the grit. Mainly because IF you go to re-apply VPA....it would be best that the scratch in the body needs to be harsher than 120 grit for it to stick well. And 80 grit is right on the line.
FOR WHAT THIS IS WORTH:
I have trained many guys and many of them did not know anything about doing body work. And the first time I handed them the grinder...they were apprehensive.
I stood there and told them to "OWN THE TOOL"...and by that I further explained that they need to hold firmly and not hold it loosely. I also mentioned that he did not have to squeeze the tool to death with his grip...just have a hold of it so it does not get away form you like you would a hammer. If he did that and also watched what he was doing...he would not do any damage to any area of the car that was not in the area where the grinding disc was touching.
I know you are new to this but let me mention this also. I understand when people begin to do this forth first time they try to keep all of what they are doing to the smallest area. Sometimes that is wise...but generally...do not worry of you grind out past where the body filler is and make a groove in the panel. Reason being....you are going to be amazed on how far out you will need to apply the VPA so you can shape the body...that trying to keep things small can actually be counterproductive and not best for what you are doing. SO thinking that when you get done you VPA area will look just like what the panel looked like before you ground off the body filler. Think again....it will more than likely be larger...which is fine that it is.
EXAMPLE:
Experienced body men will do something that those that do not do it may not understand but what they will do is actually faster and better for the repair. Imagine that is a metal door...and it has a bad dent right in the center of it. After feeling out the dent and how bad it is and getting it out as much as possible so the body filler will not be excessively thick. Often times the body man will strip the paint off the door from end to end and apply the body filer from edge to edge. This is due door damage can cause the entire outer skin to sink in and hard to feel but WILL be seen when completed. Then he will block it out. Doing it that way may cause him to block off much of the body filler he applied. But what it does is make sure that he has all of the filler he needs to get the panel flat.
If he just applied the body filler in a small patch and blocked it...it is highly likely that when he feels the panel...he will need to re-apply the body filler and do it again. AND when he feels it again he might need to do that again. So he is basically chasing the dent to the edges of the panel. THAT is why sometimes coating the entire panel is BEST. And it does not matter if it is s fiberglass panel. The same issue can occur. I know fiberglass panels do not dent like steel...but that can flex and be put under stress and sink in or weakened.
DUB
Alright, so a couple other questions.
Do I need to scratch the whole body in 24 or 36 grit or only areas that need body filler? Looks like I need to block out most of the body anyways to make sure everything is blended in so I probably can answer that question myself, but it's good to verify.
And I'm guessing you recommend VPA as a body filler instead of bondo or any other body filler correct? How much would you guess I would need? Would a gallon take care of most of a body that needs attention?
As always, thanks for all the advice you provide the forum.
Do I need to scratch the whole body in 24 or 36 grit or only areas that need body filler? Looks like I need to block out most of the body anyways to make sure everything is blended in so I probably can answer that question myself, but it's good to verify.
24 or 36 grit is used when you are grinding out stuff and prepping the surface for laminating and applying VPA and stuff like that most of the time.. So...NO do not do the rest of your body panels that are basically fine. You can use 80 grit and then 180 grit when blocking out the panels that did not get ground on by the 24/36 grit.
And I'm guessing you recommend VPA as a body filler instead of bondo or any other body filler correct? How much would you guess I would need? Would a gallon take care of most of a body that needs attention?
As always, thanks for all the advice you provide the forum.
Thanks..I gladly spend time to try to help you and others.
Yes.... a gallon can possibly do it...but that also depends on how well you can spread it and use it wisely and not waste it. I know I can generally use up a gallon when doing body work and reworking the bonding seams...and that is on Corvettes with no fender flare as that I would need to address again....so...it might take more.
DUB
Ok, just to make sure I'm 100% in tune with what you are saying...36 grit to remove old body work, 80 grit all over so the VPA has something to grab a hold of and 180 to block it all out ahead of paint.
Thanks gentlemen, just needed to know how much to start with. I'll order a gallon to start and figure on more later.
YES..24 or 36 grit to grind out your old body fillers and body work.
VPA CAN be applied to that harsh grit from the 24 or 36 grit....so no need to sand it with 80 grit.
36 grit can be used to block down the VPA if needed . Then block it with 80 grit. IF VPA needs to be added to that 80 grit scratch...that is okay to do.
Then once the body has been blocked with 80 grit...go over it with 180 and you are ready for your primer...depending on what type you plan on using. If you are not using a polyester primer or gelcoat. I would go over it 180 grit.
Some primers can EASILY fill over 80 grit scratches...so the body would not need to be blocked with 180 if a person chose to do so.
MAKE SURE you call EVERCOAT and understand how they date code the VPA. EVERCOAT guarantees it for ONE year. SO when you go and pick it up you can make sure it is good product.
And do not be surprised if you spend a good half hour or so mixing it up so it is evenly creamy. I would make sure I do it the day before you plan on using it. Mixing it up a day before is not a must.
When I get my gallons I go ahead and mix it up...and if I need it two day later. I mix it again but it takes less time to do so. Then ALWYS make sure you keep it mixed well so it does not get thick when you get to the bottom of the can.
The reason I mix mine up ahead of time is to the air that will get mixed into it can rise to the top and escape. IF I get a gallon and need it right away...I just make sure I really mash it very well when I am mixing it to get the air to escape so my VPA does not have air bubbles in it.
One thing I learned when I worked in a shop and it has served me well over the years. Keep your sandpaper fresh and sharp so it cuts nice and evenly. You will get a feel for when to toss it and grab a fresh piece. In the overall picture, sandpaper is cheap and you aren't spending much to use a few sheets for a panel. It makes it much easier to achieve accurate body work.
One thing I learned when I worked in a shop and it has served me well over the years. Keep your sandpaper fresh and sharp so it cuts nice and evenly. You will get a feel for when to toss it and grab a fresh piece. In the overall picture, sandpaper is cheap and you aren't spending much to use a few sheets for a panel. It makes it much easier to achieve accurate body work.
I do throw away the old used sandpaper. But I also have a huge box of old / used sandpaper....due to in some areas...having the paper be not so starchy and rigid is what is needed when sanding around rolled edges. Because sometimes you might not want a fresh piece of 80 grit D/A paper that can cut like crazy...where the old D/A paper will do just nicely and still provide a good scratch for adhesion.
Let's do a huge update on the progress of all of the body work that I have done on the car so far. I am sure I screwed something up along the way.
Replacement rear valance needed to have the exhaust cutouts filled in to match the car since I have side pipes. Also filled in the center cutout that provides access to the spare tire since I am not going to carry one. I need to extend the top edges to catch the body better. The valance came off of a donor clip we had where it was glassed on. I did my best to remove it, but it isn't perfect. Attachment 48347416
Cut some big holes in the front fenders to install motion style reverse gills. I was really displeased with the quality of the parts received. I had to repair them before even trying to install the vents. Glassing them in with the panel on the car was also a horrible experience. I still need to do the body work around them and finish off the edges of the vents.
The driver's side fender corner had to be clamped to bring the edge in line with the door line. Attachment 48347428
I tried the same thing on the passenger's side, but could never get the corner to form in line with the door. I ended up having to heat up the adhesive and pull the corner off so I could grind down the bonding strip so it would line up better. I am very happy with the results. Attachment 48347429
The front fender corners seemed to take some damage over the years of racing which made the valance not line of well enough to just bond on. I decided to glass it on and fix the corners while I was at it. Attachment 48347432
That brings us up to the very recent stuff I have been working on. Below you can see the glass layer on the rear fender looks very light. It looks like it delaminated along the way or was never installed very well to begin with. Attachment 48344988
I ground off all of that glass and old bondo, removed the screws that help the flare on for initial bonding decades ago and reinstalled some new fiberglass and started filling with VPA. Attachment 48347439
So to my eyes all looks good from what I can see. Plenty of hard work went into what you did. Questions? I guess at some point you will be going to primer?
Look at all you have learned and now know. Nice job!
So to my eyes all looks good from what I can see. Plenty of hard work went into what you did. Questions? I guess at some point you will be going to primer?
Look at all you have learned and now know. Nice job!
RVZIO
Thanks Roger!
I guess the main question is if there is a step between this body work and primer? My thought is to use Evercoat slick sand on top of the work I am doing now and block that out to fill in any pin hole imperfections that may be present. I will also need to dig through dad's paint supplies and see if there are any useable spray guns or see if I need to shell out more money.
I used the Evecoat Finish sand which was a lot thicker and once I saw what it covered I will continue to use it. Made a lot of my work look really good. Anyway it gets a little hairy right now. Her's why. You bought all the right stuff to do your body work. You worked hard I know, so lets just get a cheap gun and hurry the paint. The price of good guns is crazy I know. Try to get a gun that you can afford. Hell a new HF gun works for my sealer $15. I got a Devilbess GTI gun which listed for $525 and I got it for $325. That was enough shock for me. Anyway, nowing you I.m sure you will do a great job. It is a tough decision I know. Hopefully Dad has a gun that you can take apart and get it setup.
I used the Evecoat Finish sand which was a lot thicker and once I saw what it covered I will continue to use it. Made a lot of my work look really good. Anyway it gets a little hairy right now. Her's why. You bought all the right stuff to do your body work. You worked hard I know, so lets just get a cheap gun and hurry the paint. The price of good guns is crazy I know. Try to get a gun that you can afford. Hell a new HF gun works for my sealer $15. I got a Devilbess GTI gun which listed for $525 and I got it for $325. That was enough shock for me. Anyway, nowing you I.m sure you will do a great job. It is a tough decision I know. Hopefully Dad has a gun that you can take apart and get it setup.
Thank Roger, I will look into to Evercoat Finish. For awhile dad was a painter at a vette/classic car shop and painted some stunning vehicle. Unfortunately I am sure any good paint guns he had there were sold along with his tool box after he left for medical reasons. I will have to see what is available in the garage. Definitely don't want to cheap out on the tools, because I know where that can lead, but also not flush with cash at the moment.
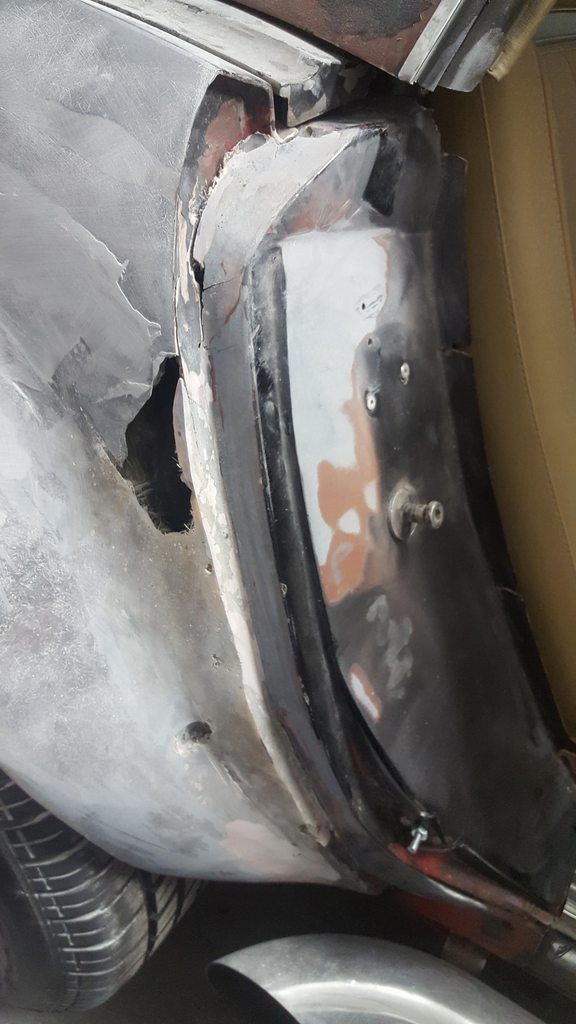
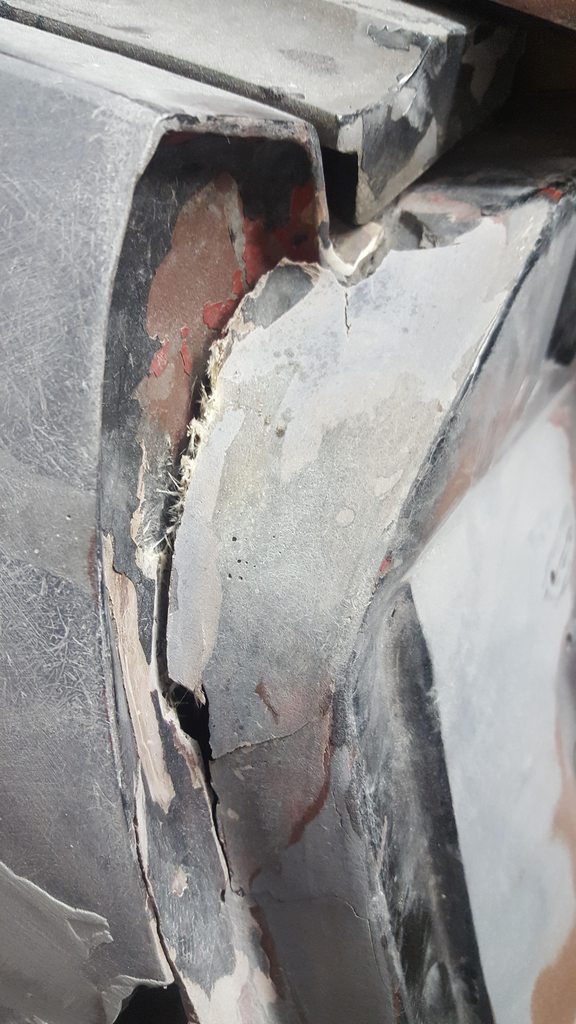
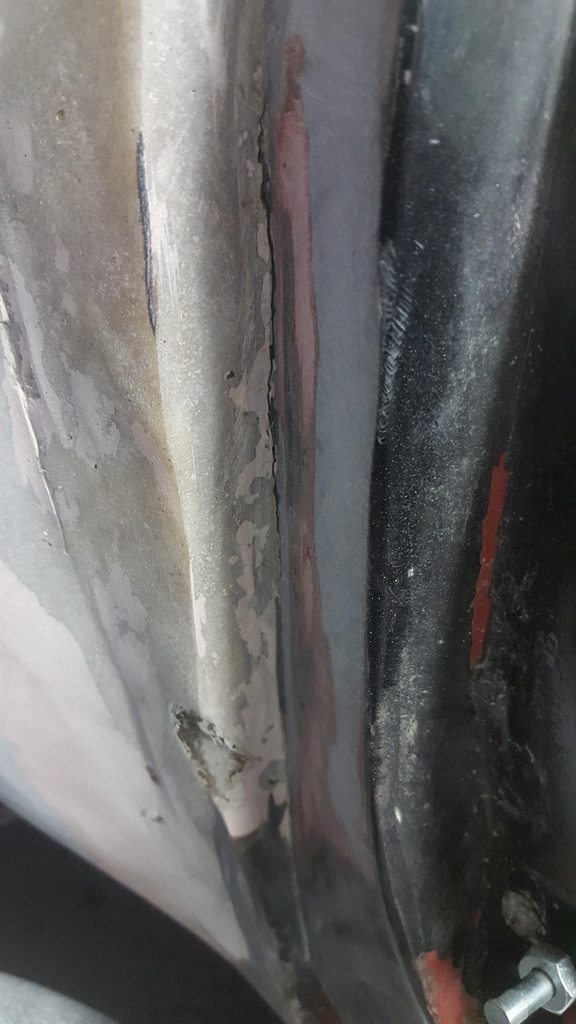
On to my big body work gremlin, the passenger's side door lock pillar. This area appears to have taken damage in the past and was repaired. I peeled out a large area of bad fiberglass which is why there is a hole in the panel. The pillar piece itself seems to have been split up near the top and has a failed repair. It also split along the side.
My thoughts on best repair would be to pull the pillar out of the car. Repair the rear fender hole since I would have access to the backside and could repair it properly. And replace the pillar panel with a new one, which we happen to have a replacement stashed away at dad's shop already that I believe will work. Thoughts?
 02-27-2018, 01:04 AM


 I do throw away the old used sandpaper. But I also have a huge box of old / used sandpaper....due to in some areas...having the paper be not so starchy and rigid is what is needed when sanding around rolled edges. Because sometimes you might not want a fresh piece of 80 grit D/A paper that can cut like crazy...where the old D/A paper will do just nicely and still provide a good scratch for adhesion.