Need to change diff cover
 10-21-2017, 09:00 AM
#1
Melting Slicks

Thread Starter
Member Since: Jul 2005
Location: Cuyahoga Falls OH
Posts: 2,509
Received 334 Likes
on
261 Posts
2016 C2 of the Year Finalist

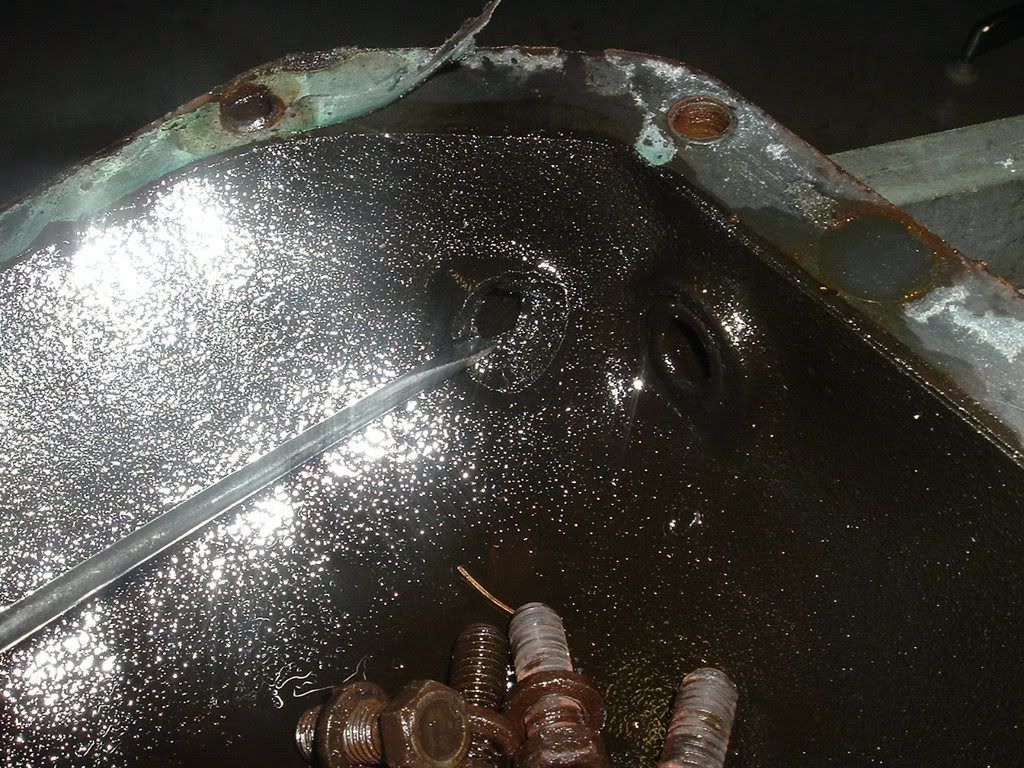
64-327-300. Under car exhaust.....Differential cover leaks from a spring bracket bolt hole so I figure it’s cracked. I know I’ll have to drop the spring but will the crossmember need to come off?
Are all the bolts holding the spring the same length? Dave
Dave
Are all the bolts holding the spring the same length?
Dave
 10-21-2017, 09:59 AM
#2
Tech Contributor

Most likely someone used a longer bolt and broke the inside of the cover, common enough for me to find with these. You technically can separate the diff and cover in the car but please don't try it. The diff is held in place by the front bracket and the rear cover. If you try and split it like the old manuals suggest you will end up with 2 qts of nasty gear oil on you and possibly 100 lb of iron on top of you. The best way to do it is to remove the spring to get it out of the way, support the diff and get the cross member bolts out and lower the diff and cross member down as one, safely. Then you can remove the cross member very easy. If you have an engine stand mount the diff on the stand and remove the cover, drain the oil and look to see what posi or open case you have. If you have an original 64 posi, a Dana, look it over close as they are very weak and parts are long gone for them now. Chances are it has been replaced with an Eaton posi. Look to see which type- a small 1" window is not much better then the Dana and they were used from 65-68 and as service parts during that period. Do the poor mans magnaflux to check it for cracks. Any cracks you have to replace the posi case as it will continue to crack until the posi implodes.
10-21-2017, 12:16 PM
#3
Team Owner


Member Since: Apr 2008
Location: Coloring within the lines
Posts: 27,341
Received 1,919 Likes
on
1,332 Posts

 10-21-2017, 12:28 PM
#4
Melting Slicks
Thread Starter
Member Since: Jul 2005
Location: Cuyahoga Falls OH
Posts: 2,509
Received 334 Likes
on
261 Posts
2016 C2 of the Year Finalist
Thank you, Gary, for your great explanation. For sure I don’t want washed down in gear oil or smashed.
The diff is original but I can’t say what posi unit is in it. I too would like to know more about the “ poor man’s magniflux” if you’d be able to explain.Dave
The diff is original but I can’t say what posi unit is in it. I too would like to know more about the “ poor man’s magniflux” if you’d be able to explain.
Dave
10-21-2017, 12:36 PM
#5
Team Owner
Member Since: Apr 2008
Location: Coloring within the lines
Posts: 27,341
Received 1,919 Likes
on
1,332 Posts
All I could find with Google seemed to say that the poor man's magna flux was actually a liquid dye penetrant test (LPT). LPT can point out many surface cracks, but is very technique-dependent, and does not reveal slightly sub-surface cracks.
10-21-2017, 01:04 PM
#6
Tech Contributor
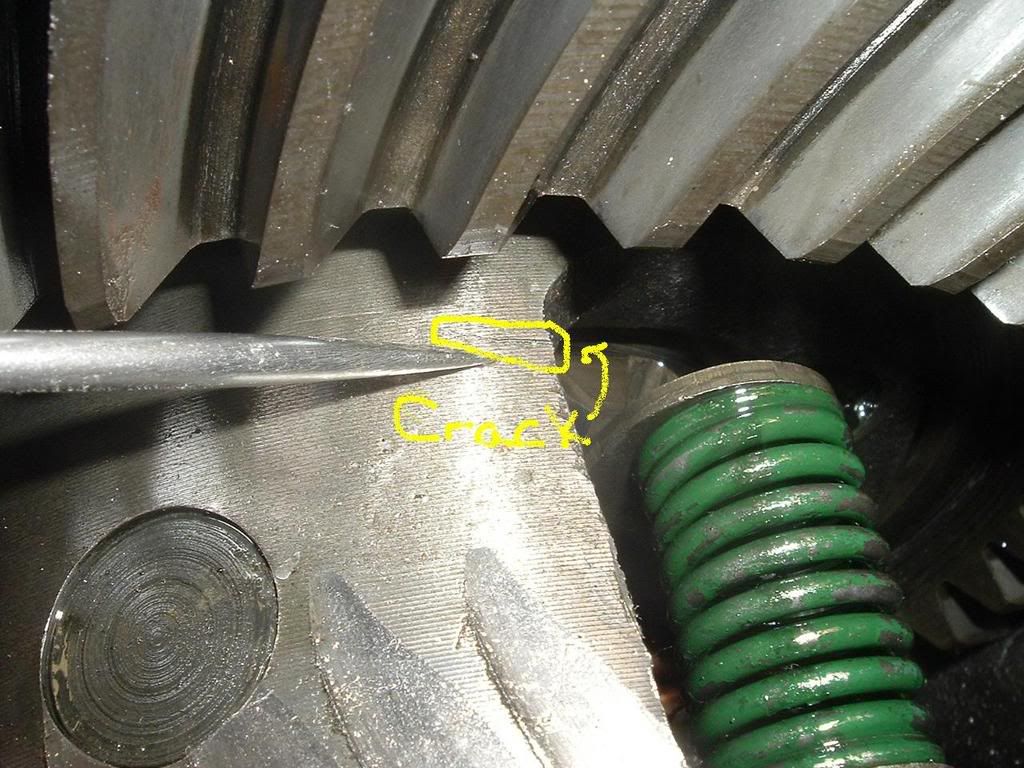
The first thing I do when I open a diff is check it and the 63-68's were known for the posi's breaking under load, from cracks that formed and spread unknown to the driver. Kind of like a silent heart attack, which no one needs.
With the diff on the stand spray wipe down the posi case and spray a light coat of brake cleaner on it, then lightly mist it dry with air. Cracks will stay wet long enough for you to see. Look at the radius of the large window where the seams end and the surfaces are very rough, leading to crack formation.
Here is a 63-64 DANA posi- notice the long springs
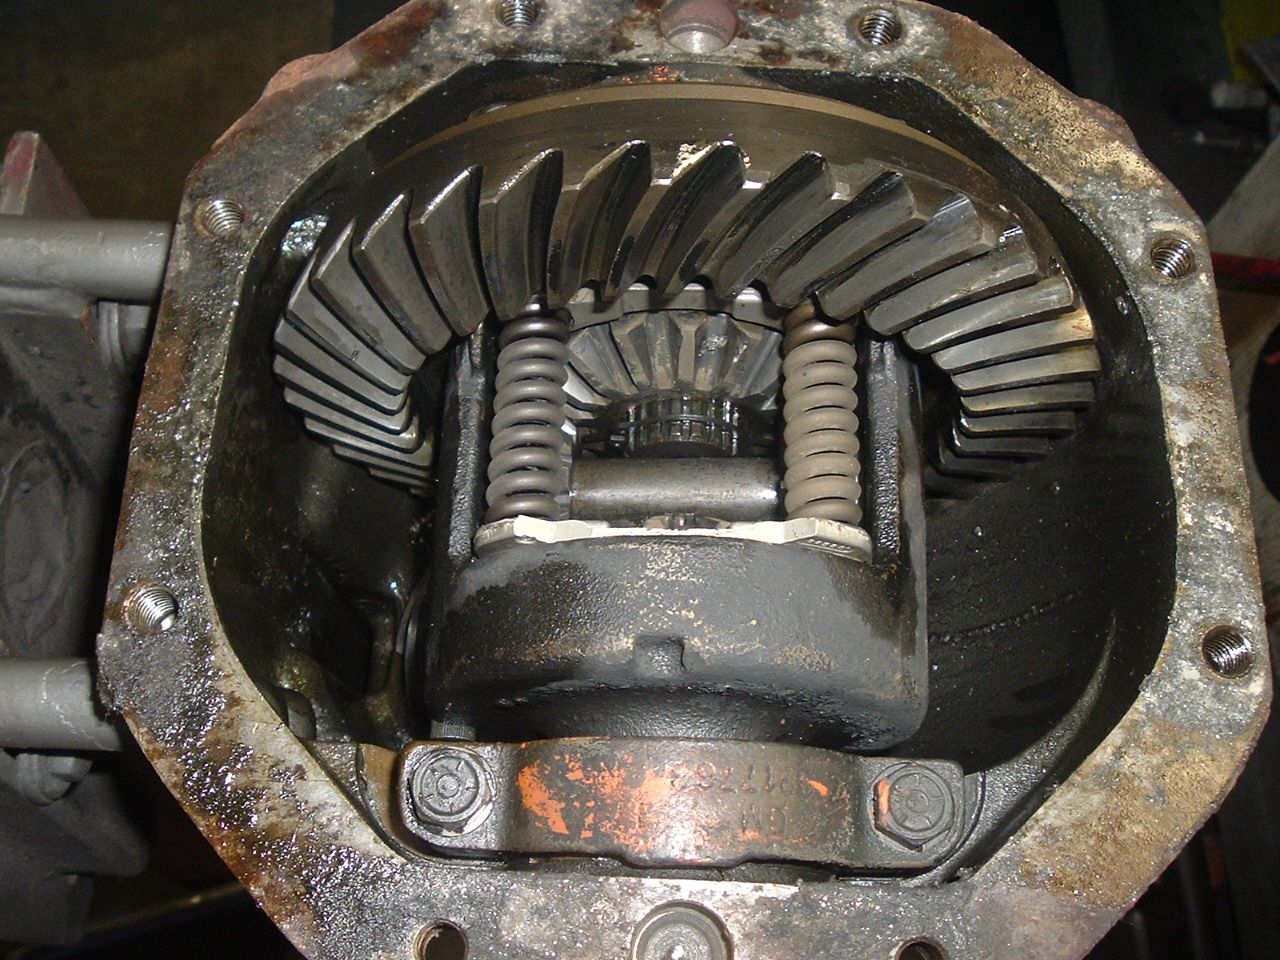
Here is one place they break the spring pad

Here is a cover with a blown out bolt boss
Here is a crack and you can also see the pinion smashed into the case
With the diff on the stand spray wipe down the posi case and spray a light coat of brake cleaner on it, then lightly mist it dry with air. Cracks will stay wet long enough for you to see. Look at the radius of the large window where the seams end and the surfaces are very rough, leading to crack formation.
Here is a 63-64 DANA posi- notice the long springs
Here is one place they break the spring pad
Here is a cover with a blown out bolt boss
Here is a crack and you can also see the pinion smashed into the case
The following users liked this post:
dkleather (10-21-2017)
10-21-2017, 06:32 PM
#7
Race Director


Every one I have removed...the factory bolts where all the same length.
I can say that getting the crossmember to drop down can be a challenge. And whenever I do them ..I remove the two bolts ( one on each side) that holds the crossmember to the frame. I take them out and then thread them back in about 2 or 3 threads. The reason being...when I get the crossmember bushing to finally let go..I do not want the crossmember to have such severe angle to it ( due to it dropping down) that when I go to do the other side it will NOT let go.
For what this is worth.
it seems that your car is original...but for those who are putting in a new steel spring. I measure how thick the factory spring is at the center bolt. Then I measure the new spring...and do the math. Normally the springs I get are thicker than factory..and I go out and get new bolts and cut them down to what i need so I know I am getting a good amount of threads to hold the spring...but no so much where it damages the rear end cover. I verify the length of the bolts I modified by installing them into the rear end cover and measuring how much is still left. If I know that when the bolt bottoms out is giving me a measurement of 'X'...I know that my bolts should be less than that so I know there is no chance of it damaging the cover. I do this regardless if it is a factory cover or a new heavy duty cover when the spring is being replaced that is different. YES...I know...if the factory spring was 2' thick (for example)..and the new spring is 2-1/4" thick...then I know I need to ADD a 1/4" to the new bolts....BUT..I still check it anyway.
And...when you go and tighten the four bolts for your rear spring to correct torque...I would HIGHLY advise that you have it fully installed and the car sitting on the ground...to flatten the spring and so you do not break the rear end cover. I generally tighten the four bolts to a good snug...and then torque them when I get it on the ground.
DUB
Last edited by DUB; 10-21-2017 at 06:45 PM.
The following users liked this post:
dkleather (10-21-2017)
10-21-2017, 07:52 PM
#8
Melting Slicks
Thread Starter
Member Since: Jul 2005
Location: Cuyahoga Falls OH
Posts: 2,509
Received 334 Likes
on
261 Posts
2016 C2 of the Year Finalist
Thank you, DUB. I appreciate your tips on making sure the bolts are the right length for the spring used and for making sure the weight of the car is on the spring before final tightening. I’m not looking forward to breaking the crossmember loose. I may have to call in some payback favors for extra hands.
The cover on the diff now is a replacement with a different part number than original. Seems like it’s for a wider spring since it has a 1/4 ‘ spacer to the rear against the case. The differential itself is original according to the stamped date. I’ve got another correct cover to put on. Should I use the correct number cover I have that’s from another 64 differential or buy a new reinforced one? Is the original design weak?Dave
The cover on the diff now is a replacement with a different part number than original. Seems like it’s for a wider spring since it has a 1/4 ‘ spacer to the rear against the case. The differential itself is original according to the stamped date. I’ve got another correct cover to put on. Should I use the correct number cover I have that’s from another 64 differential or buy a new reinforced one? Is the original design weak?
Dave
10-21-2017, 09:01 PM
#9
Tech Contributor
There were 2 covers used from 63-79. The 78 & 79 had a cast in pad, the previous have a flat pad. A lot of times used covers are swapped for one reason or another and sometimes the 78/79's end up on an earlier car. Also the bolts are 7/16 for the spring on the 78/79 and 9/16 for the 63-77. The problem with them, other then what you may have is the lower ears will snap if not loaded correctly. As DUB certainly knows and pointed out, snug up the 4 bolts and then with the weight of the car on the suspension and loading it, roll the car a few feet and then torque them to 75 ft/lb with the weight of the car. Other then hitting a pot hole or high RR track the cover should be ok. The HD Muskegon covers are great and have thick ears if you want to change the cover. One word of advice be aware of some of the knockoff covers on the market. I have found the bolt holes off and had to mill them to get them to work. I use Muskegon covers if I want a real HD one.
The following users liked this post:
dkleather (10-21-2017)
10-21-2017, 09:31 PM
#10
All great advice.
I have two diffs for my vette, a 3:36 and 4:11. I have changed out the rear end a few times to suit my driving needs.
I can do the swap now in about 4 hrs.
I also have under car exhaust, and I have found the best way is to loosen the exhaust mounts so the pipes can hang and be moved.
Remove the camber arm bracket from the diff, and the camber rods from the shock mounts. Don't mess with the camber rod bolts where it attaches to the bracket (keeps your alignment). pull the bracket with the two rods still attached.
Then remove the spring bolts from the trailing arms. I use a jack to preload one side of the spring while the car is on several jack stands.
With the spring now unloaded and free from the trailing arms load both ends of the spring with 2 jacks, and loosen your spring mount bolts. Don't take them all the way out. Then a little at a time lower the jacks and unload the spring. Be careful the jacks don't slip.
With the spring out, now remove the front diff mount bushing bolt, then the u-Joint straps from the driveshaft and push the driveshaft forward an inch or so.
Next drop the cross member. You may need a pry bar and follow the advice Dub gave. When you put it back use a liberal amount of anti-seize on the pocket and "nub".
Once the cross member is free, use a jack to support the diff. Then lower the diff and cross member as one.
About halfway down, you should be able to rotate the cross member and diff 45* and slide it out between the exhaust pipes. 2 people work best here, 1 running the jack and 1 steering the cross member.
Reverse to put back.
The following users liked this post:
dkleather (10-21-2017)
10-21-2017, 10:35 PM
#11
Melting Slicks
Thread Starter
Member Since: Jul 2005
Location: Cuyahoga Falls OH
Posts: 2,509
Received 334 Likes
on
261 Posts
2016 C2 of the Year Finalist
Ghostrider, thanks for the step by step on this. Your detail will be a great help in knowing exactly what I need to do. I appreciate all the time you put into your response. I’ve got a friend with a lift and will set this project up with him. My 70 year old bones don’t much care for working on my back anymore and I’m sure the lift would be a good addition.
The guys on this forum are the best! !Dave
The guys on this forum are the best! !
Dave
Last edited by dkleather; 10-21-2017 at 10:40 PM.
10-22-2017, 10:24 AM
#12
Melting Slicks


+1 on the Muskegeon cover. It's what I used on my '71. After the work of removal, I would almost do this as a matter of course.
There's visible differences in the two covers. The MB cover is way heavier. I had mine and had picked it up several times, and gotten used to the weight of it. When I got the diff dropped, and first took the original cover off, I about pitched it over the roof of my bud's shop. Such was the weight difference between the two.
GTR1999 rules. My '71 has the full Gary Treatment.
Carter
10-22-2017, 05:36 PM
#13
Race Director
PLEASE...if I may...I need to add to some of the information in 'ghostrider20's' post.
By removing the strut rod bracket that holds the strut rods from under the differential and allowing it to hang will make this process much harder due it it is in the way.... The strut rods need to be disconnected at each trailing arm...and that often times requites using a special tool so you can hopefully get the lower shock bolt to actually move. Every once and a while I have to burn out the strut rod bushing at the trialing arms due to the inner sleeve of the strut rod bushing has seized to the lower shock bolt and if a person keeps hitting it...they can BREAK the bearing support housing and THEN that opens up even more problems. Do not ask me how I know about this...because it happen to me about 30 years ago..and it has only happened ONCE.
IF a person removes the cam bolts for the strut rods under the differential where it is used for alignment...they can be simply marked and put back where they go. The problem is when this is done...reinstalling them can be a bit of a challenge because you need to get the trailing arm at the correct height so you are not fighting the tension.
I disconnect the half shaft at each inner wheel area and take them WITH the differential when I am pulling it out. I replace the french locks so the four bolts for each side are installed and torqued as required and the french lock prevent the bolts from loosening. I also pull the driveshaft WITH the differential and leave it attached. I take it out ...yoke and all.....BUT
I do not do differential removals when the car is on a lift. I do them on the ground....BUT I have USED half of my lift.
Here are few reasons why I do it the way I do it.
1.) With the rear of the car being higher...because I am lifting the car with only two arms of my lift...I am lifting it right below the #3 body mount area on the frame....so when I pull out the driveshaft/yoke...NO fluid leaks out.
2.) Removing the compressed rear leaf spring on each side is MUCH easier when you can do one side at a time...because if it is on a lift and level. You are going to have a really fun time watching your car lift UP and FEAR that is slides off your lift. (depending on the lift design).
With the rear of the car raised...I attach a plate I made that locks onto the spring so when I slowly lower it down... the jack stand I am using catches on the plate and begins to compress the spring...and I do it high enough off the ground so I can get UNDER the long spring bolt and get it loosened with my 1/2" impact. Sometimes HEAT is needed to get that castle nut to break free.
3.) When trying to get the differential crossmember to release...you may find that the car needs to be low so your long pry bar (mine is about 5 feet long) can get in where it needs to go to get the bushing to release. Sometimes these bushings just do not want to let go...and you will find how much fun it can be. Having the car up on a lift....there would be NO WAY I would attempt it....even if I lowered my lift to inches off the ground.
I am NOT saying that this way is the only way.
YES...'GTR1999' DOES RULE!!!! Make NO mistake about it.
DUB
The following 2 users liked this post by DUB:
bmans vette (10-23-2017),
dkleather (10-24-2017)
10-23-2017, 09:30 PM
#14
Le Mans Master

If the rear cover is cracked... Muskegon Brake makes an excellent, heavy duty replacement. Waiting for mine to be shipped now. Look around... price varies. 137.00 to 170.00.
Last edited by KENS78SILVERANNIV; 10-23-2017 at 09:33 PM.
The following users liked this post:
dkleather (10-24-2017)
 10-24-2017, 03:51 PM
#16
Tech Contributor
Dave
That reminds me of the old John Wayne movie, Big Jake. Everyone speaking to John Wayne said " I thought you were dead" Simple response "not hardly"
That reminds me of the old John Wayne movie, Big Jake. Everyone speaking to John Wayne said " I thought you were dead" Simple response "not hardly"
10-24-2017, 06:02 PM
#17
Race Director
BUT what is even better is that this forum got 'smart' and allows Gary and his wisdom and expertise to be able to NOW be expressed on this forum again.
Keeping him off of this forum was an injustice for whatever reason caused for his expulsion...because if the principles/'mission statement' of this forum are for providing those who want to keep their Corvette in excellent condition a place to communicate and share ideas. Then having GTR1999 is A MUST due to what he can offer.
DUB