
Chasing my last water leak before interior goes in
 08-25-2014, 08:55 PM
#1
Racer

Thread Starter

Long storry short, I am in the final stages of my frame off resortation that has taken me about 16 years to complete.
I have a water leak on my 72 Coupe that is driving me nuts. The water is running down the door jamb area (rear of the door to quarter) and running in at the corner of the sill plate and interior quarter trim. The water basically pools where the outer rearward seat mounting bracket botls to the floor. I saw some trim moldings at the base of the door jamb in another post which my vette does not have. See the post below.
http://forums.corvetteforum.com/c3-p...-windlace.html
Is that trim mld at a 45 degree angle to deflect water? Any ideas or suggestions would be greatly appreciated.
Thanks!!
 08-25-2014, 10:14 PM
#2
Race Director

Member Since: Apr 2011
Location: North of Toronto - Ontario
Posts: 10,856
Received 3,139 Likes
on
2,070 Posts


Yup, that's what my 72 did too
I added a bead of seal sealer (dumdum) under the very back of the sill plate and let is squish out to prevent the water from making it into the interior. It still ran onto the sill plate and pooled there.
Mine didn't have those pieces shown on Alan's 71 and I don't recall finding them in the AIM so eventually I installed a set of the diverters that they used on the 74 and up cars (again, can't even spell NCRS)
08-25-2014, 10:18 PM
#3
Race Director
Member Since: Apr 2011
Location: North of Toronto - Ontario
Posts: 10,856
Received 3,139 Likes
on
2,070 Posts
If Alan drops in, where are those pieces in the 71 AIM?
M
M
08-26-2014, 07:07 AM
#4
Team Owner

Member Since: Sep 2006
Location: Westminster Maryland
Posts: 30,173
Likes: 0
Received 2,878 Likes
on
2,515 Posts

Hi,
The water diverter is called out as a 'strip' with 2 pop rivets in the 71 AIM in UPC 1 Bolt/Weld, Sheet B9, Item 13.
It's a very busy sheet so they're easy to miss.
They're available in reproduction but are pretty $$.
Regards,
Alan
The water diverter is called out as a 'strip' with 2 pop rivets in the 71 AIM in UPC 1 Bolt/Weld, Sheet B9, Item 13.
It's a very busy sheet so they're easy to miss.
They're available in reproduction but are pretty $$.
Regards,
Alan
08-26-2014, 07:26 AM
#5
Race Director
Member Since: Apr 2011
Location: North of Toronto - Ontario
Posts: 10,856
Received 3,139 Likes
on
2,070 Posts
08-26-2014, 10:03 AM
#6
Burning Brakes

08-26-2014, 10:18 AM
#7
Race Director
Member Since: Apr 2011
Location: North of Toronto - Ontario
Posts: 10,856
Received 3,139 Likes
on
2,070 Posts
BlownZ51, I don't know when your car was built but we might not have ever got them
M
08-26-2014, 01:11 PM
#8
Racer
Thread Starter
I believe my car was built in Jan of 72. Its been a while since i checked but thats what I recall. I can try the sealer method. I was considering do that anyways. Just trying to keep a clean look in the jambs. This water diverter that was brought up. Is this something the aftemarket vendors carry? Any pics or part numbers out there from vendor's websites? Just trying to get an idea of what these pieces look like. I assume they are rubber?
08-26-2014, 03:23 PM
#9
Team Owner
Member Since: Sep 2006
Location: Westminster Maryland
Posts: 30,173
Likes: 0
Received 2,878 Likes
on
2,515 Posts
Hi,
Here's the fiberglass strip pop riveted in place.
The later one is a combination metal/rubber diverter.
Regards,
Alan
Paragon has both styles. 12689k and 5854/5853
Here's the fiberglass strip pop riveted in place.
The later one is a combination metal/rubber diverter.
Regards,
Alan
Paragon has both styles. 12689k and 5854/5853
Last edited by Alan 71; 08-26-2014 at 03:25 PM.
08-26-2014, 06:04 PM
#10
Racer
Thread Starter
Thanks for the info!!! I will be ordering a set and will also try not to damage my paint during the installation process.
08-26-2014, 08:43 PM
#11
Race Director
Member Since: Apr 2011
Location: North of Toronto - Ontario
Posts: 10,856
Received 3,139 Likes
on
2,070 Posts
I wonder when (and as always, why) they dropped them in 72 and 73. The date on the AIM was Feb 11, 72. I can only guess there was a NIEO out to remove it some time before the AIM was updated so Might have even affected later 71's
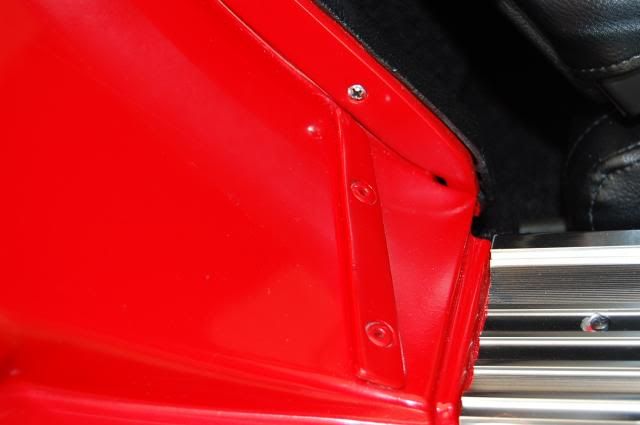
Here's what the 74+ style looks like

It actually attached under the sill plate edge and has a rubber lip to help catch the water.
M
Here's what the 74+ style looks like

It actually attached under the sill plate edge and has a rubber lip to help catch the water.
M
08-28-2014, 09:37 PM
#12
Racer
Thread Starter
I wonder when (and as always, why) they dropped them in 72 and 73. The date on the AIM was Feb 11, 72. I can only guess there was a NIEO out to remove it some time before the AIM was updated so Might have even affected later 71's
Here's what the 74+ style looks like
It actually attached under the sill plate edge and has a rubber lip to help catch the water.
M
Here's what the 74+ style looks like
It actually attached under the sill plate edge and has a rubber lip to help catch the water.
M
08-28-2014, 09:55 PM
#13
Race Director
Member Since: Apr 2011
Location: North of Toronto - Ontario
Posts: 10,856
Received 3,139 Likes
on
2,070 Posts
Look away Alan !!!
Here's how they attached under the sill plates


Two rivets into the flat under the sills. Then I run a string of butyl along the corner as insurance.
HIH
M
08-28-2014, 10:29 PM
#14
Racer
Thread Starter
Yeah those are on my 72. been there for years, never had a water problem after installing them, never had any issues on the doors, I'd say lots of room.
Look away Alan !!!
Here's how they attached under the sill plates


Two rivets into the flat under the sills. Then I run a string of butyl along the corner as insurance.
HIH
M
Look away Alan !!!
Here's how they attached under the sill plates
Two rivets into the flat under the sills. Then I run a string of butyl along the corner as insurance.
HIH
M
As long as it keeps my interior dry I am happy! It looks nice and clean with the sill plates installed.